
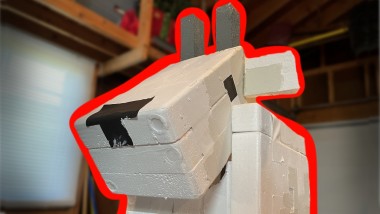
Building A Robot That Looks And Acts Like A Minecraft Goat

Made by ethanmichel_ / Robotics
About the project
This project began with the idea to create a human-following robot, but after a bit of inspiration (and forgetting to buy a laser distance sensor), I instead chose to create a robot that emulates the behavior of a goat from Minecraft's new 1.17 update. Basically, I built a robot that's designed to run into people.
Project info
Difficulty: Easy
Platforms: Raspberry Pi, Windows, Python, OpenCV
Estimated time: 5 days
License: GNU General Public License, version 3 or later (GPL3+)
Items used in this project
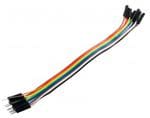
Hardware components


Story
--------------------------------------------------------------------------------------
Step 1: First, we have to disassemble the RC car, so that we can locate the internal motors that turn the wheels & axle(s). Once you've found this, you'll want to disconnect the current chip that controls the car, since we'll replace it.
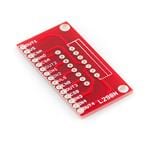
Step 2: Next, you'll want to attach the L298N motor driver to the lead wires from the car's motors. We'll also use our 4x AA battery pack here, and attach it to the L298N to power our motors.
Step 3: Now, we'll want to connect our L298N motor driver to our Raspberry Pi, and set up the inputs to the L298N on our RPi's GPIO pinout. Once we've done this, we'll want to power up our RPi. You can also take this time to attach an external power supply like a portable phone charger to the RPi.
Step 4: We'll want to test our motors to ensure they work and that we can properly control them. You can use this code here to run an external website off of your computer that can interface with the RPi, and allow you to control each motor individually. Please note: this website & the RPi code for the motors is based on the car model that I used, which uses 2WD. You may have to adjust the code for different car models or if you use different GPIO pins.
Step 5: Now that we know everything is working, we can attach our webcam to the RPi via USB.
Step 6: With all of our parts attached, we now just need to set up the code. Due to the weak computing power of the RPi (at least, for object detection), we have to outsource some of our computing power to a different device. As such, I set up code that has an API running on my laptop (or any other computer), which can take an image as input, detect any people in the image, determine if they're in the center, and then send back a True or False response as to whether the goat should ram them. On the other end, the RPi runs code that repeatedly takes pictures with the webcam, sends them to the API, and them charges forward if it receives a True response or performs an idle "animation" if it receives a False response.
Step 6.5: The code for this project requires a lot of prerequisites. On your RPi, you'll need to install OpenCV & gpiozero. On the computer you use for the webserver/API, you'll need to install ngrok, Flask, OpenCV, and ImageAI.
Step 7: Now, the robot should work! If you'd like, you can decorate the robot. I personally ran into issues, as my decorations were too heavy (and due to age and cheapness, the RC car was too weak) for the robot to move properly, so I ended up having to remove them to get it to work entirely. Regardless, I hope you enjoy. :)
* You can find the final autonomous code here. To use this, you'll want to run main.py on your computer to run the webserver. This will generate an API link through ngrok. Then, you'll want to run auto.py on your RPi/robot, and type in the API link for the webserver. This will connect the two, and the robot will automatically begin running on its own.
Code
Credits
Related products


Leave your feedback...