

Working Within The Cloud: Silicon Labs Thunderboard™ Sense 2

Made by Arakiel / Productivity / Sensors / IoT
About the project
In this project, we will introduce you to the Medium One Sandbox and Silicon Labs Thunderboard™ Sense 2 tools that will help to give you a great starting point for your own ideas and projects. Both tools are perfect for those just getting started, those working on early developments, and those just wanting to tinker and tweak.
Project info
Difficulty: Moderate
Platforms: Silicon Labs
Estimated time: 4 hours
License: GNU General Public License, version 3 or later (GPL3+)
Items used in this project
Hardware components

Story
Everyone likes easy projects because our lives move at a pretty quick pace. As for myself, I know I’m constantly looking for ways to streamline as much of my life as I can. I’ve littered my house with all manner of Internet of Things (IoT) and cloud-based devices trying to simplify my day-to-day life. As you read this article, I’m most likely planning the next thing for my home: Maybe a door lock or maybe a video doorbell. In almost every electronics or home-improvement store you enter, you’ll see a slew of different IoT devices. But what if there isn’t a device that does exactly what you want? What if you have an idea for something you think everyone might benefit from?
In this project, we will introduce you to the Medium One Sandbox and Silicon Labs Thunderboard™ Sense 2 tools that will help to give you a great starting point for your own ideas and projects. Both tools are perfect for those just getting started, those working on early developments, and those just wanting to tinker and tweak. The Medium One Sandbox is an especially inexpensive and easy entry point for anyone. This project will guide you through your account creations, setups, and configurations as well as provide useful resources and documentation for you to use in your own design.
Project Materials and Resources
Project BOM (bill of materials)
Project Code
Project Hardware
- USB-A to Micro USB cables x 2
- MicroSD card (8GB to 32GB) with SD adapter
- Monitor (must support a digital visual interface (DVI) or high-definition multimedia interface (HDMI) or have appropriate HDMI adapter)
- Keyboard/mouse
- Video cable
- USB power adapter
- SD card reader
Project Accounts and Software
Project Technology Overview
Silicon Labs Thunderboard Sense 2
The Thunderboard Sense 2 IoT starter kit (Figure 1) from Silicon Labs provides an amazing and inexpensive introduction into low-energy, connected IoT devices. The Thunderboard Sense 2 is powered by the Mighty Gecko system-on-chip (SoC) and is packed with an array of different sensors such as the Si7021 relative humidity and temperature sensor and the Si7210 hall-effect sensor to name a few. This platform is ready to run, with an easy to download app for Android or iOS and downloadable source code on GitHub.
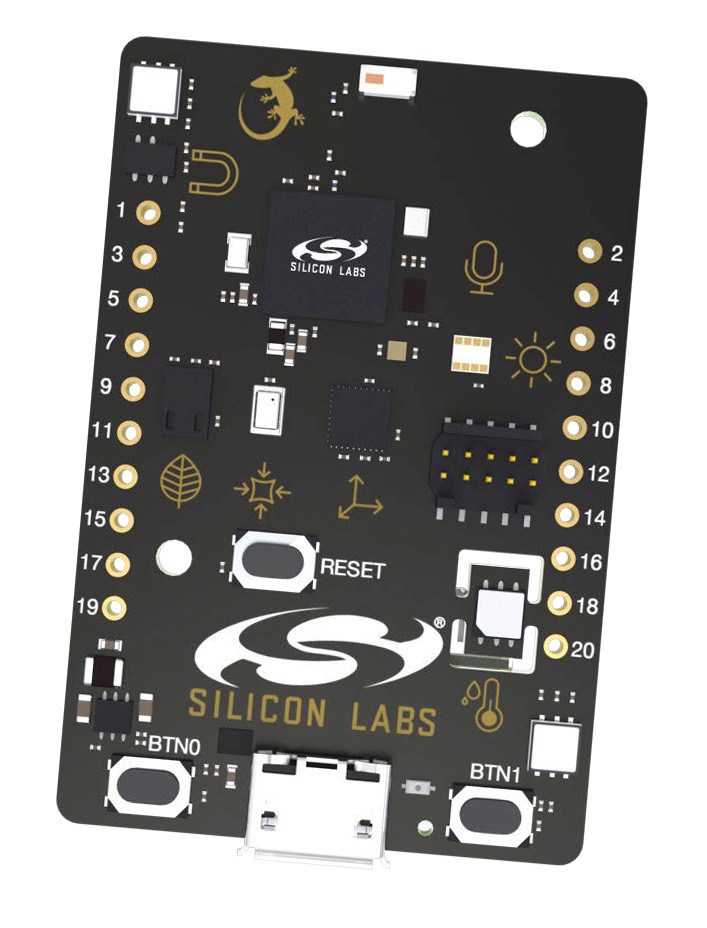
Figure 1: Thunderboard Sense 2
Medium One Sandbox
Medium One (Figure 2) is an amazing way to begin an IoT prototype by anyone interested in the early phase development of IoT projects. Highly customizable workflows along with prepackaged modules and libraries enable rapid prototyping. Easy to create dashboards allow for quick visualizations and interactions with your data. A low-cost, annual fee with no long-term commitments makes Medium One ideal for anyone ready to jump in and begin developing your own creation.
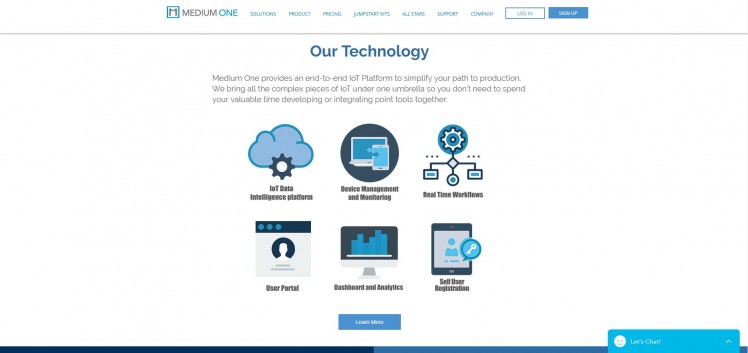
Figure 2: Medium One Home Page
Raspberry Pi 3 Model B Arm v8 with 1GB of RAM
Versatile and sporting a vast number of different features, the Raspberry Pi 3 Model B (Figure 3) is an outstanding development platform. Easy to setup with nothing more than a keyboard, mouse, and monitor, the Raspberry Pi 3 Model B is a fully equipped, single-board computer. Its dual-band wireless local area network (LAN) and Bluetooth, 4-pole stereo audio, and full-size HDMI only scratch the surface of what’s built in this platform. Use either the suggested operating system (OS) from RaspberryPi.org or any of the third-party images, and you will open the door for any number of possible projects.
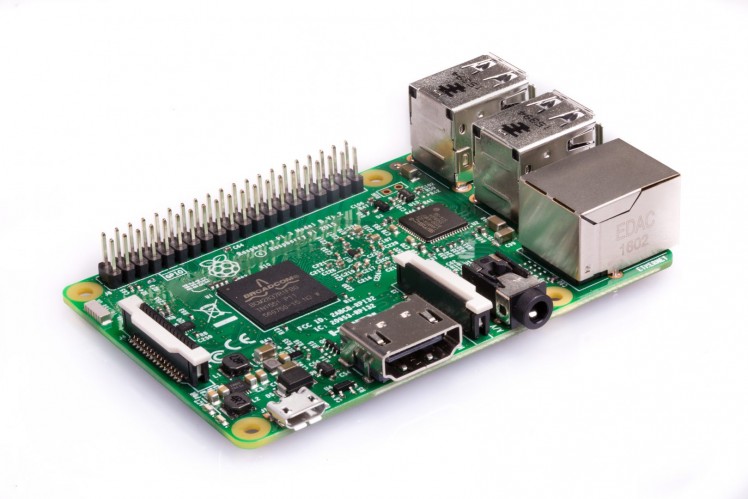
Figure 3: Raspberry Pi 3 Model B
The Setup (Hardware)
Now that we’ve discussed each component of the project, we can focus on how to set everything up. This is the fun part! This project is relatively easy to build and configure but does require a software download. A basic understanding of working in a Linux shell and with Python is helpful too. Of course, the Internet is littered with plenty of sites to introduce you to both and recommend helpful literature such as Python for Microcontrollers.
Configuring Raspberry Pi 3 Model B
To start the Raspberry Pi 3 Model B configuration, you will need to download, install, and update the appropriate OS. This Raspberry Pi device doesn’t have enough onboard storage for this step, which is why the microSD card will serve to extend this function.
Loading Raspbian to the Raspberry Pi 3 Model B
To avoid having to download, install, or load any additional software, we will be using a drag and drop method for installs using Raspbian.
- On your computer, navigate to the download page with this link: NOOBS.
- Scroll down to the middle of the page and select the “Download ZIP” option under the NOOBS install section (not NOOBS LITE) and download the file to your system.
- Locate the downloaded file within your Downloads folder, select the file, right click, and select Extract All.
- Insert a formatted microSD into your computer, using an appropriate reader and adapter if necessary. Make sure to identify the drive letter assigned to the new device.
- Select and drag all the files from the newly created, extracted folder and drop them onto the formatted microSD card. (You can identify the microSD card by the drive letter it creates upon the insertion of the card).
- Once the process is complete, safely remove the microSD card from your computer, then insert the card into the appropriate slot on the bottom of the Raspberry Pi 3 Model B.
- Connect a mouse, keyboard, and monitor to the Raspberry Pi device with the Universal Serial Bus (USB) and HDMI connections that are available on the board (Figure 4).
- Using a USB power adapter and Micro USB cable, plug the Micro USB cable into the Micro USB connector on the Raspberry Pi 3 Model B labeled “Power In” (Figure 4).
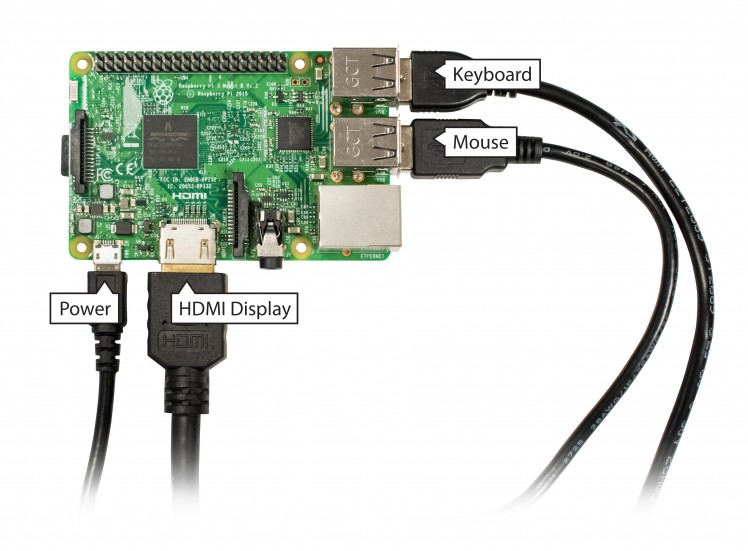
Figure 4: External Connections and Power
- The unit should immediately begin to boot, and it will prompt you to select an OS.
- Using your mouser, select Raspbian (Recommended). This installation will take several minutes to complete.
- Once the installation is complete, the Raspberry Pi 3 Model B should boot in the desktop environment (Figure 5).
(*Recommendation: You should use a 32GB or smaller microSD card in this project, as larger devices will format in the Extended File Allocation Table (exFAT), which is not compatible with NOOBS.)

Figure 5: Desktop Environment
Configuring the Raspberry Pi 3 Model B to connect to the Thunderboard Sense 2
Here we will download and use software from GitHub to empower communication between the Raspberry Pi 3 Model B and the Thunderboard Sense 2. You will use the Raspberry Pi 3 Model B as the computer interface to complete this section of the project by following the steps below:
- Navigate to Mouser’s GitHub repository, by clicking the blue globe in the top left-hand corner of the Raspbian desktop environment, and type in the following uniform resource locator (URL):
- For anyone new to GitHub: You will not need to create an account to download or clone files.
- Once the repository page has loaded, click the green “Clone or download” button midway down the page on the right-hand side (Figure 6).
- A drop-down box will appear with several options. Select “Download ZIP” to begin downloading the necessary files (Figure 6).
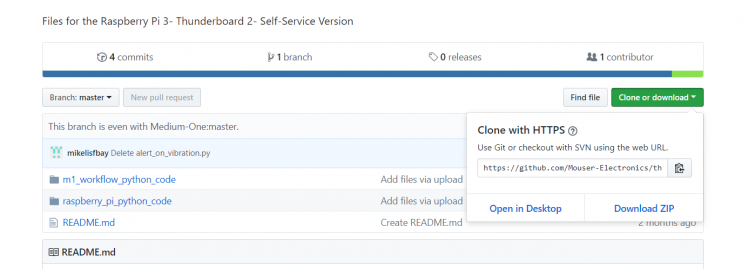
Figure 6: GitHub Webpage
- You can now extract the downloaded file by opening the file manager, locating it in the dlownload folder, right-clicking on the file, and selecting "Extract to:" (Figure 7).
- Change the directory you're extracting files to by removing "Downloads" so that the "Extract To:" directory is
/home/pi, and remove the check mark next to "Extract files with full path" under options (Figure 8).
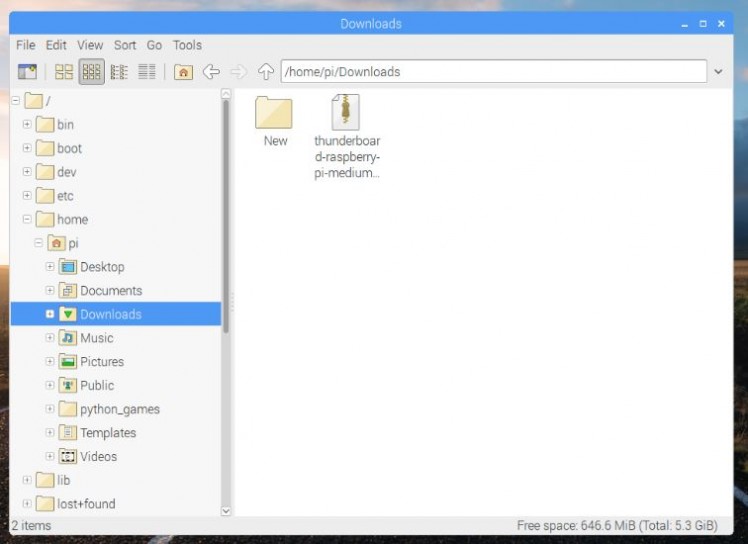
Figure 7: Download Folder
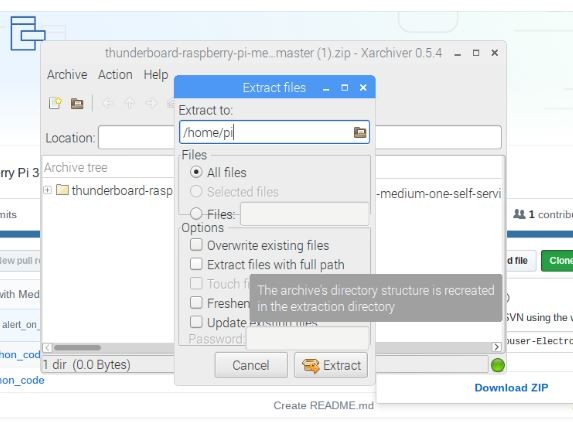
Figure 8: File Extraction Interface
- Now that the files are extracted, you need to run a setup file within the shell to complete the configuration.
- Click the Terminal icon in the top-left corner of the screen (Figure 9) and enter the following command into the terminal window:
pi@raspberrypi:~ $ sudo sh setup.sh- If you receive a prompt asking you whether you wish to continue, type "Y" and hit enter. Wait until the script's completion and return to the command prompt.
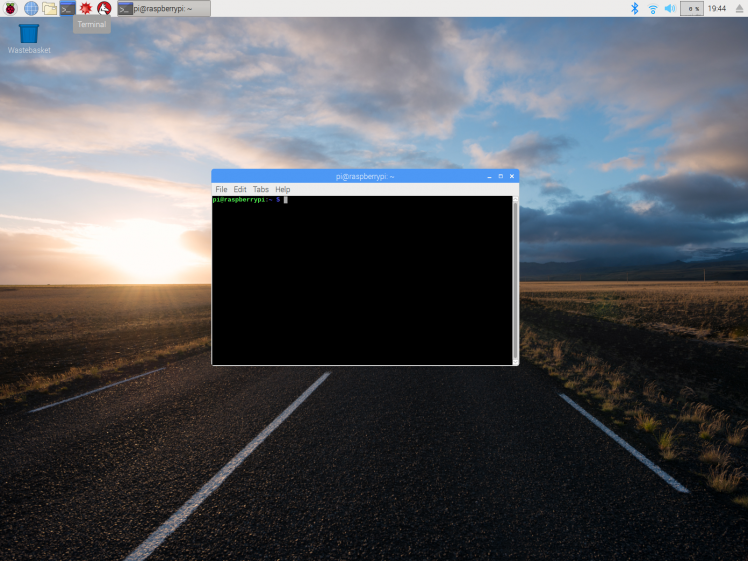
Figure 9: Terminal Window
Configuring your Medium One Account
If you don’t already have an account with Medium One, creating one is simple. Once you’ve purchased the 349-M1IOTPROTO from Mouser.com, either by itself or as one of the jumpstart kits, you will receive several emails. One of the emails will be from support@mediumone.com, providing you with login credentials. Using the link provided in the email or https://www.mediumone.com, select “Login” in the top-right corner, input the supplied credentials, and hit enter or click “Sign in.” Of course the first thing you should do after logging in for the first time is create a new password by following these steps:
- Click “Setup” from the left-hand drop-down menu.
- Select “My Account.”
- Hover over “Password” and click “Edit.”
Now let’s configure the Medium One Sandbox to begin receiving data. We will first set up a new user or device.
- Select “Manage Users” under “Setup” in the left-hand menu to bring up the “Manage API User” screen (Figure 10).
- Click the “Add New User” button at the bottom right-hand of the screen.
- Enter the username of the device and remember this information, as it will be necessary later.
- Create a password in the next two fields below the username and select “Save,” and again, remember this information, because it will be required later.
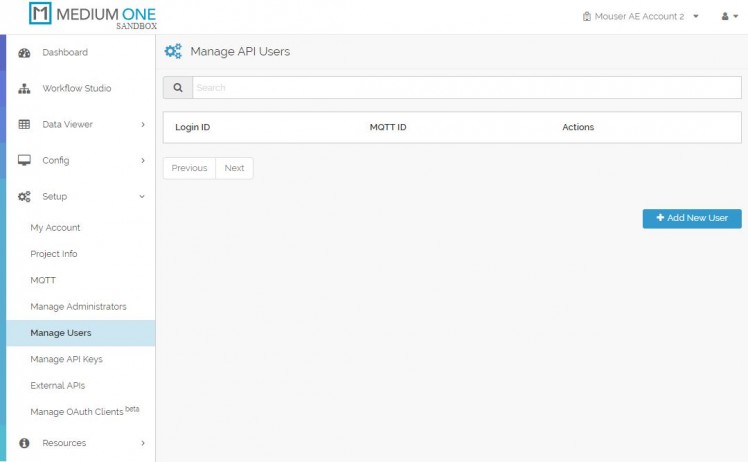
Figure 10: Manage API User Screen
At this point, we need to add a new API key. Creating multiple API keys can help when maintaining multiple devices or projects.
- Select “Manage API Keys” under “Setup” from the left-hand menu to bring up the “Manage API Keys” screen (Figure 11).
- Click the “Add New API Key” option on the right-hand side of the screen under the API key description row.
- Though not required, you may want to enter a description to help identify multiple projects or devices.
- Make sure a check mark is in the “Enabled” box and click “Save.”
- Once this step is complete, you will return to the “Manage API Keys” screen, but now you will see a very long list of text under the API key. Write down or copy this text to use later.
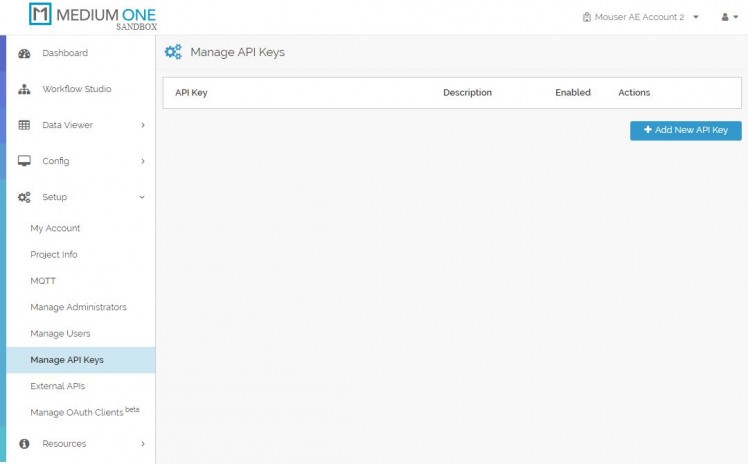
Figure 11: Manage API Keys Screen
We’ve successfully created our device and API key. Next, we need to set up our data streams for the information coming from the Thunderboard Sense 2. These data streams work in conjunction with the code set up for the Raspberry Pi 3 Model B and help to sort the data. To do this, follow these steps:
- Select “Data Streams” under “Config” in the menu on the left-hand side of the screen to bring yourself to the “Config Data Streams” screen (Figure 12).
- Click the “Create New Stream” button. Then in the “General Information” section, enter sensor_data in the “Name” field and click “Save Data Stream.”
- Repeat the previous step, but this time use device_data for the name, and once again, click “Save Data Stream.”
- You should now see both streams (Figure 12).
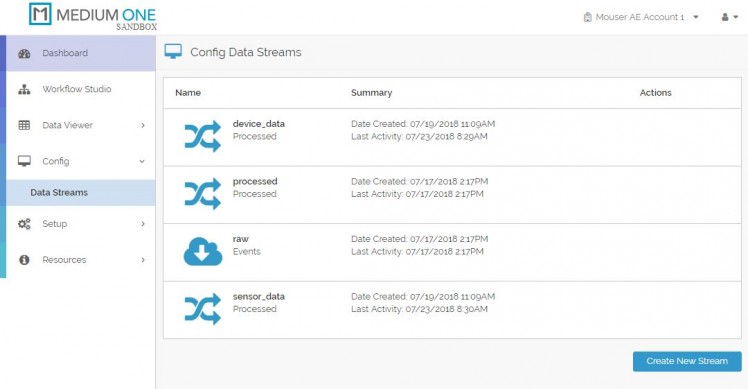
Figure 12: Config Data Stream Window
Linking the Silicon Labs Thunderboard Sense 2, Raspberry Pi 3 Model B, and Medium One Sandbox
With the Medium One Sandbox configuration complete, we can turn our attention back to the Thunderboard Sense 2 and Raspberry Pi 3 Model B and finish the board configuration so that it will connect and send data to Medium One Sandbox.
- Start by powering the Thunderboard Sense 2, either by using an appropriate coin cell battery or a Micro USB cable. (Tip: You can use one of the USB connections on the Raspberry Pi 3 Model B as a source).
- Like before, open a terminal window and type the following code:
pi@raspberrypi:~ $ sudo python scan.py
The Raspberry Pi 3 Model B will begin to scan specifically for any available Thunderboards nearby and will print the detected Thunderboard's address in the terminal window in the following format: 00:00:00:00:00:00. Record this device address, since it will be important later. If the Raspberry Pi 3 Model B does not detect your Thunderboard, you can unplug the Thunderboard Sense 2 and restart it. If you have previously connected the Thunderboard Sense 2 to your phone or mobile device, you will need to turn off that device’s Bluetooth so the Thunderboard is free to connect.
- Finally, type “Ctrl-C” to end the scan script and return to the prompt.
Now that we’ve configured the Sandbox and gotten our device name, API key, and device address, it’s time to make one last configuration on our Raspberry Pi 3 Model B for data to start streaming.
- From the terminal window on the Raspberry Pi device, type the following command:
pi@raspberrypi:~ $ sudo nano /m1/login.txt
- Within the text editor window that pops up (Figure 13), replace the values on the following lines:
- Line 1: Username (created in the Manage API User window)
- Line 2: Password (created in the Manage API User window)
- Line 3: API Key (created in the Manage API Key window)
- Line 4: Device address (found on the Raspberry Pi device using the scan.py program)
- When this process is complete, press “Ctrl-X” to save this information. When the device prompts you to overwrite, you will simply type “Y” and press enter.
- Lastly, when the prompt says “File Name to Write,” again hit enter.
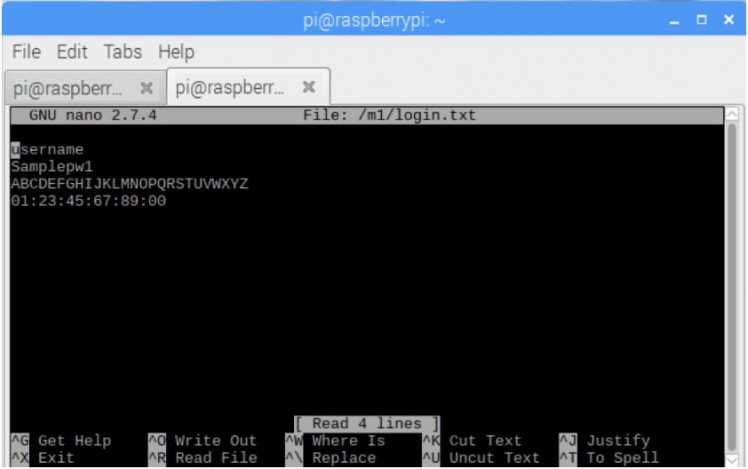
Figure 13: Login Text Editor Screen
Working in the Sandbox (Software)
At this point, we need to check to ensure that everything we’ve done thus far is correct, everything is linked, and data is streaming from the Thunderboard Sense 2 to the Raspberry Pi 3 Model B. I would recommend at this point that you restart the Raspberry Pi device but not plug in the Thunderboard device.
Dashboard
Start with a simple stream that shows you are receiving information, and then you can add something more visual.
- Select “Dashboard” from the menu on the left side of the screen.
- Locate the “Add Widget” section near the bottom of the screen and select the “Single User Real Time Events Stream” option (Figure 14).
- Select your device name from the drop-down box in the upper-right side of the window.
- Plug in the Thunderboard Sense 2, and after a few moments, you should see data start to post (Figure 14).

Figure 14: Real Time Event Stream
As you can see, we have quite a few options to choose from; let’s try one more.
- From the list of widgets, select the “Single User Real Time Line Chart.”
- As before, select your device name from the drop box in the top-right side of the window (Figure 15).
You should now see time stamps scrolling across the screen with no data. Unlike the “Real Time User Events Stream” option that reveals everything, this screen requires us to choose specifically which data we want to display.
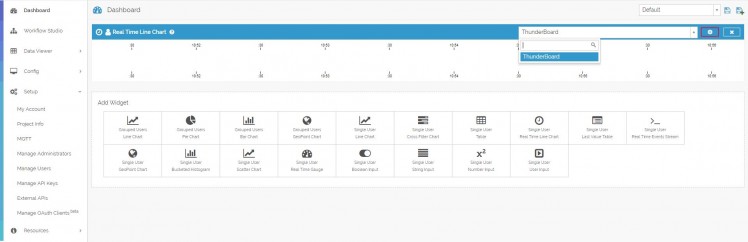
Figure 15: Real Time Event Stream
- From here, select the red outline cogwheel in the space next to the debice name. This should bring up another window with different data (Figure 16).
- Next, select the following items and then click "Save":
- sensor_data:x_max
- sensor_data:y_max
- sensor_data:z_max
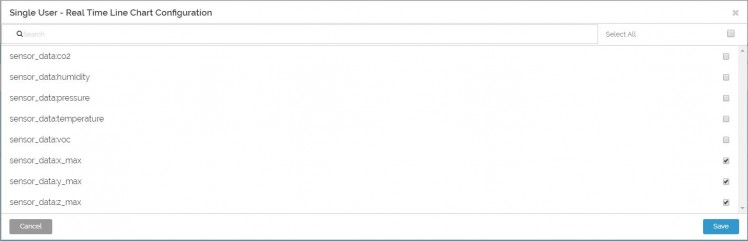
Figure 16: Chart Configuration
You should see three data objects on the screen with completely blue bars. Try shaking the Thunderboard around and watch how these bars shift. This will be important in the next section where we will create workflows.
(Note: As a final tidbit on the dashboards, you will need to click the “Save” icon at the very top-right corner of the screen or you will lose any changes you’ve made on the dashboard when you close the screen.)
Workflows
Congratulations! You now have data you can display on your dashboard and view from virtually anywhere. But what do you do with the data now that you have it? Is there some way you can access and process the data in real time, to help read, interpret, and provide immediate output from this data?
Workflows are Python-based applications that run as data is provided and can be useful to perform whatever task you program. Perhaps you want to know if your Thunderboard Sense 2 has moved and want to make sure you get a notification. Let’s generate a workflow that will do just that.
- To start, select “Workflow Studio” from the menu on the left-hand side of the window (Figure 17).
- On the Workflow Studio screen, we will need to select the “Create” icon.

Figure 17: Workflow Studio
- At the top-left side of the screen just below the Medium One logo, you’ll see a spot that indicates “Enter Workflow Name.” Give the workflow any name you like. In Figure 17 and Figure 18, it’s labeled Alert on Vibration.
- Click anywhere inside the field below the text box to save.
From here, we will start adding pieces to our workflow. You’ll see several icons along the right-hand side of the screen. Hovering over each icon will produce a pop-up that indicates the name of the icon. The two icons we will focus on for this project are “Tags and Triggers” (the first icon that resembles linked chains) and “Modules” (the icon that looks like three horizontal-stacked lines).
- Click the “Tags and Triggers” icon on the top-right side of the screen to bring out the menu.
- Select “sensor_data” for a drop-down list of available sensors.
- Click, hold, and drag “x_max” from the list onto the Workflow Studio screen.
- Repeat for “y_max” and “z_max” (Figure 18).
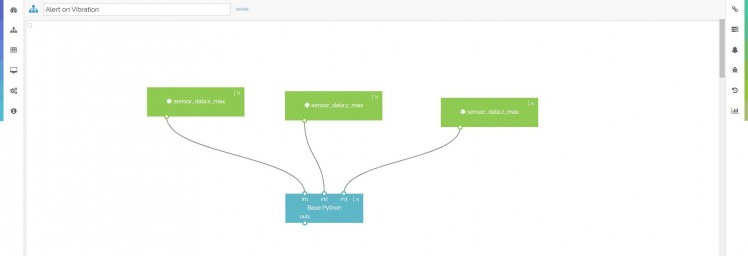
Figure 18: Workflow Studio with "Tags and Triggers" and "Modules"
- Now select the “Modules” icon from the list on the right to bring out the Modules menu.
- Click on “Foundation” to present the available options.
- Click on “Python,” then hold and drag it into place just below your three sensor boxes (Figure 18).
- Modify the “Base Python” module by a double click on the box to open the module’s interface screen.
- Click on “Inputs/Outputs” to display a drop-down field (Figure 19).
- Click on “Add Input” twice and notice that you now have in1, in2, and in3.
- Click “Save” at the bottom of the screen.
You should now have four modules very similar to what is displayed in Figure 18. You can click on the small circles beneath each of the sensor modules to connect them directly to one of the three inputs now available on the Base Python module.
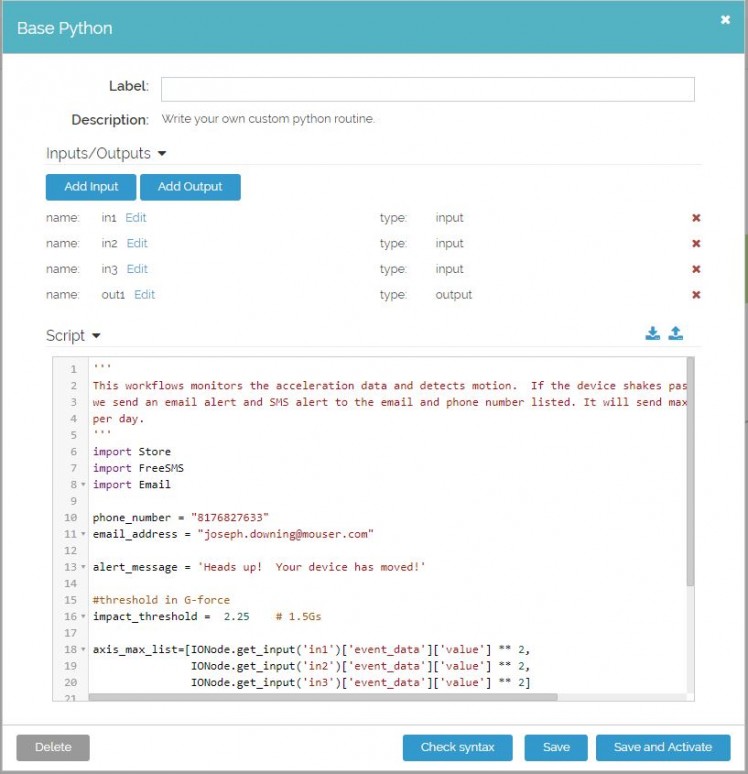
Figure 19: Base Python Module Interface Screen
The last thing we have left to do is to provide instructions on what we would like to accomplish with the sensor data. I’m sure we can all think of a plethora of options, but for this example, we are going to send notifications by text and email.
- Once more, double click on the Base Python module to open the module’s interface screen.
- At the Mouser GitHub repository for this project, copy the following Python script:
insert script name and link
- Delete the existing code in the script box and paste the new code obtained from the repository.
- Make sure to replace the placeholder phone number and email with the ones you wish to use to receive notifications.
- Finally, click “Save and Activate” at the bottom of the interface screen (Figure 19).
Your entire device should be ready to go! Pick up your Thunderboard and shake it around for 5 to 10 seconds. Not only should you see the changes in the Real Time Line Charts but you should receive a notification to the designated phone number and email address you’ve listed. One thing to note about the Python script is that the time-frame default is set to deliver these notifications only once per day. You can of course adjust this time frame to suit your needs by changing the number of seconds.
Final Thoughts
Connecting devices to each other and the cloud—while applying workflows—allows us to simplify tasks. This project has demonstrated how we can utilize a platform with numerous sensor capabilities in combination with a wireless gateway to send and use data to notify us of changes. Of course, this only scratches the surface of what the Medium One Sandbox and Silicon Labs Thunderboard Sense 2 are capable of accomplishing. Checking firmware versions, monitoring atmospheric data, generating notifications, and even producing interactions are options also available.
Both Medium One and Silicon Labs have incredible resources available that cover other features included with these devices. As in any project, we’ve just briefly touched on a small portion of what these two devices can do, and we strongly recommend reading additional resources they provide, including those highlighting other account features through Medium One.
Code
Credits
Related products


Leave your feedback...