

Accurate Timekeeping On Raspberry Pi Pico With Ds3231 Rtc

Made by electroscope_archive / Clocks / Communication
About the project
Build a reliable real-time clock with the Raspberry Pi Pico and DS3231 module, display time, date & temperature on I2C LCD, and learn syncin
Project info
Items used in this project
Hardware components

Story
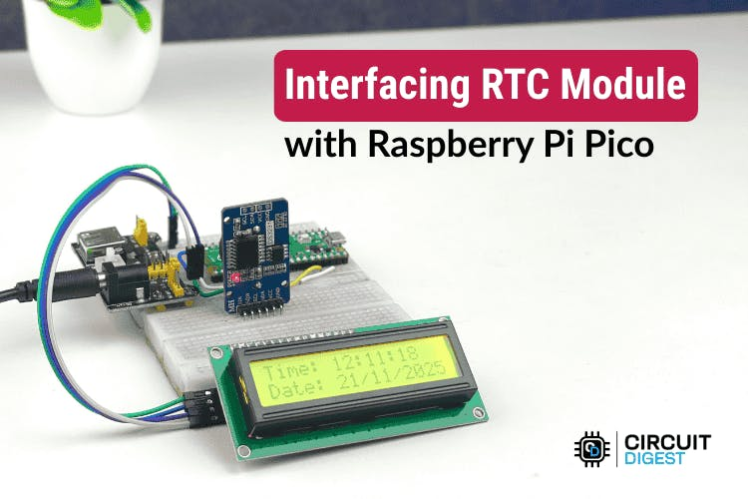
In this project, you’ll learn how to interface a Raspberry Pi Pico RTC DS3231 module with a Raspberry Pi Pico to build an accurate clock system using the Arduino IDE. The DS3231 keeps precise time even during power loss thanks to its battery backup, and you’ll display time, date, and temperature on a 16×2 I²C LCD.
What You’ll Learn✔ How to connect the Pico and DS3231 using I²C✔ How to set and keep accurate time on the RTC✔ How to read and display time, date, and temperature on an LCD✔ How to handle initial time setup and power-loss-safe operation
The DS3231 is far more accurate than older RTC chips like the DS1307 because it uses a temperature-compensated crystal oscillator (TCXO) that adjusts for temperature shifts. This ensures accuracy even in changing environments.
Key Specs:
- I²C interface, 400 kHz fast mode
- Built-in battery backup (CR2032)
- Tracks seconds, minutes, hours, day, date, month, year
- Integrated temperature sensor
You only need to set the RTC time once.
Method 1: Auto Sync with Compile TimeInclude this line once in your sketch to initialise the RTC with your computer’s current date/time:
rtc.adjust(DateTime(F(__DATE__), F(__TIME__)));
rtc.adjust(DateTime(F(__DATE__), F(__TIME__)));
Upload the sketch, then comment out this line and upload again — otherwise the clock will reset on every reboot
Method 2: Manual Time SetTo use a specific date/time:
rtc.adjust(DateTime(2025, 12, 31, 23, 59, 59));
rtc.adjust(DateTime(2025, 12, 31, 23, 59, 59));
This is useful when syncing multiple clocks or testing timed events.
Arduino Code (Overview)Below is a simplified overview of the full project code. It initialises the RTC and LCD, reads time & temperature and prints them.
Include Libraries & Initials#include <Wire.h>
#include "RTClib.h"
#include <LiquidCrystal_I2C.h>
#define DS3231_ADDR 0x68
#define LCD_ADDR 0x27
RTC_DS3231 rtc;
LiquidCrystal_I2C lcd(LCD_ADDR, 20, 4);
#include <Wire.h>
#include "RTClib.h"
#include <LiquidCrystal_I2C.h>

#define DS3231_ADDR 0x68
#define LCD_ADDR    0x27

RTC_DS3231 rtc;
LiquidCrystal_I2C lcd(LCD_ADDR, 20, 4);
void setup() {
  Wire.begin();
  lcd.begin();
  lcd.backlight();

  if (!rtc.begin()) {
    lcd.print("RTC NOT FOUND");
    while (1);
  }

  if (rtc.lostPower()) {
    rtc.adjust(DateTime(F(__DATE__), F(__TIME__))); // Comment after first run
  }
}
void setup() {
  Wire.begin();
  lcd.begin();
  lcd.backlight();

  if (!rtc.begin()) {
    lcd.print("RTC NOT FOUND");
    while (1);
  }

  if (rtc.lostPower()) {
    rtc.adjust(DateTime(F(__DATE__), F(__TIME__))); // Comment after first run
  }
}
void loop() {
  DateTime now = rtc.now();
  float temp = rtc.getTemperature();

  lcd.setCursor(0, 0);
  lcd.printf("Date: %04u-%02u-%02u", now.year(), now.month(), now.day());
  lcd.setCursor(0, 1);
  lcd.printf("Time: %02u:%02u:%02u", now.hour(), now.minute(), now.second());
  lcd.setCursor(0, 2);
  lcd.printf("Temp: %.2f C", temp);

  delay(1000);
}
This updates the display with time and temperature every second.
Troubleshooting Tips- RTC not found: Check SDA & SCL wiring and that both devices share the same bus.
- LCD shows garbled text: Confirm correct I²C address (0x27 or 0x3F) and wiring.
- Time keeps resetting: Ensure you comment out the RTC adjustment line after the first set.
- RTC drifts: Verify the battery in the DS3231 module isn’t dead or missing.
Once you’ve built this basic clock:
- Add data logging with timestamps (e.g., to an SD card)
- Use the DS3231 alarm pins to trigger events
- Integrate with a display other than LCD (OLED, e-ink) for low-power clocks
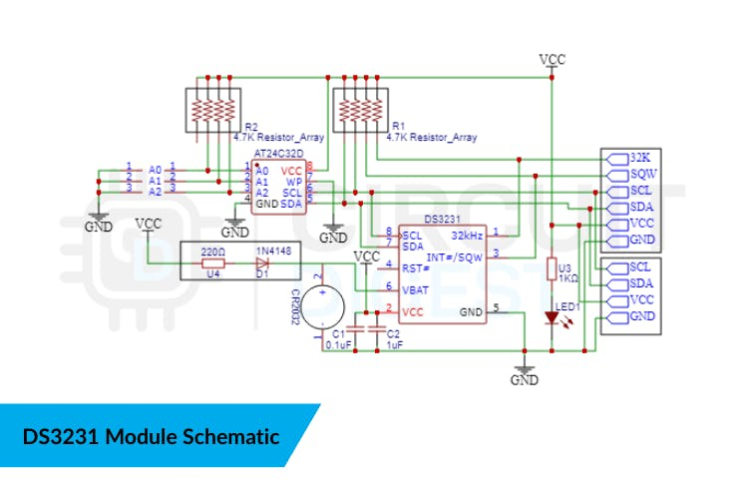
Schematics, diagrams and documents
Code
Credits
Related products


Leave your feedback...