
Wireless Temperature Sensor
About the project
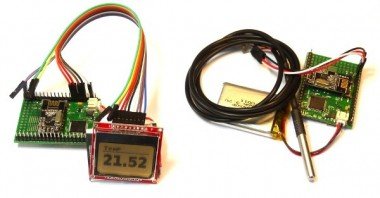
This is a quick and easy Wireless Temperature Sensor. One Espruino reads the temperature from a DS18B20 temperature sensor.
Project info
Difficulty: Easy
Platforms: Espruino
Estimated time: 1 day
License: GNU General Public License, version 3 or later (GPL3+)
Items used in this project
Hardware components


Story
Wiring Up
Board 1 (transmitter)
- Follow the wiring instructions for wiring up the NRF24L01+ wireless module
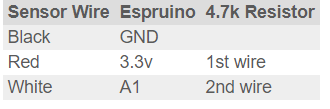
- Connect up the DS18B20 Temperature sensor as follows:
Board 2 (receiver)
- Follow the wiring instructions for wiring up the NRF24L01+ wireless module
- Connect the Nokia 5110 LCD up as suggested here
Software
Connect to the transmitting Espruino, copy and paste this into the right-hand window, then click the Send to Espruino button.
- SPI1.setup({sck:A5, miso:A6, mosi:A7});
- var nrf = require("NRF24L01P").connect( SPI1, B0, B1 );
- var ow = new OneWire(A1);
- var sensor = require("DS18B20").connect(ow);
- function onInit() {
- nrf.init([0,0,0,0,2], [0,0,0,0,1]);
- }
- onInit();
- setInterval(function() {
- var temperature = sensor.getTemp();
- nrf.sendString(""+temperature);
- }, 10000);
Now, connect to the second (receiving) Espruino, and copy and paste this in:
- SPI1.setup({sck:A5, miso:A6, mosi:A7});
- var nrf = require("NRF24L01P").connect( SPI1, B0, B1 );
- SPI3.setup({ baud: 1000000, sck:B3, mosi:B5 });
- var g;
- function onInit() {
- nrf.init([0,0,0,0,1], [0,0,0,0,2]);
- // We set up the LCD here because it needs to initialise at power on
- g = require("PCD8544").connect(SPI3,B6,B7,B8);
- }
- // Draw temperature onto the LCD
- function showTemperature(temp) {
- g.clear();
- g.setFontBitmap();
- g.drawString("Temp",1,0);
- g.drawLine(0,10,84,10);
- g.setFontVector(20);
- g.drawString(temp,1,15);
- g.flip();
- }
- // Keep checking to see if we have any new data...
- dataLine = "";
- setInterval(function() {
- while (nrf.getDataPipe() !== undefined) {
- var data = nrf.getData();
- for (var i in data) {
- var ch = data[i];
- if (ch===0 && dataLine!=="") {
- // if we got a 0 (end of string), show what we got
- showTemperature(dataLine);
- dataLine = "";
- } else if (ch!==0) {
- dataLine += String.fromCharCode(ch);
- }
- }
- }
- }, 50);
- onInit();
About 10 seconds later the display should update with the temperature received from the sender...
And that's it! A wireless temperature sensor. This could be extended with the code from the Heater Controller to make a wireless themostat, a history graph could be drawn, more than one wireless temperature sensor could be used or data could be logged onto an SD card...
Code
Credits
Espruino
Espruino, Espruino Pico and Puck.js are low-power Microcontrollers that run JavaScript. Espruino is a JavaScript Interpreter for Microcontrollers that is designed to make development quick and easy. The Espruino interpreter is firmware that runs on a variety of different microcontrollers, but we also make Espruino Boards that come with the interpreter pre-installed and are the easiest devices to get started with. However Espruino itself isn't just the interpreter firmware or hardware - there's also the Web IDE, command-line tools, documentation, tutorials, and modules that form a complete solution for embedded software development.
Leave your feedback...