
Ultra Low-powered Linux Computer Using Mcu

Made by knaveen / Displays / Retro Tech
About the project
A portable computer that runs on a Linux operating system can fit in your pocket.
Project info
Difficulty: Moderate
Platforms: Adafruit, Arduino, M5Stack
Estimated time: 5 hours
License: MIT license (MIT)
Items used in this project
Hardware components

Story
Linux is a family of open-source operating systems that are based on the Linux kernel, which is a core program that manages the communication between hardware and software. Linux was created by Linus Torvalds in 1991 and has since grown to become one of the most widely used and versatile operating systems in the world.
One of the main advantages of Linux is its portability, which means that it can run on different types of hardware platforms, such as personal computers, servers, smartphones, tablets, embedded devices, and supercomputers. Linux can also be customized and modified according to the needs and preferences of the users and developers, as it is distributed under a free and open-source license. This allows for great diversity and innovation in the Linux ecosystem, with many different distributions and applications available for various purposes and audiences.
Linux port on microcontrollers is the process of running Linux applications on embedded devices that use microcontroller units (MCUs) instead of microprocessor units (MPUs). MCUs are typically cheaper, smaller, and more power-efficient than MPUs, but they have less memory and processing power, and they do not support memory management units (MMUs) that are required by most Linux distributions.
This project is based on the work of jcmvbkbc, who has ported Linux to various Xtensa platforms. We are going to build a small, functional Linux computer using mostly stackable hardware components. The Arduino Nano ESP32 with an ESP32S3 microcontroller (512 KB SRAM and 8 MB PSRAM) will run the Linux operating system.
Build Linux and flash to the Arduino Nano ESP32
We would need another Linux machine (or a Linux VM) to cross-compile and build the kernels and filesystems. I am using a Ubuntu 22.04 Linux machine. Please execute the commands below to install prerequisites.
$ sudo apt install git wget flex bison gperf python3 python3-pip python3-venv
$ sudo apt install cmake ninja-build ccache libffi-dev libssl-dev dfu-util libusb-1.0-0
Download the script from here and execute it to build the Linux for the ESP32S3 target. This script automates compiling and flashing firmware and Linux to Arduino Nano ESP32.
$ bash rebuild-esp32s3-linux.shAfter flashing the board successfully and resetting or power cycling the board. we can see the boot-up console messages by connecting a USB-to-Serial adapter to the Nano ESP32's UART pins (TX0/RX0). But later in this project we will connect the Nano ESP32 to the UNO R4 WiFi via serial connection to emulate the command line terminal console.
Setup hardware
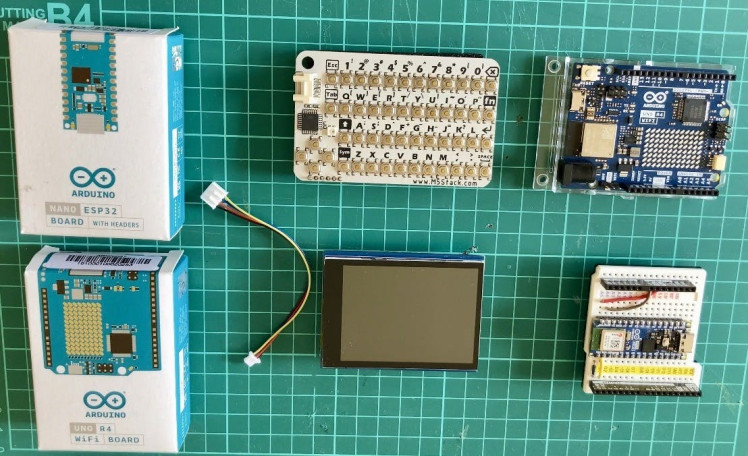
In order to construct a computer, we require the hardware components depicted in the image.
We are using an ArduinoEZ ONE stackable breadboard shield to connect the Nano ESP32 to the UNO R4 Wi-Fi via a serial connection, as demonstrated in the image below.
UNO R4 WiFi                    Nano ESP32

RX0                            TX1
TX1                            RX0
5V                             VIN
GND                            GND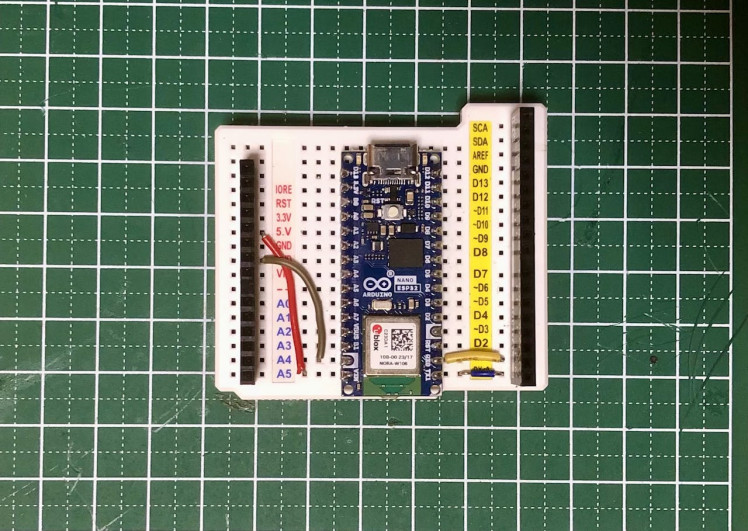
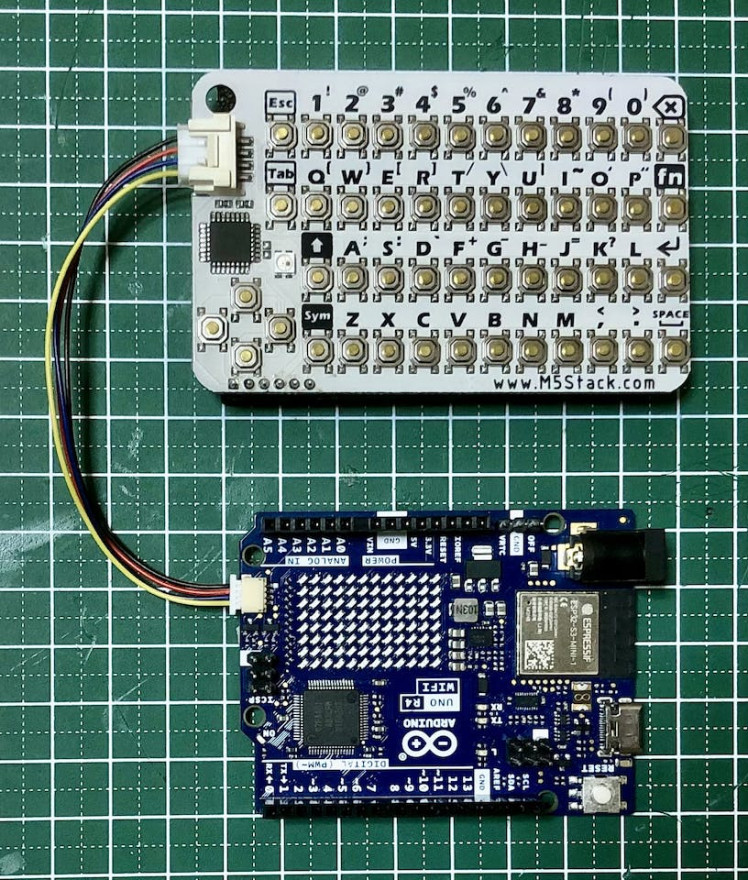
We are using an M5Stack CardKB, a tiny full QWERTY keyboard, connected to the Uno R4 WiFi via onboard Qwiic connector over I2C.
Once all the components have been assembled and stacked, the computer should look like the image below.
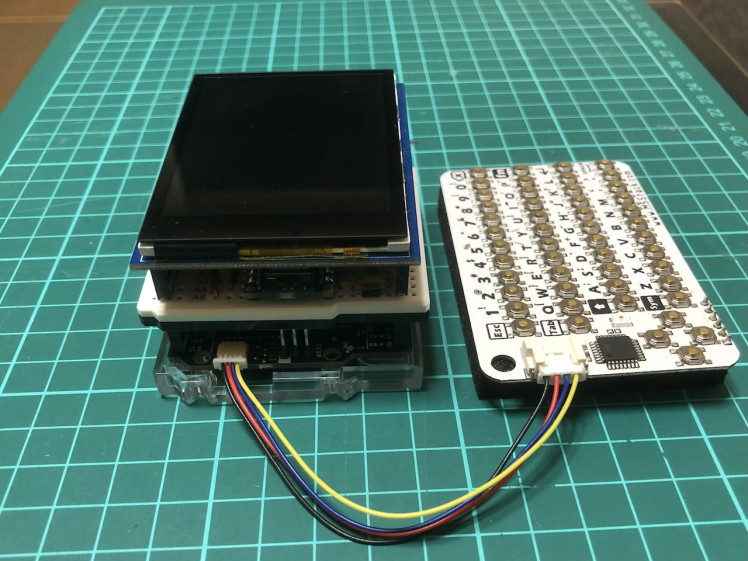
This design does not require soldering and is convenient to use.
Build and Flash Uno R4 WiFi Firmware
The Arduino Uno R4 WiFi is used to drive an Adafruit TFT display and communicate to the Nano ESP32 over a serial connection. The complete sketch is given below.
#include <Wire.h>
#include "SPI.h"
#include "Adafruit_GFX.h"
#include "Adafruit_ILI9341.h"

#define CARDKB_I2C_ADDR 0x5F
#define TEXT_WIDTH 8
#define TEXT_HEIGHT 16
#define BOTTOM_FIXED_AREA 0
#define TOP_FIXED_AREA 16
#define YMAX 320
#define TFT_DC 9
#define TFT_CS 10

Adafruit_ILI9341 tft = Adafruit_ILI9341(TFT_CS, TFT_DC);

uint16_t yStart = TOP_FIXED_AREA;
uint16_t yArea = YMAX - TOP_FIXED_AREA - BOTTOM_FIXED_AREA;
uint16_t yDraw = YMAX - BOTTOM_FIXED_AREA - TEXT_HEIGHT;

uint16_t xPos = 0;

boolean escapeSeq = false;

int blank[19];

void setup()
{
  Serial.begin(115200);
  Serial1.begin(115200);

  Wire1.begin();

  tft.begin();
  tft.setRotation(0);
  tft.fillScreen(ILI9341_BLACK);
  tft.setTextColor(ILI9341_BLACK, ILI9341_YELLOW);
  tft.fillRect(0, 0, 240, 16, ILI9341_YELLOW);
  tft.setTextSize(2);
  tft.print("  Nano ESP32 Linux");
  tft.setTextColor(ILI9341_WHITE, ILI9341_BLACK);
  tft.setTextSize(1);
  tft.setScrollMargins(TOP_FIXED_AREA, BOTTOM_FIXED_AREA);

  for (byte i = 0; i < 18; i++) {
    blank[i] = 0;
  }
}

void loop(void)
{
  while (Serial1.available()) {
    char c = Serial1.read();
    if (c == 'r'  || xPos > 231) {
      xPos = 0;
      yDraw = scroll_line();
    }


    if (c == 8) {
      xPos -= TEXT_WIDTH;
      tft.fillRect(xPos, yDraw, TEXT_WIDTH, TEXT_HEIGHT, ILI9341_BLACK);
      continue;
    }

    if (c == 27) {
      escapeSeq = true;
    }

    if (c > 31 && c < 128) {
      if (escapeSeq) {
        if ((c >= 'A' && c <= 'Z') || (c >= 'a' && c <= 'z')) {
          escapeSeq = false;
        }
        continue;
      }
      tft.drawChar(xPos, yDraw, c, ILI9341_WHITE, ILI9341_BLACK , 1);
      xPos += TEXT_WIDTH;
      blank[(18 + (yStart - TOP_FIXED_AREA) / TEXT_HEIGHT) % 19] = xPos;
    }
  }

  while (Serial.available()) {
    char c = Serial.read();
    Serial1.print(c);
  }

  Wire1.requestFrom(CARDKB_I2C_ADDR, 1);

  while (Wire1.available()) {
    byte b = Wire1.read();

    switch (b) {
      case 0xA8:
        Serial1.write(0x03);
        break;
      case 0x96:
        Serial1.write(0x10);
        break;
      case 0x90:
        Serial1.write(0x12);
        break;
      default:
        break;
    }

    char c = b;
    if (c != 0) {
      Serial1.print(c);
      Serial.print(c, HEX);
    }
  }
}

int scroll_line() {
  int yTemp = yStart;


  tft.fillRect(0, yStart, blank[(yStart - TOP_FIXED_AREA) / TEXT_HEIGHT], TEXT_HEIGHT, ILI9341_BLACK);
  yStart += TEXT_HEIGHT;

  if (yStart >= YMAX - BOTTOM_FIXED_AREA) {
    yStart = TOP_FIXED_AREA + (yStart - YMAX + BOTTOM_FIXED_AREA);
  }

  tft.scrollTo(yStart);

  return  yTemp;
}
We need to install the Adafruit_ILI9341 library through the Arduino IDE Library Manager. Then, we can upload the sketch to the Uno R4 WiFi board.
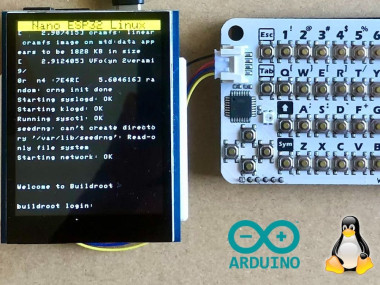
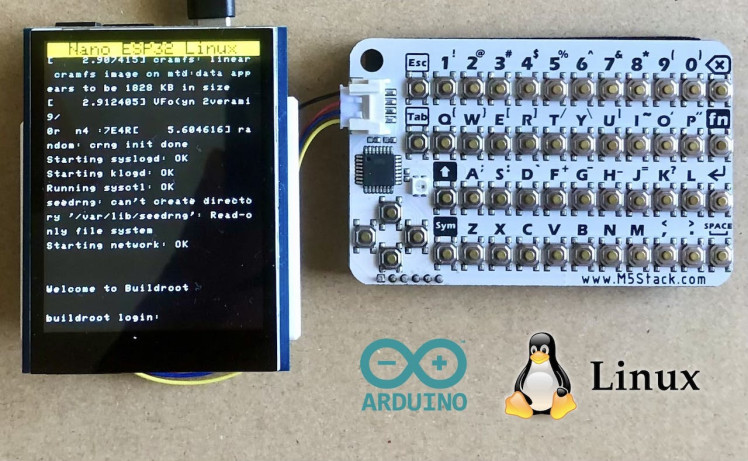
Powering and booting up the Linux
We can power the Uno R4 WiFi through its USB-C connector, which in turn supplies power to the Nano ESP32 and LCD shield. Once powered, the Linux system boots up and displays the boot messages on the LCD.
Live Demo
Conclusion
In this project, we made a tiny Linux computer that is functional and opens up a way to create a plethora of embedded Linux applications using the Arduino ESP32 Nano and possibly many other MCUs-based boards in the future. This computer offers the flexibility of being powered by either batteries or a solar power system. There is another Linux port that supports WiFi, and during our testing, we successfully used wget and ping commands. This can be advantageous for IoT applications that use MQTT.
Code
Credits
Related products


Leave your feedback...