
Time Lapse Camera
Made by Espruino / Photos & Video / Sensors
About the project
While the Espruino board doesn't have enough memory to take proper pictures, nothing stops it from controlling other devices. In many cases this is a cheaper and more power efficient way to get the same result!
Project info
Difficulty: Easy
Platforms: Espruino
Estimated time: 4 hours
License: Apache License 2.0 (Apache-2.0)
Items used in this project
Hardware components

Story
The Espruino board will fake the keypresses needed to turn the camera on, put it into picture mode, take a picture, and then turn it off.
Here, we'll show you how to make a time lapse camera using a cheap keyring camera and an Espruino board.
While the Espruino board doesn't have enough memory to take proper pictures, nothing stops it from controlling other devices. In many cases this is a cheaper and more power efficient way to get the same result!
Wiring
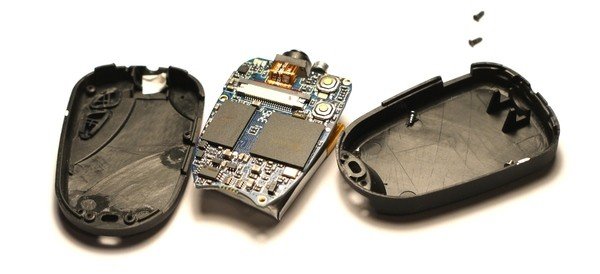
- Take the camera to pieces - there are two screws on the 'keyring' end of the camera
- Remove the PCB from the case (there are 3 screws), and disconnect the battery
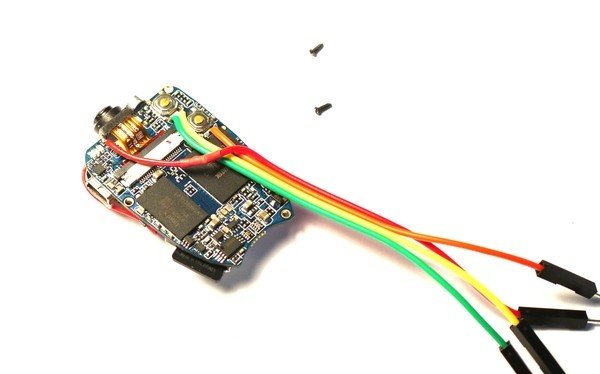
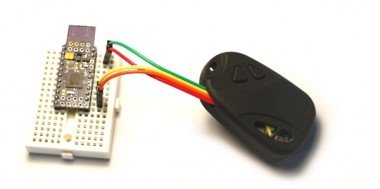
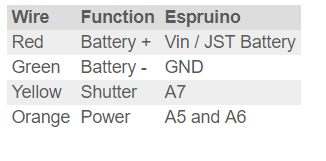
Connect the wires as shown in the picture. You need:
- One wire to the battery's positive terminal (red)
- One wire to each side of the 'shutter' switch. The (green) wire nearest the camera sensor is ground, the other (yellow) wire is the shutter signal.
- One wire to the power button nearest the edge of the board (orange)
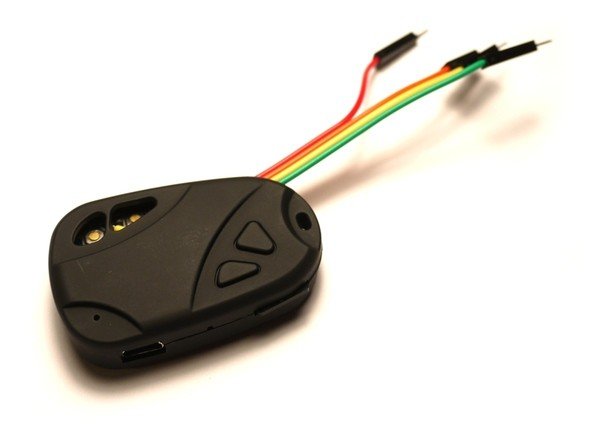
- Re-assemble everything. If your wires are thick then you may need to leave out the two plastic buttons and the three internal screws.
- Now connect to Espruino:

The image above shows an Espruino Pico prototype, but you can also use a 'classic' Espruino board for this.
How it works
The manual says the following:
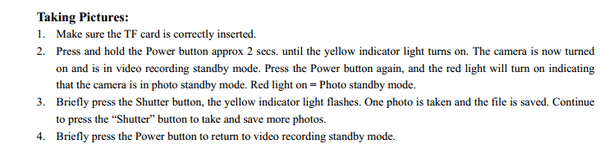
So (while Espruino can't check the SD card!), we need to follow the steps given which we'll do using timeouts and callbacks.
The one slight 'gotcha' is that the camera requires quite a lot of power across the 'power' button to be able to turn itself on. In order to get this from Espruino without any external components we're just going to join two outputs together (A5 and A6).
Software
Load the code below into Espruino, type save(), and you're sorted! Espruino will run off the keyring camera's battery and take a picture every 60 seconds.
Just edit the last few lines of code below to change the time period that the camera is active for...
- var PWR = [A5,A6];
- // PWR active high - we need a lot of current to force the camera on, so use 2 pins
- var SHUTTER = A7;
- // SHUTTER active low
- // Pulse the power pin(s) high for the given time period, wait, and call the callback
- function pulsePWR(time, callbackDelay, callback) {
- digitalWrite(PWR,255);
- setTimeout(function() {
- digitalRead(PWR); // set to open circuit
- if (callback) setTimeout(callback,callbackDelay);
- },time);
- }
- // Turn power on
- function powerOn(callback) {
- pulsePWR(2000, 2000, callback);
- }
- // Turn power off
- function powerOff(callback) {
- pulsePWR(3000, 2000, callback);
- }
- // Short-press power to switch modes
- function toggleMode(callback) {
- pulsePWR(100, 1000, callback);
- }
- // Short-press shutter to take picture
- function shutter(callback) {
- digitalWrite(SHUTTER,0);
- setTimeout(function() {
- digitalRead(SHUTTER); // set to open circuit
- if (callback) setTimeout(callback,1000);
- },100);
- }
- // Glue all the commands together to turn the camera on and take a picture
- function takePicture() {
- powerOn(function() {
- toggleMode(function() {
- shutter(function() {
- powerOff();
- });
- });
- });
- }
- // Flash every 15s to show we're alive
- setInterval(function() {
- digitalPulse(LED1,1,20);
- }, 15000);
- // Take a picture every 60s
- setInterval(function() {
- takePicture();
- }, 60*1000);
- // Go into power save mode
- setDeepSleep(1);
Now you have this framework, you could easily use it to record a few seconds of video every few minutes, or when a Pyroelectricsensor detected motion!
Credits
Espruino
Espruino, Espruino Pico and Puck.js are low-power Microcontrollers that run JavaScript. Espruino is a JavaScript Interpreter for Microcontrollers that is designed to make development quick and easy. The Espruino interpreter is firmware that runs on a variety of different microcontrollers, but we also make Espruino Boards that come with the interpreter pre-installed and are the easiest devices to get started with. However Espruino itself isn't just the interpreter firmware or hardware - there's also the Web IDE, command-line tools, documentation, tutorials, and modules that form a complete solution for embedded software development.
Leave your feedback...