
The New Wio Terminal Erpc Firmware

Made by salmanfarisvp
About the project
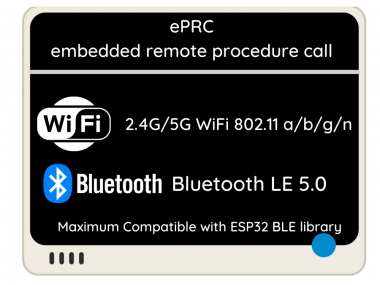
Seeed Wio Terminal have new WiFI and Bluetooth Firmware based on eRPC a.k.a Embedded Remote Procedure Call that supports 5Ghz WiFi and BLE.
Project info
Items used in this project
Story

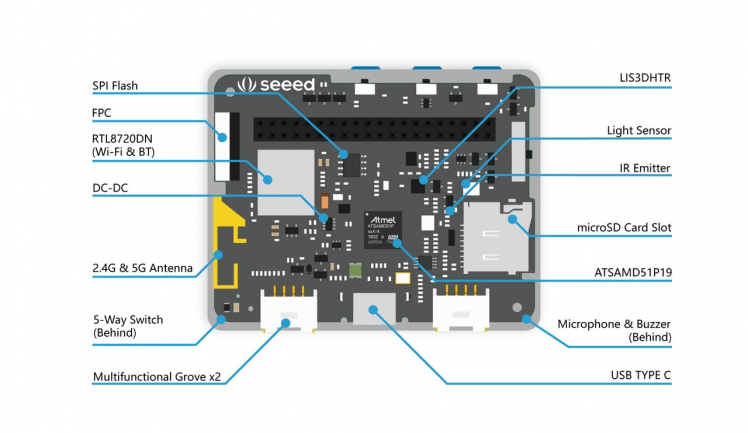
The Wio Terminal is a SAMD51-based microcontroller with Wireless Connectivity supported by Realtek RTL8720DN that’s compatible with Arduino and MicroPython. It runs at 120MHz (Boost up to 200MHz), 4MB External Flash and 192KB RAM. It supports both Bluetooth and Wi-Fi providing the backbone for IoT projects. The Wio Terminal itself is equipped with a 2.4” LCD Screen, onboard IMU(LIS3DHTR), Microphone, Buzzer, microSD card slot, Light sensor, and Infrared Emitter(IR 940nm). On top of that, it also has two multifunctional Grove ports for Grove Ecosystem and 40 Raspberry pi compatible pin GPIO for more add-ons.
Seeed Wio Terminal now support supports 5Ghz WiFi and BLE 5.0 with the new WiFI and Bluetooth Firmware based on eRPC a.k.a Embedded Remote Procedure Call.

The eRPC (Embedded Remote Procedure Call) is a Remote Procedure Call (RPC) mechanism used to invoke a software routine on a remote system using a simple local function call to invoke the Realtek RTL8720DN WiFi and Bluetooth Low Energy Functions.
The eRPC protocol is used to implement API calls between different architectures and different chips. In this software library, we mainly implement API calls related to Bluetooth and WiFi. It can communicate through UART, SPI, I2C and other interfaces. we use UART to communicate in this software library.
The Old AT-Command Wi-Fi firmware and related libraries will not work with Bluetooth at the same time and are getting but after upgrading to eRPC you can use that.
ePRC Based Firmware Features
- Maximum Compatible with ESP32 wifi library
- Dual Band 2.4Ghz / 5Ghz Wi-Fi (802.11 a/b/g/n)
- BLE / BLE 5.0
- WiFi and BLE low power consumption
As part of the ePRC Firmware, seeed provided two libraries
The rpcWiFi software library calls Seeed Arduino rpcUnified to implement WiFi and BLE function compatibility with Arduino-ESP32. To reduce the cost of using the software, you can import your favourite ESP32 wifi app and BLE app directly, with minor changes, and then use it. You'll find that your favourite ESP32 app has 5G features and has BLE5.0 features, runs on ARM and other architectures.
Update the Wireless Core Firmware
First, You need to update the firmware for the Realtek RTL8720 Wireless core on Wio Terminal.
Step 1 - Arduino Configuration
To be able to update the firmware on the RTL8720, we need to enable the Serial connection from SAMD51 to RTL8720. Seeed provides uf2 methods of uploading Wio Terminal's firmware. Simply download the uf2 files from below.
-
Download the rtl8720_update_v2.uf2
uf2files.
Step 1:1 Entering the bootloader mode by sliding the power switch twice quickly.
To Enter Bootloader: Slide the switch twice very quickly, as followed:
To Enter Bootloader Mode

To Enter Bootloader Mode
Once Wio Terminal is in the Bootloader mode, the blue LED will start to breathe in a way that is different from blinking. Check the port again and it should appear.
Bootloader Mode

Bootloader Mode
Step 1.2: An external drive named Arduino should appear in your PC.

Drag the downloaded rtl8720_update_v2.uf2 files into the Arduino drive and it will reset the Wio Terminal and loaded the sketch!
drag and drop the .uf2 files into Arduino drive

drag and drop the .uf2 files into Arduino drive
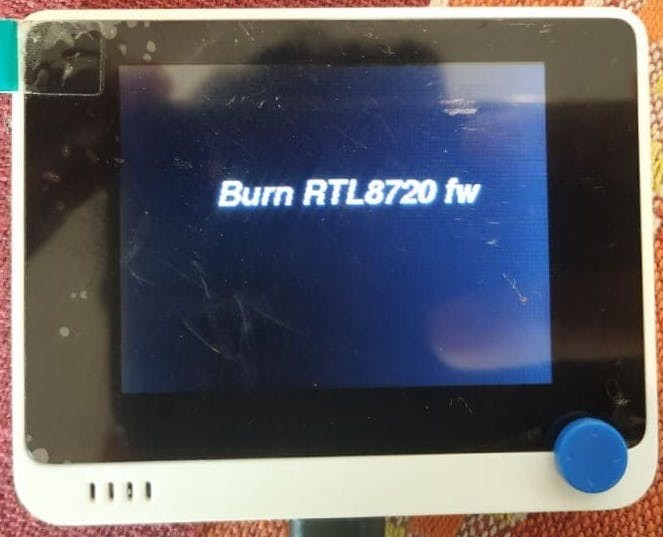
After that, you should see that Burn RTL8720 fw on the Wio Terminal's screen. This means that it is currently in the burning firmware mode!
Step 2 - Download the Latest Firmware
You can download the latest eRPC Structure Firmware for RTL8720
- Download the latest RTL8720 FirmwareHere.
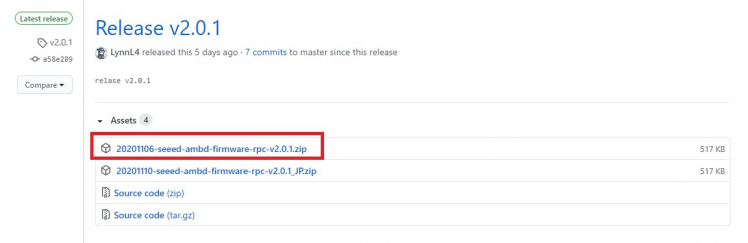
Note that the version might change in future.

Firmware binary
Step 3 - Download Flash Tool
Next, you can download the flash tool.
Goto LynnL4/ambd_flash_tool and download the whole repo by clicking download ZIP or simply click here
Unzip the file and you can see the tool

After downloading the tools you can flash the RTL8720 firmware to Wio Terminal using the CLI methods.
-
For macOS and LinuxOS, please use the
ambd_flash_tool.pyscript. -
For Windows OS, please use the
ambd_flash_tool.exescript.
Since I was using the windows, I'll go with the ambd_flash_tool.exe to flash the firmware on wio terminal.
Step 4 - Erase Initial Firmware
First, we need to erase initial firmware inside the RTL8720, for that run:
Open the flash tool folder and open the PowerShell from the directory or you can open PowerShell and navigate to the directory.
To Erase
.ambd_flash_tool.exe erasenote that, it will take about 3 minutes some times to complete the erasing process, so please wait until you get the success message.
Step 5 - Flash New Firmware
To flash the newly downloaded firmware into the RTL8720, run:
.ambd_flash_tool.exe -d [RTL8720-firmware-path]For it's on the download folder and I need to mention the full path.
.ambd_flash_tool.exe flash -d C:UsersFarisDownloads20201106-seeed-ambd-firmware-rpc-v2.0.120201106-seeed-ambd-firmware-rpc-v2.0.1
Please wait until you get the success message

Great, Flashing Completed ?. If you facing any issues while flashing, post your queries at SeeedStudio Forum
Installing LibrariesAs part of the ePRC Firmware, seeed provided few libraries that are needed for the wireless connectivity.
The rpcWiFi software library calls Seeed Arduino rpcUnified to implement WiFi and BLE function compatibility with Arduino-ESP32. To reduce the cost of using the software, you can import your favourite ESP32 wifi app and BLE app directly, with minor changes, and then use it. You'll find that your favourite ESP32 app has 5G features and has BLE5.0 features, runs on ARM and other architectures.
1. Install the Seeed_Arduino_rpcWiFi
Visit the Seeed_Arduino_rpcWiFirepositories and download the entire repo to your local drive.
- Visit the Seeed_Arduino_rpcWiFirepositories and download the entire repo to your local drive.
-
Now, the Seeed_Arduino_rpcWiFi library can be installed to the Arduino IDE. Open the Arduino IDE, and click
sketch->Include Library->Add .ZIP Library, and choose theSeeed_Arduino_rpcWiFifile that you have just downloaded.
2. Install the Seeed_Arduino_rpcBLE
Visit the Seeed_Arduino_rpcBLE repositories and download the entire repo to your local drive.
- Visit the Seeed_Arduino_rpcBLE repositories and download the entire repo to your local drive.
-
Now, the Seeed_Arduino_rpcWiFi library can be installed to the Arduino IDE. Open the Arduino IDE, and click
sketch->Include Library->Add .ZIP Library, and choose theSeeed_Arduino_rpcBLEfile that you have just downloaded.
3. Install the Seeed_Arduino_rpcUnified
Visit the Seeed_Arduino_rpcUnifiedrepositories and download the entire repo to your local drive.
- Visit the Seeed_Arduino_rpcUnifiedrepositories and download the entire repo to your local drive.
-
Now, the Seeed-Arduino-FreeRTOS library can be installed to the Arduino IDE. Open the Arduino IDE, and click
sketch->Include Library->Add .ZIP Library, and choose theSeeed_Arduino_rpcUnifiedfile that you have just downloaded
4. Install the Seeed_Arduino_FreeRTOS
Visit the Seeed_Arduino_FreeRTOSrepositories and download the entire repo to your local drive.
- Visit the Seeed_Arduino_FreeRTOSrepositories and download the entire repo to your local drive.
-
Now, the Seeed-Arduino-FreeRTOS library can be installed to the Arduino IDE. Open the Arduino IDE, and click
sketch->Include Library->Add .ZIP Library, and choose theSeeed_Arduino_FreeRTOSfile that you have just downloaded.
After installing all the required libraries, you are all set to do some BLE and WiFi Hacks ?.
I tried to scan both available WiFi access point and Bluetooth devices together, and it works like a charm ?
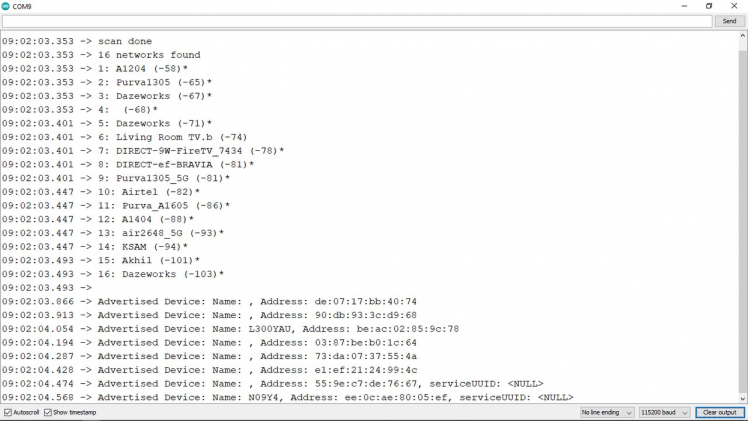
Here you can see that The wio terminal now detect the 5Ghz WiFi signal too.
Arduino Sketch:
/*
    This Sketch is combination of WiFi Scan and BLE Scan example provided by SeeedStudio
*/
#include "rpcWiFi.h"
#include <rpcBLEDevice.h>
#include <BLEScan.h>
#include <BLEAdvertisedDevice.h>

int scanTime = 5; //In seconds
BLEScan* pBLEScan;

class MyAdvertisedDeviceCallbacks: public BLEAdvertisedDeviceCallbacks {
    void onResult(BLEAdvertisedDevice advertisedDevice) {
      Serial.printf("Advertised Device: %s n", advertisedDevice.toString().c_str());
    }
};

void setup()
{
  Serial.begin(115200);

  // Set WiFi to station mode and disconnect from an AP if it was previously connected
  WiFi.mode(WIFI_STA);
  WiFi.disconnect();
  delay(100);

  BLEDevice::init("");
  pBLEScan = BLEDevice::getScan(); //create new scan
  pBLEScan->setAdvertisedDeviceCallbacks(new MyAdvertisedDeviceCallbacks());
  pBLEScan->setActiveScan(true); //active scan uses more power, but get results faster
  pBLEScan->setInterval(100);
  pBLEScan->setWindow(99);  // less or equal setInterval value


  Serial.println("Setup done");
}

void loop()
{
  Serial.println("scan start");


  // WiFi.scanNetworks will return the number of networks found
  int n = WiFi.scanNetworks();
  Serial.println("scan done");
  if (n == 0) {
    Serial.println("no networks found");
  } else {
    Serial.print(n);
    Serial.println(" networks found");
    for (int i = 0; i < n; ++i) {
      // Print SSID and RSSI for each network found
      Serial.print(i + 1);
      Serial.print(": ");
      Serial.print(WiFi.SSID(i));
      Serial.print(" (");
      Serial.print(WiFi.RSSI(i));
      Serial.print(")");
      Serial.println((WiFi.encryptionType(i) == WIFI_AUTH_OPEN) ? " " : "*");
      delay(10);
    }
  }
  Serial.println("");

  BLEScanResults foundDevices = pBLEScan->start(scanTime, false);
  Serial.print("Devices found: ");
  Serial.println(foundDevices.getCount());
  Serial.println("Scan done!");
  pBLEScan->clearResults();   // delete results fromBLEScan buffer to release memory
  delay(2000);

  // Wait a bit before scanning again
  delay(5000);
}
The Arduino sketch is a combination of WiFi Scan example and BLE Scan example provided by the seeed. Now you can use the 5G WiFi and BLE5 at easy with Wio terminal.
If you find any issues, feel free to post comments or share your queries at SeeedStudio Forum. Thank You ??.
Update: Seeed recently released Wio Terminal Classroom Series with IoT! ?, Lakshantha Dissanayake shared detailed explanation about WiFi and BLE Capabilities.
Wio Terminal Classroom with IoT #1 | Initial Setup and ScanCode
Credits
Related products


Leave your feedback...