
The Minimalist Thermostat

Made by gusgonnet / Home Automation
About the project
A thermostat you won't see
Project info
Difficulty: Difficult
Platforms: Amazon Web Services, Particle
Estimated time: 1 hour
License: MIT license (MIT)
Items used in this project
Hardware components

Software apps and online services
Story
A thermostat is a component which senses the temperature of a system so that the system's temperature is maintained near a desired setpoint. The thermostat does this by switching heating or cooling devices on or off.
That's the definition from Wikipedia. So how hard would be to make one? Let's find out.
The itch
It's been bugging me for a long time the fact that I don't have an internet connected thermostat at home. There are always questions like "did you turn it off when we left?" or "can you turn on the fan for some minutes?" And what is worse, those questions usually arise when you are far from the thermostat.
I read a lot about Nest and the magic it can do - go check it out, it's pretty amazing. I also checked this beautiful implementation of an open source alternative done by the team at Particle. If you search the internet for open source thermostats, you get millions of results (precision: about one and a half million results).
Why would one bother to build their own when there are so many alternatives already done? In my case, it was the fact that I enjoy making things so much.
So, here's the story of how my own connected thermostat was born.
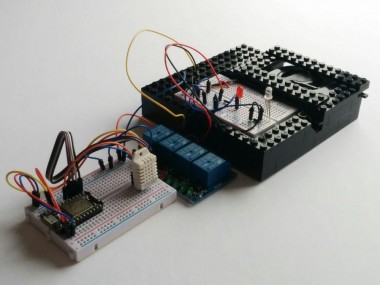
The prototype
Since I wanted to test the concept of how it would be like to build a thermostat, I created a prototype.
Here's how the control section of my prototype looks like:
 The prototype - control
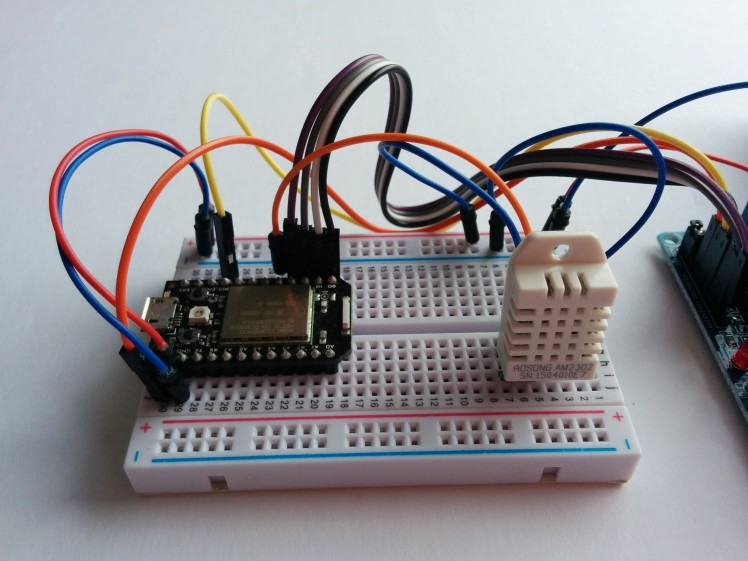
The system is controlled by a Particle Photon or Core dev kit. Since it needs to know the temperature, a DHT22 is required. If you plan to use a DHT11, please read this project for the required changes in the software.
To control the HVAC system I have at home, I used 5 volts relays. I could have used a particle relay shield but they were out of stock when I built this.
Here's how the power section looks like:
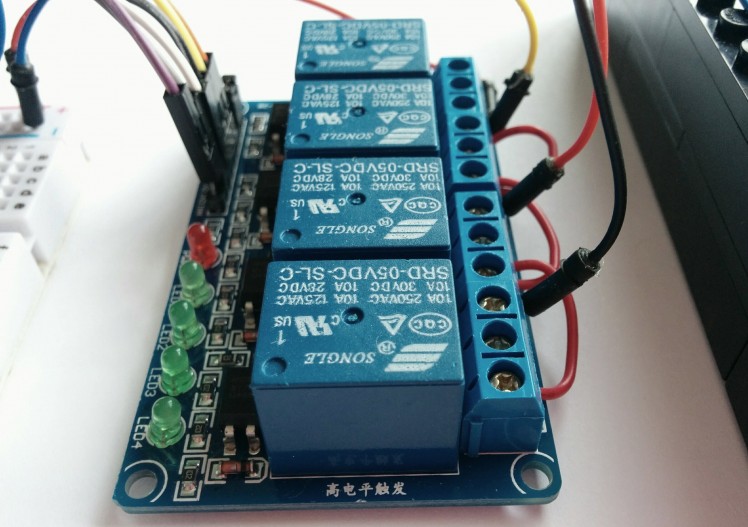 The prototype - power
The HVAC simulator
This project will be messing around with an expensive system, my HVAC. When the time comes for the installation I want to be sure that nothing goes wrong, or at least minimize my chances of something going bad.
For this I have created a visual feedback system that I will use as my HVAC simulator. It's made of Lego and pretty basic, so bear with me. For really good ones, you can get inspiration in projects like this one.
The bill of materials of my simulator
- a CPU fan of an old, broken laptop
- a red LED
- a blue LED (I had an RGB LED so I used it instead)
As you may imagine already, the fan simulates the fan of my HVAC, the red LED simulates the heating and the blue LED simulates the cooling.
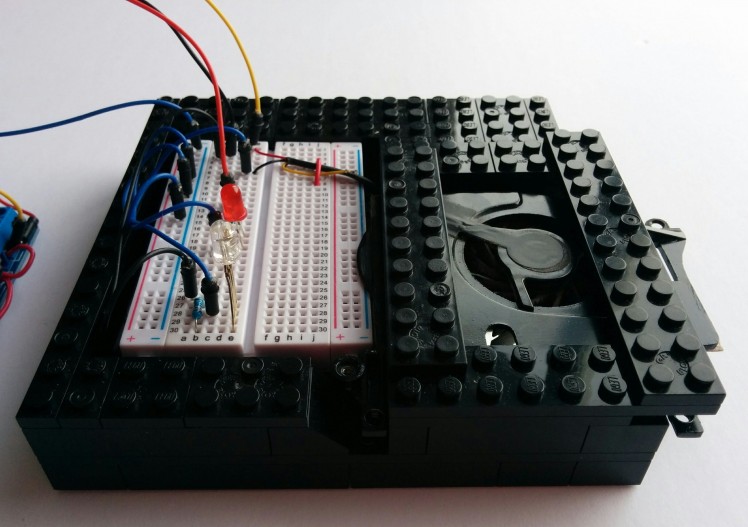 An HVAC simulator
The test setup
I used this setup to test all the scenarios while developing the software:
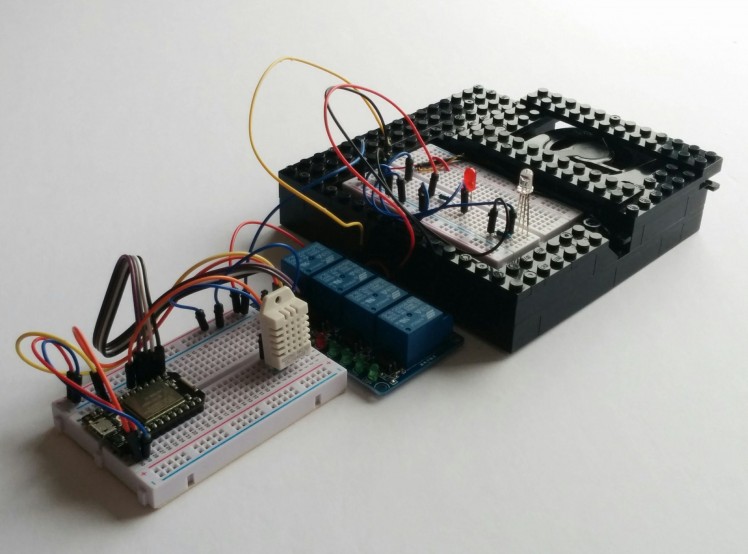 The test setup
If you take a look closely at the software, you will notice that I added extra code for making my code testable. More on how I tested my prototype in a future article.
The software
What I call in this section the software is what we used to call for many years the firmware. Since updating the firmware is made so easy with systems like the Particle dev kit (you can flash it using a wifi connection), what used to be firm is now pretty soft. So the software, the firmware or whatever you may choose to call it (perhaps the sketch, in Arduino's speak) is that piece of code running in your Particle.
Now back to the software.
The software running in our particle needs to have a desired temperature set by the user and control the heating of the furnace. Since in my HVAC the heating and the fan are two different things, the fan needs to be controlled as well.
Soon after starting writing the code, I realized that I had many variables for status, fan, temperature, and that the flow of the program was getting complicated to follow and manage.
Then I realized I could use a finite state machine to model the behavior. After reading articles like this one and the one referenced by it, I knew I was on the right track.
The Finite State Machine library
Soon I discovered that there were no FSM libraries for the particle, but when searching a library for Arduino, I found this one. I tried it and it was an excellent fit for me.
With the permission of the original author, I ported and published it in the particle libraries for everybody's benefit. The FSM library source code for Particle is here.
Note: in reality, I cannot say that I ported the library, since Arduino and Particle's code are like 98% compatible. In this case, I only changed one line for the code to run properly on my particle.
Here is a picture of the states the thermostat can go through:
 The state machine
I have four states so far:
- initState: it runs right after the thermostat powers up. This gives some time for the DHT sensor to stabilize the samples
- idleState: after a period of time (in the order of the couple of minutes) it lands in this state. The thermostat is sitting there, doing nothing but monitoring the temperature of the house.
- heatingState: once the temperature drops below the target temp (minus a margin of half a degree) it kicks off the fan and the heating
- endOfCycleState: when the target temperature is reached (plus a margin) this state runs for a period of time (between 15 to 60 seconds). The heating is turned off while the fan continues to blow air, so the hot air is evacuated from the vents.
To further protect the HVAC equipment, I will be adding a forced minimum time to stay in the heatingState. I imagine that the HVAC would NOT like a pulse of 300 milliseconds in the heating wire, for whatever reason this might happen...
The warning
Now, the mandatory word of CAUTION:
BE EXTREMELY CAREFUL WHEN DEALING WITH ANY ELECTRIC EQUIPMENT
ELECTRICITY CAN KILL YOU
Read more about electric shock in this Wikipedia page, or here where they mention that death can occur with ONLY 42 volts DC. And I thought 48 volts DC were safe to touch...
There are different types of HVAC systems, and some could have 120 volts in their control.
REALLY, THIS CAN KILL YOU IF DON'T KNOW WHAT YOU ARE DOING
MESSING WITH YOUR THERMOSTAT CAN ALSO KILL OR HURT SOMEBODY IN YOUR FAMILY
Exactly how is explained in this thread. Please pay attention to the dangers of messing around with your thermostat described there.
AN UNCHECKED, RUNAWAY HEATING CYCLE COULD POTENTIALLY BE FATAL
And if that does not kill you, your heating bill will.
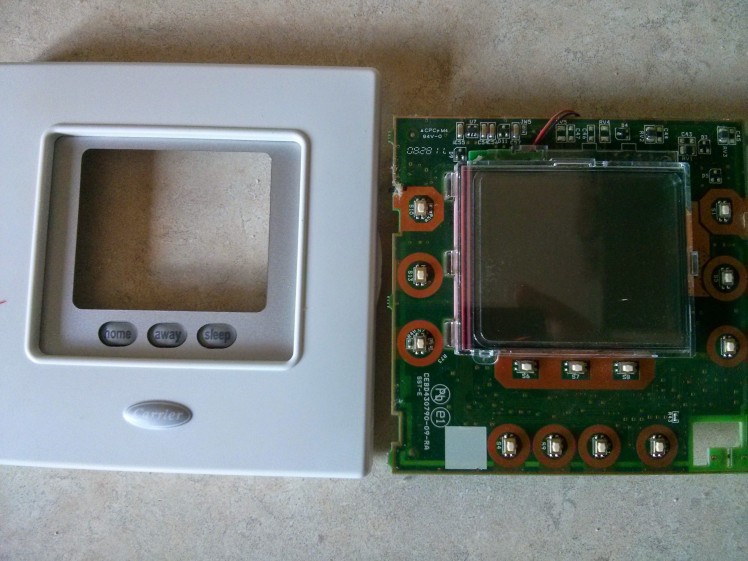
My old thermostat
My HVAC system has 5 wires as shown in this photo:
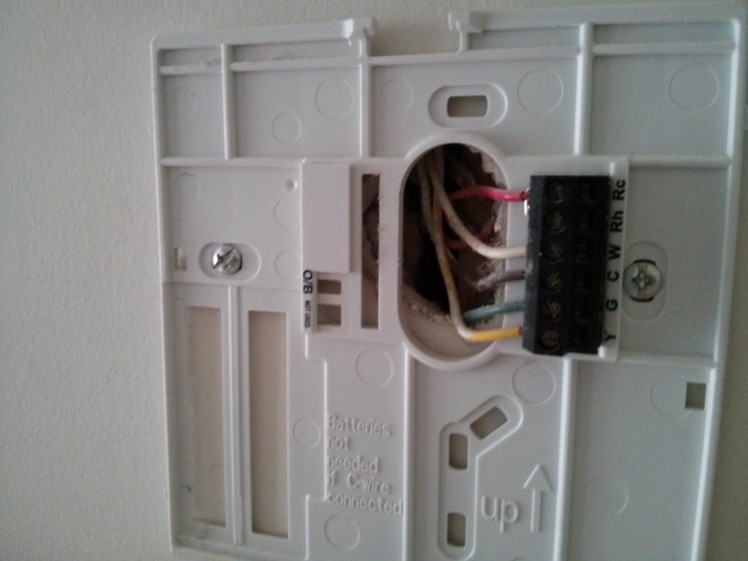 5 wires to control my HVAC
After searching on the internet, I landed here and here. Those two pages give an idea of what is what with the cables.
I also dismantled my current thermostat to find out that the control was done with three relays. You can find them on the top right of the second photo below (psst: those three white rectangles):
; ; 1 / 2 • The front of my old thermostat
A little tale from the past: when I started thinking about having a connected thermostat, or one that I could control from my phone, the first thing that came to mind was to control the buttons of my current thermostat (by hooking up some relays like I did in this project for the button of my garage).
That approach had so many limitations that I abandoned the idea soon after.
For instance, there is no button in the front panel to switch the whole system on or off. There is one that cycles over HEATING/COOLING/OFF that I could use. So what if my relay produced a bounce and instead of doing COOLING then OFF it would do COOLING then OFF then HEATING? What if my Particle lost sync with the initial state of the whole thing? Was my HVAC really off when I wanted it? Things are certainly not easy to control when you have no feedback on them.
The wiring
From the pages mentioned before (this one and this one) I did the mapping:
Rh and Rc (red wire): 24 volts hot AC
C (brown wire): 24 volts common AC
G (green wire): fan
W (white wire): heating
Y (yellow wire): cooling
Don't be surprised if your installation does not match this, since apparently there is no standard for thermostat circuit wiring colors.
I connected the fan to my first relay, then the heating to my second and the cooling to my third.
Since I suspect that I can damage something if accidentally my Particle starts the heating or the cooling without starting the fan, I wired both of them in series with the fan relay. This way, the heating or cooling can only turn on if and only if the fan is on, and this, BY HARDWARE. So if I mess up with the software, at least there is a small safety net in place to protect the equipment.
NOTE: I'm doing this in January 2016. Since I'm currently living in a place where is cold these days (and will be for months to come), I will only be playing with the heating for the time being. There will be no code for taking care of cooling in this project, not at least until the summer comes. This will give me precious troubleshooting and fine tuning time with a reduced code base.
This is how I wired the relays:
 Particle-relays-HVAC connection
Controlling the thermostat
The thermostat is wired and ready to run. Once we flash the software in the Particle, it will start heating the home according to the value in the targetTemp variable.
Now how you control your thermostat?
You can choose among different options:
- use Blynk, as explained in this project
- use Porter, please see this article
- use Particle DEV (linux users read this - I'm using DEV in Ubuntu and it works just fine)
- use the Particle CLI
- use the Amazon Echo
- so many other options!
The Amazon Web Services IoT Button
 The AWS IoT button
Since the AWS IoT button is able to detect three events (simple, double and long clicks) we could program a different action for them.
Imagine clicking on it to shut the HVAC system down when you leave the house, a double click for when you are going to bed and a long click for starting and stopping the fan.
I did not get my hands in one yet, so I leave this as an option to explore in the future.
The Amazon Echo
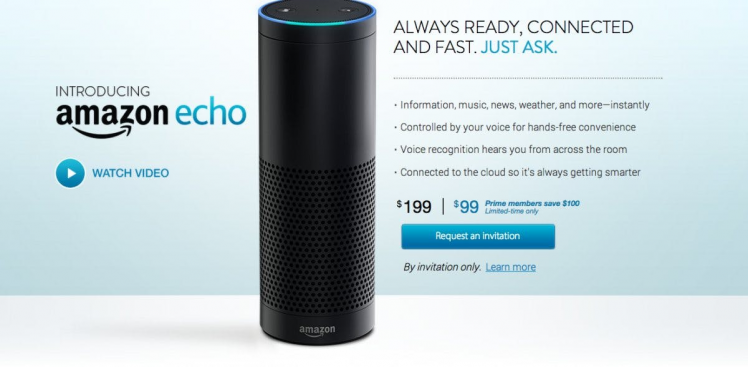 The Amazon echo (not anymore "By invitation only")
This thing looks amazing!
Since integration with Particle has been proven by projects like this one and this one, we can see that it is possible to control this thermostat with it.
Imagine saying things like "Alexa, turn on the fan for fifteen minutes", or "Alexa, we are leaving" to shut it down when going somewhere. Yeah, it looks great to me.
Again, I did not get my hands in one, so I leave this as an option to explore in the future.
Enhancing the thermostat with cloud services
There is now an IoT cloud offering from Amazon, included in the already impressive list of Amazon Web Services. Anybody can use it and lots of services are free for a full year, so go ahead and create your own account to try it out today. Even after the first year, there are many services that continue to be free. What is best than free? I guess free and useful, which I'm pretty sure the AWS IoT services are.
There are many ways to use the Amazon cloud. I will list a few below:
- use AWS Lambda - for dumping all temperature and humidity readings in a database or running advanced algorithms for intelligent temperature control
- use AWS Kinesis - to do real time analysis of the data the thermostat streams
- use AWS DynamoDB - all the data of the thermostat goes here, eg: FSM states, temperature readings, etc
- use AWS Cognito and IAM - to manage access and permissions
- use AWS S3 - to visualize the data in charts, history, trends, etc
- use AWS SNS - to push information to my devices so I learn about what the thermostat is doing in real time
One of the most interesting (for me at this time, at least) is the Amazon Simple Notification Service (AWS SNS). Since this project is new I would like to receive information about the status, and why not use SNS for that.
Another interesting one is the AWS Lambda, where a piece of code can run in the cloud like an act of magic.
Let's see what we can do with them.
Cloud Safety Net
To minimize risk while testing the thermostat, be it hardware or software, malfunctions in relays, or whatever else, let's add some cloud alarms.
Here are the proposed alarms:
- the thermostat goes offline
- the temperature goes over a certain threshold
A Lambda function will run at a specific interval to get the current temperature in the house. If the request fails, the offline alarm will be triggered and an email will be fired off. If the temperature is over the threshold, again an email will be sent with the alarm status. The email will be sent via the Amazon Simple Notification Service (AWS SNS).
Images better explain the alarms received via email:
; ; 1 / 3 • High temperature alarm
Cloud Safety Net implementation
STEP 1: create an SNS topic by following the instructions here
STEP 2: subscribe your email to the topic like described here
STEP 3: you should have received an email. Confirm your email address by following the instructions in that email
STEP 4: test your SNS topic by publishing to it. This will send a test email
STEP 5: grant permissions to your account so you can invoke SNS services from other Amazon services like described here. Hint: check example 1
STEP 6: create a scheduled Lambda function that will use the lambda-canary blueprint as described here. The Lambda function can be triggered every 30 minutes, for instance
STEP 7: the Lambda function you want to create is stored in the github repository of this project (check the software section below). It's called alarm.py under the directory aws
Note: the Lambda function needs some information both from your account at Particle and the SNS topic you created in STEP 1. Please enter it
STEP 8: test this function:
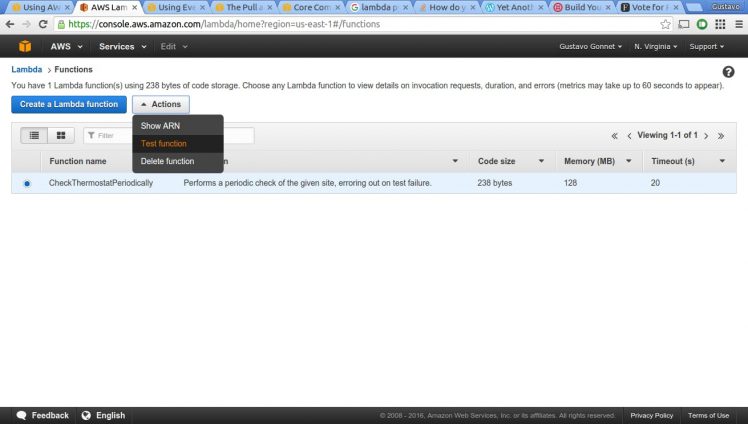 Testing the function
Side note: The explanation for the AWS implementation I present here is a bit too compact for my taste. I am planning to write an extensive tutorial about AWS, Lambdas and emails, or even expand the one I'm currently writing here so I can go in detail about what I did to make this happen.
Making the thermostat invisible
In my mission of choosing the right display to use in the project, these are the ones that made it to the short list:
- a nexus 7 (since I have one around)
- a 5.0" 40-pin TFT Display - 800x480 with Touchscreen (this one was my favorite)
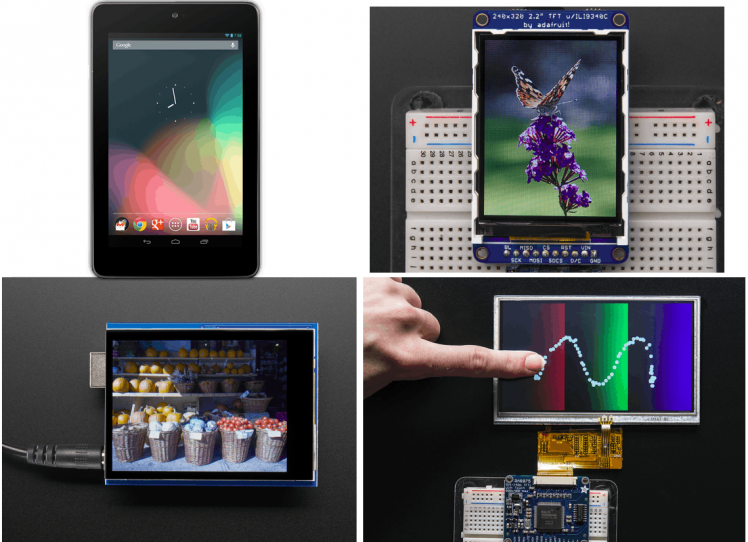 Which one to choose?
They all look so good!
However, I wanted my thermostat to be different from what I have seen so far, and to be honest, I did not think for a second that I could compete with such a beautiful display as the one from Nest. This thing is so perfect, so smooth to turn and set the temperature, so soft to tap and set the configuration. If you haven't seen one yet, go to your local computer store to play with it - totally recommended.
Then it hit me. How about NOT having a display? Do we really, really need to have one?
I knew I wanted it to be visually non-intrusive, flat on the wall or something similar so it would not get in the way. So what could be less intrusive than something that is not there?
The drawbacks of not having a display
Not having a display sounds pretty good for the looks, since simply there is nothing to look at. Where there was a thermostat before, there will be a flat wall tomorrow. Or a frame. Or even a shelve. But not a thermostat.
Now the question that remains is: how would one control it?
Of course, the natural answer is your phone, your tablet, or your computer, since it's a connected device.
In the case it runs so well, perhaps you wouldn't have to even think about controlling it. Perhaps the processing that can be done in the AWS cloud servers would again help to control it automatically forever after.
What if my connected device disconnects? In other words, what if my internet access is down? What if my router dies? What if? What if? What if?
I don't currently have all the answers, but here is what I would do in any of those rare cases:
- rely on the amazing schedule that I have already set on it last time it connected to the internet,
- fire up a hotspot on my phone with the same credentials of my home router, so my thermostat would connect to the internet through it
Regardless of what I do, the thermostat software would continue to run in the Particle, so my home would continue to be heated as programmed.
Thinking about the drawbacks this way, allows me to see worse things that can happen (and will happen) if internet access is down at home (now imagine a "daaaad, why Netflix does not work anymoreeee?"). Just kidding.
The Minimalist Thermostat is born
Once the decision of dropping the display was taken, the Minimalist Thermostat was taking shape.
To illustrate better where I am going with all this, let's take a look at how the wall with the old thermostat looks like:
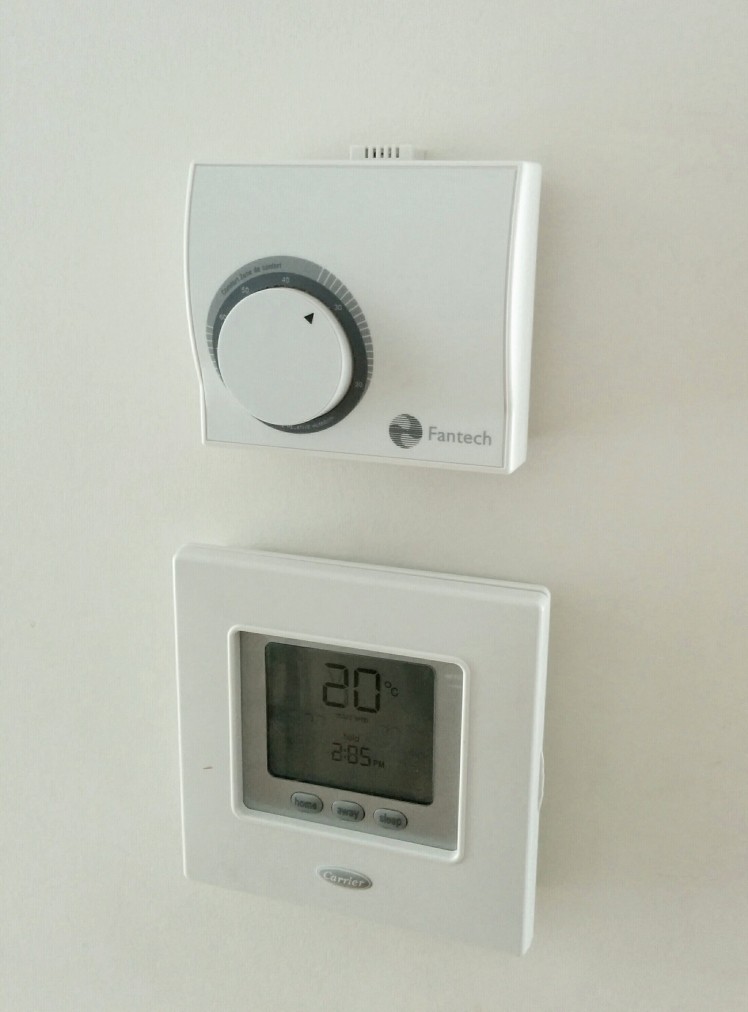 The wall
Have you noticed the DHT22 on top of the Fantech humidity control (the panel on top)?
Imagine for a moment that I could install my Particle in the basement in a great project box and wire a cable for the DHT22 up here (like I already did).
In that scenario, nothing stops me from getting rid of the thermostat, and why not, the humidity control too (however I'm not ready to replace this humidity control panel yet, maybe in a coming project). That would give me extra wall space for hanging more family frames.
That's what I mean with minimalist. No display, no panel, nada. It would be just the temperature sensor, which I could potentially hide on top of my favorite family picture frame.
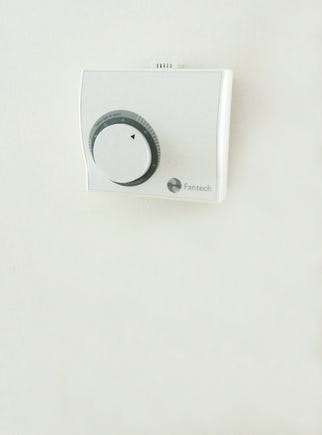 The wall with the old thermostat gone
Verifying it works
(April 1st 2016) I have now written an article on how to test this project. You can find it here.
Improvements
There are so many improvements already in the plans for this project. And it will be all open source, so if you want to pitch in let me know. We can collaborate together in this if you are replicating it or creating your own.
Final words
If you got this far, thank you! I hope you had at least half the fun I had when creating the thermostat and writing this story.
Feel free to leave me your comments below,
Gustavo.
Psst: please find my other projects here.
Help
If you require professional help with your projects, don't hesitate to write me a line about your needs at gusgonnet@gmail.com. Thank you!
New in version 0.9 (Feb 22nd 2016):
* reorganized the Particle code to group functions per areas
* added minimum time to protect on-off on the fan and the heating element in function heatingUpdateFunction()
New in version 0.10 to 0.15 (March 21st 2016):
Changes in version 0.10:
* added temperatureCalibration to fix DHT measurements with existing thermostat
* reduced END_OF_CYCLE_TIMEOUT to one sec since my HVAC controller
takes care of running the fan for a minute to evacuate the heat/cold
from the vents
* added pushbullet notifications for heating on/off
* added fan on/off setting via a cloud function
Changes in version 0.11:
* added more pushbullet notifications and commented out publish() in other cases
Changes in version 0.12:
* added blynk support
* added minimumIdleTimer, to protect fan and heating/cooling elements
from glitches
Changes in version 0.13:
* removing endOfCycleState since my HVAC does not need it
* adding time in notifications
Changes in version 0.14:
* debouncing target temp and fan status
Changes in version 0.15:
* taking few samples and averaging the temperature to improve stability
New in version 0.16 (March 26th 2016):
* discarding samples below 0 celsius for those times when the reading of
the dht sensor goes wrong
* adding date/time in notifications in a new line
* leave only 2 decimals in temp notifications (19.00 instead of 19.000000)
* improving blynk project
* fine tunning the testing mode
* adding Titan test scripts (more info on this hackster article)
Blynk integration
It is now possible to control the thermostat with Blynk. This is how it looks today:
; ;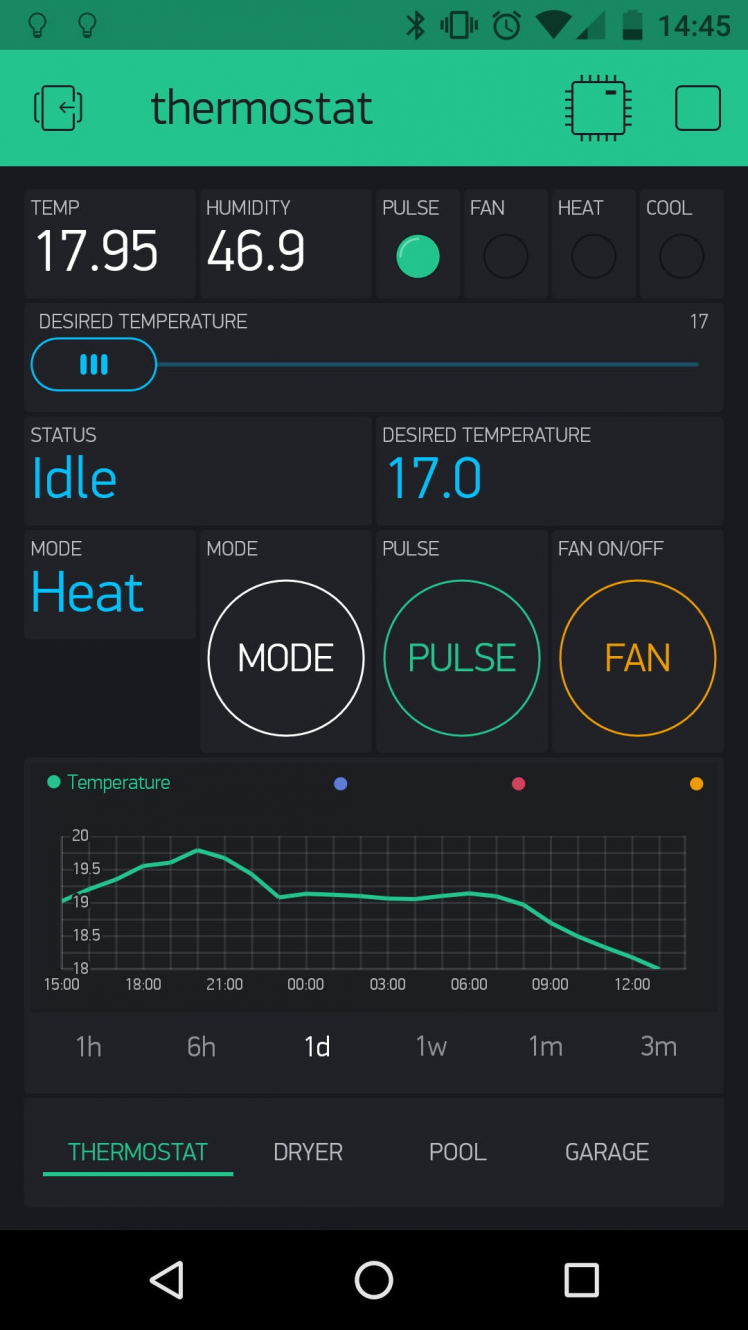 1 / 2 • Latest look
For getting the blynk project please scan this QR code with your blynk app:
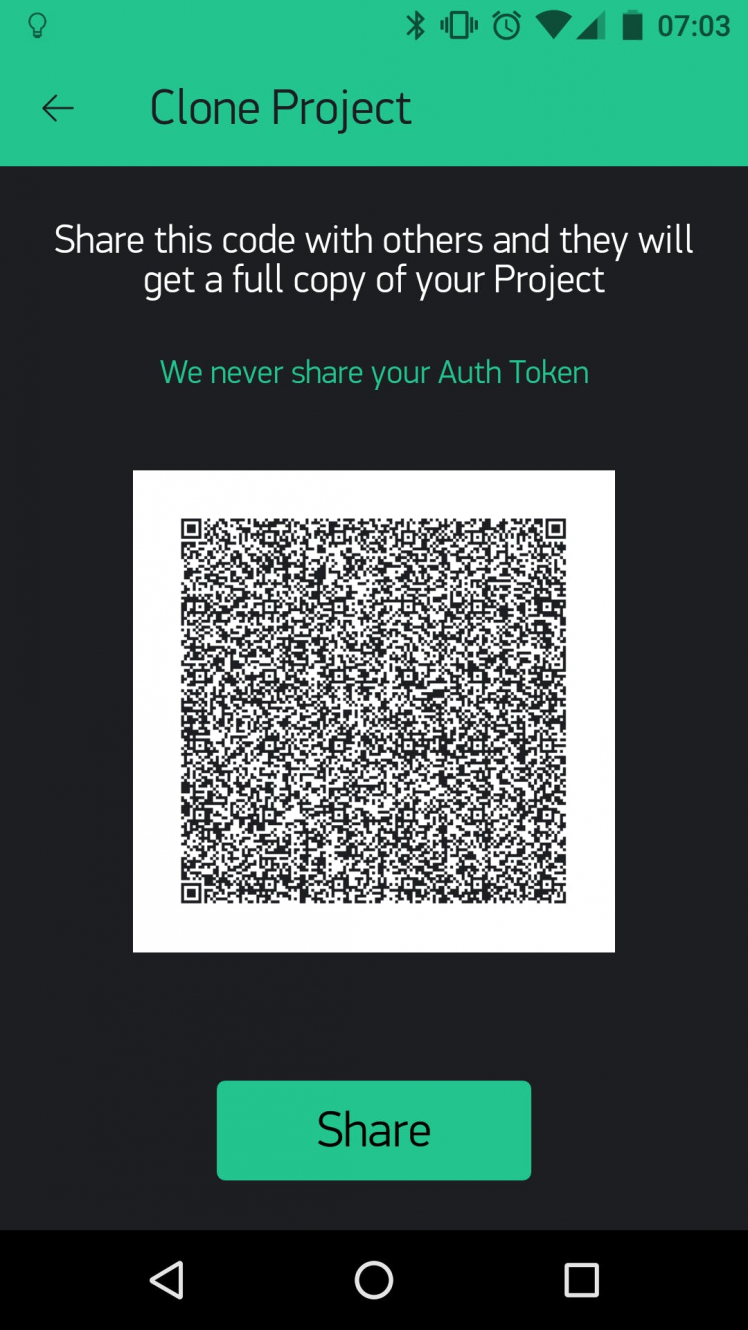 QR code to scan with the blynk app
Porter integration
It was always possible to control the thermostat with Porter. This is how it looks on my phone:
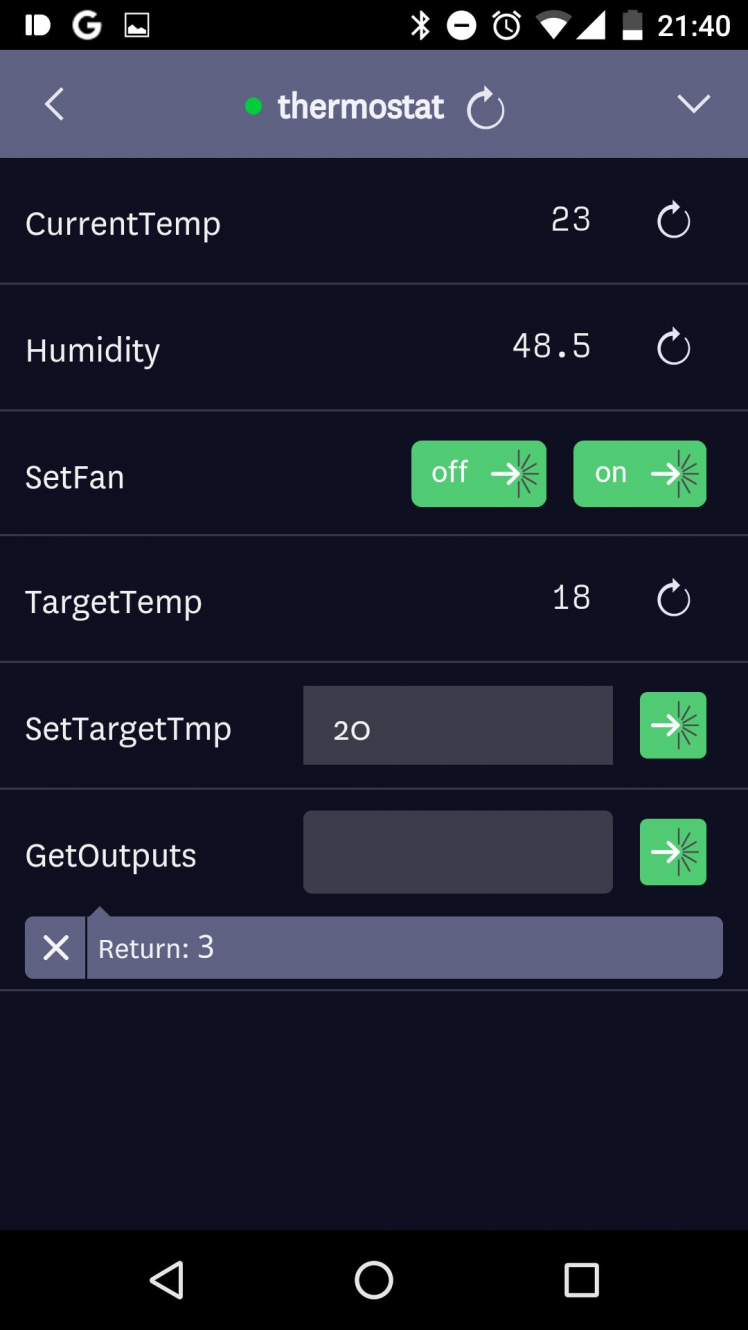 Porter interface
Pushbullet notifications
This is how they look as of version 0.16:
; ;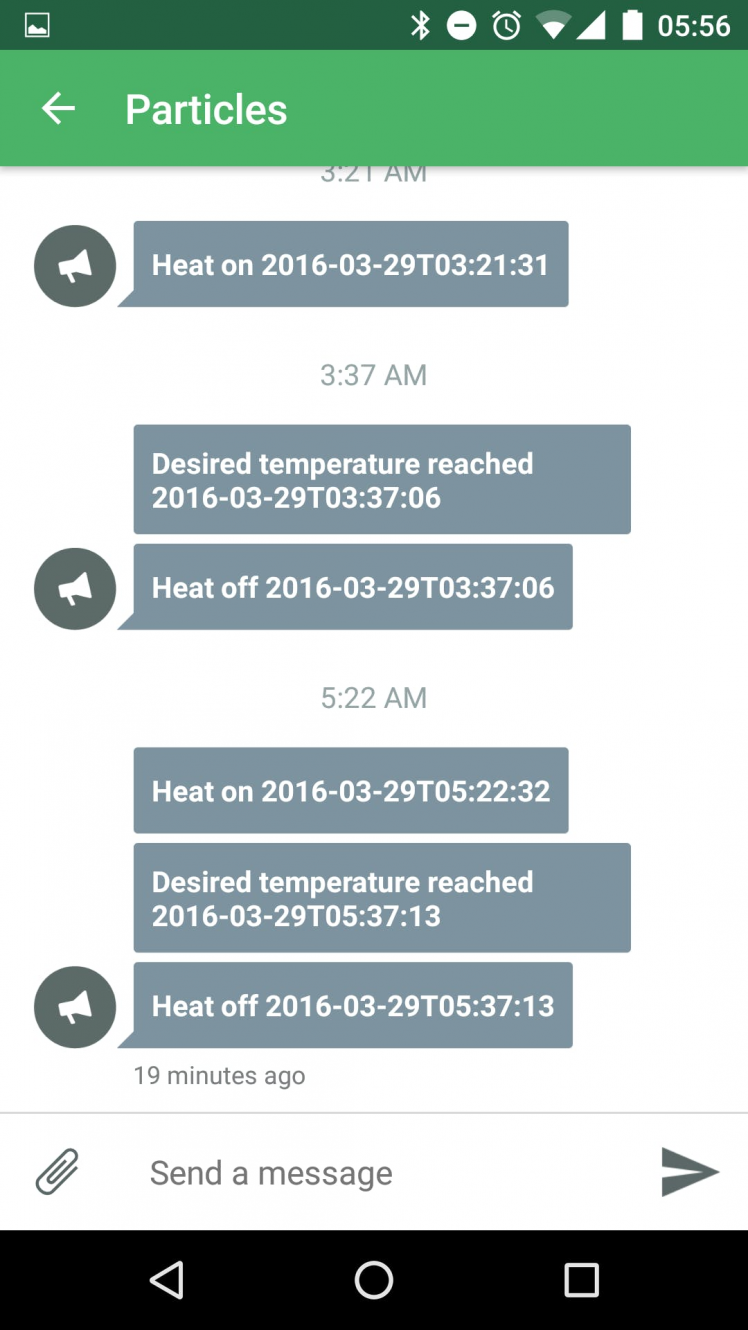 1 / 2
1 / 2
New in version 0.17 to 0.19 (May 1st 2016):
Changes in version 0.17:
* PUSHBULLET_NOTIF renamed to PUSHBULLET_NOTIF_PERSONAL
* removed yyyy-mm-dd from notifications and left only hh:mm:ss
* minor changes in temp/humidity reported with Particle.publish()
* reporting targetTemp when desired temp is reached
Changes in version 0.18:
* created a pulse of heating for warming up the house a bit
* created a function that sets the fan on and contains this code below in function myDigitalWrite() if (USE_BLYNK == "yes") {
* updated the blynk app
* created a mode variable (heating, cooling, off)
Changes in version 0.19:
* created blynk defined variables (for instance: BLYNK_LED_FAN)
* updates in the fan control, making UI more responsive to user changes
* add cooling support
* pulses now are able to cool the house
Changes in version 0.20:
* create a state variable (idle, heating, cooling, off, fan on)
* trying to fix bug where in init both cool and heat leads remain on until idle state is triggered
* set the debounce timer to double the default for mode changes
Changes in version 0.21:
* store settings in eeprom
* changing defaults to HVAC OFF (from HEATING)
* updating the blynk cloud periodically
* added in the blynk app the state of the thermostat (also published in the particle cloud)
* here is the link for cloning the blynk app http://tinyurl.com/zq9lcef
* changed all eeprom values to uint8_t to save space and bytes written
this saves eeprom pages to be written more often than needed
(for instance a float takes 4 bytes and an uint8_t takes only 1)
New in version 0.22 to 0.24 (Sept 8th 2016):
Changes in version 0.22:
* fixed an issue with targetTempString, when rebooting the photon would not show the
temperature loaded from the eeprom
Changes in version 0.23:
* Swapped pushbullet notifications with google sheets on thermostat activity
source: https://www.hackster.io/gusgonnet/pushing-data-to-google-docs-02f9c4
Changes in version 0.24:
* Reverting to Heating/Cooling from Winter/Summer modes
Troubleshooting
If your project is stuck in state init, please check the blynk configuration. I've found the hard way that if I do not configure blynk properly the whole project does not run properly!
If you are not planning on using blynk, then deactivate it by changing this line:
#define USE_BLYNK
so it ends up looking like this:
// #define USE_BLYNK
Need help?
If you require professional help with your projects, don't hesitate to write me a line about your needs at gusgonnet@gmail.com. Thank you!
Schematics, diagrams and documents
Code
Credits
Related products


Leave your feedback...