
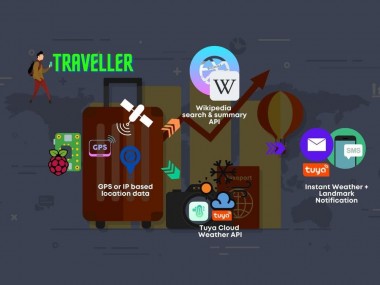
The Holidays Traveller

Made by vilaksh01
About the project
Start your new year by sightseeing at your own pace.
Project info
Items used in this project

Story
The holiday season is really what excites me whenever I am stressed due to work and studies. The holiday season is generally considered to run from late November to early January. Why not take a tour of the city or visit new places and see all the highlights that the town provides. Often we miss some famous destinations while exploring all places owing to the speed at which the tour goes, slowly detailing all landmarks on the track (sometimes unpredictable weather too). So what came to my mind was a simple solution to solve this problem. The Holidays Traveller device aims to get through the landmarks at your pace, just connect it to the network.
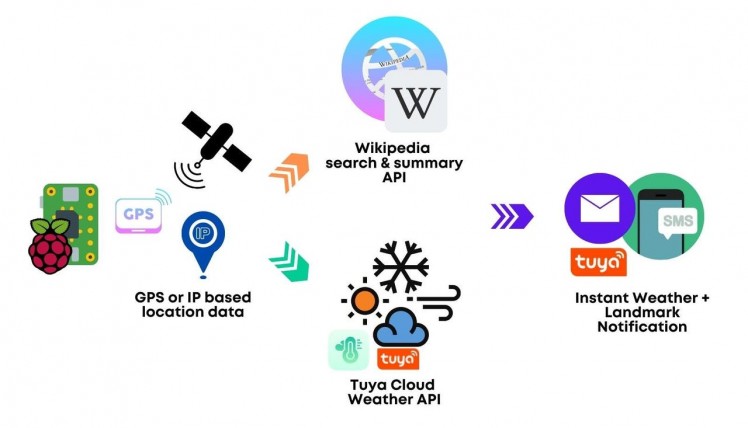
The device will automatically detect the location-based upon IP address, weather updates and nearby famous locations and brief summary and send those updates via email and SMS on our mobile to make sightseeing more interesting.
FunctionalityThe device is built using Tuya Cloud SDK, this Tuya project use-case can help developers think and innovate for the tourism industry - especially in marketing your product or whatever. Imagine such innovative use cases - sending an alert to users when they arrive at a particular location and suggesting they visit famous parks, restaurants, buildings, etc.
Tuya Smart is a global IoT development platform that builds interconnectivity standards to bridge the intelligent needs of brands, OEMs, developers, and retail chains across a broad range of smart devices and industries.
Based on the global public cloud, Tuya connects different intelligent scenarios and smart devices by providing hardware development tools, integrating public cloud services, and offering an intelligent business development platform.
Prerequisites- Tuya Developer Account. Get it here - https://developer.tuya.com/en/
- TuyaOpenAPI. To install,
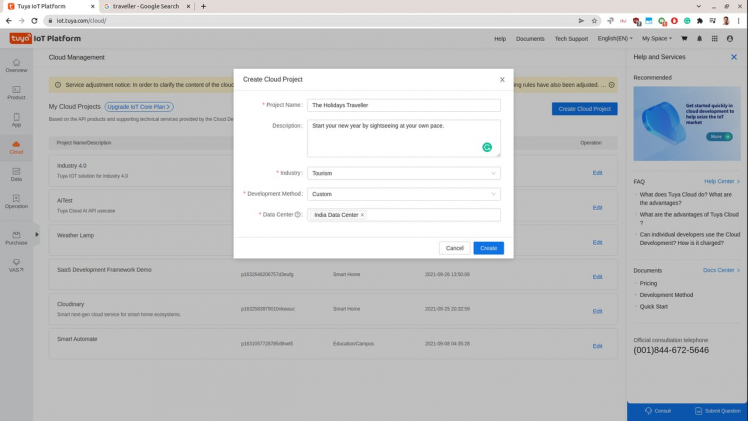
$ pip install tuya-iot-py-sdkSetting up Tuya Cloud Account and Project:
After signing up, you will head over to the dashboard. From there, go to 'Cloud' and create a project inserting the following information.
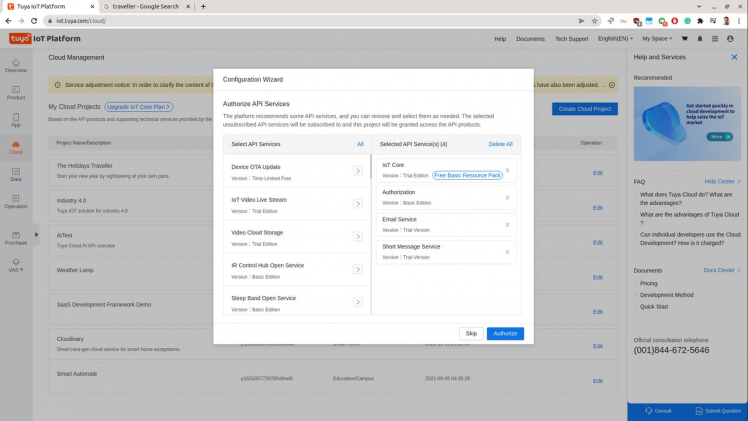
Authorize the required APIs ( we are going to need weather, location, email and SMS API)
1 / 2
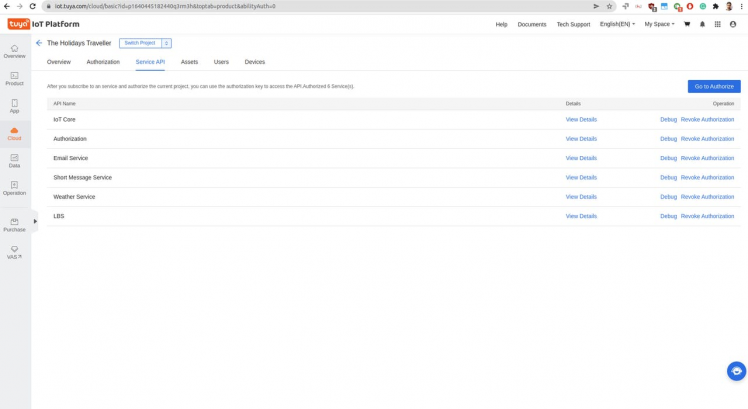
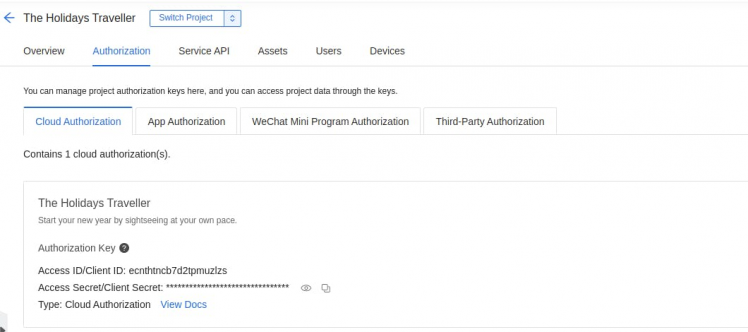
Tuya Cloud API
Most importantly you will need ACCESS_ID and ACCESS_KEY to work with APIs
from tuya_connector import (
TuyaOpenAPI
)
ACCESS_ID = "*************123"
ACCESS_KEY = "*************56565"
API_ENDPOINT = "https://openapi.tuyain.com"

# Project configuration
USERNAME = 'youremail@mail.com'  # email address or phone number
PASSWORD = 'yourpassword'

# Initialization of tuya openapi
openapi = TuyaOpenAPI(ENDPOINT, ACCESS_ID, ACCESS_KEY, AuthType.CUSTOM)
print(openapi.connect(USERNAME, PASSWORD))
If everything is correct you will get no error codes and good to proceed to other steps. We are going to need our location data in order to use Tuya Weather APIs, so we will first get our IP address and then find out our coordinates using Tuya LBS service APIs. After getting the geocoordinates we will use Wikipedia API to search for landmarks and summaries.
# Device IP
url = 'http://ipinfo.io/json'
response = urlopen(url)
data = json.load(response)
IP = data[ 'ip' ]

# Get location of device through IP
location = openapi.get(f'/v1.0/iot-03/locations/ip?ip={IP}')
print(location)
location = location[ 'result' ]
latitude, longitude = location[ 'latitude' ], location[ 'longitude' ]
Now we will get the weather data for our location using weather API
weather_url = f'/v2.0/iot-03/weather/current?lat={latitude}&lon={longitude}'
weather = openapi.get(weather_url)
condition = weather['result']['current_weather']['condition']
air_quality = weather['result']['air_quality']['aqi']
print(condition, air_quality)
Now we will construct the message, but before that let's explore the Tuya SMS and Email APIs,
sent = openapi.post("/v1.0/iot-03/messages/mails/actions/push", dict({  "to_address": "hello@gmail.com",
  "template_id": "MAIL_1624531323",
  "reply_to_address": "hi@gmail.com"}))
The above is the request parameter, 1. template_id: is the ID of an email template. Tuya provides a default as well as you can create one of your own. public default templates, MAIL_1624531323, MAIL_1624531338
2. reply_to_address: means the address that the user will send a reply to.
We are going to create a new email template according to our project, you can make it directly from the Tuya Cloud API explorer https://iot.tuya.com/cloud/explorer
{
"name": "Don't Miss These Places Traveller!",
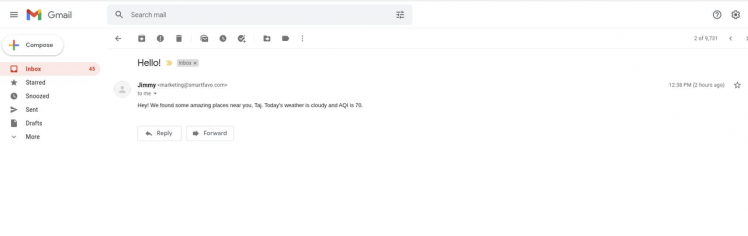
"title": "Hello!",
"sender_name": "Jimmy",
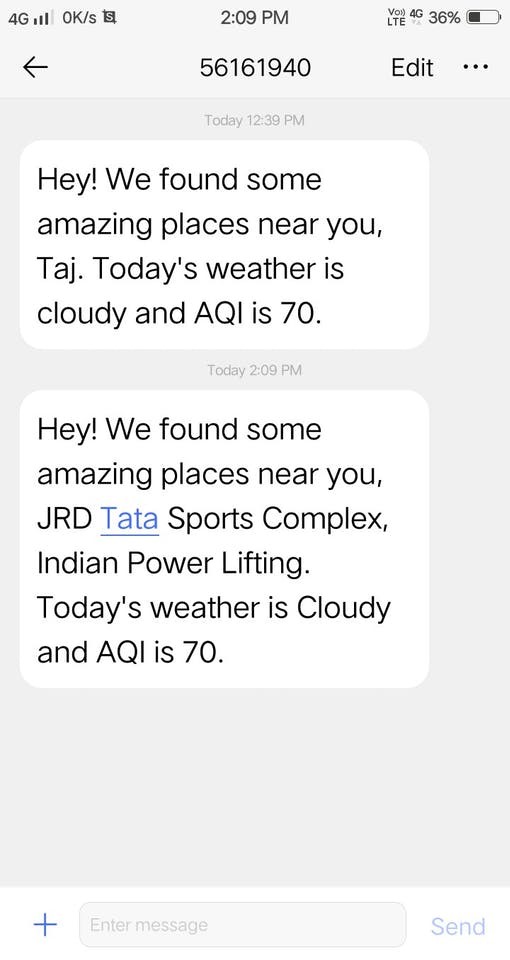
"content": "Hey! We found some amazing places near you, ${landmarks}. Today's weather is ${condition} and AQI is ${aqi}.",
"type": 2,
"remark": "This email is for tourists to get aware of nearby landmarks based upon their locations"
}The first string is a request parameter. And the dict is for content.
-
nameis the name of your template. -
contentstands for the message content. -
typeis for the type of the message— verification code, notification, or promotional. I have kept it as promotional (2)
The success message should be like this,
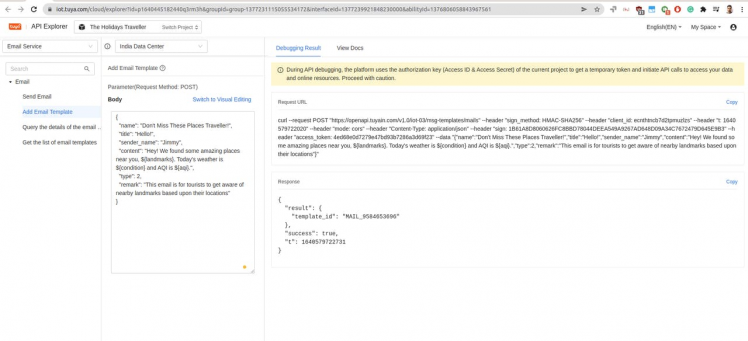
{
  "result": {
    "template_id": "MAIL_9584653696"
  },
  "success": true,
  "t": 1640579722731
}
Save the template_id, we are going to need it for further steps. Kindly note that you won't be able to use this template until it is reviewed and allowed. Don't worry, that process will take lesser than 2 working days.
Similarily do the same step for SMS template as well, you can make it directly from the Tuya Cloud API explorer https://iot.tuya.com/cloud/explorer
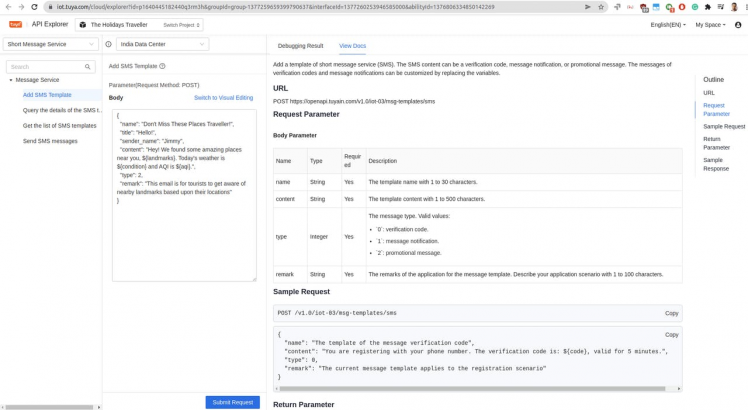
Initial tests were good for the Templates, see below how would the SMS and email look like
Once you have both the templates ready, let's jump over to our codes.
landmarks = wikipedia.geosearch(lat, lon, results=2)
landmarksListToStr = ' '.join(map(str, landmarks))

params = {
    "landmarks": landmarksListToStr,
    "condition": condition,
    "aqi": air_quality
}

payload_json = json.dumps(params)
print(payload_json)

email_sent = openapi.post("/v1.0/iot-03/messages/mails/actions/push", dict({"to_address": "gadecito@ryteto.me",
                                                                            "template_id": "MAIL_9584653696",
                                                                            "template_param": payload_json,
                                                                            "reply_to_address": ""
                                                                            }))

print(email_sent)
Find the full codes attached in the Code section. Run the program on an internet-connected Raspberry Pi device and carry where ever you go (use a trigger mechanism like a button to prevent filling up your inbox)
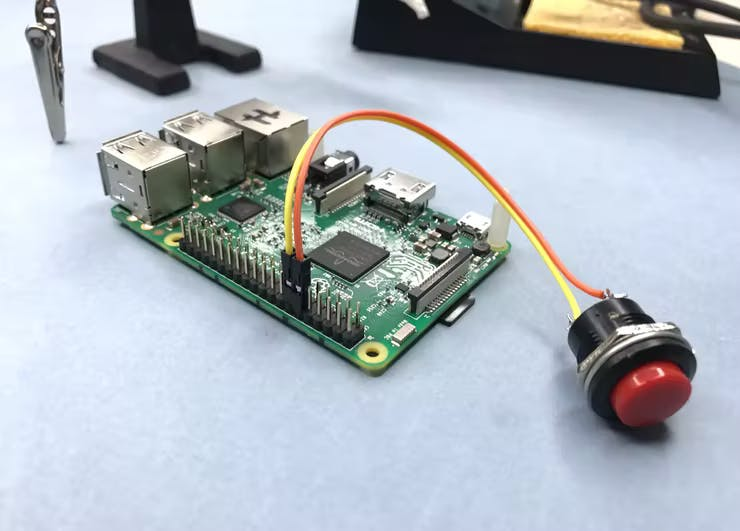
Once your button is connected, use the below codes in your script
import RPi.GPIO as GPIO
import time
from tuya_iot import (
    TuyaOpenAPI,
    AuthType,
)
from urllib.request import urlopen
import json
import wikipedia

url = 'http://ipinfo.io/json'
# Cloud project authorization info
ACCESS_ID = 'ecnthtncb7d2tpmuzlzs'
ACCESS_KEY = 'b75ce52xxxxxxxxxxxxxxxxxx'

# Select an endpoint base on your project availability zone
# For more info: https://developer.tuya.com/en/docs/iot/api-request?id=Ka4a8uuo1j4t4
ENDPOINT = "https://openapi.tuyain.com"

# Project configuration for authorized account
USERNAME = 'test1@gmail.com'  # email address or phone number
PASSWORD = 'Job894455'

SMS_TEMPLATE_ID = "SMS_2460072921"  # SMS template ID
EMAIl_TEMPLATE_ID = "MAIL_9584653696"  # Email template ID

# Initialization of tuya openapi
openapi = TuyaOpenAPI(ENDPOINT, ACCESS_ID, ACCESS_KEY, AuthType.CUSTOM)
print(openapi.connect(USERNAME, PASSWORD))

# Setup the Pin with Internal pullups enabled and PIN in reading mode.
GPIO.setmode(GPIO.BCM)
GPIO.setup(18, GPIO.IN, pull_up_down = GPIO.PUD_UP)

# Add our function to execute when the button pressed event happens
GPIO.add_event_detect(18, GPIO.FALLING, callback = SendMsg, bouncetime = 2000)

def SendMsg():
    response = urlopen(url)
    data = json.load(response)
    print(data)
    IP = data['ip']

    # Get location of device through IP
    location = openapi.get(f'/v1.0/iot-03/locations/ip?ip={IP}')
    print(location)
    location = location['result']
    latitude, longitude = location['latitude'], location['longitude']

    landmarks = wikipedia.geosearch(latitude, longitude, results=5)
    landmarksListToStr = ' '.join(map(str, landmarks))

    # get weather based on geo location
    weather_url = f'/v2.0/iot-03/weather/current?lat={latitude}&lon={longitude}'
    weather = openapi.get(weather_url)
    print(weather)
    condition = weather['result']['current_weather']['condition']
    air_quality = weather['result']['air_quality']['aqi']
    print(condition, air_quality)

    params = {
        "landmarks": landmarksListToStr,
        "condition": condition,
        "aqi": air_quality
    }

    payload_json = json.dumps(params)
    print(payload_json)

    email_sent = openapi.post("/v1.0/iot-03/messages/mails/actions/push", dict({"to_address": "gadecito@ryteto.me",
                                                                                "template_id": "MAIL_9584653696",
                                                                                "template_param": payload_json,
                                                                                "reply_to_addr}))

    sms_sent = openapi.post("/v1.0/iot-03/messages/sms/actions/push", dict({"country_code": "91",
                                                                            "phone": "748000000",
                                                                            "template_id": "SMS_2460072921",
                                                                            "template_param": payload_json,
                                                                            "sign_name": ""
                                                                            }))

    print(email_sent)
    print(sms_sent)                                                                  }))

    sms_sent = openapi.post("/v1.0/iot-03/messages/sms/actions/push", dict({"country_code": "91",
                                                                            "phone": "748000000",
                                                                            "template_id": "SMS_2460072921",
                                                                            "template_param": payload_json,
                                                                            "sign_name": ""
                                                                            }))

    print(email_sent)
print(sms_sent)Why not join Tuya Cloud and innovate with Cloud APIs for your next smart projects for SMS and EMAIL notifications. Almost all of these APIs are used in almost the same manner. Request Parameter and the dict containing everything required. The documentations are super simple to follow.
Schematics, diagrams and documents
Code
Credits
Related products


Leave your feedback...