
Temperature/humidity Monitor With Blynk

Made by gusgonnet / Environmental Sensing
About the project
Build an Android or iOS app for your hardware with no coding!
Project info
Items used in this project
Hardware components
Story
I like experimenting with new things. Specially, when new things are something I really want and need.
In this project, I am going to play with Blynk, an awesome Android and iOS app that allows you to connect any hardware to the app.
Imagine a prototyping board on your smartphone where you drag and drop buttons, sliders, displays, graphs and other functional widgets. And in a matter of minutes these widgets can control and get data from Arduino, Raspberry Pi, and in my case Particle Core and Photons!
Starting to sound amazing? Read on!
UPDATE: Blynk is getting even more awesome!
From now on you are able to share the “Apps" you’ve made with Blynk with your family, friends or even customers.
Check the sharing feature here.
The project
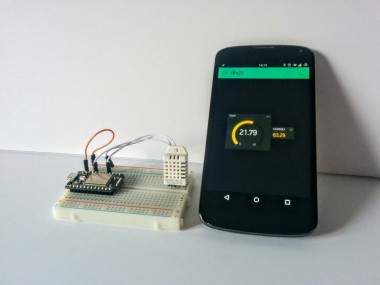
I decided to add Blynk to a simple project that I've built in the past to monitor the temperature and humidity of my house.
A DHT22 is plugged into a Particle core. If you are already familiar with this wifi dev kit, it comes with a cloud, standard. This cloud allows you to make rest requests to get information and trigger functions in your Photon or Core, check if your device is online, etc.
There is another tool that comes standard (oh, wait, there are sooo many tools that come with it!) with a Particle wifi dev kit: the Particle dashboard.
Think of it as a virtual serial cable connected via the internet from your Particle to your browser. You can monitor the events published by your Particle with no wires.
Now this Particle dashboard might not be enough to interact with your projects. It is work in progress, and so far you can receive all the events your Particles publish and that's it.
Don't get me wrong, I am grateful for having it and I think it is pretty good stuff for troubleshooting and monitoring your projects. It's just that you cannot add controls to modify variables or trigger functions in your Particles. This was at one point hinted by the devs, but sadly not implemented yet - hey, thousand new things got implemented, so I can't complain at all.
Now if what you want is to control variables or trigger functions, in other words, control your projects from your phone or tablet, you may have to code an app yourself. The guys at Particle provide Android and iOS SDKs, but still, you have to learn how to code your app in each of those two platforms.
Meet Blynk
Now, what I understand these guys at Blynk did, is to create another cloud (the Blynk server) where to connect different hardware, be it arduino, raspberry pi, particles (and more! yeah - the list is amazing), and expose that cloud to a beautiful app where you build your own controls and dashboards, with only few taps of your fingers!
From a maker's perspective, life gets so easy with things like these!
My first dashboard in Blynk
I downloaded the app on my phone from Google Play (iOS app here) and created a new account.
I went to the Particle IDE (called build), added to my Particle firmware the blynk library, added few lines of code for exposing variables to the blynk cloud and flashed the new code to my dev kit. That was it for the hardware/firmware side.
Now I needed to add some widgets on the blynk app. In this case I grabbed a value display and a gauge. This combination does not look pretty, it's just that I wanted to experiment with different widgets :)
Conclusion
In less than half an hour I had added an Android app to my project, no coding efforts.
Temperature and humidity where at the tip of my fingers in such a pretty way that would cost me countless hours of Java programming for Android. Imagine now repeating the experiment in my friend's iPhone! Forget it.
With Blynk, I can share my project with a friend, and they can load it and use it in their projects. How much more awesome can it get?
Wait, it can. Just scan the following QR code with your blynk app and you get my dashboard:
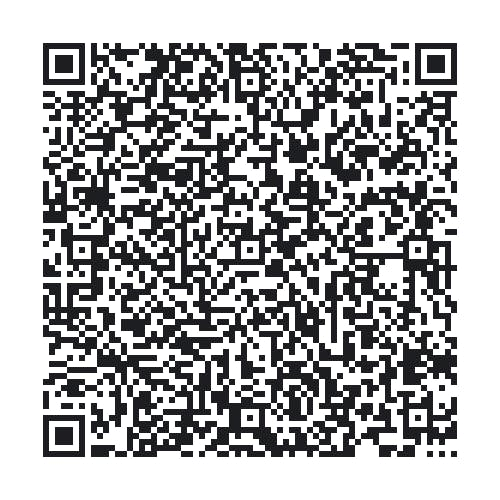 Open Blynk and scan this qr code
Another example
I find this resource very well done.
Troubleshooting
- If you get a reading of -2, most probably there is a problem with the wiring. Go back to the schematic and see if something is not wired properly
- If your reading is over your other devices or thermostats by a couple of degrees, I have experienced that and there is no way of calibrating the DHT22 as far as I know. Know that the proximity to the Particle could help raise the temperature reading.
- If you were using the project for a long time (weeks?) and then your Particle became not responsive, then maybe you hit the issue described by Owen de Long. The fix is on its way.
Expansions/Changes
- If you require more than one DHT22 sensor, then please take a look at this example from the original author of the DHT22 library.
- If you are using a DHT11, then please modify this line of code:
#define DHTTYPE DHT22 // Sensor type DHT11/21/22/AM2301/AM2302
to look like this:
#define DHTTYPE DHT11 // Sensor type DHT11/21/22/AM2301/AM2302
The end
So, did you build something similar? are you planning to? any questions?
Feel free to leave me a note below,
Gustavo.
Psst: please find my other projects here.
Help
If you require professional help with your projects, don't hesitate to write me a line about your needs at gusgonnet@gmail.com. Thank you!
Schematics, diagrams and documents
Code
Credits
Related products


Leave your feedback...