
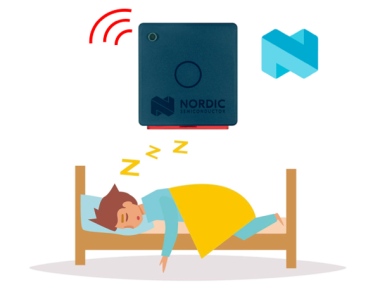
Snoring Detection Using Nordic Thingy:53

Made by knaveen / Artificial intelligence / Health / Voice
About the project
Using a Tensorflow Lite Micro model this edge device keeps an ear out and buzzes if you are snoring.
Project info
Difficulty: Difficult
Platforms: Edge Impulse, Nordic Semiconductor, TensorFlow
Estimated time: 2 days
License: GNU General Public License, version 3 or later (GPL3+)
Items used in this project
Software apps and online services
Story
Snoring is estimated to affect 57% of men and 40% of women in the United States, and over 40% of adults in the UK snore regularly. It even occurs in up to 27% of children. These statistics demonstrate snoring is widespread, but its severity and health implications can vary. Snoring can be light, occasional, and unconcerned, or it may be the sign of a serious underlying sleep-related breathing disorder. Snoring is caused by the rattling and vibration of tissues near the airway in the back of the throat. During sleep, the muscles loosen, narrowing the airway, and as we inhale and exhale, the moving air causes the tissue to flutter and make noise. Obstructive sleep apnea is a breathing disorder in which the airway gets blocked or collapsed during sleep, causing repeated lapses in the breath. Snoring is one of the most common symptoms of obstructive sleep apnea. Unless someone else tells them, most people who snore are not aware of it, and this is part of why sleep apnea is underdiagnosed. In this project, I have built a proof of concept of a non-invasive low-powered edge device that monitors and buzzes if you are snoring.
Hardware Selection
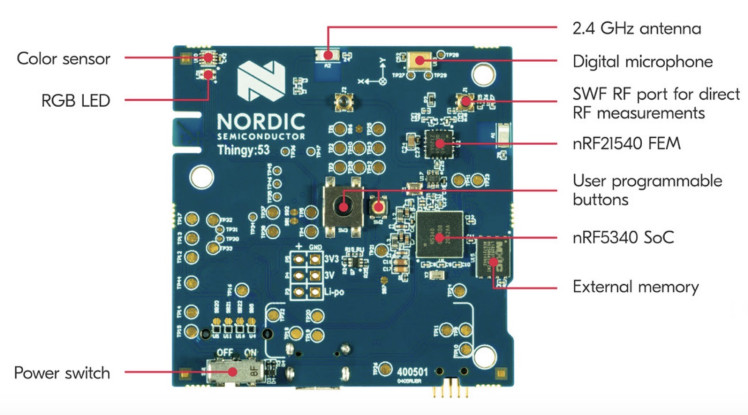
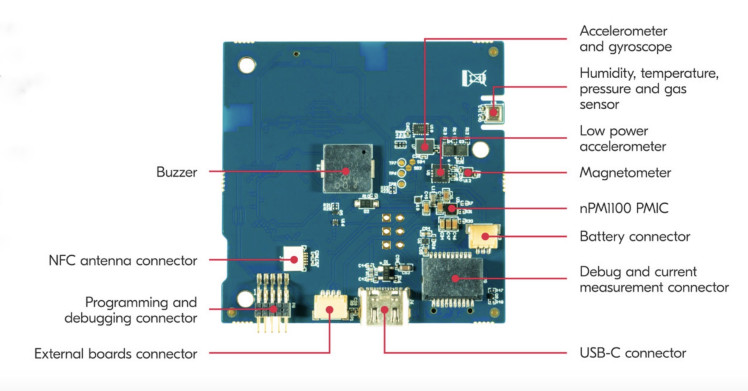
We are using Nordic Thingy:53 which is built around the nRF5340 SoC. The application core processing power (128 MHz) and memory size (512 KB RAM) of its dual Arm Cortex-M33 processors enables it to run embedded machine learning models directly on the device. The slim-profile case and inbuilt battery make it portable and a good fit for our purpose.
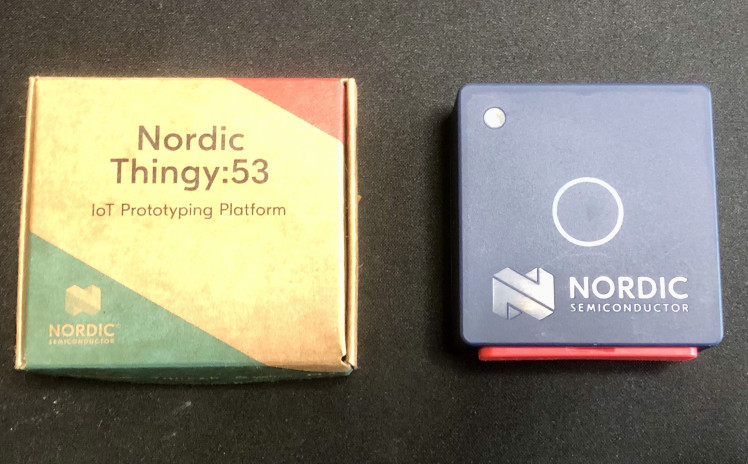
It has many onboard sensors (see the internal layout in the image below) but we will be using the PDM microphone, Buzzer, and RGB LED in this project.
Setup Development Environment
First, we need to download nRF connect for Desktop from here:
https://www.nordicsemi.com/Software-and-tools/Development-Tools/nRF-Connect-for-desktop/Download.
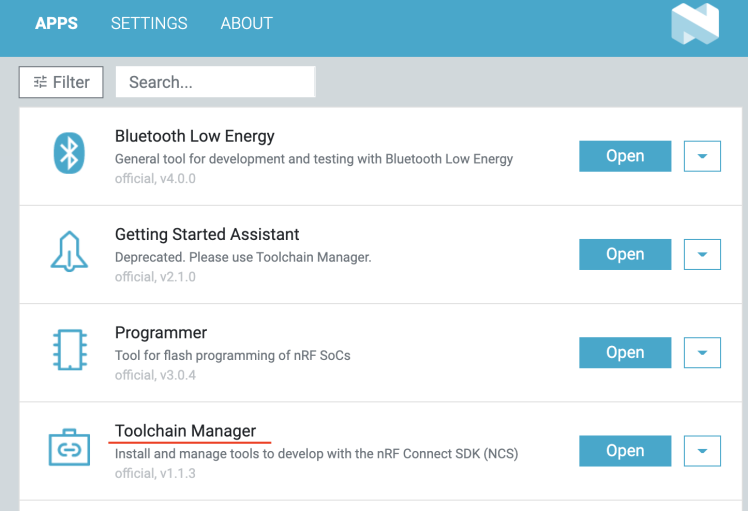
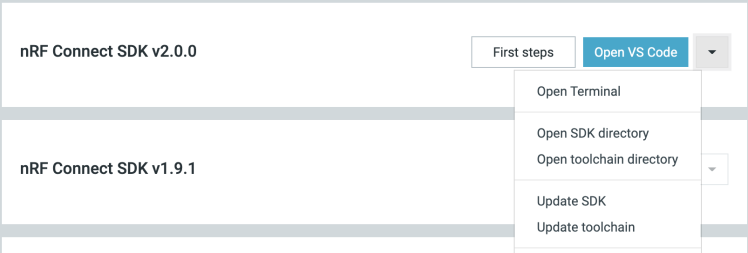
The nRF Connect for Desktop is a cross-platform tool that enables testing and development with nRF5340. Please follow the installation guide in the link above. When the installation is completed, open the app and click on the Toolchain Manager and choose nRF Connect SDK v2.0.0.

By default, the SDK is installed at the /opt/nordic/ncs directory in MacOS. After installation, click on the Open Terminal which opens up a command line terminal with all environment variables initialized to get started quickly with the development.
We are using Edge Impulse Studio for the feature generation and TensorFlow Lite model creation and training. We need to sign up for a free account at https://studio.edgeimpulse.com and create a project to get started. For the local development work, MacOS is used.
Data Collection
We have used Audioset, a large-scale dataset of manually annotated audio events, to download Snoring and other nature sounds which may occur during the night. AudioSet consists of an expanding ontology of 632 audio event classes and a collection of human-labeled 10-second sound clips drawn from YouTube videos. The audio is extracted from the YouTube videos of the select events and converted into Waveform Audio file format (wav) with a 16-bit depth mono channel at a 16KHz sample rate. The following categories selected from the Audioset Ontology are downloaded. The first column is the category ID and the second column is the category label.
- /m/01d3sd Snoring
- /m/07yv9 Vehicle
- /m/01jt3m Toilet flush
- /m/06mb1 Rain
- /m/03m9d0z Wind
- /m/07c52 Television
- /m/06bz3 Radio
- /m/028v0c Silence
- /m/03vt0 Insect
- /m/07qjznl Tick-tock
- /m/0bt9lr Dog
- /m/01hsr_ Sneeze
- /m/01b_21 Cough
- /m/07ppn3j Sniff
- /m/07pbtc8 Walk, footsteps
- /m/02fxyj Humming
- /m/07q6cd_ Squeak
- /m/0btp2 Traffic noise, roadway noise
- /m/09l8g Human Voice
- /m/07pggtn Chirp, tweet
- /t/dd00002 Baby cry, infant cry
- /m/04rlf Music
The datasets are divided into two categories, Snoring and Noise. Two CSV files are created snoring.csv and noise.csv by filtering the balanced train, unbalanced train, and evaluation datasets CSV files that contain YouTube clip URLs and other metadata can be downloaded from here.
The below bash script (download. sh) is used to download the video clip and extract the audio as a wav file. Please install youtube-dl and ffmpeg before running the command below.
- #!/bin/bash
- SAMPLE_RATE=16000
- # fetch_youtube_clip(videoID, startTime, endTime)
- fetch_youtube_clip() {
- echo "Fetching $1 ($2 to $3)..."
- outname="$1_$2"
- if [ -f "${outname}.wav" ]; then
- echo "File already exists."
- return
- fi
- youtube-dl https://youtube.com/watch?v=$1
- --quiet --extract-audio --audio-format wav
- --output "$outname.%(ext)s"
- if [ $? -eq 0 ]; then
- yes | ffmpeg -loglevel quiet -i "./$outname.wav" -ar $SAMPLE_RATE
- -ac 1 -ss "$2" -to "$3" "./${outname}_out.wav"
- mv "./${outname}_out.wav" "./$outname.wav"
- else
- sleep 1
- fi
- }
- grep -E '^[^#]' | while read line
- do
- fetch_youtube_clip $(echo "$line" | sed -E 's/, / /g')
- done
To execute the script run the command below.
- $ cat noise.csv | ./download.sh
- $ cat snoring.csv | ./download.sh
The datasets are uploaded to the Edge Impulse Studio using the Edge Impulse Uploader. Please follow the instructions here to install Edge Impulse CLI tools and execute the commands below.
- $ edge-impulse-uploader --category split --label snoring snoring/*.wav
- $ edge-impulse-uploader --category split --label noise noise/*.wav
The commands above also split the datasets into training and testing samples. We can see the uploaded datasets on the Edge Impulse Studio's Data Acquisition page.
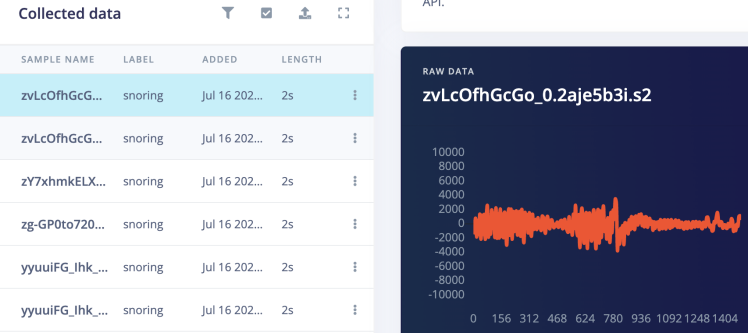
The Snoring events audio clips have background noise in between multiple snoring events which are removed from the clips by splitting the segments. The Noise category audio clips are used without any modifications.
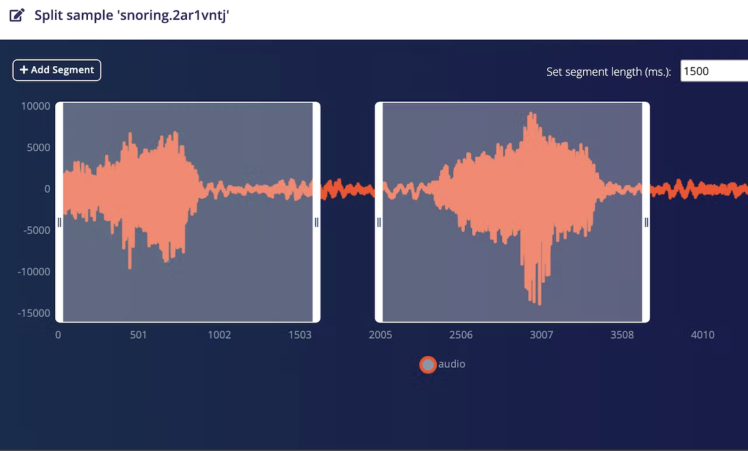
We can do splitting by selecting each sample and clicking on a Split sample from the drop-down menu but it is time-consuming and tedious work. Luckily there is an Edge Impulse SDK API that can be used to automate the process.
- import json
- import requests
- import logging
- import threading
- API_KEY = "<Insert Edge Impulse API Key here from the Dashboard > Keys"
- projectId = "<Your project ID, can be found at Edge Impulse dashboard"
- headers = {
- "Accept": "application/json",
- "x-api-key": API_KEY
- }
- def segment(tid, ids):
- for sampleId in ids:
- url1 = "https://studio.edgeimpulse.com/v1/api/{}/raw-data/{}/find-segments".format(projectId, sampleId)
- payload1 = {
- "shiftSegments": True,
- "segmentLengthMs": 1500
- }
- response1 = requests.request("POST", url1, json=payload1, headers=headers)
- resp1 = json.loads(response1.text)
- segments = resp1["segments"]
- if len(segments) == 0:
- continue
- payload2 = {"segments": segments}
- url2 = "https://studio.edgeimpulse.com/v1/api/{}/raw-data/{}/segment".format(projectId, sampleId)
- response2 = requests.request("POST", url2, json=payload2, headers=headers)
- logging.info('{} {} {}'.format(tid, sampleId, response2.text))
- if __name__ == "__main__":
- format = "%(asctime)s: %(message)s"
- logging.basicConfig(format=format, level=logging.INFO,
- datefmt="%H:%M:%S")
- querystring = {"category":"testing", "excludeSensors":"true"}
- url = "https://studio.edgeimpulse.com/v1/api/{}/raw-data".format(projectId)
- response = requests.request("GET", url, headers=headers, params=querystring)
- resp = json.loads(response.text)
- id_list = list(map(lambda s: s["id"], resp["samples"]))
- div = 8
- n = int(len(id_list) / div)
- threads = list()
- for i in range(div):
- if i == (div - 1):
- ids = id_list[n*i: ]
- else:
- ids = id_list[n*i: n*(i+1)]
- x = threading.Thread(target=segment, args=(i, ids))
- threads.append(x)
- x.start()
- for thread in threads:
- thread.join()
- logging.info("Finished")
Training
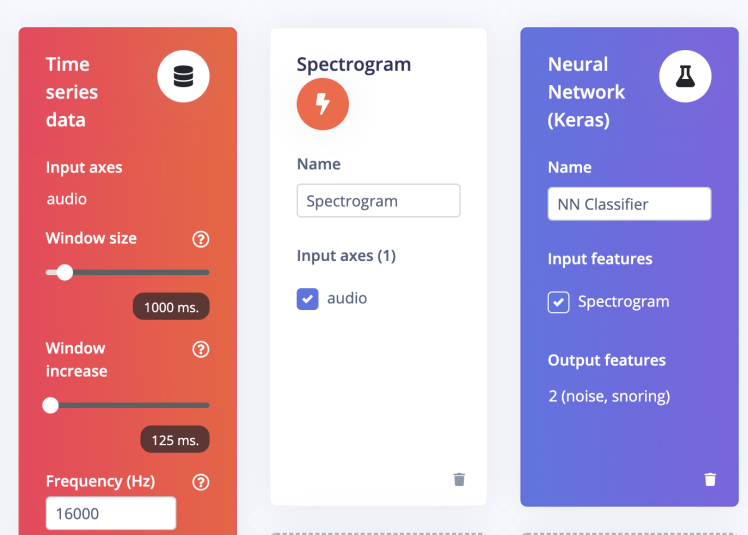
Go to the Impulse Design > Create Impulse page and click on the Add a processing block and choose Spectrogram which is a visual way of representing the signal strength, or “loudness”, of a signal over time at various frequencies present in a particular waveform. Also, on the same page click on the Add a learning block and choose Neural Network (Keras) which learns patterns from data, and can apply these to new data. We have chosen a 1000ms Window size and a 125ms Window increase. Now click on the Save Impulse button.
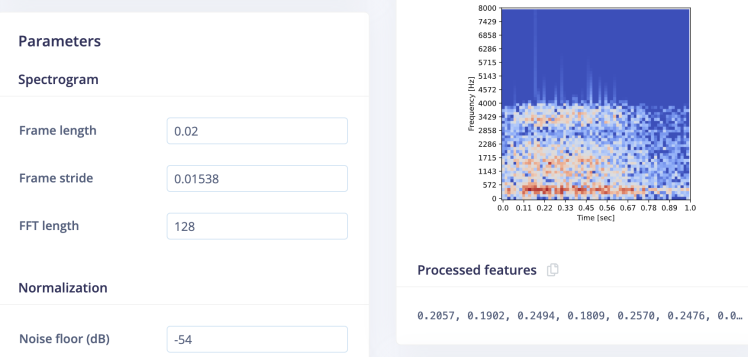
Now go to the Impulse Design > Spectrogram page and change the parameters as shown in the image below and click on the Save parameters button. We have chosen Frame Length = 0.02s, frame stride = 0.01538s, frequency bands = 128 (FFT size), and Noise floor = -54 dB. The Noise floor is used to filter out the background noise in the spectrogram. It first divides the window into multiple overlapping frames. The size and number of frames can be adjusted with the parameters of Frame length and Frame stride. For example, with a window of 1000ms, frame length of 20ms, and stride of 15.38ms, it will create 65 time frames. Each time frame is then divided into frequency bins using an FFT (Fast Fourier Transform) and we compute its power spectrum. The number of frequency bins equals the Frequency bands parameter divided by 2 plus 1. The features generated by the Spectrogram block are equal to the number of generated time frames times the number of frequency bins.
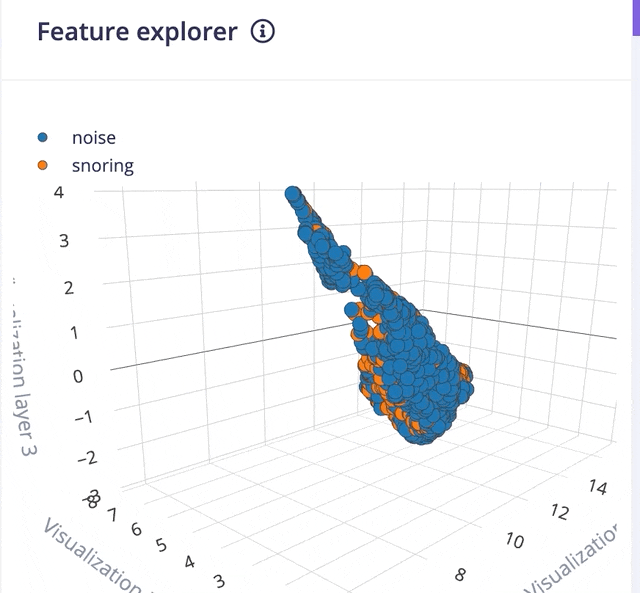
Clicking on the Save parameters button redirects us to another page where we should click on Generate Feature button. It usually takes a couple of minutes to complete feature generation. We can see the 3D visualization of the generated features in Feature Explorer.
Now go to the Impulse Design > NN Classifier page and select Switch to Keras (expert) mode from the drop-down menu and define the model architecture. There are many off-the-shelf audio classification models available but they have a large number of parameters hence not suitable for microcontrollers with 256KB or less memory. After a lot of trials, we have created a model architecture shown below.
- import tensorflow as tf
- from tensorflow.keras.models import Sequential
- from tensorflow.keras.layers import Reshape, Conv2D, Flatten, ReLU, Dropout, MaxPooling2D, Dense
- from tensorflow.keras.optimizers.schedules import InverseTimeDecay
- from tensorflow.keras.optimizers import Adam
- from tensorflow.keras.layers.experimental import preprocessing
- sys.path.append('./resources/libraries')
- import ei_tensorflow.training
- channels = 1
- columns = 65
- rows = int(input_length / (columns * channels))
- norm_layer = preprocessing.Normalization()
- norm_layer.adapt(train_dataset.map(lambda x, _: x))
- # model architecture
- model = Sequential()
- model.add(Reshape((rows, columns, channels), input_shape=(input_length, )))
- model.add(preprocessing.Resizing(24, 24, interpolation='nearest'))
- model.add(norm_layer)
- model.add(Conv2D(16, kernel_size=3))
- model.add(ReLU(6.0))
- model.add(Conv2D(32, kernel_size=3))
- model.add(ReLU(6.0))
- model.add(MaxPooling2D(pool_size=2, strides=2, padding='same'))
- model.add(Dropout(0.7))
- model.add(Flatten())
- model.add(Dense(64))
- model.add(ReLU(6.0))
- model.add(Dense(32))
- model.add(ReLU(6.0))
- model.add(Dense(classes, activation='softmax', name='y_pred'))
- BATCH_SIZE = 64
- lr_schedule = InverseTimeDecay(
- 0.0005,
- decay_steps=train_sample_count//BATCH_SIZE*15,
- decay_rate=1,
- staircase=False)
- def get_optimizer():
- return Adam(lr_schedule)
- EPOCHS = 70
- train_dataset = train_dataset.batch(BATCH_SIZE, drop_remainder=False)
- validation_dataset = validation_dataset.batch(BATCH_SIZE, drop_remainder=False)
- callbacks.append(BatchLoggerCallback(BATCH_SIZE, train_sample_count, EPOCHS))
- # train the neural network
- model.compile(loss='categorical_crossentropy', optimizer=get_optimizer(), metrics=['accuracy'])
- model.fit(train_dataset, epochs=EPOCHS, validation_data=validation_dataset, verbose=2, callbacks=callbacks)
While defining the model architecture we have tried our best to optimize it for the TinyML use case. Since 64x65 single channel spectrogram features would have large numbers of training parameters and the compiled model would not fit into the available microcontroller RAM, we have resized the spectrogram to 24x24 size which is a sweet spot for size vs accuracy of the model. Also, we have used restricted-ranged activation (ReLU6) because ReLU6 restricts the output to [0, 6] and the post-training quantization does not degrade the accuracy. The model summary is given below.
- Model: "sequential"
- _________________________________________________________________
- Layer (type) Output Shape Param #
- =================================================================
- reshape (Reshape) (None, 64, 65, 1) 0
- _________________________________________________________________
- resizing (Resizing) (None, 24, 24, 1) 0
- _________________________________________________________________
- normalization (Normalization (None, 24, 24, 1) 3
- _________________________________________________________________
- conv2d (Conv2D) (None, 22, 22, 16) 160
- _________________________________________________________________
- re_lu (ReLU) (None, 22, 22, 16) 0
- _________________________________________________________________
- conv2d_1 (Conv2D) (None, 20, 20, 32) 4640
- _________________________________________________________________
- re_lu_1 (ReLU) (None, 20, 20, 32) 0
- _________________________________________________________________
- max_pooling2d (MaxPooling2D) (None, 10, 10, 32) 0
- _________________________________________________________________
- dropout (Dropout) (None, 10, 10, 32) 0
- _________________________________________________________________
- flatten (Flatten) (None, 3200) 0
- _________________________________________________________________
- dense (Dense) (None, 64) 204864
- _________________________________________________________________
- re_lu_2 (ReLU) (None, 64) 0
- _________________________________________________________________
- dense_1 (Dense) (None, 32) 2080
- _________________________________________________________________
- re_lu_3 (ReLU) (None, 32) 0
- _________________________________________________________________
- y_pred (Dense) (None, 2) 66
- =================================================================
- Total params: 211,813
- Trainable params: 211,810
- Non-trainable params: 3
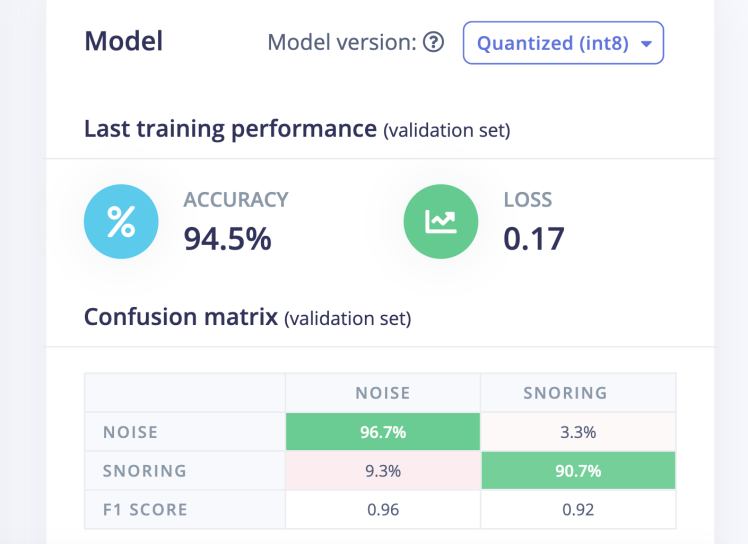
Now click on the Start Training button and wait for around an hour until training is completed. We can see the Training output and confusion matrix below. The model has 94.5% accuracy.
Deployment
Since we will be deploying the model at Nordic Thingy:53, on the Deployment page we will choose the Create Library > C++ library option. For the Select optimization option, we will choose Enable EON Compiler which reduces the memory usage of the model. Also, we will opt for the Quantized (Int8) model. Now click on the Build button and in a few seconds the library bundle will be downloaded to the local computer. For inferencing, we have created a new Zephyr project which borrows most of the code from the Edge Impulse Thingy:53 firmware project and can be cloned from the GitHub repository.
- $ git clone https://github.com/metanav/thingy53_snoring_detection.git
Now unzip the downloaded library bundle and copy the following directories to the ei-model directory under the project root directory.
- edge-impulse-sdk
- model-parameters
- tflite-model
Build and flash the firmware
Execute the command below in the terminal by opening it using the Toolchain manager as described in the Setup Development Environment section.
- $ cd /opt/nordic/ncs/v2.0.0/thingy53_snoring_detection
- $ west build -b thingy53_nrf5340_cpuapp
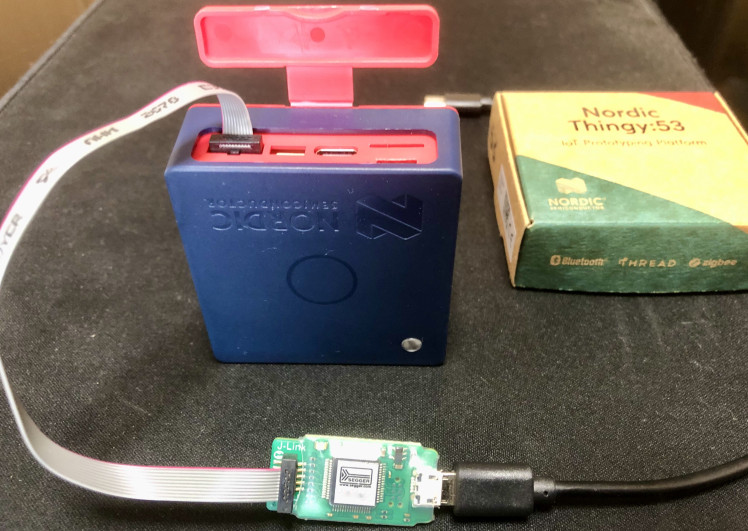
There are many ways to flash firmware to the Nordic Thingy:53. We are using a J-Link Edu Mini, an external debug probe, to flash the firmware by following the steps below.
- Open the connector cover on the side of the Nordic Thingy:53 (see the image below).
- Use a JTAG cable to connect the Nordic Thingy:53 to the debug out port on a 10-pin external debug probe.
- Power on the Nordic Thingy:53; move the power switch SW1 to the ON position.
- Connect the external debug probe to the computer with a micro-USB cable.
After setting up the hardware, execute the command below.
- $ west flash
Once the flashing is completed successfully, the application starts running.
Inferencing Demo
The application samples 1000 ms of audio data at 16KHz sample rate from the onboard PDM microphone and runs the inferencing continuously. When it detected the snoring sound, the onboard RGB LED turns green and the buzzer starts beeping. To avoid false positives, the last 10 predictions are stored in a ring buffer to make decision. The inferencing logs can be monitored over USB serial connection at 115200 baud rate. The inferencing rate is below 100ms per sample.
- Predictions (DSP: 18 ms., Classification: 66 ms., Anomaly: 0 ms.):
- noise: [0.88]
- snoring: [0.12]
Conclusion
This project presents a solution for a real-life problem that seems funny but needs careful attention. It is an easy-to-use and convenient device that respects users' privacy by running the inferencing at the edge. Although the TensorFlow Lite Micro model runs quite well, there is still room for improvement. With more curated training data the model can be made more accurate and robust. This project also showcases that a simple neural network can be used to solve complex problems with signal processing done correctly and run on low-powered resource-constrained devices, like Nordic Thingy:53.
Code
Credits
Related products

Leave your feedback...