
Smart Home: Fall Alert Monitoring For The Elderly

About the project
Build a battery-powered, cellular enabled, fall alert system with the Thingy:91 to monitor for any falls by the elderly!
Project info
Difficulty: Moderate
Platforms: Edge Impulse, Nordic Semiconductor
Estimated time: 5 hours
License: MIT license (MIT)
Items used in this project
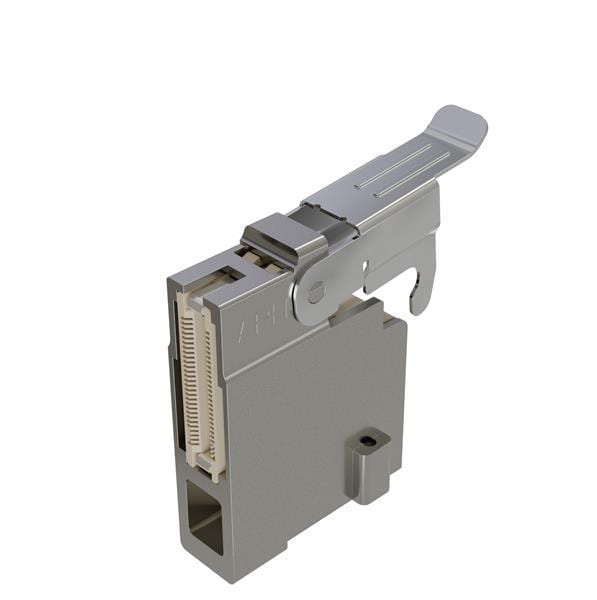
Hardware components

Software apps and online services
Story
Falls can be very dangerous for the elderly. They can result in fractures and disability and the risk of falls increases with age. I had an experience where a family member experienced a fall at home, and it took some time before anyone was alerted because she could not reach the phone and could not move. In more serious cases, the elderly might be unconscious, which makes immediate help absolutely time critical.
Apart from making the environment as safe as possible from falls, fall alerting is an important piece of the overall picture to ensure the safety of the elderly as no matter how many bars and anti-slip mats you put in place, there still remains the risk of falls.
Sketching out the Project
I decided that I needed a portable device that is easy to wear with accelerometers and a wireless radio to transmit back the sensor data. I initially considered WiFi and Bluetooth technologies, but these are highly dependent on having a hub to bridge the data back to any alerting service that I would write. If for any reason power failed or the elderly left the area of the hub, then the device would be functionally useless. It also makes for a more complicated installation and area survey of different locations to determine if there is sufficient infrastructure to support the device. Not all elderly have WiFi or Ethernet that connects back to the Internet in place. Maintaining a separate infrastructure tied to a place of residence belonging to someone else is a whole other issue.
Therefore in this particular instance, cellular technologies, whether CAT-M1, MB-IoT, or LTE, is the better choice as the device would not be sending back reels of data. It would send an occasional heartbeat message, and an alerting message when it detects a fall. With such low bandwidth requirements, cellular is a good choice as it ensures connectivity no matter where the elderly person is, and is completely independent of any fixed infrastructure.
Nordic Thingy:91 x Edge Impulse Studio
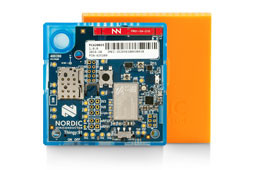
Enter the Nordic Thingy:91. It is an all-in-one cellular prototyping platform that is designed to show of the capabilities of the celluar nRF9160 IC from Nordic. It features a host of environment sensors, an accelerometer, as well as a battery, which is makes it ideal for my project and forms the core of the sensor and data transmission side of the solution
Edge Impulse forms the fall detection side of the house. By utilizing the C libraries provided by Edge Impulse, we can quickly create and embed machine learning algorithms into the Thingy:91, allowing an additional level of sophistication in determining falls from the noisy sensor data.
This project will be self-contained by utilizing the sensors available on the Thingy:91. By collecting the sensor data and feeding it into Edge Impulse Studio, I will be able to generate a machine learning model suitable to be deployed in my system. Because a fall is such a rare event, rather than trying to use classification, I decided it is better to use anomaly detection instead of type classification.
Utilizing the onboard nRF9160, we can then send a message to a cloud service to inform our user that a fall is detected, enabling a fast response for emergency services or other household members. In case a false-positive was detected, the wearer can also press a user button on the Thingy:91 to cancel the outgoing message, making it a robust system that can take false alarms into account with user interaction.
Collecting Data with the Thingy:91
In order to start collecting the data for training the model, I felt that it was important for the environment to be as realistic as possible. That means that it shouldn't be piping the data back to the computer over a connected UART cable as this would influence the accelerometer readings and potentially result in a mismatch against the trained environment and the real environment.
Ensure that the Thingy:91 has the Power switch set to 'On' and the SWD Select Switch set to 'nRF91'. Connect the Thingy:91 to your computer and you should see a USB drive be connected.

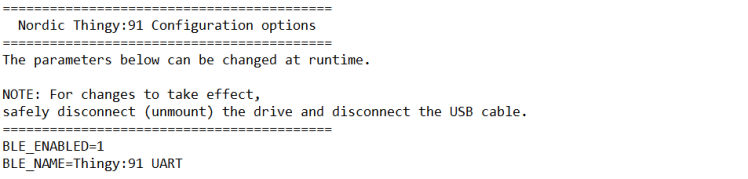
Open Config.txt and set BLE_ENABLED=1. This will enable the printf and debug outputs to be available over BLE, which will allow us to collect data wirelessly.
Next, download and install nRF Connect on your mobile device. It should be able to see the Thingy:91 BLE device. As of now if you connect and open the debug screen, there would not be any data. Install nRF Connect SDK for VSCode and pull the repository for this project from git by either downloading the zip file of the git or doing a git clone.
Set up and compile the adxl362-data-collection project in VSCode. Because the Thingy:91 does not have any onboard debugger, we will need to use MCUboot to flash the binary to the Thingy:91. Download nRF Connect for Desktop if you have not already done so

When the project has finished compiling, hold the Multi-use Button (the center button) of the Thingy:91 while turning it on to set it in MCUboot recovery mode. Open nRF Connect for Desktop and select the Thingy device, and add the compiled file from (project-home)/build/zephyr/app_signed.hex. Start the flashing process when the file is loaded.

Once the Thingy:91 is flashed, turn off and on the device again.
Once the Thingy:91 is flashed, when the button (the center button) on the Thingy:91 is pressed, the Thingy:91 will light the Red LED in the light well to indicate that it is collecting data and will start to broadcast the data over BLE. If nRF Connect is connected, upon opening the debug log, you will be able to see the accelerometer readings. The system will take data for a period of time before it stops (the RED led will also turn off), allowing different sets of data to be delineated clearly and collected.
At this point I started moving around. To keep the model simple for now, I decided to have three different motions: walking, sitting and falling. The process was simple:
- Get ready to perform motion
- Press button on Thingy:91 - when the red LED turns on, perform motion
- Once the red LED turns off, stop motion. Download the log data from nRF Connect and clear the log.
- Repeat steps 1-3 to collect as many sets of data as desired
Once I had the data, I ran the data_processing/matchNRFlog python script in the repo to process the log files into a csv format that is suitable for Edge Impulse.
Creating and Training the Model
In Edge Impulse, create a new Impulse
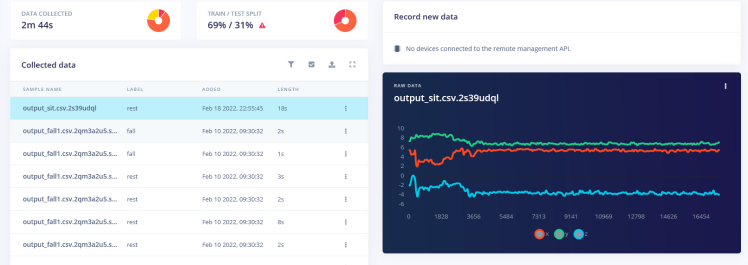

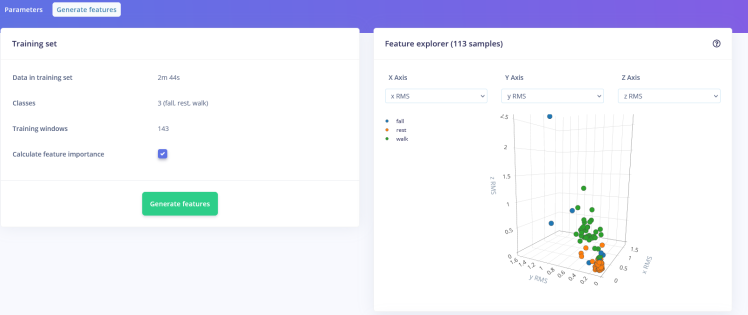
Once the features are generated it is time to start the training. As you can see up till so far, implementing the machine learning model has been pretty easy to use through Edge Impulse, with no code required to implement the model. After training, we can see that the model performs quite well, classifying and grouping most of the test data within existing sets, with falls being clear outliers. The visualization helps us to confirm that our model is working as expected.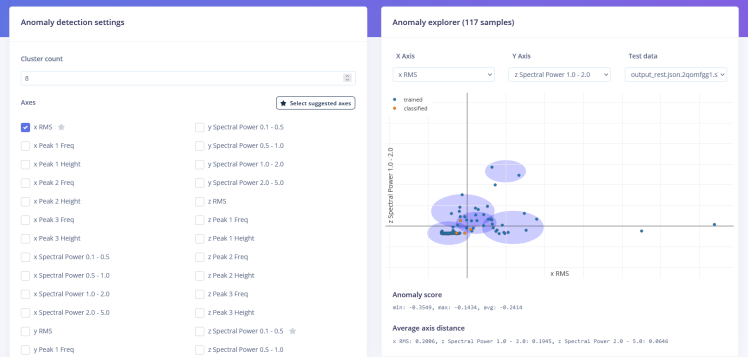
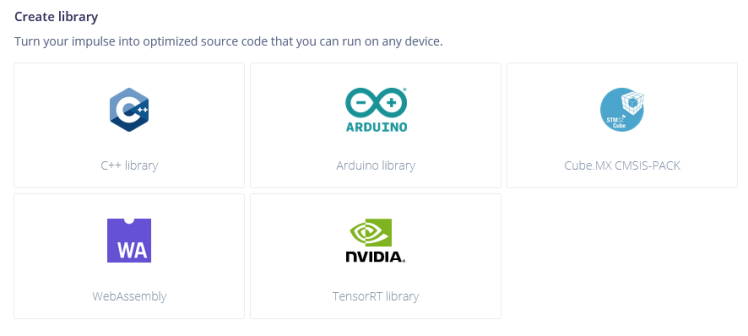
Finally, we will need to export the model, which can be done under the Deployment tab in the project. Because we are using Zephyr, we will export it as a C++ library and then copy and paste it into our existing project under the https_client project.
Setting up Cloud Services
The Cloud Services will allow us to send an SMS to anyone, anywhere on Earth, instantly when the conditions for a fall are met without having to maintain our own systems.
- Register for GCP, Cloudflare and Twilio accounts
- For GCP, enable the Cloud Functions API.
- For Twilio, register for a phone number
In Twilio, once you have registered a phone number that you will be sending the alerts from, create a messaging service. Once you have done so, you will have four pieces of information:
- Account ID
- Account API Key
- Messaging SID
- Phone number
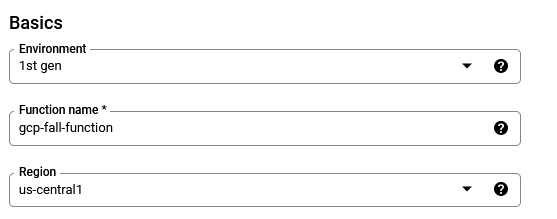
Next, log into the GCP console and create a new Cloud Function. Give it a memorable name and ensure unauthenticated invocations is set. A proper authentication method should be set up for a production system. Note down the URL you will be invoking your function from.

Under the Runtime settings, add in the runtime environment variables
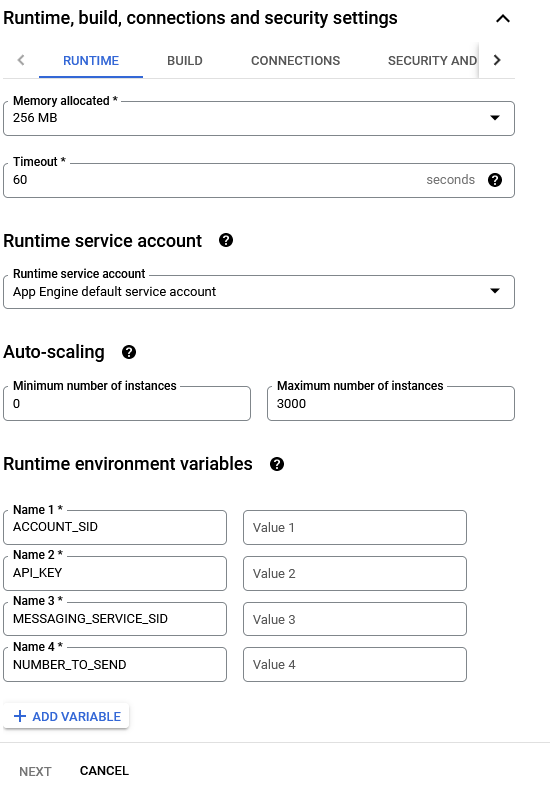
Upon creating the Cloud Function with the variables added, the code from the git repo can be pasted into main.js and package.json accordingly. Create the function and it will be ready to send out alert messages when it receives a HTTP get request at the URL endpoint specified. The last few numbers are the ID of the device, which allows for multiple devices to use this service.
GET http://gcp-cloud-function.com/alert/3212
You can try it by going to the address in your web browser, which will automatically issue a get request to the endpoint, triggering the GCP function which sends a Twilio API request which sends an SMS to your phone.
Finally, in Cloudflare, you can set up the worker service by creating a new service, and pasting the code in for the Cloudflare worker from the git repo, making sure to update the code to match the gcp cloud function's url. We are using the Cloudflare worker to forward the request to you because it has zero start time, which prevents our device from maintaining a long-lived connection while it waits for the serverless function to spin up.

That's the Cloud Services all set up!
Programming the Device
This last part is the easiest. From the C++ library downloaded from Edge Impulse, copy and paste into the main_code folder in the repository. In main.cpp, ensure that the HTTPS_HOSTNAME variable is set to your cloud function's url. If you wish, you can also modify the HTTPS_TEMPLATE variable to send a different ID. Compile and flash the Thingy:91 device.
Now when you fall, your phone should light up with an alert message as seen below. You can customize the alert message by editing the code to add more information like the time.
System
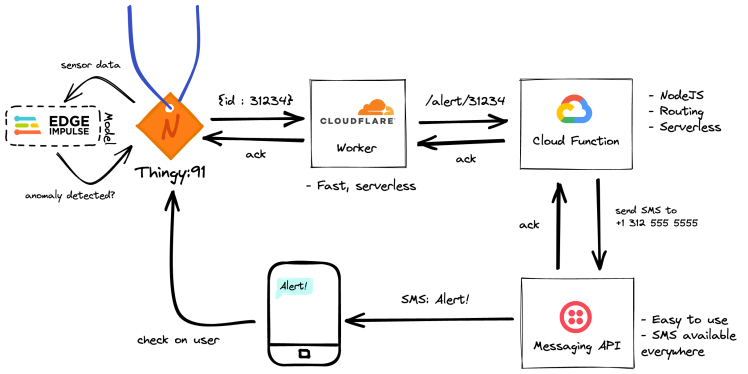
The alerting system is made from several pieces of software working in tandem. When the Edge Impulse model detects an anomaly, it triggers a process to send data out from the Thingy:91 over CAT-M1 to a Cloudflare Worker.
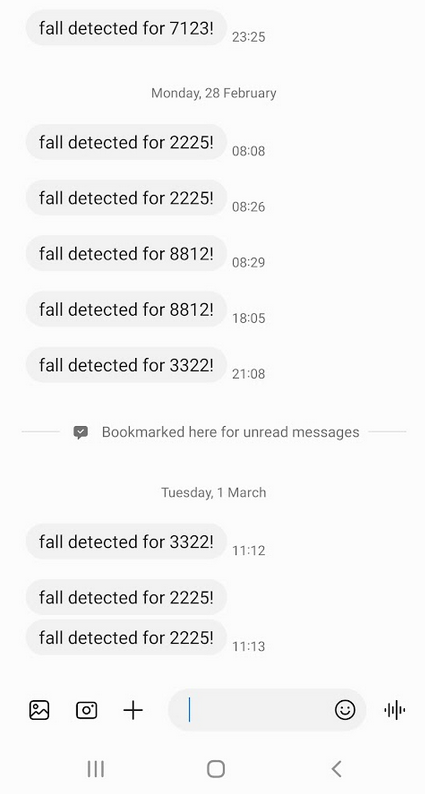
Alerts being received as SMSes
The key benefit of Cloudflare workers is that they have essentially zero cold start times, allowing it to respond immediately to the Thingy:91 while still waiting for the relatively slower Cloud Function to respond. This saves power for the device, allowing it to go to sleep as soon as possible once the data has been sent successfully.
The triggered Cloud Function houses more processing code that will take in the data from the Cloudflare worker. Once the data has been transmitted, it will then set up a Twilio API call to send an alert SMS to a predefined phone address.
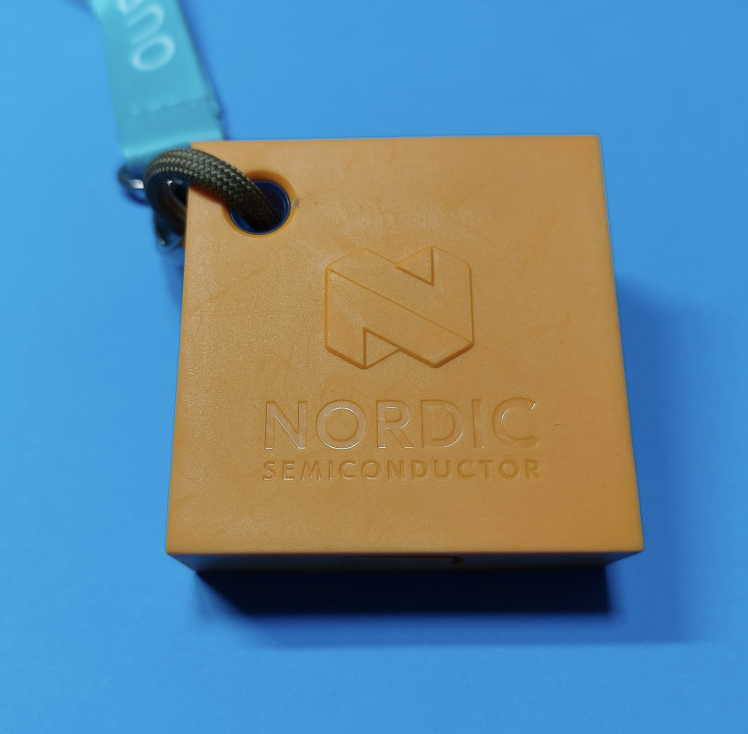
Thingy:91 with lanyard attached for easy wearing
Technology Considerations
Because data events are so rare, it makes sense to use serverless instances to save on time and cost that would have otherwise been spent on maintaining a server that spends 99% of its time waiting for a data event. The Cloudflare Worker that exists as the primary touchpoint for the Thingy:91 ensures that the response time is as good as a 'hot' server, while the Cloud Function incorporates more functionality that the Worker is unable to support.
I chose to use SMS because it is a ubiquitous protocol as compared to using a dedicated chatting app that may not be available everywhere. There is also a lower barriers to setting up SMS as anyone who has a phone an a mobile plan would have access to SMS.
Power design for wearable devices
Based off a 100mAh battery, which is the largest LiPo battery that can be designed to sit in a small wearable enclosure, the total power available is 360,000mC.
- LTE event data upload: 54.09mC (270.45mC)
- Sensor polling and MCU computation: 2.4 mA (2.4mAh = 8640mC)
This puts us effectively at 41.6h which is close to about a day's worth of power.
Obviously this is not ideal as keeping the application MCU running draws an enormous amount of power. This can be pared down further by using an ultra-low power MCU to collect the data from the sensor and run the inference at a much lower frequency than what the nRF9160 is capable of, which will allow up to 10 times as much power savings, greatly extending the battery life of the device.
Future Work
Future work specific to the Google Cloud Platform would include setting up BigQuery as a database to map device ids to phone numbers so that the system can be made available to multiple parties.
The benefit of the Cloudflare frontend is that the data can be retargeted to different cloud platforms, making it a cloud agnostic model. The Cloud Function could easily be replaced by an Azure Function or an Amazon Lambda.
The system could also be expanded to save and collate data over the last five minutes or so, with the idea that when there are false positives, the data will be transmitted over the LTE connection to Edge Impulse for retraining. The model can then be updated through a secure OTA firmware update process.
Communication channels can also be expanded from SMS to other messaging channels like email, chatting apps like WhatsApp or Telegram, or even a dedicated app to send alerts and save on messaging costs.
Schematics, diagrams and documents
CAD, enclosures and custom parts
Code
Credits
Related products

Leave your feedback...