
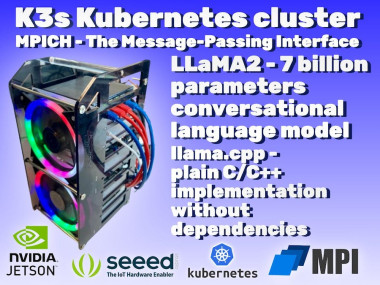
Running A Chatgpt-like Llm-llama2 On A Nvidia Jetson Cluster

Made by shakhizat / Artificial intelligence / Augmented Reality / Robotics
About the project
This project allows you to use a ChatGPT-like Large Language Model - LLaMA2 on an NVIDIA Jetson cluster.
Project info
Difficulty: Difficult
Platforms: Raspberry Pi, Seeed Studio, NVIDIA
Estimated time: 1 hour
License: GNU General Public License, version 3 or later (GPL3+)
Items used in this project
Hardware components

Story
Meta's LLaMA is one of the most popular open-source LLMs(Large Language Models) available today. LLaMA stands for Large Language Model Meta AI. LLaMa is a transformer language model from Meta research, which is a collection of large models from 7 billion to 65 billion parameters trained on publicly available datasets. Meta recently released LLaMA V2, which is now available for commercial use. LLaMA2 allows users to run on commodity hardware, making it more accessible and versatile. Llama 2 includes 7B, 13B and 70B models, trained on more tokens than LLaMA, as well as the fine-tuned variants for instruction-following and chat.
The development of the LLaMA 2 LLM model raises the question of whether it can be run on a consumer-grade hardware like Raspberry Pi or NVIDIA Jetson boards. The solution is presented in the project Llama.cpp, which achieves this by quantizing the LLaMA model parameters from 16-bit float to 4-bit integer format. This breakthrough enables the operation of extensive language models on consumer-grade CPU/GPUs.
Let's first dive into the tutorial for running the LLaMA2 7B model on the Nvidia Jetson. After that, my intention is to set up a small cluster of Nvidia Jetson boards to run the inference of the LLaMA2 7B model with the help of MPI and Kubernetes technologies.
Overview of Llama.cpp, running on a single Nvidia Jetson board with 16GB RAM from Seeed Studio.
Llama.cpp is the LLM runtime written in C++ by Georgi Gerganov. The main goal of Llama.cpp project is to run the LLAMA model with 4bit quantization on the commodity hardware. 4-bit quantized LLMs use only 4 bits per weight or activation. This means they take up much less memory and computation time than full-precision models. All these implementations are optimized to run on CPUs without GPUs. In other words, you only need enough CPU cores to load the models.
Supported platforms are:
- Mac OS
- Linux
- Windows (via CMake)
- Docker
llama.cpp supports multiple BLAS backends for faster processing. There are:
- OpenBLAS : A library for realizing high-speed matrix operations on CP
- cuBLAS : A library for realizing high-speed matrix operations on NVIDIA GPU
- CLBlast : A library for realizing high-speed matrix operations on OpenCL
First, I will check the inference results on the single NVIDIA Jetson board with 16GB RAM from Seeed Studio. I will use cuBLAS, which seems to be the fastest.
Confirm that CUDA is operating correctly on the NVIDIA Jetson board. Building Llama.cpp with cuBLAS library support requires CUDA to be correctly installed. If CUDA is not installed or not configured correctly, you will need to set up the CUDA environment. By default, it is comes with Jetpack OS.
Clone the Llama.cpp repository
git clone https://github.com/ggerganov/llama.cppNext, navigate to the cloned directory using the cd command:
cd llama.cppNow, compile the code using the cmake command:
mkdir build
cd build
cmake .. -DLLAMA_CUBLAS=ON
Navigate to the root of llama.cpp directory, where ggml.h file is located.
Open ggml.h in the text editor and replace the following lines
#ifdef __ARM_NEON
// we use the built-in 16-bit float type
typedef __fp16 ggml_fp16_t;
#else
typedef uint16_t ggml_fp16_t;
#endif
to
#if defined(__ARM_NEON) && !defined(__CUDACC__)
    // we use the built-in 16-bit float type
    typedef __fp16 ggml_fp16_t;
#elif defined(__ARM_NEON) && defined(__CUDACC__)
    typedef half ggml_fp16_t;
#else
    typedef uint16_t ggml_fp16_t;
#endif
Once you have made the changes to ggml.h, save the file. You can then compile using below cmake command.
cmake --build . --config ReleaseMain executable file and the tools to convert LLaMA models into ggml and convert into 4-bit is generated in llama.cpp/build/bin folder. Move main file to the root of llama.cpp.
Then, download the LLaMA2 weights. You can do this in two ways: either from the official Meta procedure, or directly from Hugging Face. As of now, you need to be approved to get weights from the official Meta procedure. You can find different models on the Hugging Face model hub. The model can be converted to fp16 and quantized to make it smaller, more performant, and runnable on consumer hardware.
I downloaded the llama-2-7b-chat.ggmlv3.q4_0.bin weight from the Hugging Face repository TheBloke/Llama-2-7B-Chat-GGML. When running the larger models, make sure you have enough disk space,
Finally, run the inference of the LLaMA2 model.
./main -m /llama.cpp/main -m /mnt/client_sharedfolder/llama/llama-2-7b-chat/ggml-model-q4_0.bin --temp 0.1 -p "### Instruction: Write a python code to find sum of two numbers ### Response:" -ngl 32 -b 512ngl parameter enables offloading computations to the GPU when running the model using the -ngl 32. The maximum number of layers is 32 for 7B and 40 for 13B.
If it is operating correctly, the following prompt will appear.
main: build = 975 (9ca4abe)
main: seed  = 1691741146
ggml_init_cublas: found 1 CUDA devices:
  Device 0: Xavier, compute capability 7.2
llama.cpp: loading model from /mnt/client_sharedfolder/llama/llama-2-7b-chat/ggml-model-q4_0.bin
llama_model_load_internal: format     = ggjt v3 (latest)
llama_model_load_internal: n_vocab    = 32000
llama_model_load_internal: n_ctx      = 512
llama_model_load_internal: n_embd     = 4096
llama_model_load_internal: n_mult     = 256
llama_model_load_internal: n_head     = 32
llama_model_load_internal: n_head_kv  = 32
llama_model_load_internal: n_layer    = 32
llama_model_load_internal: n_rot      = 128
llama_model_load_internal: n_gqa      = 1
llama_model_load_internal: rnorm_eps  = 5.0e-06
llama_model_load_internal: n_ff       = 11008
llama_model_load_internal: freq_base  = 10000.0
llama_model_load_internal: freq_scale = 1
llama_model_load_internal: ftype      = 2 (mostly Q4_0)
llama_model_load_internal: model size = 7B
llama_model_load_internal: ggml ctx size =    0.08 MB
llama_model_load_internal: using CUDA for GPU acceleration
llama_model_load_internal: mem required  =  474.96 MB (+  256.00 MB per state)
llama_model_load_internal: allocating batch_size x (512 kB + n_ctx x 128 B) = 288 MB VRAM for the scratch buffer
llama_model_load_internal: offloading 32 repeating layers to GPU
llama_model_load_internal: offloaded 32/35 layers to GPU
llama_model_load_internal: total VRAM used: 3763 MB
llama_new_context_with_model: kv self size  =  256.00 MB

system_info: n_threads = 3 / 6 | AVX = 0 | AVX2 = 0 | AVX512 = 0 | AVX512_VBMI = 0 | AVX512_VNNI = 0 | FMA = 0 | NEON = 1 | ARM_FMA = 1 | F16C = 0 | FP16_VA = 0 | WASM_SIMD = 0 | BLAS = 1 | SSE3 = 0 | VSX = 0 |
sampling: repeat_last_n = 64, repeat_penalty = 1.100000, presence_penalty = 0.000000, frequency_penalty = 0.000000, top_k = 40, tfs_z = 1.000000, top_p = 0.950000, typical_p = 1.000000, temp = 0.100000, mirostat = 0, mirostat_lr = 0.100000, mirostat_ent = 5.000000
generate: n_ctx = 512, n_batch = 512, n_predict = -1, n_keep = 0
When cuBLAS is enabled, logs such as using ggml_init_cublas: found 1 CUDA devices and BLAS = 1 will be displayed at startup.
Here is answer from the LLaMA2 model
### Instruction: Write a python code to find sum of two numbers ### Response:  Sure! Here is a simple Python function that takes two arguments and returns their sum: ```
 Unterscheidung between two numbers.
```
def add(x, y):
    return x + y
```
This function takes two arguments `x` and `y`, performs the addition operation on them, and then returns the result as the value of the function.

Here's an example of how you can use this function:
```
print(add(3, 5)) # Output: 8
```
This will print the sum of 3 and 5, which is 8.

I hope this helps! Let me know if you have any questions.
GPU result: 5 tokens/sec
llama_print_timings:        load time =  3085.28 ms
llama_print_timings:      sample time =   234.72 ms /   144 runs   (    1.63 ms per token,   613.50 tokens per second)
llama_print_timings: prompt eval time =  3754.70 ms /    18 tokens (  208.59 ms per token,     4.79 tokens per second)
llama_print_timings:        eval time = 27634.61 ms /   143 runs   (  193.25 ms per token,     5.17 tokens per second)
llama_print_timings:       total time = 31681.55 ms
We can also run using the cpu only by setting ngl paramater to 0
./main -m /llama.cpp/main -m /mnt/client_sharedfolder/llama/llama-2-7b-chat/ggml-model-q4_0.bin --temp 0.1 -p "### Instruction: Write a python code to find sum of two numbers ### Response:" -ngl 0 -b 512CPU result: 1 tokens/sec
llama_print_timings:        load time =  1624.67 ms
llama_print_timings:      sample time =   203.69 ms /   128 runs   (    1.59 ms per token,   628.39 tokens per second)
llama_print_timings: prompt eval time = 17891.04 ms /    19 tokens (  941.63 ms per token,     1.06 tokens per second)
llama_print_timings:        eval time = 133856.80 ms /   127 runs   ( 1053.99 ms per token,     0.95 tokens per second)
llama_print_timings:       total time = 152000.86 ms
Token generation is relatively slow when using CPU.

parameter -ngl 0

parameter -ngl 32
With default CPU settings, the 7B model clocked in at approximately 1 tokens per second. However, with full offloading of all 35 layers, this figure jumped to 5 tokens per second.
To find out more about the available flags and their function, run --help, or check the README.md in the llama.cpp repository.
./main --helpI have successfully installed Llama.cpp locally on Nvidia Jetson board. I can generate human-like text using machine learning LLMs directly from terminal.
Multi-node Kubernetes Jetson Cluster
As with single Nvidia Jetson board with many CPUs, we also have groups of Nvidia Jetson boards, which can be networked together into a Local Area Network. These used to be commonly referred to as Beowulf clusters.
Figure below shows my network configuration, of the three Nvidia Jetson computers, one is dedicated as a master and two are workers.

Figure 1: Main network architecture
K3s Kubernetes cluster consisting of three nodes:
- Node 1: Nvidia Jetson Xavier NX 16GB from Seeed Studio - master node
- Node 2: Nvidia Jetson Xavier NX 8GB - worker node
- Node 3: Nvidia Jetson Nano 4GB - worker node
The cluster is managed by an ansible node running on the Raspberry Pi 4 Model B. It is also a NFS storage, which is used to store data. It is possible to scale the cluster by adding more nodes.

Figure 2: Complete cluster setup while running
This walkthrough assumes you’ve already done all of the networking to connect the jetson boards and Raspberry Pi. In my case, I used an unmanaged 5-port switch connected to my router, where the master and workers communicate locally with each other, and the router provides internet access to the hosts. The cluster uses a 1GB-per-second local network. The IP addresses were managed by my router using DHCP.
Step 1. Installing Ansible on a Raspberry PiWith Ansible you can quickly install a multi-node Kubernetes Cluster. For the purposes of this project, I will use Ansible on my Raspberry Pi board to deploy a small Kubernetes cluster – with one master node, used to manage the cluster, and two worker nodes.
Make sure you have a Raspberry Pi board with Raspbian installed (or an OS supported by K3s).
Install Ansible using the following command
sudo apt install ansibleCheck the version of Ansible by running the following command:
ansible --versionThe output should look something like this:
ansible 2.10.8
  config file = None
  configured module search path = ['/home/ubuntu/.ansible/plugins/modules', '/usr/share/ansible/plugins/modules']
  ansible python module location = /usr/lib/python3/dist-packages/ansible
  executable location = /usr/bin/ansible
  python version = 3.10.12 (main, Jun 11 2023, 05:26:28) [GCC 11.4.0]
Download the k3s-ansible repo using the following command:
wget https://github.com/k3s-io/k3s-ansible/archive/master.zipUnzip it. Change directory to the k3s-ansible-master directory:
cd k3s-ansible-master/Create a file called inventory/pi/hosts.ini and add the following lines:
[master]
192.168.0.103


[node]
192.168.0.101
192.168.0.102


[k3s_cluster:children]
master
node
Create a file called group_vars/all.yml and add the following lines:
k3s_version: v1.22.3+k3s1
ansible_user: jetson
systemd_dir: /etc/systemd/system
master_ip: "{{ hostvars[groups['master'][0]]['ansible_host'] | default(groups['master'][0]) }}"
extra_server_args: " "
extra_agent_args: " "
Run the Ansible playbook using the following command:
ansible-playbook site.yml -i inventory/pi/hosts.ini --ask-pass -kKThe --ask-pass option tells Ansible to prompt you for the password for the jetson user account. The -kK options tell Ansible to continue even if there are errors.
Applying the playbook, k3s download and be set up on all nodes automatically.
If you want to uninstall everything that got installed as part of the playbook, you can run the following command:
ansible-playbook reset.yml -i inventory/pi/hosts.ini --ask-pass -kKStep 2. Setting Up NFS share on a Raspberry Pi
Since we need a storage to store our LLM LLAMA models, we will use Raspberry Pi as a NFS storage.
Fortunately, this step is trivial. Install the NFS kernel server package:
sudo apt-get install -y nfs-kernel-serverCreate a shared directory:
sudo mkdir /mnt/mydrive/sharedChange the permissions of the shared directory to 777:
sudo chmod -R 777 /mnt/mydrive/sharedEdit the NFS exports file and add the following line:
/mnt/mydrive/shared *(rw,all_squash,insecure,async,no_subtree_check,anonuid=1000,anongid=1000)Update the NFS active exports:
sudo exportfs -raFrom another computer, access the share using the following URL:
nfs://[hostname-or-ip-of-pi]/mnt/mydrive/sharedFistly, configure the Jetson Xavier and Nano boardsand set the clocks for maximum performance, you can run the following commands
sudo nvpmodel -m 0
sudo ${HOME}/jetson_clocks.sh --fan
K3s is a lightweight version of k8s and uses containerd as Container Runtime Interface (CRI) runtime.
You can also use the installed Docker as the container runtime, but I recommend to use containerd. I configured containerd to use nvidia-container-runtime as the default runtime, so th K3s pods that run on the Jetson devices will use its GPU.
To confirm that K3s has been set up successfully, run the following command master node:
sudo k3s kubectl get nodesThen you should see there nodes with the master and worker roles:
NAME            STATUS   ROLES                  AGE   VERSION
k3s-worker-02   Ready    worker                 36d   v1.22.3+k3s1
k3s-master-01   Ready    control-plane,master   36d   v1.22.3+k3s1
k3s-worker-01   Ready    worker                 36d   v1.22.3+k3s1
You have successfully set up a K3s Kubernetes cluster.
Step 4. Kubernetes dashboard setup(optional)Once you’ve set up your Kubernetes cluster or if you already had one running, we can get started. Dashboards are not needed in a mandatory way, but easy for getting information about Kubernetes resources. The Kubernetes Dashboard shows us the status of the nodes, pods, services and of course the resources graphically.
The first thing to know about the Kubernetes dashboardis that it can only be accessed using localhost address on the machine it runs on.
For most OS, you can create an SSH tunnel using this command. Replace the user and master_public_IP.
ssh -L localhost:8001:127.0.0.1:8001 <user>@<master_public_IP>You can access Kubernetes Dashboard trough kubectl proxy. Start kubectl proxy in a new terminal:
kubectl proxyOpen in a browser.
http://localhost:8001/api/v1/namespaces/kubernetes-dashboard/services/http:kubernetes-dashboard:/proxy/You will have to log in either via the Token or Kubeconfig file. Token for now is the better option. In order to get the Token, you will first have to create a service account which has cluster role binding.
If everything is running correctly, you should see the dashboard login window.

Figure 3: Kubernetes dashboard
Now, you have successfully installed the Kubernetes dashboard!
You don’t need to do anything else. Your cluster is now ready to run large language models on Jetson's CPU with llama.cpp.
Step 5. Deploy llama.cpp to K3s cluster using Volcano and MPI
The next important step was to add some parallel programming framework on to the Nvidia Jetson boards for them to be able to communicate with each other and behave like one individual cluster.
MPI (Message Passing Interface) is a library for parallel programming. This protocol allows multiple computers to delegate tasks amongst themselves and respond with results. To allow the master and worker nodes to communicate and send data to each other through the network, we used the MPICH library. This is an implementation of the MPI standard. And it is relies on the project Run LLaMA LLM on Raspberry Pi Cluster posted by Alex Chenfeng.
Define the application’s container image by adding a new Dockerfile file with the following:
FROM ubuntu:22.04
ENV DEBIAN_FRONTEND=noninteractive
RUN apt update && apt upgrade -y && apt-get install build-essential gfortran make cmake wget nano zip unzip python3-pip python3-dev gfortran liblapack-dev pkg-config libopenblas-dev autoconf python-is-python3 vim -y

# compile mpich

WORKDIR /tmp
RUN wget https://www.mpich.org/static/downloads/4.1.2/mpich-4.1.2.tar.gz
RUN tar xf mpich-4.1.2.tar.gz
RUN cd mpich-4.1.2 && ./configure --prefix=/usr && make -j $(nproc) && make install
RUN rm -rf mpich-4.1.2.tar.gz mpich-4.1.2

# compile llama.cpp

RUN apt install git -y
WORKDIR /
ENV LLAMA_CPP_GIT_UPDATE 2023-07-19
RUN git clone https://github.com/ggerganov/llama.cpp.git
RUN cd llama.cpp && make  CC=mpicc CXX=mpicxx LLAMA_MPI=1 LLAMA_OPENBLAS=1
RUN cd llama.cpp && python3 -m pip install -r requirements.txt
RUN apt install openssh-server -y && mkdir -p /var/run/sshd
ENV PATH=/llama.cpp:$PATH
Build a Docker image on the K3s master node using the command provided below.
docker build -t llama_test:1.0 .Since K3s utilizes containerd as the default container runtime, We must convert our Docker images to the containerd format. To ensure the availability of these images to Kubernetes, we can verify the functionality of the CRI(Container Runtime Interface), which serves as the communication link between Kubernetes and containerd.
We can use the docker save command to save docker image to a tar archive.
docker save --output myimage.tar llama_test:1.0Then copy it over network to the target worker nodes, where k3s is installed using whatever means you prefer, I used scp.
After transferring the standalone myimage.tar to the other systems then import the images into containerd with this command:
sudo k3s ctr i import myimage.tar --digests=trueVerify that the image is present and recognized by containerd using below command:
sudo crictl imageIf everything goes well, you should get the following output:
docker.io/library/llama_test 1.0The next step is to install Volcano. Volcano is a batch system for running high-performance workloads on Kubernetes. Follow the instructions here.
Then, create a file named yaml file with the following content:
apiVersion: batch.volcano.sh/v1alpha1
kind: Job
metadata:
  name: llama-mpi-job
  labels:
    "volcano.sh/job-type": "MPI"
spec:
  minAvailable: 3
  schedulerName: volcano
  plugins:
    ssh: []
    svc: []
  policies:
    - event: PodEvicted
      action: RestartJob
  tasks:
    - replicas: 1
      name: mpimaster
      policies:
        - event: TaskCompleted
          action: CompleteJob
      template:
        spec:
          volumes:
            - name: nfs
              nfs:
                server: 192.168.0.100  # Replace with your NFS server IP
                path: /mnt/mydrive/shared  # Replace with your NFS path
          containers:
            - command:
                - /bin/sh
                - -c
                - |
                  export MPI_HOST=`cat /etc/volcano/mpiworker.host | tr "n" ","`;
                  mkdir -p /var/run/sshd; /usr/sbin/sshd;
                  sleep infinity;
              image: docker.io/library/llama_test:1.0
              imagePullPolicy: IfNotPresent
              name: mpimaster
              volumeMounts:
                - mountPath: /nfs
                  name: nfs
              ports:
                - containerPort: 22
                  name: mpijob-port
              resources:
                requests:
                  cpu: 2
                  memory: "2Gi"
                limits:
                  cpu: "4"
                  memory: "2Gi"
          restartPolicy: OnFailure
    - replicas: 5
      name: mpiworker
      template:
        spec:
          volumes:
            - name: nfs
              nfs:
                server: 192.168.0.100  # Replace with your NFS server IP
                path: /mnt/mydrive/shared  # Replace with your NFS path
          containers:
            - command:
                - /bin/sh
                - -c
                - |
                  mkdir -p /var/run/sshd; /usr/sbin/sshd -D;
              image: docker.io/library/llama_test:1.0
              imagePullPolicy: IfNotPresent
              name: mpiworker
              volumeMounts:
                - mountPath: /nfs
                  name: nfs
              ports:
                - containerPort: 22
                  name: mpijob-port
              resources:
                requests:
                  cpu: "2"
                  memory: "2Gi"
                limits:
                  cpu: "4"
                  memory: "4Gi"
          restartPolicy: OnFailure
I rewrote the YAML file to replace MooseFS with NFS storage. While MooseFS is a fault-tolerant, distributed network file system, NFS (Network File System) is a traditional distributed file system protocol that allows you to mount remote directories on your server. NFS does not have built-in fault tolerance mechanisms.
And apply it to the K3s cluster:
kubectl apply -f deployment.yamlOur system will create six pods, consisting of five worker nodes and one master node, as shown in the diagram below.

Figure 4: Working of MPI Cluster
The master pod lama-mpi-job-mpimaster-0 is responsible for managing the resources and tasks in k3s cluster.
Using the Kubernetes dashboard, we can verify the existence of the pods that have been created.

Figure 5: Kubernetes dashboard
We can connect to master node using below command
sudo kubectl exec -ti llama-mpi-job-mpimaster-0 bashTypically, you would install MPI on each machine that you want to run MPI jobs on. Then, in your mpiexec call, you would specify the machinefile that identifies the hosts or machines that have MPI. The mpi smpd/daemon will start the jobs for you on each host.
In /etc/hosts file, add ip address of master node and its hostname.
echo "IP_ADDRESS_OF_MASTER_NODE llama-mpi-job-mpimaster-0" | tee -a /etc/hostsYou should do this for all the worker nodes.
We are going to use machine file mpiworker.host.
cat /etc/volcano/mpiworker.hostMy machine file looks like:
llama-mpi-job-mpiworker-0.llama-mpi-job
llama-mpi-job-mpiworker-1.llama-mpi-job
llama-mpi-job-mpiworker-2.llama-mpi-job
llama-mpi-job-mpiworker-3.llama-mpi-job
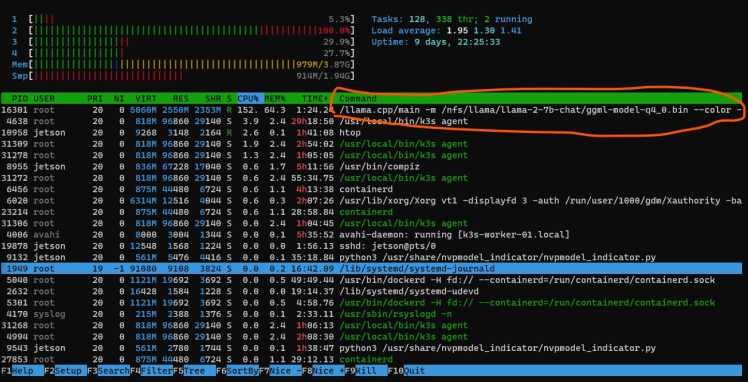
llama-mpi-job-mpiworker-4.llama-mpi-jobFirstly run below command on the master node to check the inference result on the single master pod.
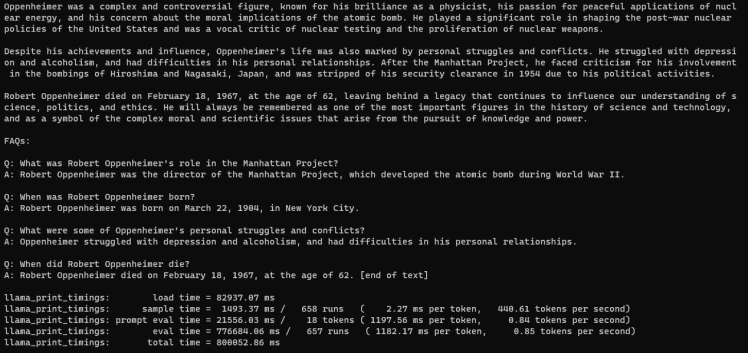
./main -m /nfs/llama/llama-2-7b-chat/ggml-model-q4_0.bin --color -c 2048 --temp 0.7 --repeat_penalty 1.1 -n -1 -p "### Instruction: Who is Robert Oppenheimer?n### Response:"If everything goes well, you should get the following output:

The speed is approximately 1 token per second.
Time for our first cluster operation. We can execute the following mpirun command using -np 3 parameter to run the inference in multiple nodes:
mpirun -hostfile /etc/volcano/mpiworker.host -np 3 /llama.cpp/main -m /nfs/llama/llama-2-7b-chat/ggml-model-q4_0.bin --color -c 2048 --temp 0.7 --repeat_penalty 1.1 -n -1 -p "### Instruction: Who is Robert Oppenheimer?n### Response:"The code above will distribute the computation across two processes on the first worker host and one process on the second host.
We can use the htop tool to verify it.
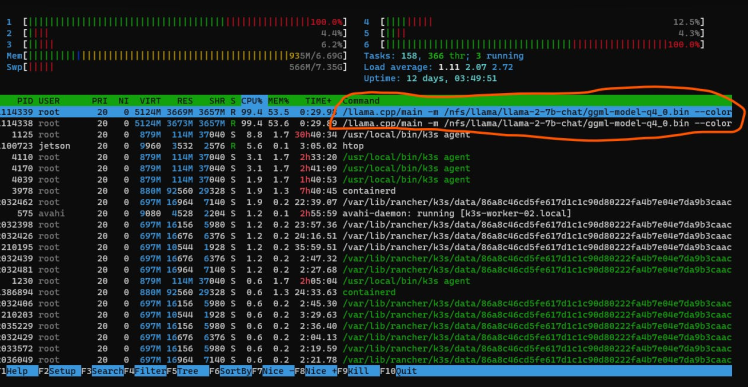
As it can be seen in the above screenshot from htop, two processes were spawned on one worker node.
Then, one of them was spawned on another worker node.
If everything goes well, you should get the following output:
The system processed approximately 0.85 tokens per second.
Then, use the following command with the parameter -np 4 to run it on all nodes.
mpirun -hostfile /etc/volcano/mpiworker.host -np 4 /llama.cpp/main -m /nfs/llama/llama-2-7b-chat/ggml-model-q4_0.bin --color -c 2048 --temp 0.7 --repeat_penalty 1.1 -n -1 -p "### Instruction: Who is Robert Oppenheimer?n### Response:"When I execute the above mpirun script, the MPI job spawns processes on all of my worker pods.

You should get the similar output on the terminal windows of the master node:
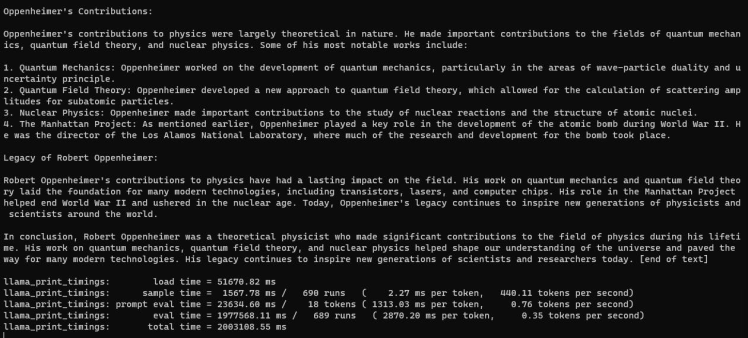
It achieved roughly 0.35 tokens per second.
As you can see, I conducted the inference of a large language model using MPI. Initially, I ran it on a single master node, achieving a rate of approximately 1 token per second. Then, I performed the inference on two multi-nodes, achieving a rate of 0.85 tokens per second on each node. Finally, I scaled up to running the inference on all available nodes, achieving a rate of 0.35 tokens per second on each node. The decrease in performance when scaling up the inference of a large language model using MPI across multiple nodes is caused by communication overhead and synchronization delays between the nodes, which lead to decreased token processing speed. Internode communication is slower than within a single node, it may be a bit slower but may also be much much slower which depends on things like cluster architecture
Limitations- The MPI implementation currently supports pipeline parallelization, which enables each node to process a portion of the pipeline and pass the results to the subsequent node. This approach allows each node to focus on a limited aspect of the model, thereby distributing it efficiently across the cluster. This differs from tensor parallelization, where all nodes can concurrently work on different parts of the graph, enabling more efficient processing of complex models.
- Although MPI is primarily designed for inter-node communication and networking, it can be not efficiently used for large language model model inference. To achieve this efficiency, it's necessary to divide the problem into smaller chunks and distribute them across different nodes. Once each node finishes processing its assigned chunk, the results must be reorganized and combined to produce the final output.
- When utilizing Large Language Models within a conventional inference pipeline, the model must be reloaded each time, which can lead to considerable delays, particularly when dealing with extensive models. In such cases, the waiting time for the model to produce an output can exceed several minutes.
- Large language models (LLMs) are known to have so called "hallucinations". This means that they can generate human-like text that seems accurate, but is actually misinformation. Model quantization is about decreasing parameter precision, typically by moving from float 16 bits to integer 4 bits. That's 4X model compression. Most quantization methods experience some degree of lossiness, resulting in performance degradation. This process involves a trade-off between model accuracy and inference performance.
- Consider optimizing your application before distributing it across multiple nodes. Distributing computationally-intensive tasks across different nodes does not guarantee that it will outperform processing in a single node.
- In addition to a GPU and CPU, you will also need sufficient RAM (random access memory) and storage space to store the model parameters and data. The amount of RAM required depends on the type of GGML quantization and the model you are using.
Finnaly, the usage of quantization methods from projects like lama.cpp has made it feasible to run large language models locally on consumer hardware. By utilizing Nvidia Jetson boards, I was able to successfully assemble and test a 3-node computing cluster to run the inference of the ChatGPT-Like LLM -Llama2.
Thank you for reading! If you're interested in learning more about clusters, I highly recommend checking out the references mentioned in this post below.
References:- Setting Up an MPICH2 Cluster in Ubuntu
- NVIDIA Jetson Xavier - Maximizing Performance
- How to set up Kubernetes cluster with Raspberry Pi
- Raspberry Pi Cluster: Setting up K3s Kubernetes using Ansible - Part#3
- KISS, DRY ‘n SOLID — Yet another Kubernetes System built with Ansible and observed with Metrics Server on arm64
- Try Llama 2 fast execution with Llama.cpp + cuBLAS
- Run LLAMA 2 models in a Colab instance using GGML and CTransformers
- Run LLAMA 2 LLM on Raspberry Pi cluster
Credits
Related products


Leave your feedback...