
Rugged Timelapse Camera With Camthink Neoeyes Ne101

Made by CETECH11 / Photos & Video
About the project
Will guide you through the building of Rugged TimeLapse Camera using
Project info
Difficulty: Moderate
Platforms: Arduino
Estimated time: 1 hour
License: GNU General Public License, version 3 or later (GPL3+)
Items used in this project
Hardware components

Story
A timelapse camera captures images at regular intervals and compiles them into a fast-paced video. It's perfect for visualizing slow changes over time—like plant growth, urban development, weather cycles, and wildlife behavior.

- Long-term monitoring without constant supervision
- Reveals patterns not visible in real time
- Compact, energy-efficient, and DIY-friendly
- Excellent tool for scientific research, environmental studies, and content creation
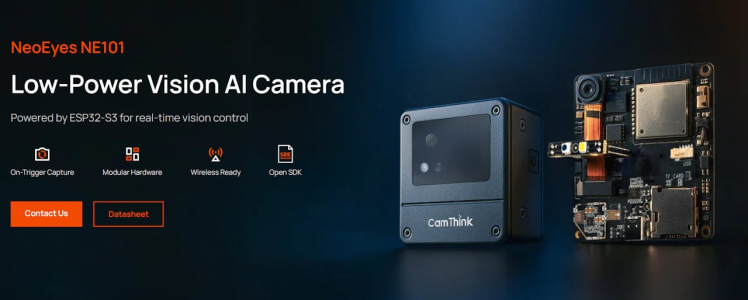
The NeoEyes NE101 is a developer-friendly timelapse module based on ESP32-S3, combined with rugged design.

You must check out PCBWAY for ordering PCBs online for cheap!
You get 10 good-quality PCBs manufactured and shipped to your doorstep for cheap. You will also get a discount on shipping on your first order. Upload your Gerber files onto PCBWAY to get them manufactured with good quality and quick turnaround time. PCBWay now could provide a complete product solution, from design to enclosure production. Check out their online Gerber viewer function. With reward points, you can get free stuff from their gift shop. Also, check out this useful blog on PCBWay Plugin for KiCad from here. Using this plugin, you can directly order PCBs in just one click after completing your design in KiCad.
🛠️ Key Features- ESP32-S3 MCU with 8MB RAM, 16MB Flash
- OV5640 high-resolution camera sensor
- RTC-driven scheduling and event triggers
- Expandable communication: Wi-Fi, Cat-1 LTE, HaLow
- Supports gesture triggers, fill-light control, SD storage
- IP67-rated case for dust and water resistance
- Compatible with Edge Impulse
- Ultra-low-power design for long battery life
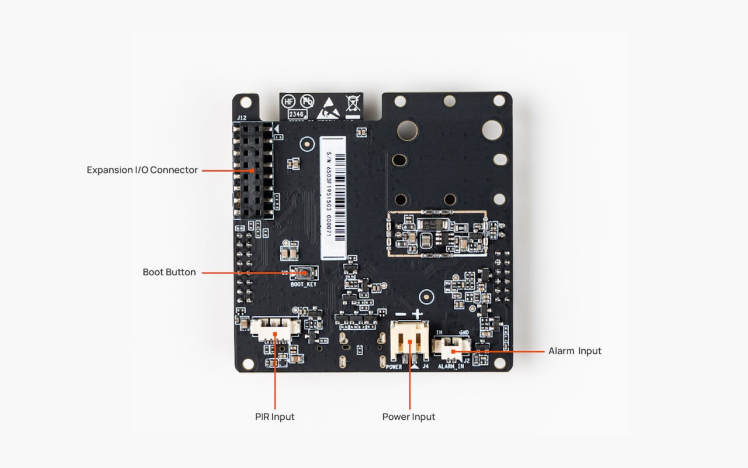
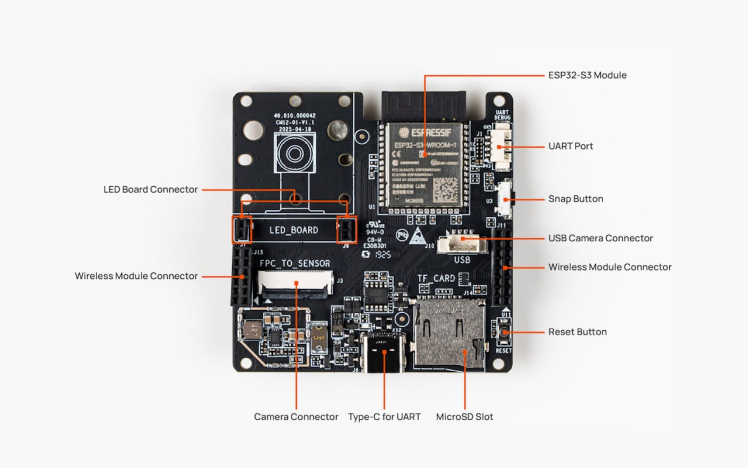
Don't worry about the hardware connections, just plug the SD card inside the CamThink NeoEyes NE101 and that's all.
All the components and everything is already placed insides the NE101, so no hard wiring needed. Just insert the SD card and program the NE101 and we are good to deploy the product.
1 / 2
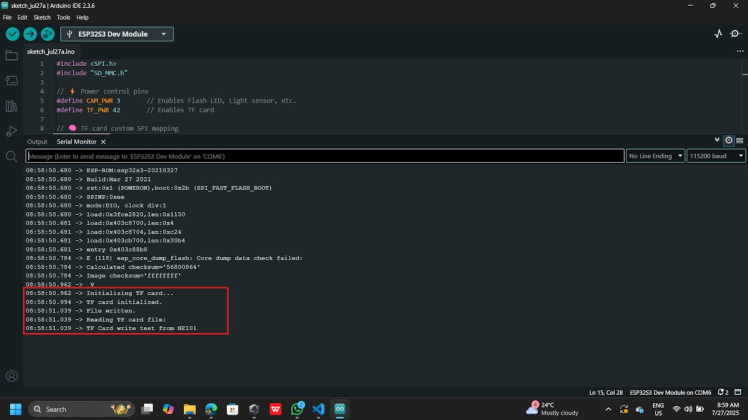
In the Programming first we need to verify the SD card is readable by the system. Here is the simple Arduino sketch that can ensure the SD card status.
#include <SPI.h>
#include "SD_MMC.h"

// ⚡ Power control pins
#define CAM_PWR 3       // Enables Flash LED, Light sensor, etc.
#define TF_PWR 42       // Enables TF card

// 🧠 TF card custom SPI mapping
#define TF_CS    45
#define TF_MOSI  38  // CMD
#define TF_MISO  40  // DAT0
#define TF_CLK   39  // CLK

#define LEDC_CHANNEL 0
#define LEDC_FREQUENCY 5000
#define LEDC_RESOLUTION 8  // bits

void setup() {
  Serial.begin(115200);
  delay(100);

  // 🔋 Enable peripheral power
  pinMode(CAM_PWR, OUTPUT);
  pinMode(TF_PWR, OUTPUT);
  digitalWrite(CAM_PWR, HIGH);
  digitalWrite(TF_PWR, HIGH);
  delay(50);

  Serial.println(" V");

  // 📦 TF Card
  Serial.println("Initializing TF card...");
  if (!SD_MMC.setPins(TF_CLK, TF_MOSI, TF_MISO)) {
    Serial.println("Pin change failed!");
    return;
  }
  if (!SD_MMC.begin("/sdcard", true)) {
    Serial.println("TF card init failed");
    return;
  }
  Serial.println("TF card initialized.");

  File testFile = SD_MMC.open("/test.txt", FILE_WRITE);
  if (testFile) {
    testFile.println("TF Card write test from NE101");
    testFile.close();
    Serial.println("File written.");
  } else {
    Serial.println("File write failed.");
  }

  testFile = SD_MMC.open("/test.txt");
  if (testFile) {
    Serial.println("Reading TF card file:");
    while (testFile.available()) {
      Serial.write(testFile.read());
    }
    testFile.close();
  } else {
    Serial.println("File read failed.");
  }
}

void loop() {
  // Nothing for now
}
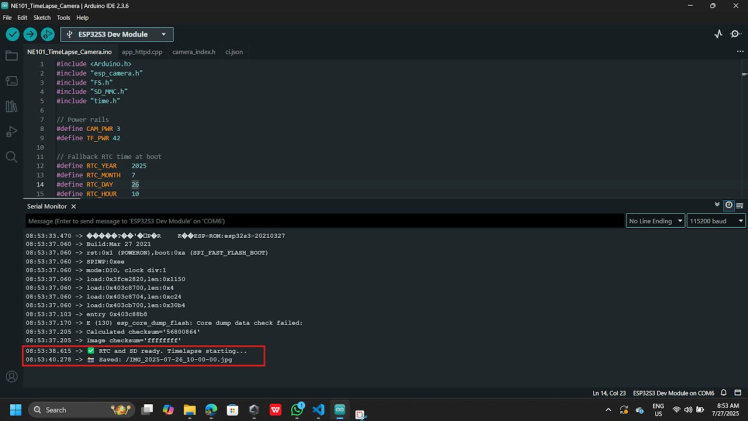
Next, we are ready to dump the complete sketch. Upload this below sketch to the NE101 and verify the serial terminal response. This sketch can capture the image for everyone minutes and it will print the data in the serial terminal. Also, it will store the images in the SD card with the RTC based file name.
#include <Arduino.h>
#include "esp_camera.h"
#include "FS.h"
#include "SD_MMC.h"
#include "time.h"

// Power rails
#define CAM_PWR 3
#define TF_PWR 42

// Fallback RTC time at boot
#define RTC_YEAR    2025
#define RTC_MONTH   7
#define RTC_DAY     26
#define RTC_HOUR    10
#define RTC_MINUTE  0
#define RTC_SECOND  0

// Capture interval (1 minute)
const unsigned long captureIntervalMs = 60000;

void setup() {
  Serial.begin(115200);
  delay(100);

  // Power cycle SD card
  pinMode(TF_PWR, OUTPUT);
  digitalWrite(TF_PWR, LOW);
  delay(50);
  digitalWrite(TF_PWR, HIGH);
  delay(200);

  // Power on camera
  pinMode(CAM_PWR, OUTPUT);
  digitalWrite(CAM_PWR, HIGH);
  delay(100);

  // Set RTC time manually (once)
  struct tm tm;
  tm.tm_year = RTC_YEAR - 1900;
  tm.tm_mon  = RTC_MONTH - 1;
  tm.tm_mday = RTC_DAY;
  tm.tm_hour = RTC_HOUR;
  tm.tm_min  = RTC_MINUTE;
  tm.tm_sec  = RTC_SECOND;
  time_t t = mktime(&tm);
  struct timeval now = { .tv_sec = t };
  settimeofday(&now, nullptr);

  // Camera setup
  camera_config_t config;
  config.ledc_channel = LEDC_CHANNEL_0;
  config.ledc_timer   = LEDC_TIMER_0;
  config.pin_d0 = 11; config.pin_d1 = 9;  config.pin_d2 = 8;  config.pin_d3 = 10;
  config.pin_d4 = 12; config.pin_d5 = 18; config.pin_d6 = 17; config.pin_d7 = 16;
  config.pin_xclk = 15; config.pin_pclk = 13;
  config.pin_vsync = 6; config.pin_href = 7;
  config.pin_sccb_sda = 4; config.pin_sccb_scl = 5;
  config.pin_pwdn = -1; config.pin_reset = -1;
  config.xclk_freq_hz = 20000000;
  config.frame_size   = FRAMESIZE_UXGA;
  config.pixel_format = PIXFORMAT_JPEG;
  config.fb_location  = CAMERA_FB_IN_PSRAM;
  config.jpeg_quality = 3;
  config.fb_count     = 2;
  config.grab_mode    = CAMERA_GRAB_LATEST;

  if (esp_camera_init(&config) != ESP_OK) {
    Serial.println("❌ Camera init failed");
    return;
  }

  // OV5640 tweaks
  sensor_t *s = esp_camera_sensor_get();
  if (s->id.PID == OV5640_PID) {
    s->set_brightness(s, 1);
    s->set_saturation(s, -2);
    s->set_framesize(s, FRAMESIZE_UXGA);
  }

  // Init SD card
  SD_MMC.setPins(39, 38, 40);
  if (!SD_MMC.begin("/sdcard", true)) {
    Serial.println("❌ SD init failed");
    return;
  }

  Serial.println("✅ RTC and SD ready. Timelapse starting...");
}

void loop() {
  // Get current time
  struct tm timeinfo;
  if (!getLocalTime(&timeinfo)) {
    Serial.println("❌ Failed to fetch RTC time");
    return;
  }

  // Filename from RTC time
  char filename[64];
  snprintf(filename, sizeof(filename), "/IMG_%04d-%02d-%02d_%02d-%02d-%02d.jpg",
           timeinfo.tm_year + 1900, timeinfo.tm_mon + 1, timeinfo.tm_mday,
           timeinfo.tm_hour, timeinfo.tm_min, timeinfo.tm_sec);

  // Capture image
  camera_fb_t *fb = esp_camera_fb_get();
  if (!fb) {
    Serial.println("❌ Capture failed");
    return;
  }

  File file = SD_MMC.open(filename, FILE_WRITE);
  if (file) {
    file.write(fb->buf, fb->len);
    file.close();
    Serial.println("📸 Saved: " + String(filename));
  } else {
    Serial.println("❌ File write failed");
  }

  esp_camera_fb_return(fb);
  delay(captureIntervalMs);
}
Here is the Serial Terminal Response.
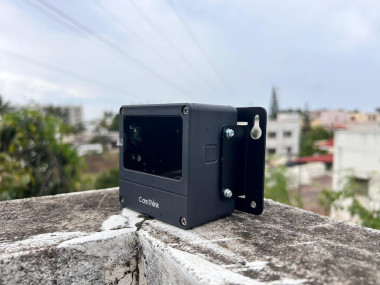
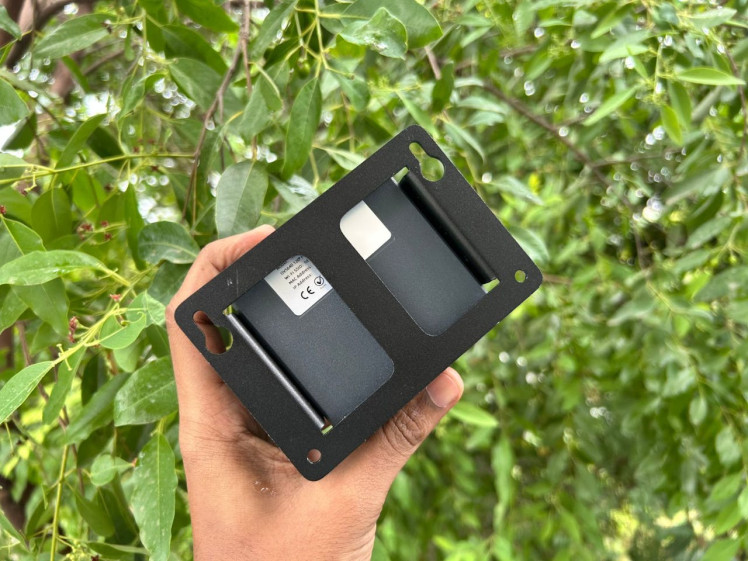
I have used the backplate mounting kit which comes with the NeoEyes NE101 itself

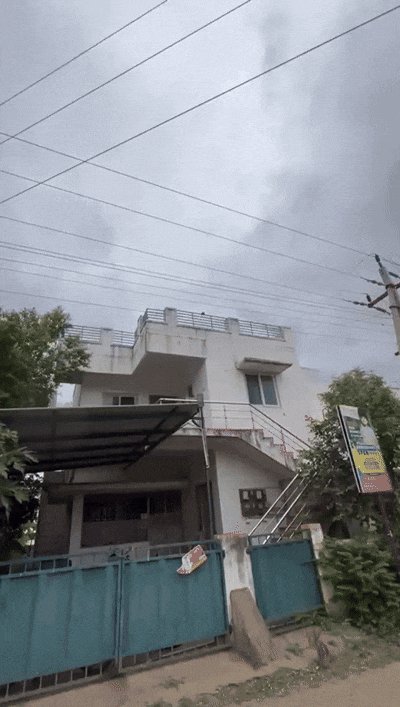
I have mounted this in my home, and I have left it for overnight.
]
I haven’t used any deep sleep or hibernate mode to save battery life; I just left it on my terrace. The weather at my location shows otherwise, but trust me, it’s windy and drizzling here, so the footage might appear dull due to these weather conditions.
Here are the images which I have captured from the NE101.
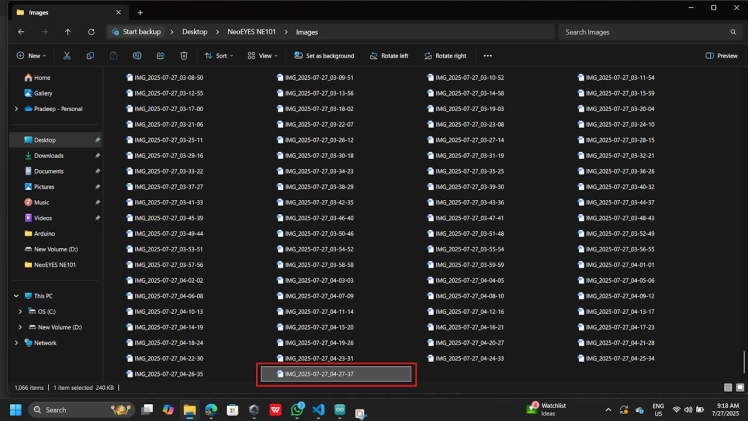
If you look at the last image file name, it shows next day 4:30 am. So, I installed on 10.00am Saturday and it records 4:30 am Sunday.it successfully ran for about 18.5 hours before capturing that frame—impressive uptime!
Next step is to make a Time-lapse video. Here is the simple python script that can generate the Time-lapse video from the images.
import cv2
import os

# 📁 Configuration
image_folder = 'Images'  # Replace with actual folder path
video_name = 'timelapse_annotated.avi'
fps = 5
font = cv2.FONT_HERSHEY_SIMPLEX
font_scale = 1
font_color = (255, 255, 255)
thickness = 2
position = (30, 50)  # Top-left corner

# 📸 Collect and sort image files
images = sorted([img for img in os.listdir(image_folder) if img.lower().endswith(('.jpg', '.png'))])

# 🖼️ Load first image to get dimensions
first_frame = cv2.imread(os.path.join(image_folder, images[0]))
height, width, _ = first_frame.shape

# 🎞️ Setup video writer
video = cv2.VideoWriter(video_name, cv2.VideoWriter_fourcc(*'XVID'), fps, (width, height))

# 🔁 Frame processing
for image in images:
    frame = cv2.imread(os.path.join(image_folder, image))

    # 🧠 Extract timestamp from filename
    base_name = os.path.splitext(image)[0]  # e.g. IMG_2025-07-26_10-00-00
    timestamp = base_name.replace("IMG_", "").replace("_", " ")

    # 📝 Put timestamp on frame
    cv2.putText(frame, timestamp, position, font, font_scale, font_color, thickness, cv2.LINE_AA)

    # ➕ Add frame to video
    video.write(frame)

video.release()
print("✅ Annotated video generated:", video_name)
Here is my generated video from the python script.
🏁 Wrapping Up: More Than Just a CameraFrom a simple ESP32-S3 board to a fully autonomous timelapse storyteller, this build captures more than just images—it records the passage of time in a way that feels alive. Whether you're chronicling the serene stillness of a sunrise or the rush of a bustling construction site, the NeoEyes NE101 module proves that DIY tech can be both powerful and poetic.
Adding timestamp overlays brings clarity and context to your footage, making each frame not just beautiful, but informative. The result? A video that speaks both visually and temporally.
So if you're looking to automate observation, enhance your data collection, or just build something undeniably cool, let this timelapse project be your springboard. The next sunrise is waiting—and your camera might just beat you to it. 🌄✨
Credits
Related products


Leave your feedback...