
Real Time Radiation Mapper Using Dfrobot Beetle Esp32 C3

Made by pradeeplogu0
About the project
Will guide you to build a Radiation mapper device with DFRobot Beetle ESP32 C3 and Geiger Counter.
Project info
Difficulty: Moderate
Estimated time: 1 hour
License: GNU General Public License, version 3 or later (GPL3+)
Items used in this project
Hardware components

Story
The Chornobyl nuclear disaster, which occurred on April 26, 1986, at the Chornobyl Nuclear Power Plant in Pripyat, Ukraine, was one of the most catastrophic nuclear power plant accidents in history.
1 / 3
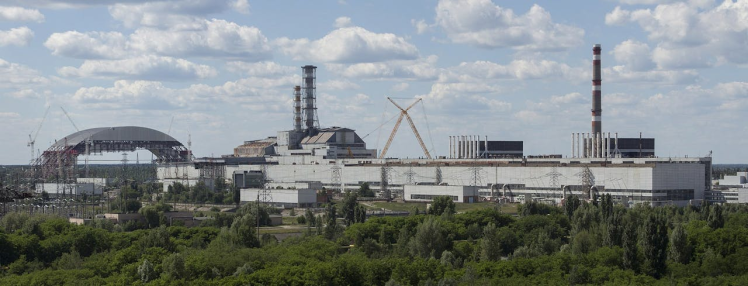


The disaster released large amounts of radioactive material into the atmosphere, causing significant environmental contamination and health issues across Europe. Inspired by this event, we can create a radiation mapper device that includes a Particulate Matter Sensor (PMS) and GPS mapping to monitor radiation levels and particulate matter in real-time.
The HBO miniseries "Chernobyl" vividly portrays the harrowing events and aftermath of the disaster, highlighting the importance of accurate radiation monitoring and timely response.

Drawing inspiration from the series, we can develop a device that provides real-time data on radiation levels and particulate matter to help prevent and mitigate the effects of nuclear accidents.
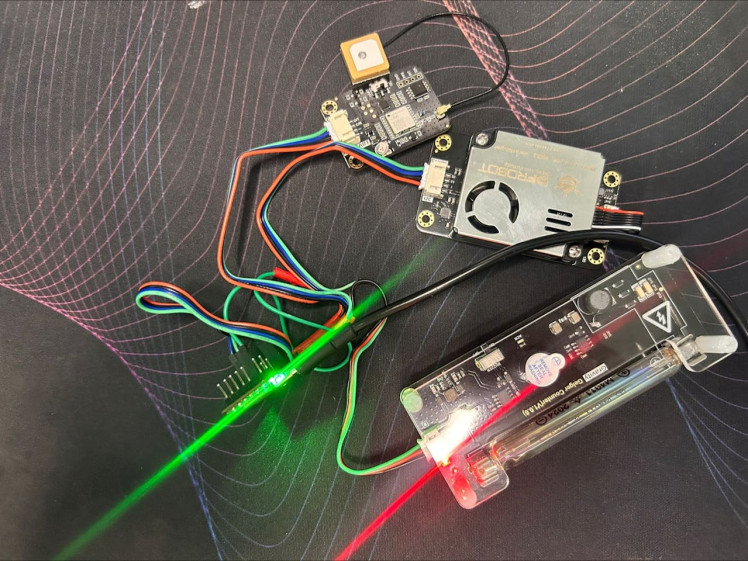
Components Required- DFRobotGeiger Counter: To measure radiation levels
- DFRobotPMS Sensor: To measure particulate matter (PM1.0, PM2.5, PM10)
- DFRobotGPS Module: To provide location data.
- DFRobot Beetle ESP32 C3Microcontroller: ESP32 C3 to process data.
1. DFRobot Geiger Counter: To Measure Radiation Levels
The DFRobot Geiger Counter is a highly sensitive module designed to detect ionizing radiation, such as nuclear radiation, X-rays, and cosmic rays. It uses the M4011 Geiger tube, which can detect alpha, beta, and gamma rays. The module is easy to integrate with microcontrollers and provides digital output for radiation detection.
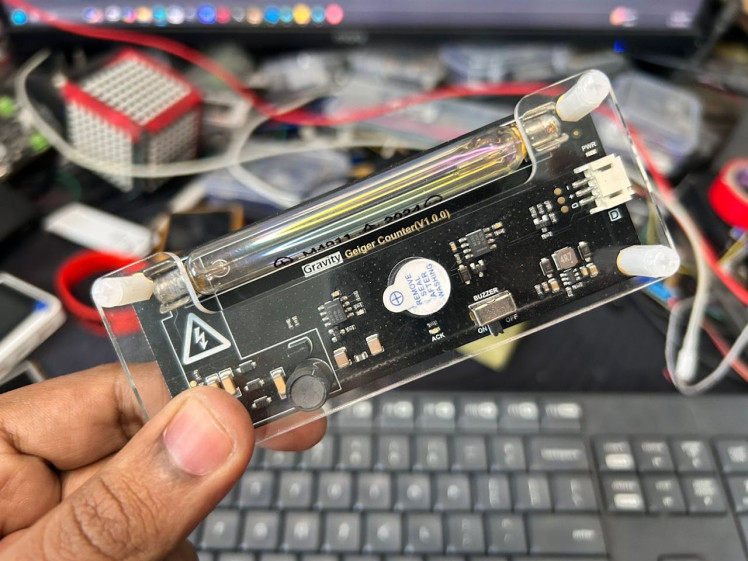
Key Features:
- Power Supply: 3.3V ~ 5V
- Signal Output: Digital output, pull down when a pulse is detected
- Driving Voltage: ≈400V
- Maximum Range: 1200 µSv/h (theoretical)
- Background Counts: ≈25 CPM
- CPM Ratio: 153.8 CPM/ (µSv/h)
2. DFRobot PMS Sensor: To Measure Particulate Matter (PM1.0, PM2.5, PM10)
The DFRobot PMS Sensor is an air quality sensor that measures particulate matter like PM1.0, PM2.5, and PM10. It uses the principle of laser scattering to measure particle concentration in the air accurately. The sensor is compatible with most microcontrollers and provides real-time data via the I2C interface.
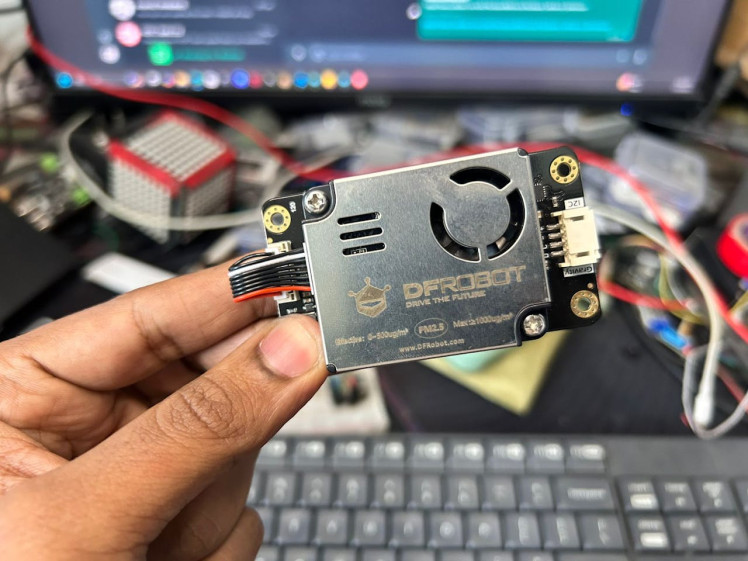
Key Features
- Working Voltage: 3.3V ~ 5V
- Maximum Working Current: 100mA
- Particle Measurement Range: 0.3 ~ 1.0µm; 1.0 ~ 2.5µm; 2.5 ~ 10µm
- Particle Counting Efficiency: 50% @ 0.3µm, 98% @ ≥0.5µm
- Effective Range of Particle Mass Concentration (PM2.5 standard value): 0~500ug/m³
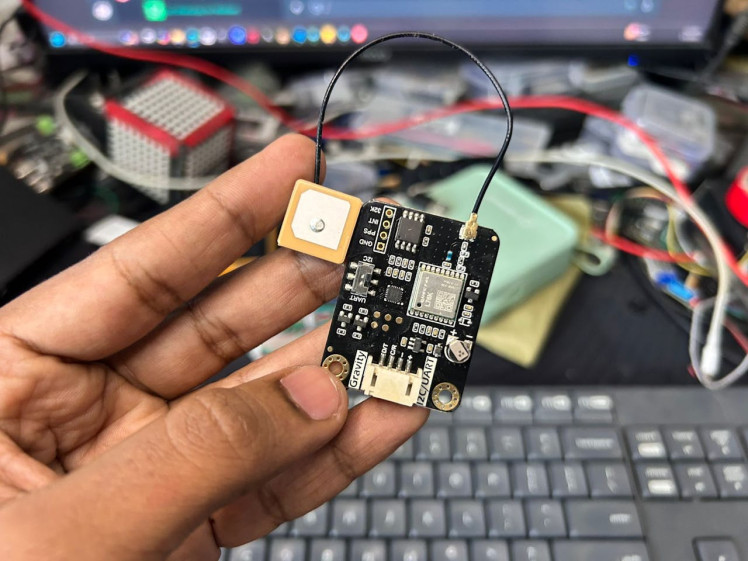
3. DFRobot GPS Module: To Provide Location Data
The DFRobot GPS Module is a compact GPS receiver that provides accurate geographic coordinates (latitude and longitude), speed, heading, and GMT. It is easy to integrate with microcontrollers and supports multiple baud rates for flexible communication.
Key Features:
- Solution: UBX-G7020-KT
- Output Rate: 1Hz (default) ~ 10Hz
- Interface: TTL serial
- Power Supply: 5V @ 30mA (supports 3.3~5V)
- Accuracy: 2.5m (Autonomous) / <2m [SBAS]
- Operating Temperature: -40°C to 85°C
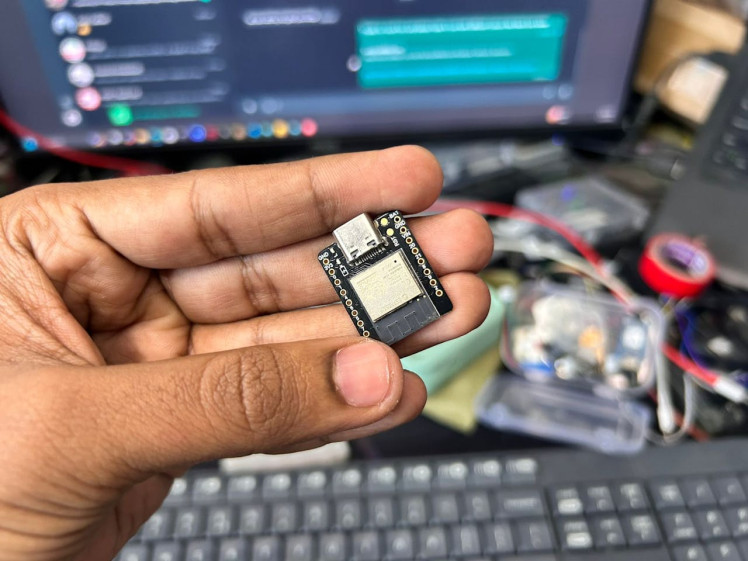
4. DFRobot Beetle ESP32 C3 Microcontroller: To Process Data
The DFRobot Beetle ESP32 C3 is a compact microcontroller based on the ESP32-C3 RISC-V 32-bit single-core processor. It supports Wi-Fi and Bluetooth 5 (LE) dual-mode communication, making it ideal for IoT applications. The microcontroller is equipped with multiple I/O ports and supports various programming environments, including Arduino IDE, ESP-IDF, and MicroPython.
1 / 2

Key Features:
- Processor: 32-bit RISC-V single-core processor
- Main Frequency: 160 MHz
- SRAM: 400KB
- Flash: 4MB
- Operating Voltage: 3.3V
- Type-C Input Voltage: 5V DC
- Wi-Fi: IEEE 802.11b/g/n
- Bluetooth: Bluetooth 5, Bluetooth Mesh
These components together form the backbone of a radiation mapper device, providing accurate measurements of radiation levels, particulate matter, and precise location data. By integrating these components, we can develop a powerful tool for monitoring environmental conditions and ensuring safety in areas affected by radiation.
Circuit Connection:Both the PM2.5 Sensor and GNSS Sensor work with I2C communication. So, we can directly connect both sensors to the I2C port of the Beetle ESP32 C3 and we can connect with the D0 pin.

To use these three different sensors we need these three Arduino libraries.
Also, we need the Qubitro Arduino library to send our data to the cloud.
Open the Arduino IDE and import all these four libraries.
Code Integration :Here is the complete Arduino code to get all these sensor data and publish it to the Qubitro cloud via MQTT protocol.
#include <WiFi.h>
#include <QubitroMqttClient.h>
#include <DFRobot_Geiger.h>
#include "DFRobot_GNSSAndRTC.h"
#include "DFRobot_AirQualitySensor.h"
#define detect_pin 0
DFRobot_Geiger geiger(detect_pin);
DFRobot_GNSSAndRTC_I2C gnss(&Wire, MODULE_I2C_ADDRESS);
#define I2C_ADDRESS 0x19
DFRobot_AirQualitySensor particle(&Wire , I2C_ADDRESS);
WiFiClient wifiClient;
QubitroMqttClient mqttClient(wifiClient);
char deviceID[] = "";
char deviceToken[] = "";
const char* STA_SSID = "";
const char* STA_PASS = "";
void setup()
{
Serial.begin(115200);
geiger.start();
enableWiFi();
qubitro_init();
while (!gnss.begin()) {
Serial.println("NO Deivces !");
delay(1000);
}
gnss.enablePower(); // Enable gnss power
gnss.setGnss(gnss.eGPS_BeiDou_GLONASS);
while (!particle.begin()) {
Serial.println("NO Deivces !");
delay(1000);
}
Serial.println("sensor begin success!");
delay(1000);
//Get sensor version number
uint8_t version = particle.gainVersion();
Serial.print("version is : ");
Serial.println(version);
delay(20000);
}
void loop()
{
DFRobot_GNSSAndRTC::sLonLat_t lat = gnss.getLat();
DFRobot_GNSSAndRTC::sLonLat_t lon = gnss.getLon();
double high = gnss.getAlt();
uint8_t starUserd = gnss.getNumSatUsed();
Serial.print("lat degree = ");
Serial.println(lat.latitudeDegree, 6);
Serial.print("lon degree = ");
Serial.println(lon.lonitudeDegree, 6);
Serial.print("star userd = ");
Serial.println(starUserd);
Serial.print("alt high = ");
Serial.println(high);
uint16_t concentration0 = particle.gainParticleConcentration_ugm3(PARTICLE_PM1_0_STANDARD);
uint16_t concentration1 = particle.gainParticleConcentration_ugm3(PARTICLE_PM2_5_STANDARD);
uint16_t concentration2 = particle.gainParticleConcentration_ugm3(PARTICLE_PM10_STANDARD);
uint16_t concentration3 = particle.gainParticleConcentration_ugm3(PARTICLE_PM1_0_ATMOSPHERE);
uint16_t concentration4 = particle.gainParticleConcentration_ugm3(PARTICLE_PM2_5_ATMOSPHERE);
uint16_t concentration5 = particle.gainParticleConcentration_ugm3(PARTICLE_PM10_ATMOSPHERE);
Serial.print("PM1.0 concentration STD:");
Serial.print(concentration0);
Serial.println(" mg/m3");
Serial.print("PM2.5 concentration STD:");
Serial.print(concentration1);
Serial.println(" mg/m3");
Serial.print("PM10 concentration STD:");
Serial.print(concentration2);
Serial.println(" mg/m3");
Serial.print("PM1.0 concentration Air:");
Serial.print(concentration3);
Serial.println(" mg/m3");
Serial.print("PM2.5 concentration Air:");
Serial.print(concentration4);
Serial.println(" mg/m3");
Serial.print("PM10 concentration Air:");
Serial.print(concentration5);
Serial.println(" mg/m3");
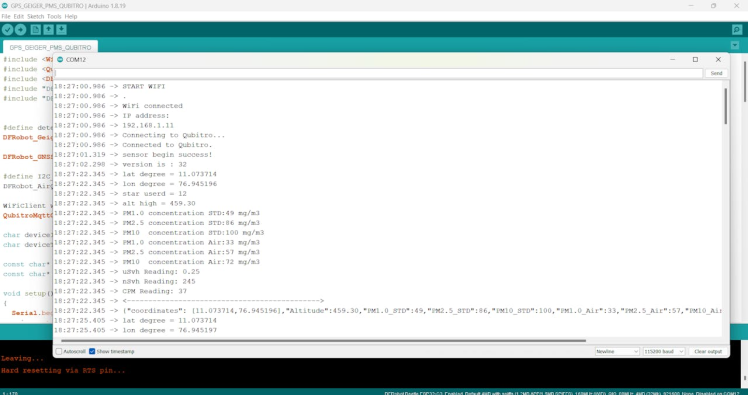
Serial.print("uSvh Reading: ");
Serial.println(geiger.getuSvh());
Serial.print("nSvh Reading: ");
Serial.println(geiger.getnSvh());
Serial.print("CPM Reading: ");
Serial.println(geiger.getCPM());
Serial.println("<--------------------------------------------->");
String payload = "{"coordinates": [" + String(lat.latitudeDegree, 6) + "," + String(lon.lonitudeDegree, 6) + "]," +
""Altitude":" + String(high) + "," +
""PM1.0_STD":" + String(concentration0) + "," +
""PM2.5_STD":" + String(concentration1) + "," +
""PM10_STD":" + String(concentration2) + "," +
""PM1.0_Air":" + String(concentration3) + "," +
""PM2.5_Air":" + String(concentration4) + "," +
""PM10_Air":" + String(concentration5) + "," +
""CPM":" + String(geiger.getCPM()) + "," +
""nSvh":" + String(geiger.getnSvh()) + "," +
""uSvh":" + String(geiger.getuSvh(), 2) + "}";
Serial.println(payload);
mqttClient.poll();
mqttClient.beginMessage(deviceID);
mqttClient.print(payload);
mqttClient.endMessage();
delay(3000);
}
void enableWiFi() {
WiFi.disconnect(false); // Reconnect the network
WiFi.mode(WIFI_STA); // Switch WiFi off
Serial.println("START WIFI");
WiFi.begin(STA_SSID, STA_PASS);
while (WiFi.status() != WL_CONNECTED) {
delay(500);
Serial.print(".");
}
Serial.println("");
Serial.println("WiFi connected");
Serial.println("IP address: ");
Serial.println(WiFi.localIP());
}
void qubitro_init() {
char host[] = "broker.qubitro.com";
int port = 1883;
mqttClient.setId(deviceID);
mqttClient.setDeviceIdToken(deviceID, deviceToken);
Serial.println("Connecting to Qubitro...");
if (!mqttClient.connect(host, port))
{
Serial.print("Connection failed. Error code: ");
Serial.println(mqttClient.connectError());
Serial.println("Visit docs.qubitro.com or create a new issue on github.com/qubitro");
}
Serial.println("Connected to Qubitro.");
mqttClient.subscribe(deviceID);
}In this code, you need to enter 4 different parameters. The first two parameters are MQTT device ID and Tocken. To get these credentials login to the Qubitro Portal and create a MQTT connection and get these credentials.

Connect a suitable battery to power the device. Ensure that the battery provides enough power for all components.
Then just look at the serial terminal response.
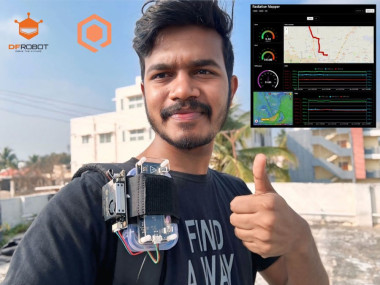
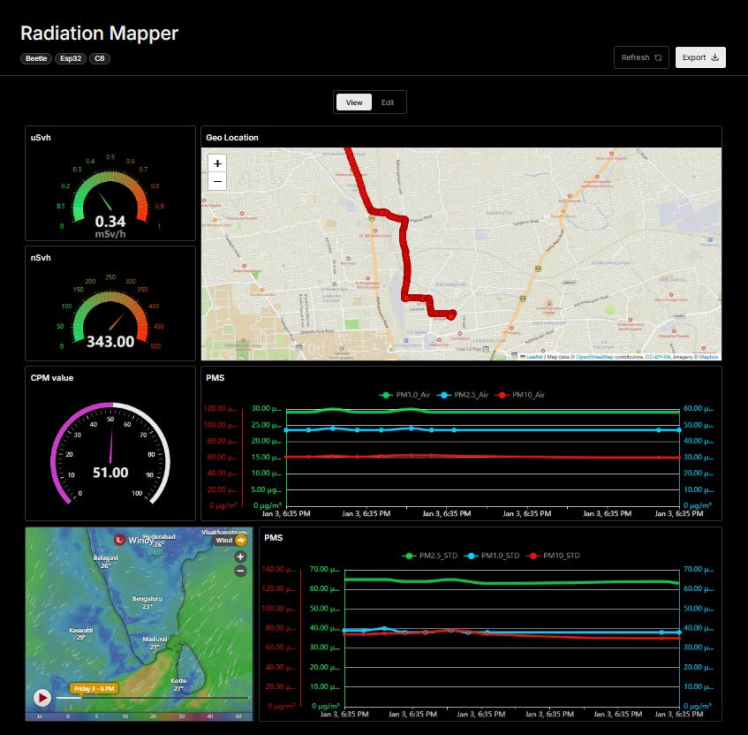
Now you can view the data in the Qubitro portal.

You can also create some awesome dashboards with Qubitro.
Design the Enclosure: Design an enclosure to house all components securely. Ensure that the enclosure is durable and protects the components from environmental factors.

In this, I have used a hand grip strap to attach this device to my backpack and this is what it looks like.

Imagine a scenario where a radiation mapper device is deployed in an area affected by a nuclear disaster similar to Chornobyl. The device continuously monitors radiation levels and particulate matter in real-time, providing valuable data to authorities and researchers. The GPS mapping feature allows for precise location tracking, enabling targeted response and cleanup efforts.
Inspired by the HBO miniseries "Chernobyl, " which vividly portrays the harrowing events and aftermath of the disaster, this device can help prevent and mitigate the effects of nuclear accidents by providing accurate and timely data. The series highlights the importance of accurate radiation monitoring and timely response, emphasizing the need for such devices in disaster-prone areas.
ConclusionBuilding a radiation mapper device with a PMS sensor and GPS mapping is a valuable project that can provide real-time monitoring of radiation levels and particulate matter. Inspired by the Chornobyl disaster and the HBO miniseries "Chernobyl, " such a device can help prevent and mitigate the effects of nuclear accidents by providing accurate and timely data.
I extend my heartfelt gratitude to the DFRobot team and Shirley Li for their invaluable support and provision of the components essential for this project. Their expertise and assistance have been instrumental in bringing this innovative idea to life.
For more information on the Chornobyl disaster, you can visit Wikipedia. To learn more about the HBO miniseries "Chernobyl, " you can visit the official HBO website.

If you have any questions or need further assistance, feel free to ask!
Credits
Related products


Leave your feedback...