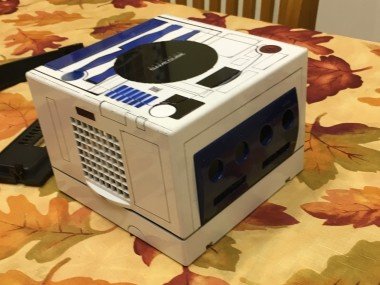
Raspberry-pi Console With Custom R2d2 Gamecube Case

About the project

Ever wanted to re-live the golden age of video games in a compact, all in one box? Create your dream console emulator with raspberry pi.

Project info

Difficulty: Easy

Platforms: Raspberry Pi

Estimated time: 3 days

License: GNU General Public License, version 3 or later (GPL3+)

Items used in this project

Hardware components

3055  ARM Raspberry Pi 3 Model B 3055 ARM Raspberry Pi 3 Model B x 1
Mausberry shutdown circuit Mausberry shutdown circuit Located at: https://mausberry-circuits.myshopify.com/products/shutdown-circuit-use-your-own-switch This circuit is crucial because it allows the raspberry pi to be shut down properly simply from pressing a push button that is going to be mounted to the case. The circuit detects whether the switch you solder to it is momentary (meaning push button) or a simple on off switch. You can use whatever switch you like. I went with momentary. The circuit also has soldering points for an led bulb to give a clear indication of when the console is on or off. x 1
Wire (around 30 awg) Wire (around 30 awg) knowledge of soldering is only important for the mausberry circuit. x 1
USB extender 6 inch male to female USB extender 6 inch male to female These are going to line up with the gamecube controller ports and plug straight into the raspberry pi usb ports. x 4
HDMI extender cable 6 inch male to female HDMI extender cable 6 inch male to female This plugs into the pi and lines up with a custom port i dremelled out of the gamecube's airvents in the back. x 1
Micro usb extender male to female Micro usb extender male to female This is going to be where your power supply will plug into. fits perfectly where the gamecube's original dc 12v in port used to be. x 1
Micro SD card Micro SD card storage for the pi. any Micro SD of your choice. x 1
5.2V 2.5 AMP power supply 5.2V 2.5 AMP power supply I recommend a power supply with a little bit extra voltage to prevent under voltage, simply because the extra cables, circuits, and things plugged into the pi will demmand more power. I have had slight under voltage with the canakit power supply (5v), an otherwise extremely proven reliable power supply, just doesn't give enough juice for this build. x 1
Acrylic protective case for pi Acrylic protective case for pi https://www.amazon.com/gp/product/B072JJVBRH/ref=oh_aui_detailpage_o01_s00?ie=UTF8&psc=1 This one is sold off amazon, it comes with a fan, ultimately this was hot glued into the gamecube to make mounting the fan easier. It houses a 40x40x10 mm fan. A fan isn't necessary because the pi generally doesn't require one if kept stock. I wanted to overclock mine so a fan was a must. x 1
LED bulb with two pins for wires. LED bulb with two pins for wires. these can be found all over the internet, and they line up perfectly with the GameCube's original light. x 1
A broken gamecube A broken gamecube There are tons of these selling on ebay. I got mine for 10 dollars. I didn't have the heart to waste my working gamecube so I bought a broken one. I highly recommend the indigo model if you can get your hands on one. The plexi glass disc tray cover is removable on the indigo model so it's easier to paint and customize. I bought a platinum model. x 1

View all

Software apps and online services

paint.net paint.net a free download, used this to create and measure a template for the R2D2 stencils

Hand tools and fabrication machines

Razor Razor used to cut the paper i printed for the stencils. the sharper the better. x 1
Hot glue Hot glue hot glue will be what is holding the bulk of this build together. Fun fact: a ton of apple products are hot glued together. x 1
dremel/cutter dremel/cutter I got creative with this tool, you are going to need to get creative and cut some plastic to house your pi. x 1
mini screw drivers mini screw drivers a must. x 1
Nintendo screwdriver bit Nintendo screwdriver bit if you want to crack open a GameCube, you are going to need Nintendo's custom screw driver bit. x 1
Spray paint (optional) Spray paint (optional) This is where I had the most fun. You can totally leave the gamecube stock, it's up to you. I wanted to make something no one else had, so i went for an R2D2 theme. Anyone trying this, i would love to see pictures of what you can make. Get creative. x 1

Story

    I have always had a passion for retro gaming. I grew up playing Super Nintendo and NES, as well as the GameCube. I am a die hard Nintendo fan as well as a huge Star Wars fan. When I saw what people were doing with raspberry pi's and emulation it opened up a new world to me. If you would have shown kid-me that i could play the whole libraries of NES, N64, Arcade games, Genesis, SNES, etc. All on one console that you create yourself, to your own specifications, my mind would have been blown. That's what this whole project was about, bringing back my inner child. I wanted to create and own something that no one else has. Maybe the project didn't turn out exactly the way I envisioned, but it's still mine. I created something and i'm very glad i tried and succeeded. Yes, I could have bought a case on amazon for 5 dollars, but i wanted something more special. More personal. Something that felt more like a console that I could come home and turn on and get a sensation that i'm playing a video game console, not simply a computer board in a small plastic case. 


The cases you can buy on amazon have the advantage of portability, but that was not the purpose of this build. This build was about making something that can sit proudly in my room, and turn on and start playing Mortal Kombat with a friend who is actually in the room with me. Or start button mashing my way through the Simpsons arcade game with 3 other friends. This project is about remembering the days where my friends or family would come over and we'd be laughing having a good time playing some video games. I hope to create new experiences with this console and impress people who have no knowledge of emulation or computers with it. 

Schematics, diagrams and documents

rough image of how the guts look

2

back ports

inside

power circuit seen plugged into pi's micro usb power slot, led wires are the red and green, and the power switch wires are pink

CAD, enclosures and custom parts

painting 1

stencil

painting 2

painting 3

completed case

Credits

Leave your feedback...