
Package Handling Assurance System

Made by nekhil-ravi
About the project
A solution employing machine learning and cellular IoT for the secure transportation of packages.
Project info
Difficulty: Moderate
Platforms: Arduino, Blues Wireless
Estimated time: 1 hour
License: Apache License 2.0 (Apache-2.0)
Items used in this project
Hardware components


Story

Traditional markets are making way for a digital revolution driven by technology, transforming how we buy and sell goods. The rise of online sellers became a linchpin in this shift, reshaping commerce and providing unparalleled convenience to consumers.
As online retailing soared to new heights, the significance of a secure transit system for packages during delivery became increasingly apparent. Ensuring the safe transit of packages for online retailers is a critical challenge, and the industry faces frequent damages during delivery, leading to a higher rate of product returns, reduced customer satisfaction, and potential harm to retailers' reputations.
So here I am introducing a system in which they can ensure the safe transit of packages by combining the capabilities of Cellular IoT and machine learning.
This system is mainly intended for use with Fragile items.
How does it work?
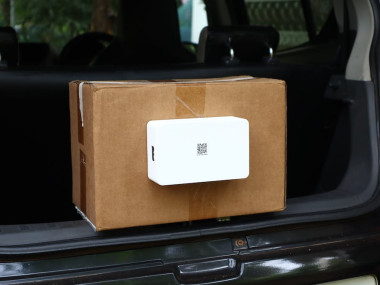
This package assurance system is a kind of box which can be attached to any packages that we need to monitor. At the time of transit whenever someone mishandles the package, the instant itself will get an SMS alert to the user's phone. In addition to that, the mishandling event will be recorded on a website with that specific timestamp. So any person who has access to the website can locate the place where the mishandling event occurred via Google Maps.
Hardware Components
1. Notecard
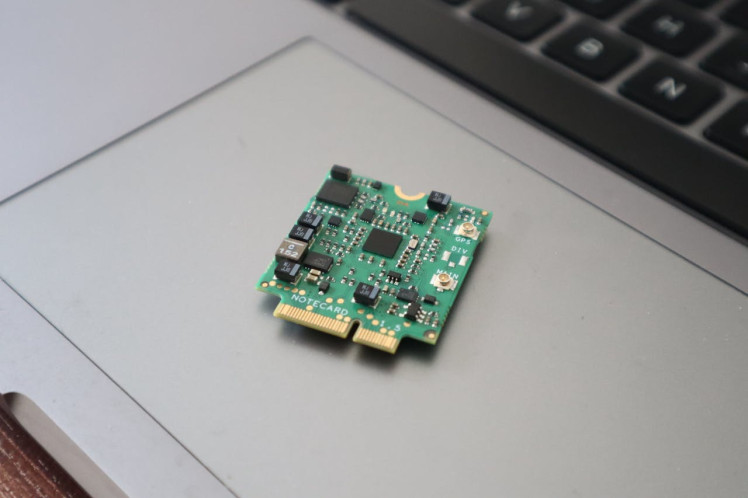
This is the cellular IoT device from Blue Wireless responsible for communication and data transfer. It Facilitates seamless connectivity with the cloud for real-time updates. It can easily provide a global cellular connection without any subscription or cellular plans.
An interesting aspect of the device is that it can be easily programmed with the help of JSON and it consumes only less power, it also supports both I2C and UART for sending JSON commands.
There are a variety of Notecards available. You can choose your own according to your region and needs.
In this project, I am going with the Notecard cellular global version.
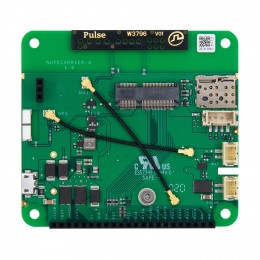
2. Notecarrier A
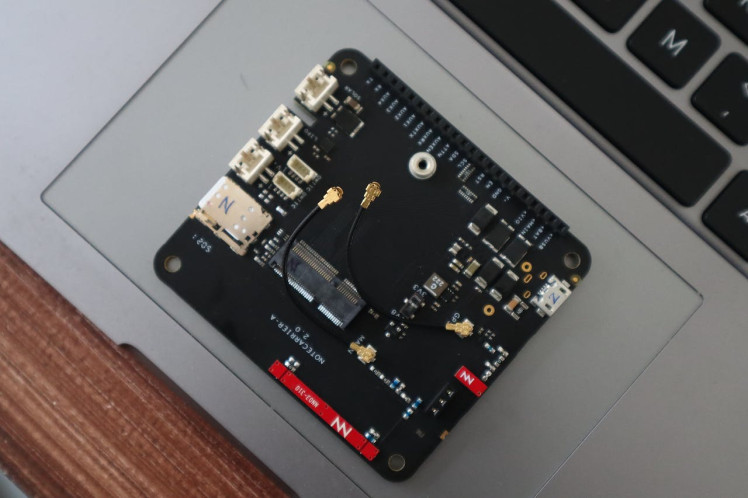
Notecards cannot be used independently, so we need a Notecarrier to hold them. There are also a variety of Notecarrier available. This project is proceeding with Notecarrier A due to its ability to connect the Lipo battery. Each Notecarrier has its benefits.
Unfortunately, my country does not support the embedded SIM. So I used an external SIM to establish the connection with the Notehub.
3. Adafruit GPS Module
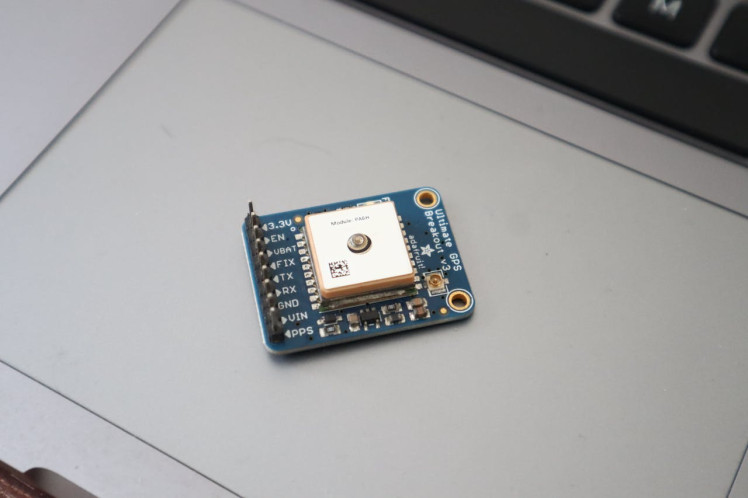
The Adafruit GPS module integrated into the Package Assurance System serves as a critical component, enhancing the precision and functionality of location tracking within the system. With its advanced capabilities, this module provides accurate real-time GPS data, enabling the Package Assurance System to pinpoint the exact location of packages during mishandling events. The module boasts a user-friendly design, allowing seamless integration with the Arduino Nano 33 BLE Sense and other system components.
Note: The Notecard does not support running both continuous cellular connection and continuous GPS. That's why an external GPS module is used.
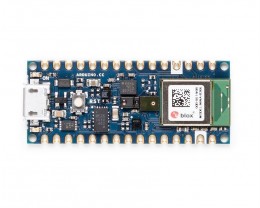
4. Arduino Nano 33 BLE SenseRev2
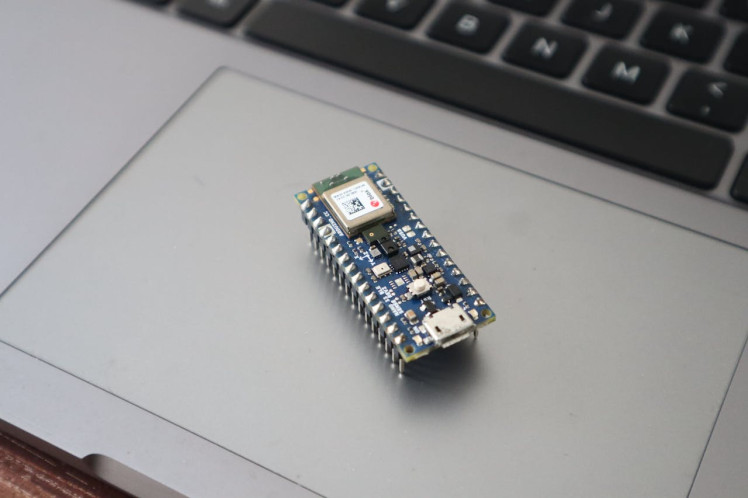
The host of the system is Arduino Nano 33 BLE sense Rev2. It's a 3.3V AI-enabled board in the smallest available form factor. It comes with a series of embedded sensors.This project utilizes the 3 acceleration channels of the LSM9DS1 sensor for detecting the mishandling of the package.
I2C protocol is used here for communication with the Notecard and UART is used for communicating with the GPS module.
Machine learning Model
Identifying the mishandling of packages(vigorous shaking, Throwing, Falling) can be challenging when employing rule-based programming, but machine learning offers a more adaptable solution to address these variations. In this context, I will leverage Edge Impulse, a tool that simplifies the processes of model training and integration, enhancing overall efficiency.
Note: If you are new to the edge impulse just do some basic projects and get back to it.
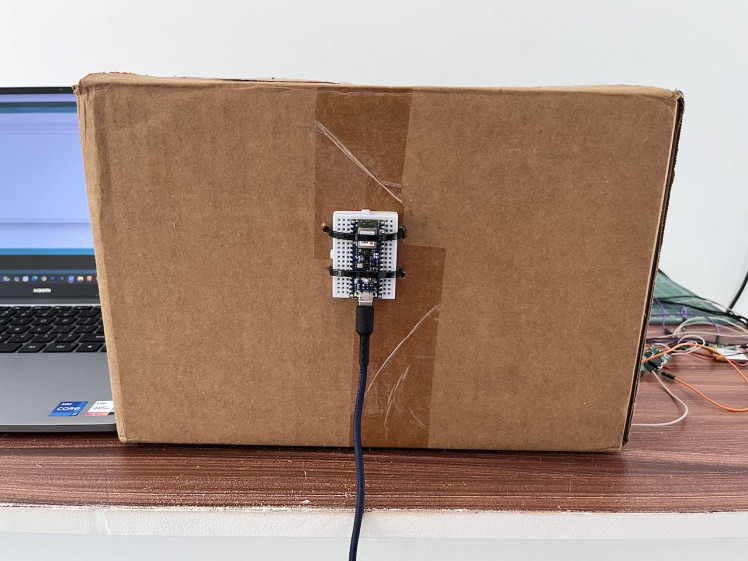
As for the training purpose, I just attached the Arduino Nano 33 BLE to a cardboard package via the breadboard using some wiring ties.
1. Dataforwarder
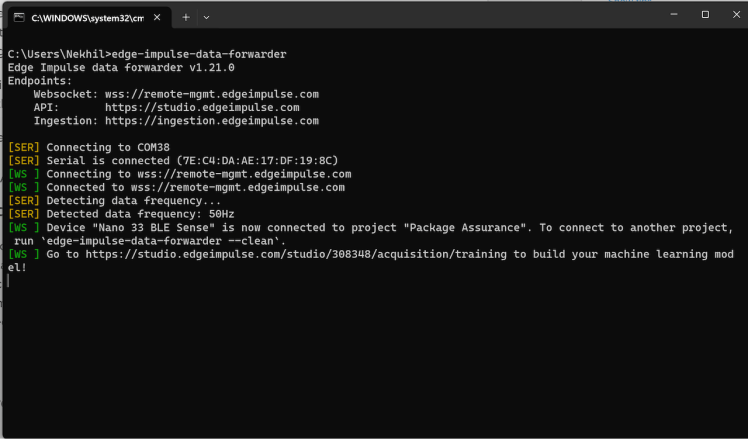
The Arduino Nano 33 BLE sense Rev2 is not officially supported by Edge Impulse, so to connect the device with the Edge Impulse, I use a data forwarder tool of Edge Impulse CLI to solve the issue.
To install Edge Impulse CLI follow this tutorial. Then Upload the data collection.ino to the Arduino Nano 33 BLE sense.
Then fire up the data forwarder tool via the command prompt and login into your account.
2. Data Collection
Machine learning begins with the data you provide. It is crucial to gather clean data so that your machine-learning model can identify the proper patterns. How accurate your model is, will depend on the quality of the data you provide the computer.
So I sampled the three-axis accelerometer data designated as Ax, Ay, Az for 0ne min at 50Hz Frequency. Here I mainly focused on getting three classes of data ie, when the package is in Normal Handling, Idle and Moving. So basically I am creating a machine learning model which can recognize these events properly.
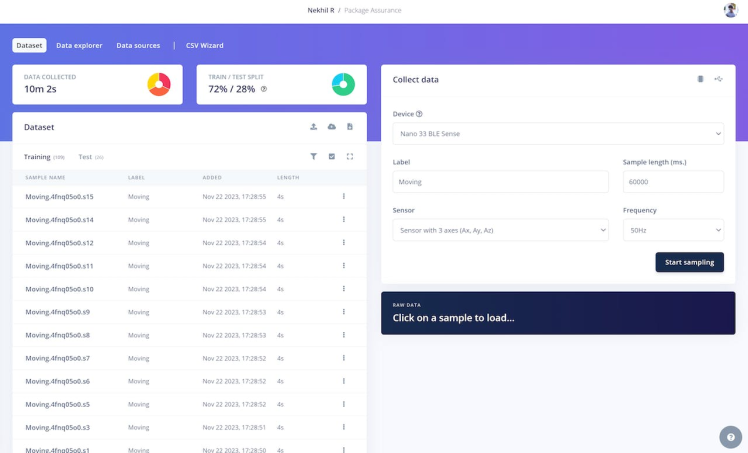
Then I split the whole data into 4 seconds which is split between the training and testing dataset.
3. Impulse Design

Figuring out which features to extract from the data to submit to our model for training and, eventually, inference, is one of the most essential things we can do in machine learning. Rather than picking and choosing some of the raw samples, the edge impulse will combine the samples in a variety of ways to generate unique features that help describe what's going on in a particular motion.
To generate these features I created an Impulse which is the Edge Impulse word for machine learning pipeline. The above screenshot shows my Impulse design for this project.
Although neural networks are fantastic, they have one major problem. They're useless when it comes to dealing with data they've never seen before. Because neural networks only have access to training data, they are unable to assess this. Even if you offer it something entirely different beyond what it's seen before, it'll still fall into one of the three categories. So I also added an anomaly detection block to find the anomalies in the motions. They will stand out in the output which is used in finding the mishandling of packages.
4. Feature Generation
After setting the Impulse I just get into the feature generation. The below image shows my features, generated from the dataset. By merely looking at the feature generation tab anyone can quickly verify whether the data is properly clustered or not.

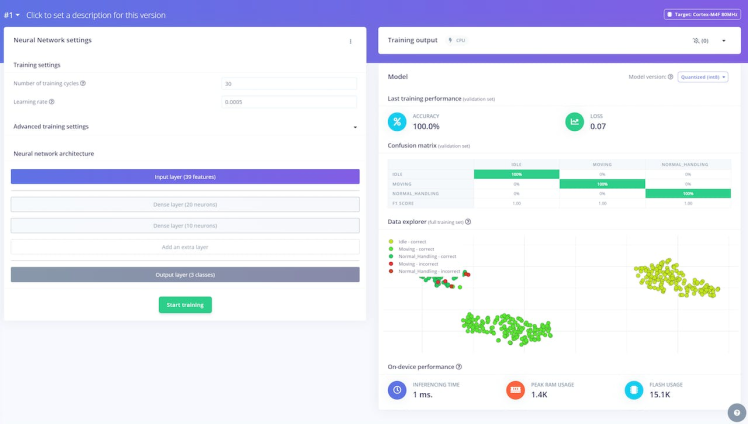
5. Model Training
Model training is the phase in which the neural network tries to fit the best combination of weights and biases to a machine learning algorithm to minimize a loss function.
By using these Neural Network settings, I made 100% accuracy for the model. It is very rare to get this much accuracy.
6. Anomaly detection
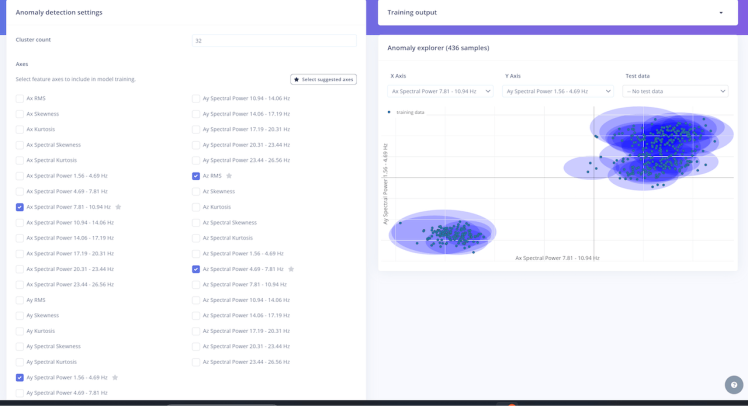
The main intention of anomaly detection is to identify the anomalies during the transit of packages. The Edge Impulse already calculated the feature importance for my data, because they are very significant in anomaly detection.
The edge impulse uses K-means clustering for anomaly detection. This method looks at the data points in a dataset and groups those that are similar into a predefined number K of clusters. A threshold value can be added to detect anomalies: if the distance between a data point and its nearest centroid is greater than the threshold value, it is an anomaly.
In the system, any other movements except our trained movements will be regarded as mishandling.
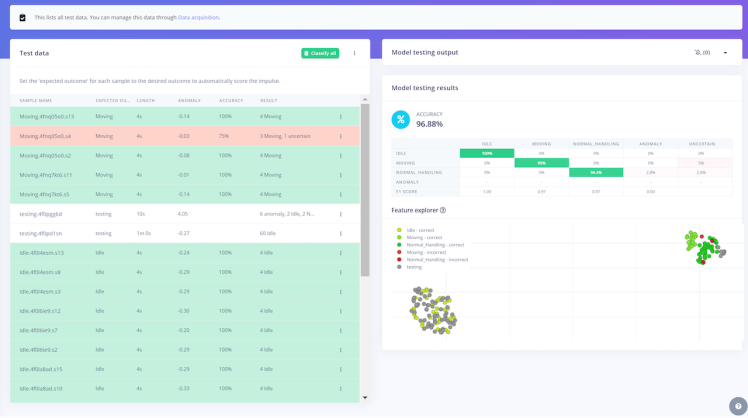
7. ModelTesting
The model's performance on our testing data is displayed in the Model testing results tab. Our accuracy is 96%, which is still quite good. Anyone can easily look at the Confusion matrix to determine which labels are most susceptible to error.
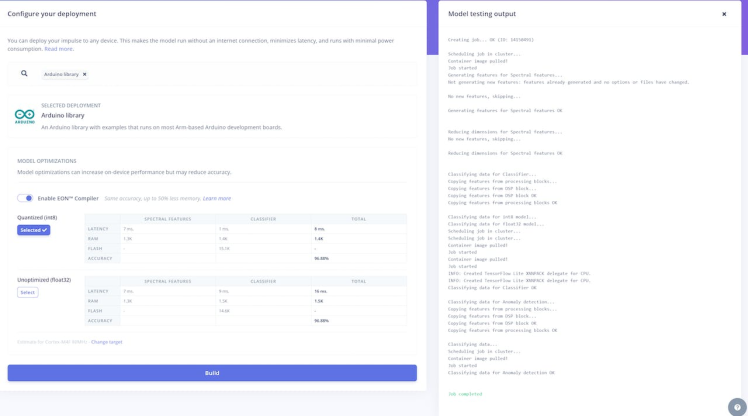
8. Deployment
It's time to deploy it back to the device. Edge Impulse will suggest the option that is optimal for the project's needs. Then I downloaded the model as the ZIP library which can be added in Arduino IDE.
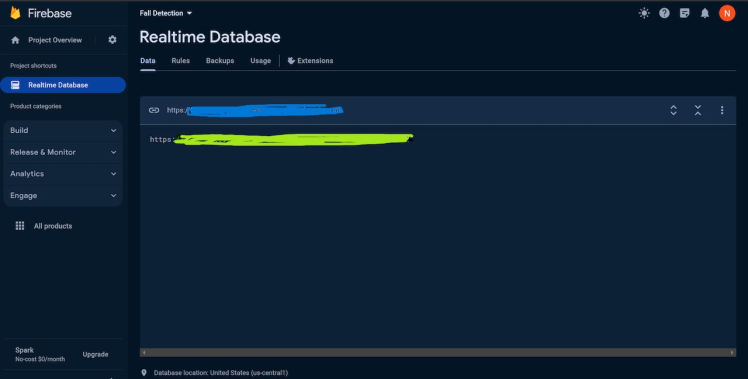
Firebase
Firebase is the backbone of our Package Assurance System website, functioning as a real-time database that ensures users receive instantaneous updates. The main advantage of the Firebase is that no Server management is necessary, no need to create APIs. Firebase is your server, API, and data storage, all of which are constructed in such a generic way that you can adapt them to the majority of demands.
To set up your real-time database just have a look at this doc.
This is my real-time database.
To find the Firebase Config:
- Go to Firebase
- Then go to Settings > Project Setting
- Under Your Apps > SDK Setup and Configuration > Config (Sample given below)
const firebaseConfig = {
apiKey: "<apiKey>",
authDomain: "<authDomain>",
databaseURL: "<databaseURL>",
projectId: "<projectID>",
storageBucket: "<storageBucket>",
messagingSenderId: "<ID>",
appId: "<APP ID>"
};
The config will be used in the website to retrieve the data from the Firebase.
Twilio
Twilio stands as a vital communication tool in our Package Assurance System, specifically chosen for its exceptional capabilities in delivering real-time alerts to users. When mishandling events occur Twilio comes into action, promptly sending SMS messages to users. This immediate notification system ensures that users are informed of any irregularities in the handling of packages, allowing for swift responses and interventions.
Setting up the Twilio account is pretty simple. If you have any doubts just follow this video.
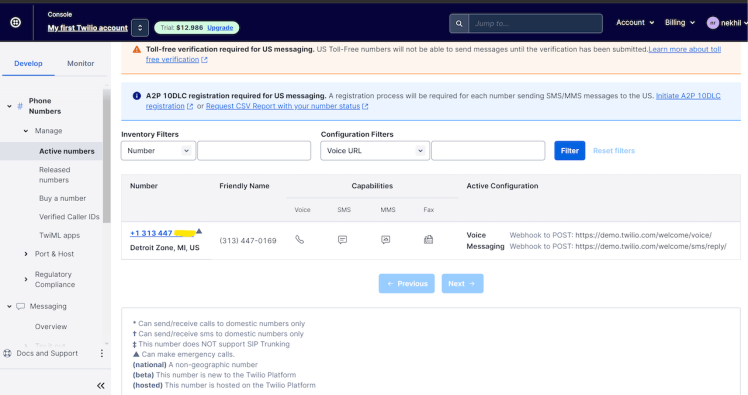
This is my active number which will be used to send the alert SMS.
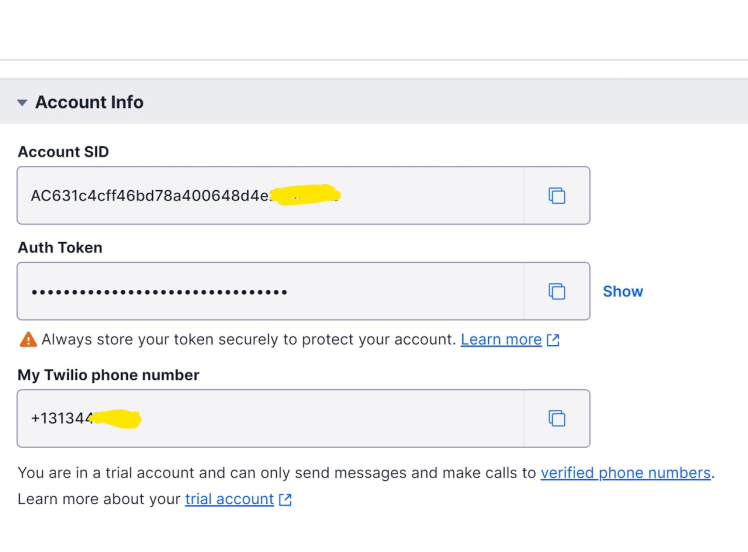
This is my account info which will be used later when creating routes.
Notehub
Notehub serves as the central hub for managing and visualizing data transmitted by the Notecard in the Package Assurance System. With its user-friendly interface, the platform simplifies the navigation and interaction with real-time data, providing a unified view of package handling conditions, anomalies, and location details. Notehub ensures secure data transmission, aligning with Notecard's commitment to standards-based and secure communication.
For a quick start with the Notecard and Notehub follow this tutorial
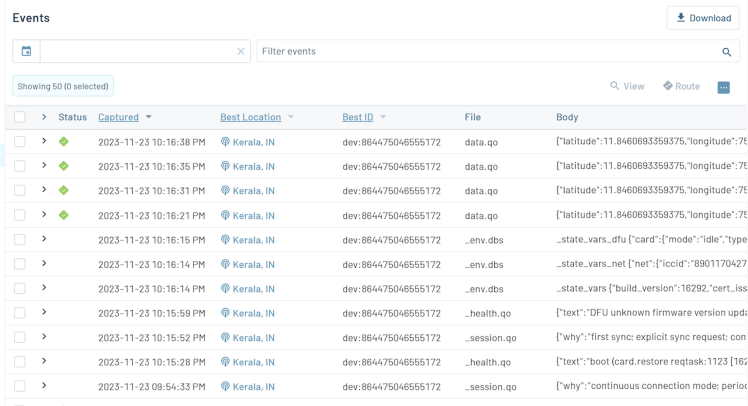
This is my device which is connected to the Notehub.

These data came from the Notecard when the package mishandled was detected. The data contains Latitude, Longitude and the Timestamp at which the event has occurred.
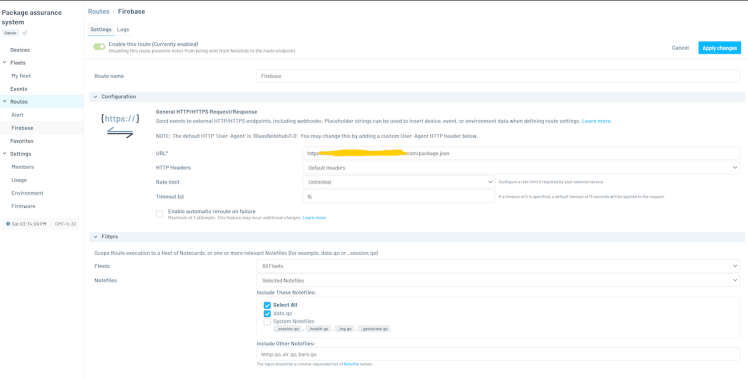
Routing in Notehub is a crucial feature that enables the seamless transmission of data from the Notecard to the centralized platform. By setting routes it can seamlessly route data from Notecard to a centralized platform. Here I am setting two routes one to the Twilio for sending SMS alerts and another one to the firebase to update the mishandling event in the website with timestamp and location.
This is the Firebase route in which its URL will be followed by the Firebase URL plus some JSON file format.
This is the Twilio route.
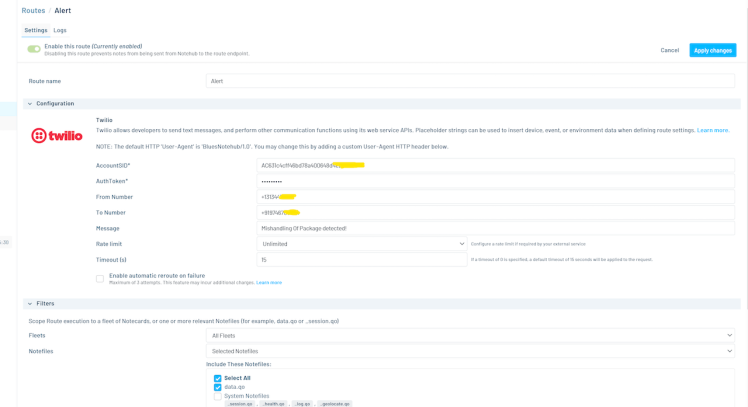
The Notehub has a direct integration with Twilio we just need to provide the Account SID, Auth token, From number, To Number and the message.
Web Interface

The web interface is designed in such a way that it can reflect all types of mishandling events updated in the Firebase database. The insecure handling events are updated in the Firebase by the Notecard. This webpage is created using the HTML, CSS and JS.
Some extra hardware
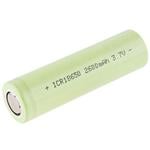
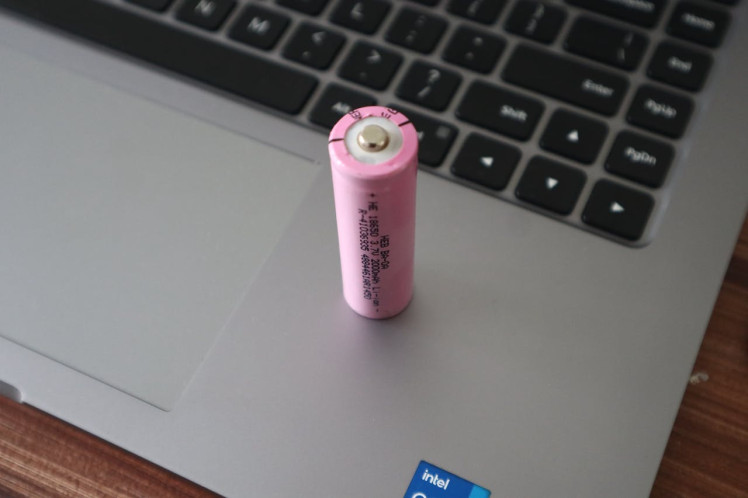
- Lipo battery
The power supply for the device is a 3.7V 18650 Li-ion cell with a current of 2000 mah.
- Voltage Booster
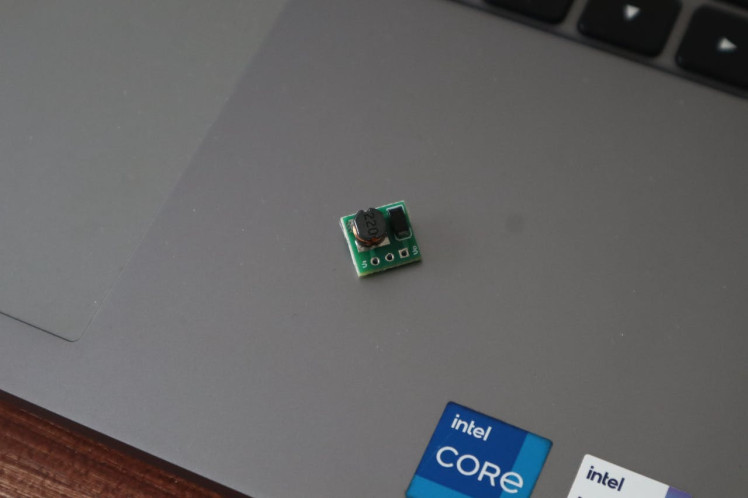
The Notecarrier can be easily powered by a Li-ion battery, and it also contains a built-in charge controller to charge the battery. The problem is that, here I am supposed to power the Arduino through its Vin Pin which needs strictly 5V, but Li-ion can only provide a max 4.2V when it's fully charged, so it mitigates this issue I have used a tiny voltage booster.
Final Assembly
I repurposed my old plastic enclosure as the case for this project and assembled all the components as per the schematics.
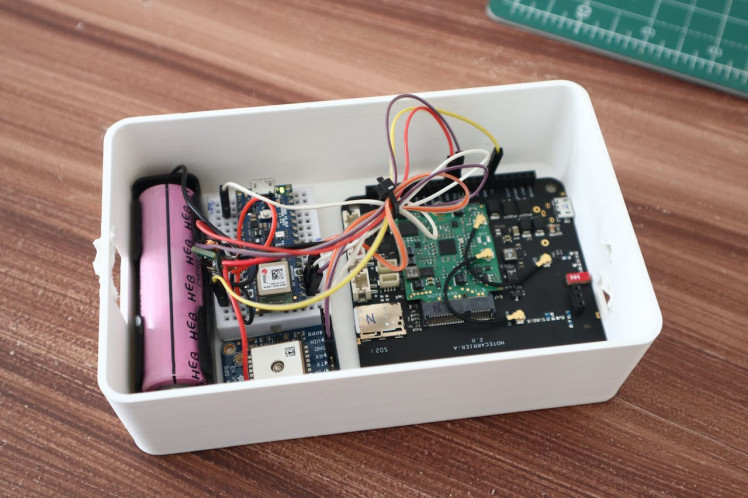
Then you can easily tie this system to any package.


You can find all the assets regarding this project in the GitHub repository.
Schematics, diagrams and documents
Code
Credits
Related products


Leave your feedback...