
"microdot" For Lattepanda (or Raspberry Pi) By Allan

Made by DoYouKnowArduino / Home Automation
About the project
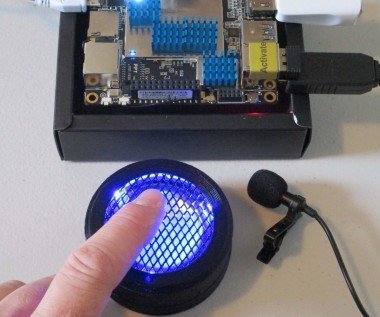
The MicroDot is a home-made Alexa 'button' designed to be connected to a LattePanda or a Raspberry Pi, with Alexa Sample App installed. It is a small speaker with LED's and touch/speech activation, and is ideal for use on a desktop or in a car.
Items used in this project
Hardware components

View all
Software apps and online services
Story
Step 1: System Overview
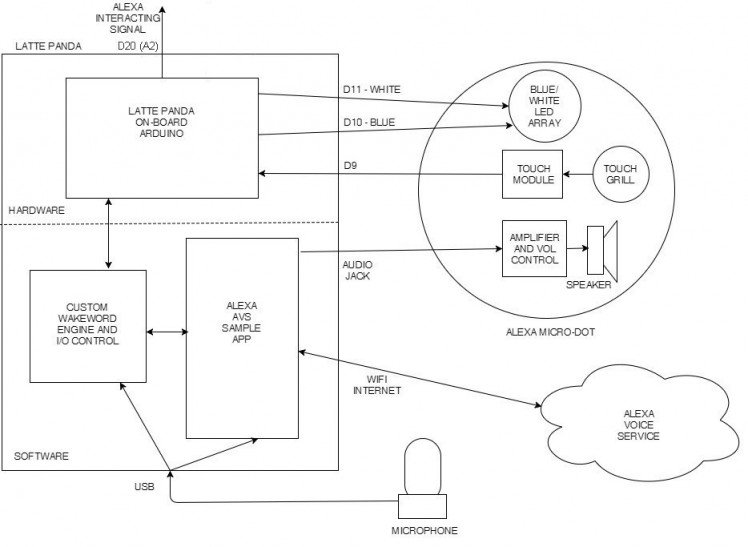
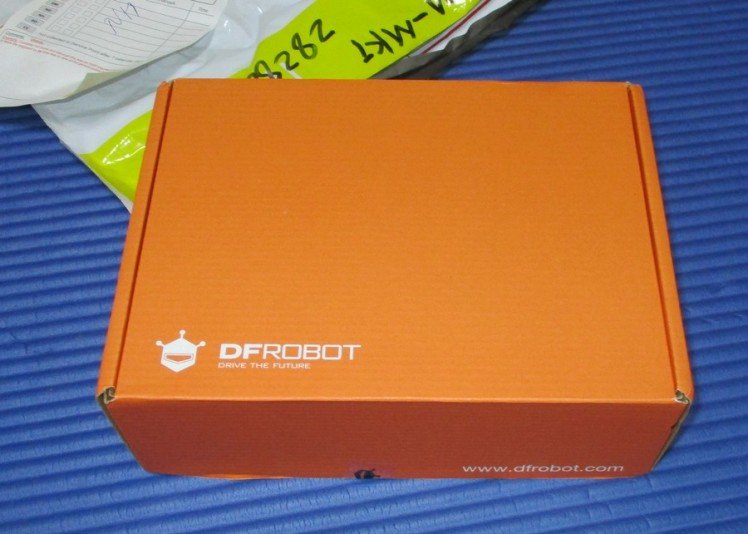
LATTE PANDA
The LattePanda is a small (about the size of a Raspberry Pi) Windows 10 computer with a built-in Arduino for interfacing to the real world. It really is quite nifty - and is a good replacement to the Raspberry Pi - especially if you (like me) have problems getting to grips with Linux.
I have installed the Alexa Sample App onto the Panda, and have implemented my own wake-word engine based on Windows built-in speech recognition SDK.
MICRODOT
The MicroDot consists of a small amplifier and speaker with a touch-sensitive grill and blue/white LED array. The MicroDot was originally designed to be placed on the dash in my car to provide my in-car Alexa solution (to pair with my previous project - Alexa-enabled car stereo). As well as having a wake-word option, I wanted touch-activation because Alexa will have a hard time hearing my wake-word when the music is up loud! (Once activated, the Panda will send a signal to the stereo to turn the volume down while Alexa is listening/speaking).
RASPBERRY PI
For those who are more fluent in "Raspberry Pi", I have described at the end of this Instructable how to interface the MicroDot with a Rapsberry Pi 3.
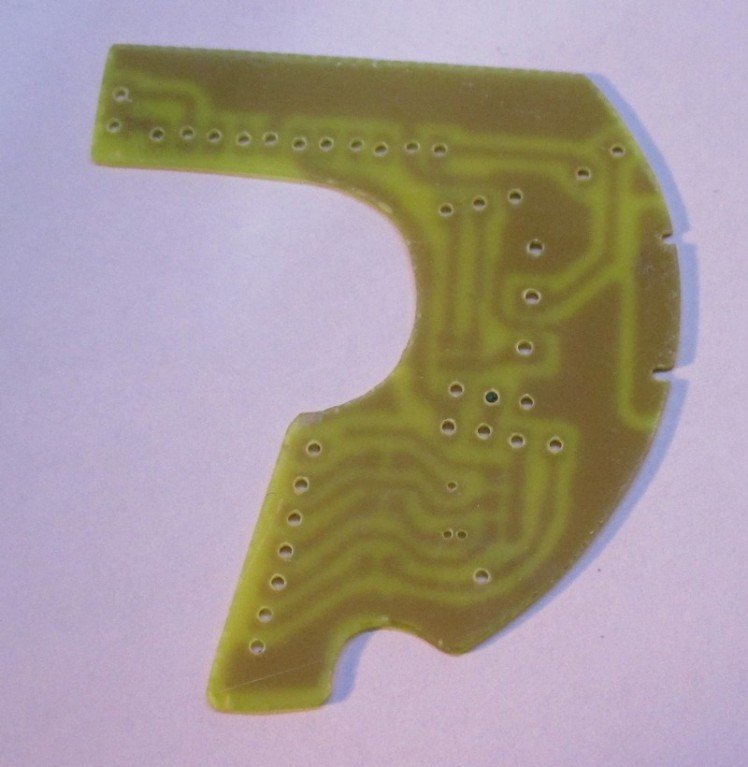
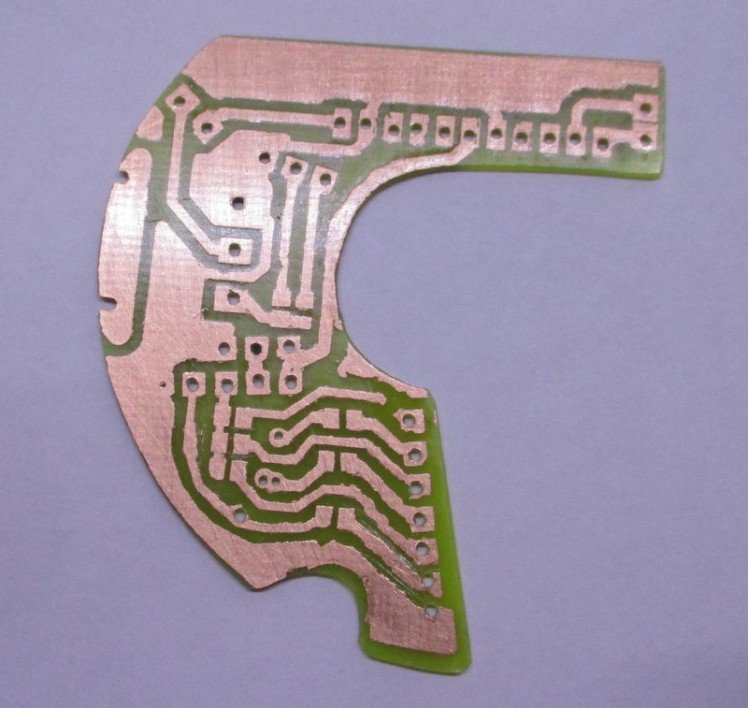
Step 2: MicroDot Circuit
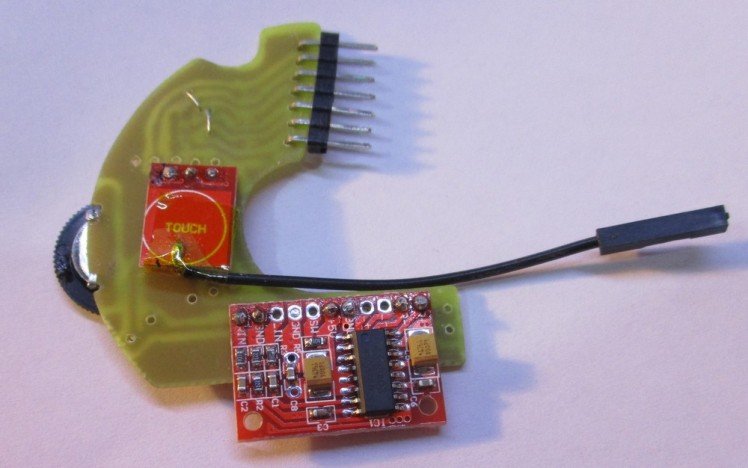
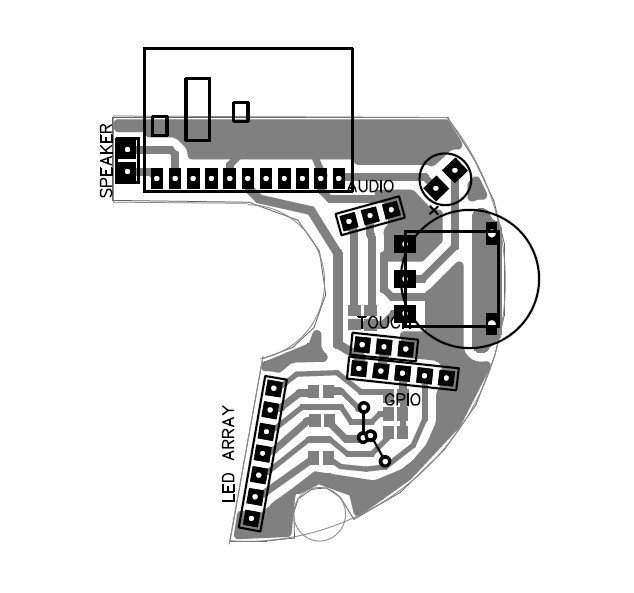
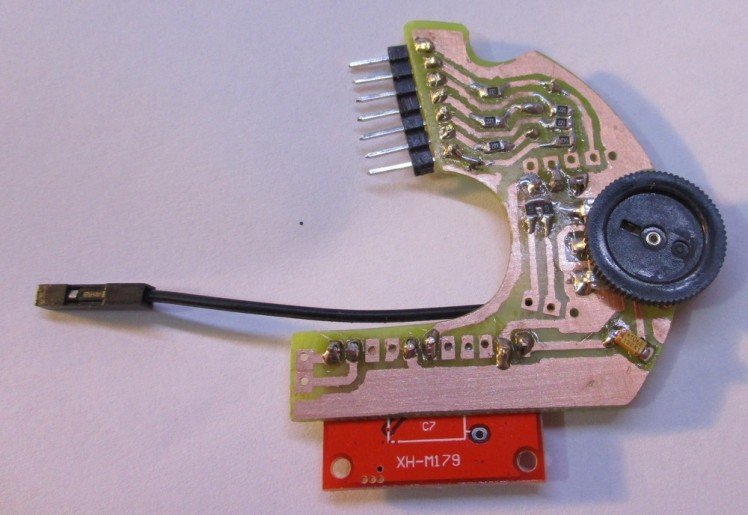
PARTS
6 x 220R SMD Resistors2 x 470R SMD Resistors1 x 10uF SMD Capacitor1 x TTP223 Touch Sensor Module ( https://www.ebay.com/itm/192097635565 )1 x PAM8403 3W Amplifier Module ( https://www.ebay.com/itm/221895096190 )1 x 10K Single Linear Thumb Potentiometer ( https://www.ebay.com/itm/401105807680 )1 x 50pF Ceramic Capacitor3 x 3mm Blue LEDs3 x 3mm White LEDs1 x 1.7inch 4ohm 3W Speaker1 x Thin Black Cable from old Earphones1 x Thin Black 1m USB Extension Cable*
CONSTRUCTION
The MicroDot PCB was made by iron on toner method on 0.8mm thick single-sided board - at this thickness it can be cut roughly to shape with sharp scissors and then easily filed to shape. Mount all the surface mount components first.
A wire needs to be connected to the touch surface of the sensor, so a small area needs to be scraped away to solder to. I found that in its raw mode, the sensor was way too sensitive - it worked fine, but once it was mounted in the enclosure it was often false-triggered due to its proximity to the metal speaker. I grounded the metal speaker - which helped somewhat, but I had to eventually refer to the >https://www.ebay.com/itm/371801191297 ) to get good sound. Note that in the photos I use the audio-out of my HDMI-VGA video adapter, but it is fine to use the on-board audio output jack.
You will also need a usb microphone (https://www.ebay.com/itm/332148968227 ).
Step 4: The LattePanda
SETUP
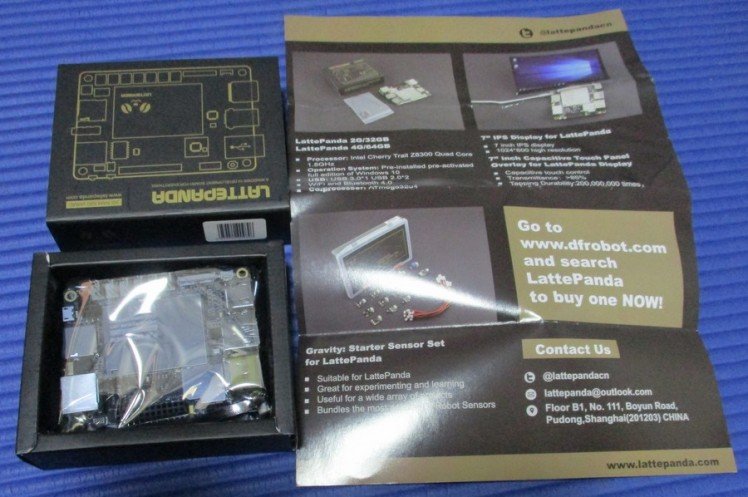
The Panda comes in 2G/32G and 4G/64G models, with or without Windows 10 License. The model that I used was the 2G/32G version with Windows 10 License: https://www.dfrobot.com/product-1405.html
Please see the official documentation for settting up your LattePanda (http://docs.lattepanda.com) There is nothing too complicated here, but take note of the instructions for powering up your Panda (http://docs.lattepanda.com/content/getStarted/powe...).
Everything seemed to work first time for me (which is a nice change from my Raspberry Pi experiences).
One important thing is that you really need some kind of cooling for the Panda. I used some stick-on heatsinks on the top and bottom (the underside gets particularly hot).
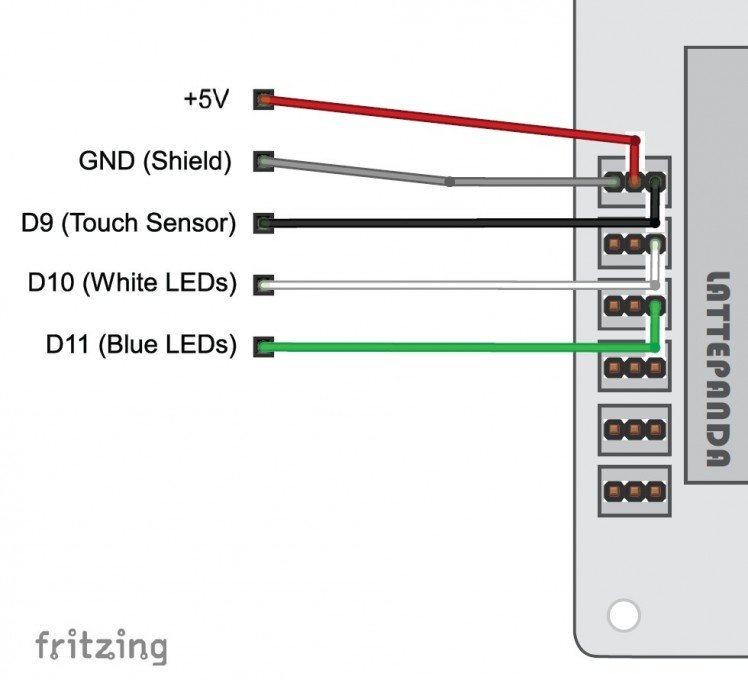
This diagram details the Arduino inputs and outputs: http://docs.lattepanda.com/content/hardware/inputs... We will be using the array of 3 pin connectors on the left-hand side to connect to the MicroDot (D9, D10 and D11), as well as the audio output jack.
Step 5: LattePanda - Install Alexa Sample App
DOWNLOAD
The Alexa Sample App is available here:
https://github.com/alexa/alexa-avs-sample-app/
Press the Clone or Download button and download as .zip
Create a directory on c drive C:ALEXA, and extract the contents of the zip so that the zipped directory called samples sits directly in the ALEXA directory (ie C:ALEXAsamples...)
INSTALLING
The official full instructions for how to install on Windows are here:
https://github.com/alexa/alexa-avs-sample-app/wiki...
There are quite a few steps, and it takes a little while, but I found that with Windows everything went smoothly first time.
You will need a good text editor to edit some of the configuration files (Notepad is no good as the files have Linux style line endings). I used Notepad++ which is available here: https://notepad-plus-plus.org/
A few notes regarding the official instructions:
Part 3 - Dependencies
My Panda is 64 bit, so I downloaded all the 64 bit versions, but if you are installing on a 32 bit system you will need to use the 32 bit versions. Note: don't mix 32 and 64 bit versions of the dependancies.
The link shown for VLC media player, will take you to 32 bit version. To get the 64 bit version, go to this link: http://www.videolan.org/vlc/download-windows.html and on the download button, select the arrow, and then Installer for 64bit version.
For JDK install I used version: jdk-8u144-windows-x64For nodejs I used: Windows Installer (.msi) 64 bitFor Maven: apache-maven-3.5.0-bin.zipFor OpenSSL I used: Win64 OpenSSL v1.1.0f
Part 5 - Authentication method
Choose 5a - Nodejs server. If you get an error running npm command, then you need to add your nodejs directory to your path environment variable (it is explained in the instructions how to do this).
Part 6 - Running the sample app
When editing the config.json file, set wakeWordAgentEnabled to true, as we will be installing a custom wake word engine in the next section (the wake word engine included in the sample app only works with Linux).
If you get an error running the mvn command, then you need to add your mavenbin directory to your path environment variable.
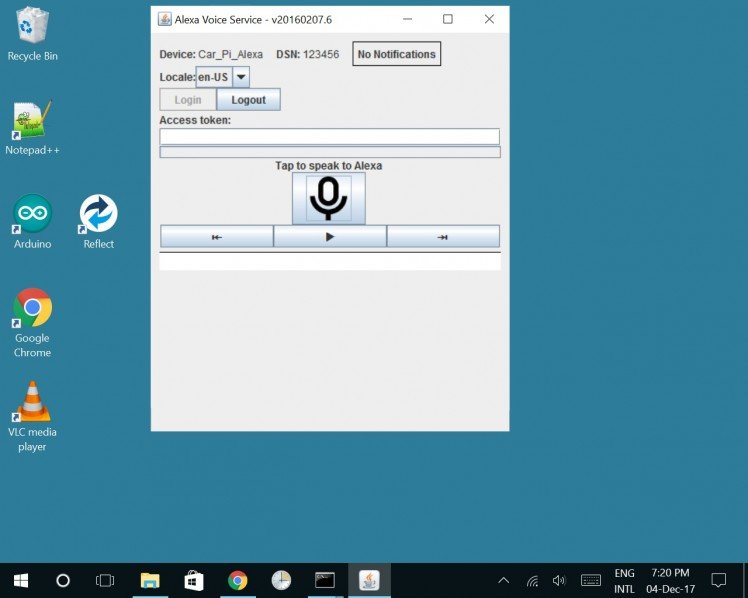
When you run the app, you should get the GUI shown in the screenshot. When you click on the icon you will be able to talk to Alexa. This is the basic Alexa app - but we will need more than this!
The next steps will be to install a custom wake-word engine so you can just say "Alexa" to activate, and also have the option to use a touch sensor via Arduino input. We also need to make the app auto-run on startup, and light up some LED's when Alexa is listening and talking.
Step 6: LattePanda - Install Custom WakeWord Engine
WAKEWORD ENGINE
A WakeWord engine allows Alexa to be awoken by a spoken word (usually ''Alexa"), instead of having to click on a button. The sample app has two options for the WakeWord engine: Sensory or KITT.AI wake word engines. The implementation for these in the sample app, however, only work for Linux. Both these engines are also subject to certain licensing requirements.
Here I will implement a custom wake word engine which is based on Windows 10's own speech recognition SDK. So this is also free of any additional license requirements.
INSTALL DEPENDENCIES
Microsoft Speech Platform - Runtime (Version 11)https://www.microsoft.com/en-gb/download/details.a...x86_SpeechPlatformRuntimeSpeechPlatformRuntime.msi (32 bit) or x64_SpeechPlatformRuntimeSpeechPlatformRuntime.msi (64 bit)
Microsoft Speech Platform - Runtime Languages (Version 11) https://www.microsoft.com/en-gb/download/details....MSSpeech_SR_en-US_TELE.msi
My custom WakeWord engine was written in C# in Visual Studio 2017. I have supplied the final executable here and also the source code. If you want to compile it yourself, then you will also need this:
Microsoft Speech Platform - Software Development Kit (SDK) (Version 11) https://www.microsoft.com/en-gb/download/details.... |x86_MicrosoftSpeechPlatformSDKMicrosoftSpeechPlatformSDK.msi (32 bit) or x64_MicrosoftSpeechPlatformSDKMicrosoftSpeechPlatformSDK.msi (64 bit)
Put WakeWordPanda.exe (and alexa_run.bat) into the ALEXA directory. This program does the following tasks:- Listens for ''Alexa" wake word- Monitors the touch input sensor- Controls the BLUE and WHITE LED's
Note that I developed this on another Windows 10 computer so that I did not have to install Visual Studio on the LattePanda, as I didn't want to use up the Gigabytes. I connected an Arduino Uno installed with StandardFirmata (http://www.lattepanda.com/docs/#SetuptheArduino) to the development computer so that I could also develop with the Arduino input/outputs. The Visual Studio source code is also attached if you want to modify and/or compile this yourself.
MODIFY THE JAVA CLIENT
The Java Client needs a few extra lines added to the code. This is to enable to LED's to work correctly:
When Alexa is listening, a PAUSE_WAKE_WORD_ENGINE signal is sent to the WakeWord engine. I used this signal to know when to turn on the BLUE (Alexa listening LED). When the RESUME_WAKE_WORD_ENGINE signal is received, the Blue LED turns off, and the WHITE (Alexa speaking LED) turns on. The extra code sends another RESUME_WAKE_WORD_ENGINE signal when Alexa stops speaking - so that the WakeWord engine knows when to turn off the White LED.
Navigate to: C:ALEXAsamplesjavaclientsrcmainjavacomamazonalexaavs and open AVSController.java in your text editor. Copy the code from the Extra_Code.txt file attached. It needs to be inserted in two places:
1. In the function public void onAlexaSpeechFinished() directly after the statement: dependentDirectiveThread.unblock();
2. In the function private void handleAudioPlayerDirective(Directive directive) directly before the statement: player.handleStop();
I have also re-purposed the CONFIRM signal so that the WakeWord engine will know if Alexa has responded. This is to cancel a 5 second timeout that will occur if there is no response. Copy the code from Extra_Code2.txt and insert it in one place:
1. In the function public void onAlexaSpeechStarted() directly after the statement dependentDirectiveThread.block();
You now need to recompile the Java Client. Open a command prompt and navigate to C:ALEXAsamplesjavaclient Enter: mvn install to recompile.
If you start up the Companion Service and Java Alexa app as before, and then also double click on WakeWordPanda.exe, wait for it to connect, and then you should be able to activate Alexa by saying "Alexa".
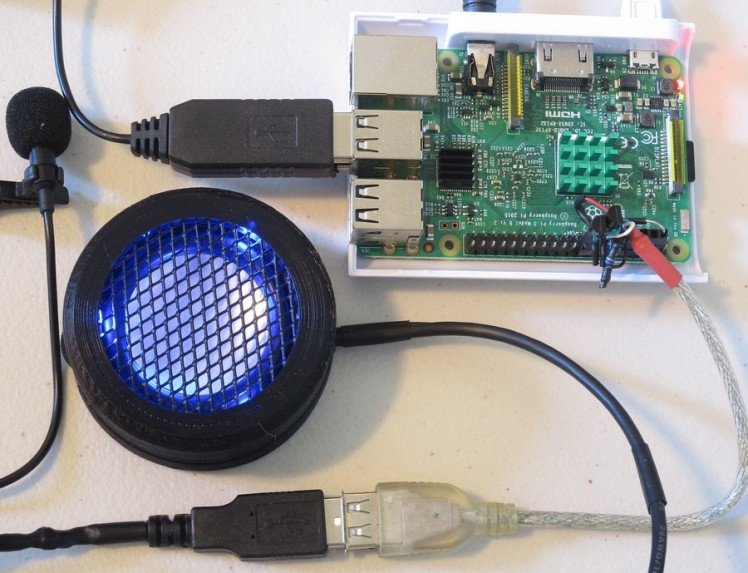
MICRODOT
If you connect the MicroDot's 'USB' cable to the LattePanda as shown in the diagram, and plug in the audio cable, it should now be fully functional. Speaking the wake-word or touching the grill should activate Alexa and the blue LED's should come on. The white LED's should come on as Alexa responds.
SETUP AUTO RUN
Instead of typing in all the commands manually to start everything up, you can use the alexa_run.bat script. This will wait for an internet connection, and then invoke the separate modules (companion service, java client, wake-word engine).
The last step is to make everything run automatically on startup:
1. Right-click on auto-run.bat and select create shortcut.2. Press ctrl+R and type shell:startup. This will open the startup folder.3. Drag the shortcut you created into the startup folder.
Alexa will now auto-run on startup (it takes 30 seconds or so to initialise after startup).
Step 7: MicroDot for Raspberry Pi
(If you want to use a Raspberry Pi 3 instead of a LattePanda).
DOWNLOAD
Download the Alexa Sample App from here: https://github.com/alexa/alexa-avs-sample-app/
Press the Clone or Download button and download as .zip. Unzip so that the alexa-ava-sample-app folder is on the Desktop.
INSTALLING
Follow the official full instructions here (note: setup so that the alexa-ava-sample-app folder on the Desktop):
https://github.com/alexa/alexa-avs-sample-app/wiki...
There are plenty of guides for doing this with a Raspberry Pi on the interne. I have installed this a couple of times on the Raspberry Pi, and neither time did it go as smoothly as installing on WIndows 10 (no surprise - Linux gets me every time). The main issues I encountered were:
1. Getting the audio and microphone to work properly. See here https://github.com/alexa-pi/AlexaPi/wiki/Audio-set... if you also have these issues.
2. Problems with the JDK version. See 4.3 in the official instructions, and the note in the pom.xml file that talks about overriding the version when executing the mvn exec:exec command (ie I had to add this switch -Dalpn-boot.version=8.1.6.v20151105). Note that this command is included in my startup script (alexa_startup.sh).
3. Getting the Sensory wake word engine to work ( https://github.com/Sensory/alexa-rpi )
Once you can get it all running with the manual commands as outlined in the instructions, proceed with the MicroDot installation.
MICRODOT CONNECTION
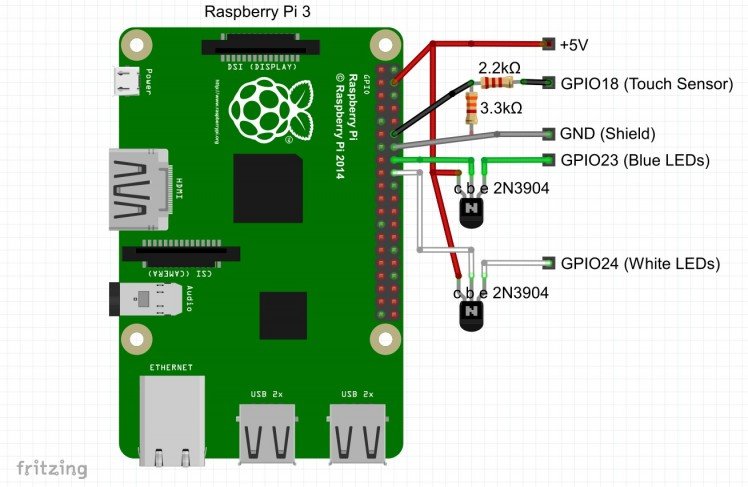
You cannot directly attach the MicroDot to the GPIO because it will draw too much current. You will need: 2x 2N3904 transisitors to drive the LED's, 1x2K2 and 1x3K3 resistors to drop the voltage from the touch sensor to 3.3V (the MicroDot will be powered from the 5V supply). Refer to the attached diagram. You might want to make a PCB for this, but I have just mounted these components on the back of a 8 pin female plug.
CUSTOM WAKE ENGINE (TOUCH)
Unzip the contents of the attached zip folder into the alexa-avs-sample-app folder. There are two files:wake.py - a python script which is the custom (touch) wake engine for the MicroDotalexa_autostart.sh - a script to run everything. Right click properties on this, and select execute: anyone on the permissions tab.
You will need python installed to run the wake engine. You will also need the GPIO library (https://makezine.com/projects/tutorial-raspberry-p...) These should already be installed in the latest version of Raspbian.
To run everything, type into terminal:cd /home/pi/Desktop/alexa-avs-sample-appsudo ./alexa_startup.sh
SET UP AUTORUN
To setup Alexa to auto-run on bootup, open a terminal and type:
cd /home/pi/.config/lxsession/LXDE-pisudo nano autostart
and add the line and save:
@/home/pi/Desktop/alexa-avs-sample-app/alexa_autostart.sh
Reboot and the Alexa app should auto-run.
Credits
DoYouKnowArduino
Offering quality microcontroller, shield, sensors, electronic components, iot gateway/node and robot kit with arduino, lattepanda, raspberry pi and intel edison/cuire/joule.
Related products


Leave your feedback...