
Make An Image Gallery With An St7789 Display And Meadow

Made by jorgedevs
About the project
Learn how to load and display JPEG videos with Meadow. Foundation's Graphics Library on a TFT SPI ST7789 display.
Project info
Difficulty: Easy
Platforms: Microsoft, Meadow, Wilderness Labs
Estimated time: 1 hour
License: MIT license (MIT)
Items used in this project
Hardware components


Story
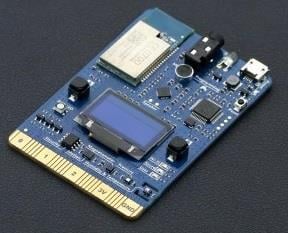
Everything you need to build this project is included in the Wilderness Labs Meadow F7 w/Hack Kit Pro. We'll see how easy is to program these peripherals using Meadow.Foundation.
Meadow.Foundation is a platform for quickly and easily building connected things using .NET on Meadow. Created by Wilderness Labs, it's completely open source and maintained by the Wilderness Labs community.
If you're new working with Meadow, I suggest you go to the Getting Started w/ Meadow by Controlling the Onboard RGB LED project to properly set up your development environment.
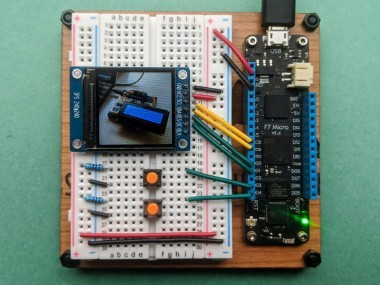
Step 1 - Assemble the circuitWire your project like this:
Fritzing diagram for Meadow GalleryViewer project

Fritzing diagram for Meadow GalleryViewer project
Step 2 - Create a Meadow Application projectCreate a new Meadow Application project in Visual Studio 2019 for Windows or macOS and name it GalleryViewer.
Step 3 - Add the required NuGet packagesWindows
Right-click on the GalleryViewer project and click Manage NuGet Packages. In the Browse tab, search for Meadow.Foundation.Displays.TftSpi and SimpleJpegDecoder and click Install to add them to the project.
macOS
Alt-click on the GalleryViewer project in the Solution Explorer, and click Add => Add Nuget Package to open the NuGet Package window. Search for Meadow.Foundation.Displays.TftSpiand SimpleJpegDecoderand click Install to add them to the project.
Step 4 - Add JPEG image assets to your projectNow feel free to add whatever JPEG files you want, but make sure they are no bigger than 240x240 pixels. You could download the following Meadow photos that are used in this project:
filename: image1.jpg

filename: image1.jpg
filename: image2.jpg

filename: image2.jpg
filename: image3.jpg

filename: image3.jpg
Make sure you add them in the root of your project, and go to the properties window on each image, and make sure the Build Action is set to Embedded Resource.
Set Build Action to Embedded Resource in the properties panel for all image assets

Set Build Action to Embedded Resource in the properties panel for all image assets
Step 5 - Write the code for GalleryViewerCopy the following code below:
public class MeadowApp : App<F7Micro, MeadowApp>{ Led red, green; St7789 display; GraphicsLibrary graphics; PushButton buttonNext; PushButton buttonPrevious; int selectedIndex; string[] images = new string[3] { "image1.jpg", "image2.jpg", "image3.jpg" }; public MeadowApp() { Console.WriteLine("Initializing..."); red = new Led(Device.CreateDigitalOutputPort(Device.Pins.OnboardLedRed)); green = new Led(Device.CreateDigitalOutputPort(Device.Pins.OnboardLedGreen)); buttonNext = new PushButton(Device, Device.Pins.D03); buttonNext.Clicked += ButtonNextClicked; buttonPrevious = new PushButton(Device, Device.Pins.D04); buttonPrevious.Clicked += ButtonPreviousClicked; var config = new SpiClockConfiguration( speedKHz: 6000, mode: SpiClockConfiguration.Mode.Mode3); display = new St7789 ( device: Device, spiBus: Device.CreateSpiBus( clock: Device.Pins.SCK, mosi: Device.Pins.MOSI, miso: Device.Pins.MISO, config: config), chipSelectPin: null, dcPin: Device.Pins.D01, resetPin: Device.Pins.D00, width: 240, height: 240 ); graphics = new GraphicsLibrary(display); graphics.Rotation = GraphicsLibrary.RotationType._270Degrees; ShowJpeg(); green.IsOn = true; } void ButtonNextClicked(object sender, EventArgs e) { red.IsOn = true; green.IsOn = false; if (selectedIndex + 1 > 2) selectedIndex = 0; else selectedIndex++; ShowJpeg(); red.IsOn = false; green.IsOn = true; } void ButtonPreviousClicked(object sender, EventArgs e) { red.IsOn = true; green.IsOn = false; if (selectedIndex - 1 < 0) selectedIndex = 2; else selectedIndex--; JpegTest(); red.IsOn = false; green.IsOn = true; } void ShowJpeg() { var jpgData = LoadResource(images[selectedIndex]); var decoder = new JpegDecoder(); var jpg = decoder.DecodeJpeg(jpgData); Console.WriteLine($"Jpeg decoded is {jpg.Length} bytes"); Console.WriteLine($"Width {decoder.Width}"); Console.WriteLine($"Height {decoder.Height}"); graphics.Clear(); int x = 0; int y = 0; byte r, g, b; for (int i = 0; i < jpg.Length; i += 3) { r = jpg[i]; g = jpg[i + 1]; b = jpg[i + 2]; graphics.DrawPixel(x, y, Color.FromRgb(r, g, b)); x++; if (x % decoder.Width == 0) { y++; x = 0; } } display.Show(); } byte[] LoadResource(string filename) { var assembly = Assembly.GetExecutingAssembly(); var resourceName = $"GalleryViewer.{filename}"; using (Stream stream = assembly.GetManifestResourceStream(resourceName)) { using (var ms = new MemoryStream()) { stream.CopyTo(ms); return ms.ToArray(); } } }}In the MeadowApp's app constructor, it initializes two push buttons, the onboard green and red LED, the ST7789 display and the graphics library which we'll use to draw the image onto the display.
The push buttons have the Clicked event handlers registered, and we see that they're used to display the next or previous image in an array of strings with the filenames. When a button is pressed, the red onboard LED turns on to indicate that the image is being loaded and will show up in the display (when they call the ShowJpeg() method) in a few seconds, and once it does, the onboard LED turns back to green.
ShowJpeg() method first calls the LoadResource() function that opens the image file to get the stream and returns an array of bytes of raw data. Then we use the SimpleJpegDecoder to decode the array of bytes, which are assigned to the jpg byte array that has all the red, green and blue values on each pixel on after another. With a For loop we extract those color channel values, and call DrawPixel to draw each pixel of the image into the display's buffer, and finally we call display.Show(); to load whatever is in the buffer to the display to show the image.
Click the Run button in Visual Studio. It should look like to the following GIF:
GalleryViewer project running

GalleryViewer project running
Note: It might take several seconds to load and display images due that the current version of Meadow OS is running in interpreted mode. It will get much faster when AOT compilation is enabled.
Check out Meadow.Foundation!This project is only the tip of the iceberg in terms of the extensive exciting things you can do with Meadow.Foundation.
- It comes with a huge peripheral driver library with drivers for the most common sensors and peripherals.
- The peripheral drivers encapsulate the core logic and expose a simple, clean, modern API.
- This project is backed by a growing community that is constantly working on building cool connected things and are always excited to help new-comers and discuss new projects.
Schematics, diagrams and documents
Code
Credits
Related products


Leave your feedback...