
Spacex Launch Tracker On A Raspberry Pi

Made by Jonathan / Astronomy / Displays / Retro Tech
About the project
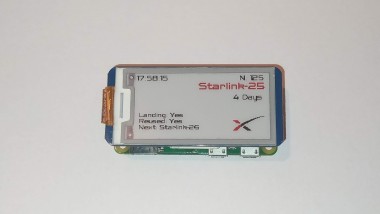
A project which tracks SpaceX launches and displays them on a cheap tri-color E-paper using Python and the Pillow Library.
Project info
Difficulty: Moderate
Platforms: Raspberry Pi, Linux, Python
Estimated time: 1 hour
License: GNU General Public License, version 3 or later (GPL3+)
Items used in this project
Hardware components

Story
TUTORIAL - If you want to make this yourself:
STEP 1:
First we will have to create some files
Create a new directory like this:
- mkdir spacex
And then go to the spacex directory:
- cd spacex
Ok, cool. Lets create all 5 files we need (I recommend using SSH):
- touch main.py
- touch epd2in13b_v3.py
- touch epdconfig.py
- touch scrape_api.py
Copy this code in epd2in13b_v3.py,
this code in epdconfig.py
and this in scrape_api.py
Perfect!
The last two things you need to do is to download this
 Image and download this font!
That's it, That's all Files you need!
STEP 2:
Now we can finally start to program!
So we need to open the main.py file you should have created.
Lets start with import all necessary modules
- from PIL import Image, ImageDraw, ImageFont
- import os
- import scrape_api as api # Importing our file "scrape_api.py" as "api"
- from datetime import datetime
- import calendar
- import ast
- import time
- import epd2in13b_v3 as epd2in13b_v3
- import re
Next we initialize the display and the time you want to wait in the loop
- MINUTES = 15 # Define The amount of time to wait in the loop
- display = epd2in13b_v3.EPD() # Defining "display"
- display.init() # Initializing and Clearing the display [epd2in13b_v3.EPD()]
- display.Clear()
The X-logo will also show a "progress-bar" where the left side is the latest launch, the right the next launch
and the corner between red and black is the current time.
That's why we create the calculate_percentage() function to calculate all the pixels of the X which need to be red.
- def calculate_percentage(start, current, end, image_x=50): # This is a function which will calcute how many Pixels of the X need to be red
- x = (current - start) / (end - start)
- return int(round(image_x/100*x*100))
Ok, lets create the while True loop and parse the data from this API and the "scrape_api.py" file we created:
- while True:
- received_page = False
- while not received_page:
- try:
- api.load_site() # Loads site, if it fails the code will wait 60 seconds and try again
- received_page = True
- except:
- time.sleep(60)
- ### GETTING DATA ###
- mission_name = api.next_launch("name") # This Gets the name of the Next mission
- launch_time = api.next_launch("date_unix") # And this will scrape the time of the launch in Unix Time
- unix_time_last_launch = api.latest_launch("date_unix") # Gives the Unix Time of the last launch
- flight_number = api.next_launch("flight_number") # The number of the launch
- next_launch = api.get_more_launches("name", 1) # will return The launch after the next launch
- ### ###
The above code parsed all the important data we need from the API.
Next, We define some variables which contain timestamps, font sizes, etc.
- current_date = datetime.utcnow()
- unixtime = calendar.timegm(current_date.utctimetuple()) # Saving the current Unix Time
- UNIX_START = unix_time_last_launch
- UNIX_NOW = unixtime # Defining the 3 important Unix-Timestamps (last flight, current time, next flight)
- UNIX_STOP = launch_time
- font_9 = ImageFont.truetype(os.path.join("font.ttf"), size=9) # Creating multiple font-sizes using the Pillow (PIL) module
- font_8 = ImageFont.truetype(os.path.join("font.ttf"), size=8)
- font_7 = ImageFont.truetype(os.path.join("font.ttf"), size=7)
- font_10 = ImageFont.truetype(os.path.join("font.ttf"), size=10)
- font = ImageFont.truetype(os.path.join("font.ttf"), size=15)
Good, For our project we need to display the time to the next launch, so lets do this!
We will calculate the time to next launch using "time_left = int(launch_time) - int(unixtime)",
next the code will convert this to a readable format. The last two lines will put white spaces in front of the time.
- try: # Converting Unix Time in a readable format
- time_left = int(launch_time) - int(unixtime)
- if time_left > 86400:
- time_text = f"{round(time_left / 86400)} Days"
- elif time_left > 3600:
- time_text = f"{round(time_left / 3600)} Hours"
- elif time_left > 60:
- time_text = f"{round(time_left / 60)} Minutes"
- else:
- time_text = f"{time_left} Seconds! "
- except:
- time_text = "error"
- white_spaces = " " * (10 - len(time_text)) # Adding whitespaces in front of the Text so that the text is on the left side
- time_text = f"{white_spaces}{time_text}"
Ok cool!
To draw something on the screen we need to get the display size, That's what we do in the first 2 lines
in the following code. After that we create 2 new Images, a black and a red one.
When we finally draw this on the screen, the black images gets displayed first, and then we draw the red layer on top.
- w = display.height # Receiving Display High/Width
- h = display.width
- red_image = Image.new(mode="1", size=(212, 104), color=255) # Creating two images
- red_draw = ImageDraw.Draw(red_image)
- image = Image.new(mode="1", size=(212, 104), color=255)
- draw = ImageDraw.Draw(image)
[OPTIONAL]
I had problems when rockets with a "(" or a ")" launched, My display couldn't display it.
So I filtered all "(" and ")" out using some basic Regex:
- ### THIS PART IS OPTIONAL ###
- next_mission_name = re.sub("([^>]+)", "", mission_name) # I had a problem Displaying "(" and ")" on the display, so I will filter them out using some basic Regex
- if next_mission_name[-1] == " ": # You can delete this part if you want!
- next_mission_name = next_mission_name[:-1]
- _2_launch = re.sub("([^>]+)", "", next_launch)
- if _2_launch[-1] == " ":
- _2_launch = _2_launch[:-1]
- ### ###
Now we create the last few variables before drawing the Image on the E-Paper.
I will parse the JSON data from the API. But here is a problem we need to solve first:
When parsing the API we only receive a string, but how can I fix this? Well, after some basic
googling I found a way to convert a string to a dictionary, I think this is not the most pythonic way
but hey, It works!
- core = api.next_launch("cores") # Parsing a Dictionary with important data from the SpaceX api
- core = str(core[-1:]) # Removing a '"' from the beginning and end of the String
- core = str(core[1:][:-1])
- core_dict = ast.literal_eval(core) # Converting the Parsed string to Python Dictionary (Not the most Pythonic way!)
Next we save the current time in the Hour : Minute : Second Format to see when the display
refreshed the last time:
- t = time.localtime() # Receiving the time in the Hour:Minute:Second Format
- current_time = time.strftime("%H:%M:%S", t)
Cool! No more variables to create :)
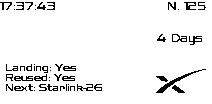
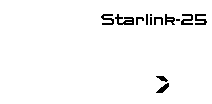
Now we draw some informations on the image (The Mission name in red!):
- draw.text((167, 0), f"N. {flight_number}", 0, font_10) # Drawing the flight number on the Black Image
- red_draw.text((209 - len(next_mission_name) * 5, 30), next_mission_name, 0, font, align="left", anchor="md") # Drawing Mission-name on Red image
- draw.text((172, 45), f"{time_text}", 0, font_10, anchor="md") # Drawing the time on the black Image
- draw.text((0, 0), str(current_time), 0, font_10) # Drawing the current time in the upper right corner so we can see if the display updated.
But hold on! We need to draw even more informations on this display! Things like:
"Does it Land?", "Is it Reused?" And "what is the name of the next rocket?"
- if core_dict["landing_attempt"] == True:
- draw.text((5, 62), f"Landing: Yes", 0, font_9) # If the Rocket attempts to land
- else:
- red_draw.text((5, 62), f"Landing: No", 0, font_9) # If the Rocket won't land, the Text will get displayed in red!
- if core_dict["reused"] == True:
- draw.text((5, 72), f"Reused: Yes", 0, font_9) # If the Booster is reused
- else:
- red_draw.text((5, 72), f"Reused: No", 0, font_9)
- draw.text((5, 82), f"Next: {_2_launch}", 0, font_9) # And this will draw the next launch on the Image
Only a few more lines, and you are done, keep going!
Now we open the spacex.png and draw it on the image.
For the red part we load this image again and crop the image with the "calculate_percentage()" function:
- full_spacex_x = Image.open("spacex.png") # Here we open/load the SpaceX logo (You can download this image in my GitHub Repo.)
- full_spacex_x_redpart = full_spacex_x.crop((0, 0, calculate_percentage(UNIX_START, UNIX_NOW, UNIX_STOP), 24)) # Crops the SpaceX logo using the "calculate_percentage" function
- image.paste(full_spacex_x, (156, 69))
- red_image.paste(full_spacex_x_redpart, (156, 69)) # This fills the cropped part with red
Perfect, We drew all the things we need on the image!
The black image should now look like this:
And the red image like this (The image is black, but we will display it as red):
Lets finally draw the image on the screen!
First we clear the screen:
- display.init() # Reinitialize the screen
- display.Clear() # Clearing the display
And now draw the black part of the image and then the red part on top:
- display.display(display.getbuffer(image=image), display.getbuffer(image=red_image))
- display.sleep() # Putting the display in sleep mode to reduce the power!
- time.sleep(MINUTES * 60) # Waits n Minutes
DONE! Thats it!
I hope you liked my first ever tutorial! I would really like some feedback :D
For the lazy people:
Code
Credits
Related products


Leave your feedback...