
How To Use Hexabitz Modules With Raspberry Pi Pico

Made by Aula_Jazmati / Displays / Kids & Family / Lights / Notifications
About the project
Learn how to use Hexabitz modules with Raspberry Pi Pico.
Project info
Difficulty: Easy
Platforms: Raspberry Pi, STMicroelectronics, MicroPython
Estimated time: 1 hour
License: MIT license (MIT)
Items used in this project
Hardware components

View all
Story
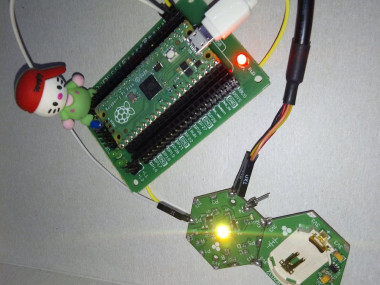
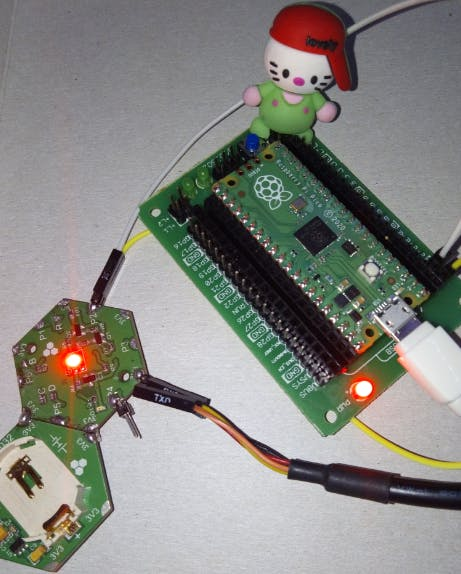
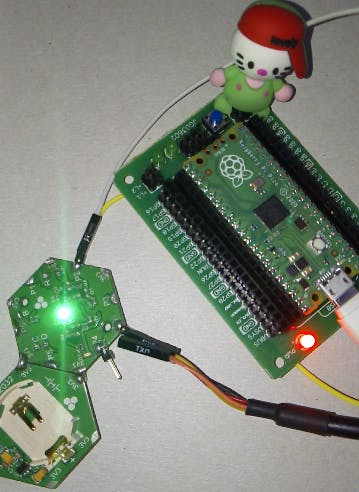
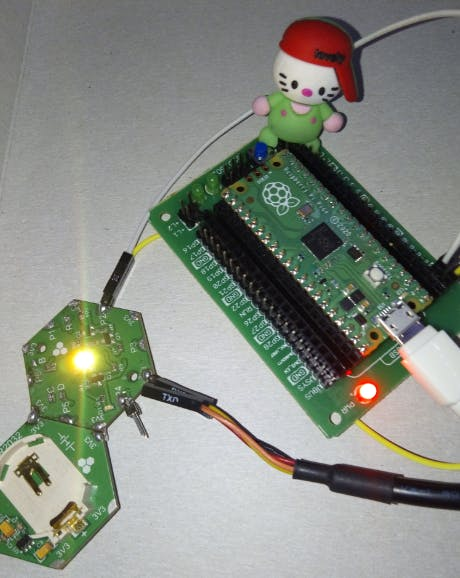
This Project demonstrates how to use Hexabitz modules with Raspberry Pi Pico. We learn to control RGB LED module using Raspberry Pi Pico and MicroPython.
? Why Hexabitz ?- Hexabitz modules have their own MCUs and thus can be used without an external controller. But when we use these modules with Raspberry Pi, we can design powerful electronic system.
- Hexabitz modules can natively interface to any external hardware via array ports running UART communication. External hardware can mimic a CLI textual input or utilize a more efficient machine format (a serial, packet-based messaging protocol).
- Hexabitz modules use a novel edge-soldering technique that eliminates the overhead of connectors and wires while providing more rigid, clean, and reliable prototypes. Save time and free yourself from the hassle of debugging wire connections. Instead, build a rigid prototype that can leave your bench and return unharmed!
Raspberry Pi Pico is a low-cost, high-performance microcontroller board with flexible digital interfaces. Key features include:
- RP2040 microcontroller chip designed by Raspberry Pi in the United Kingdom
- Dual-core Arm Cortex M0+ processor, flexible clock running up to 133 MHz
- 264kB of SRAM, and 2MB of on-board flash memory
- USB 1.1 with device and host support
- Low-power sleep and dormant modes
- Drag-and-drop programming using mass storage over USB
- 26 × multi-function GPIO pins
- 2 × SPI, 2 × I2C, 2 × UART, 3 × 12-bit ADC, 16 × controllable PWM channels
- Accurate clock and timer on-chip
- Temperature sensor
- Accelerated floating-point libraries on-chip
- 8 × Programmable I/O (PIO) state machines for custom peripheral support
The Raspberry Pi Pico comes as a castellated module allows soldering direct to carrier boards, while the Pico H comes with pre-soldered headers.
https://www.raspberrypi.com/documentation/microcontrollers/
Pinout and design files:
1 / 3 • The Raspberry Pi Pico Development Board

The Raspberry Pi Pico Development Board

Raspberry Pi Pico

Raspberry Pi Pico
Below is a quick reference for Raspberry Pi RP2xxx boards. If it is your first time working with this board it may be useful to get an overview of the microcontroller:
What is MicroPython?
MicroPython is a full implementation of the Python 3 programming language that runs directly on embedded hardware like Raspberry Pi Pico. You get an interactive prompt (the REPL) to execute commands immediately via USB Serial, and a built-in filesystem. The Pico port of MicroPython includes modules for accessing low-level chip-specific hardware.
Drag-and-Drop MicroPython: You can program your Pico by connecting it to a computer via USB, then dragging and dropping a file onto it so we’ve put together a downloadable UF2 file to let you install MicroPython more easily.
Download the correct MicroPython UF2 file for your board:
Raspberry Pi Pico Raspberry Pi Pico W (with urequests and upip preinstalled)Then go ahead and:
- Push and hold the BOOTSEL button and plug your Pico into the USB port of your Raspberry Pi or other computer. Release the BOOTSEL button after your Pico is connected.
- Push and hold the BOOTSEL button and plug your Pico into the USB port of your Raspberry Pi or other computer. Release the BOOTSEL button after your Pico is connected.
- It will mount as a Mass Storage Device called RPI-RP2.
- Drag and drop the MicroPython UF2 file onto the RPI-RP2 volume. Your Pico will reboot. You are now running MicroPython.
- You can access the REPL via USB Serial.
The Raspberry Pi Pico Python SDK book contains step-by-step instructions for connecting to your Pico and programming it in MicroPython using both the command line and the Thonny IDE.
UART (serial bus): There are two UARTs, UART0 and UART1. UART0 can be mapped to GPIO 0/1, 12/13 and 16/17, and UART1 to GPIO 4/5 and 8/9.
Class UART – duplex serial communication bus:
UART implements the standard UART/USART duplex serial communications protocol. At the physical level it consists of 2 lines: RX and TX. The unit of communication is a character (not to be confused with a string character) which can be 8 or 9 bits wide.
UART objects can be created and initialised using:
from machine import UART

uart = UART(1, 9600)                         # init with given baudrate
uart.init(9600, bits=8, parity=None, stop=1) # init with given parameters
Supported parameters differ on a board:
Pyboard: Bits can be 7, 8 or 9. Stop can be 1 or 2. With parity=None, only 8 and 9 bits are supported. With parity enabled, only 7 and 8 bits are supported.
WiPy/CC3200: Bits can be 5, 6, 7, 8. Stop can be 1 or 2.
A UART object acts like a streamobject and reading and writing is done using the standard stream methods:
uart.read(10)       # read 10 characters, returns a bytes object
uart.read()         # read all available characters
uart.readline()     # read a line
uart.readinto(buf)  # read and store into the given buffer
uart.write('abc')   # write the 3 characters
See machine.UART.
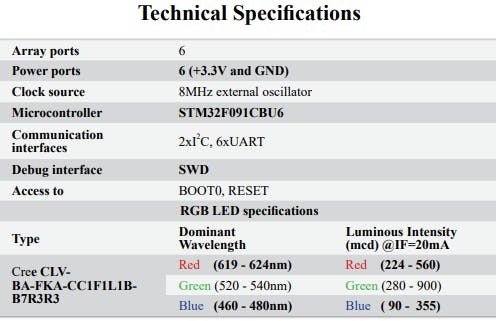
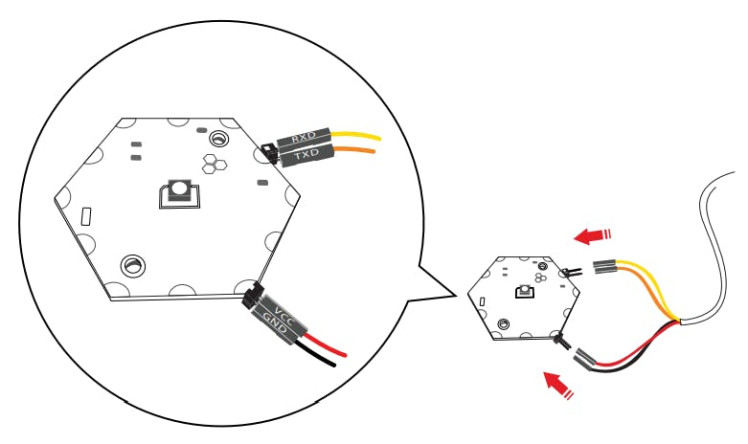
2- RGB LED (H01R0x):H01R0x is a smart RGB LED module based on Cree CLVBA-FKA RGB LED and STM32F0 MCU.
1 / 2 • Hexabitz RGB LED Module

Hexabitz RGB LED Module
1 / 6 • Hexabitz RGB LED Module

Hexabitz RGB LED Module

Python IDE for beginners. Thonny comes with Python 3.10 built in, so just one simple installer is needed and you're ready to learn programming. (You can also use a separate Python installation, if necessary.) The initial user interface is stripped of all features that may distract beginners.
Learn more: https://thonny.org/
Code Explanation ?️ ?All you need to do is perform the following steps :
- Import the machine module.
- Import the time module.
from machine import UART, Pin
import time
UART objects can be created and initialised using:
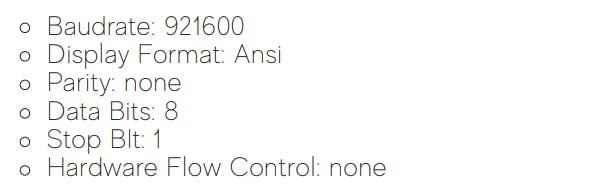
uart = UART(0, baudrate= 921600, tx=Pin(0), rx=Pin(1))     # init with given baudrate
uart.init(921600, bits=8, parity=None, stop=1) # init with given parameters
A UART object acts like a stream object and reading and writing to Hexabitz module is done using the standard stream methods:
txData = b'r'
uart.write(txData)
time.sleep(3)
rxData = uart.readline()
print(rxData)
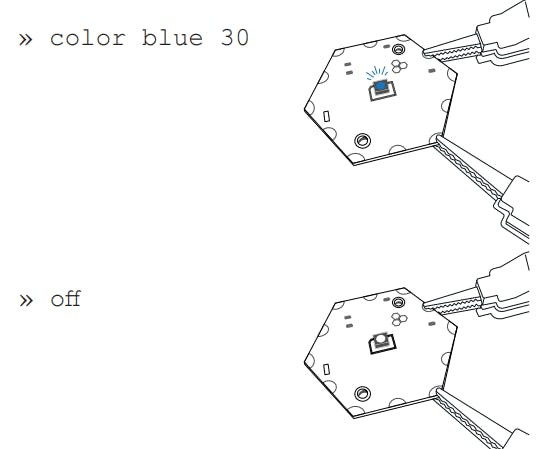
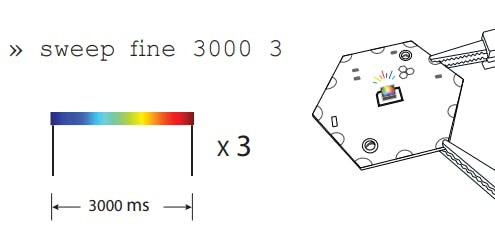
txData = b'color red 90 r'
uart.write(txData.decode('utf-8'))
time.sleep(3)
txData = b'color green 90 r'
uart.write(txData.decode('utf-8'))
time.sleep(3)
txData = b'color yellow 90 r'
uart.write(txData.decode('utf-8'))
time.sleep(3)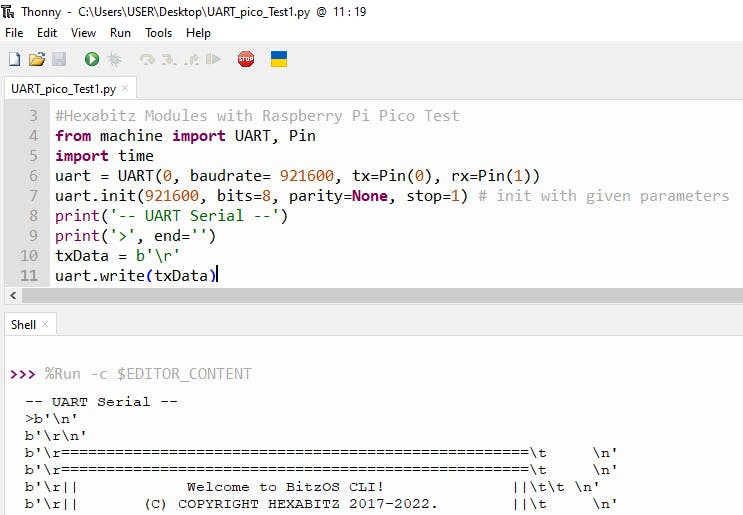
Schematics, diagrams and documents
Code
Credits
Related products


Leave your feedback...