
Hcsr04 With Builtin Led Module With Arduino Uno

Made by mahmood-m-shilleh
About the project
Quickly learn how to set up the new HCSR04 with RGB connected to the Arduino UNO.
Project info
Difficulty: Easy
Platforms: Arduino
Estimated time: 1 hour
License: GNU General Public License, version 3 or later (GPL3+)
Items used in this project
Hardware components

Story
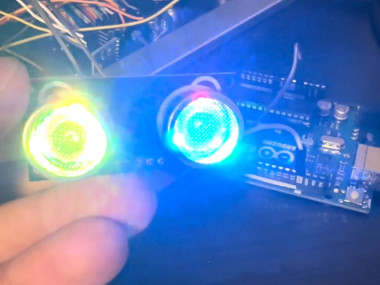
Learn how to connect the new HCSR04 with RGB to your Arduino UNO with some simple steps! This sensor allows you to measure distance using ultrasonic pulses, with capabilities to measure objects up to 4 meters away. It is easy to use the distance measuring capabilities as it is compatible with HCSR04 libraries online. However, the sensor also comes with 6 Neopixel LEDs for an added effect to your projects. These are easily programmable with several libraries online, one of which I will show you in this tutorial.
Step 1-) Physical Connection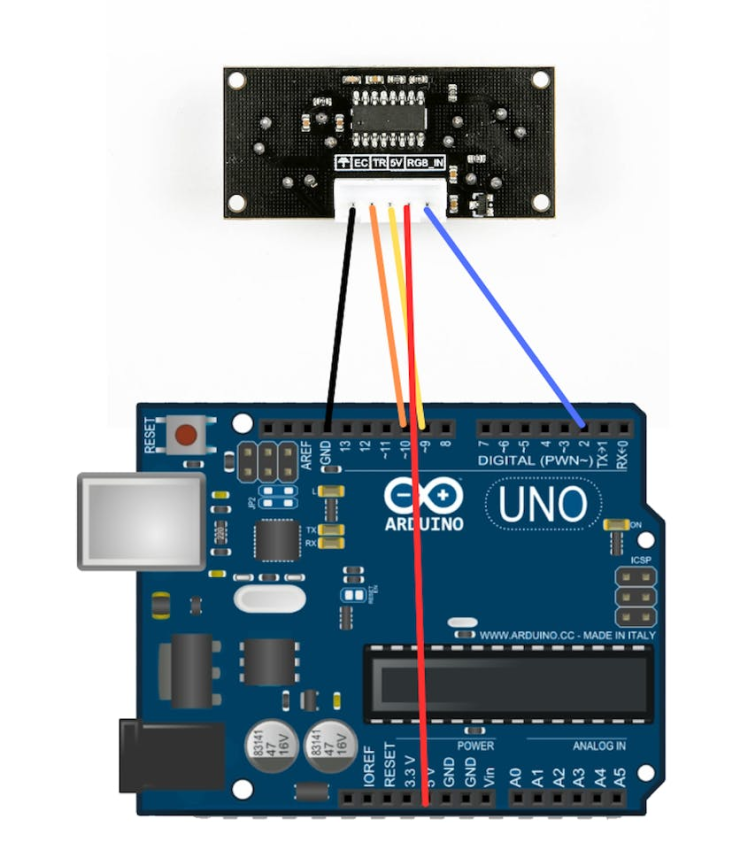
The sensor comes with 5 pins that you should connect as shown in the diagram:
- Umbrella (ground), labeled in black, goes to GND on the Arduino UNO, this is the 0V portion of the circuit.
- Power (5V), labeled red, goes to 5V on the Arduino. This is important, do not connect it with the 3.3V
- RGB-IN, labeled in blue, goes to pin number 2. This allows you to control the 6 onboard LEDs, two in each barrel.
- EC (echo), labeled in orange, goes to Pin 10 on the Arduino UNO. Which emits an ultrasonic pulse when triggered.
- TR (trigger), labeled in yellow, goes in pin 9. This receives the pulse from the trigger.
- Create a sketch in the Arduino IDE
- Add the following library files from my Github Page, you can do this by downloading them, and going to Sketch > Add File, in the Arduino IDE.
https://github.com/shillehbean/youtube-channel/blob/main/RGBLed.cpp
https://github.com/shillehbean/youtube-channel/blob/main/RGBLed.h
- Create another file with the following content
#include "RGBLed.h"
// Set the pin nr wired to the ultrasonic sensor's pin marked "RGB" or "RGB_IN":
const int RGBpin = 2;
const int trigPin = 9;
const int echoPin = 10;
const long RED    = 0xFF0000;
const long ORANGE = 0xFF8800;
const long YELLOW = 0xFFFF00;
const long GREEN  = 0x00FF00;
const long BLUE   = 0x0000FF;
const long PURPLE = 0xFF00FF;
// Put the colours in an array:
const long RAINBOW[6] = {RED, ORANGE, YELLOW, GREEN, BLUE, PURPLE};
int index = 0;
// The ultrasonic sensor has 6 built-in leds in total: 3 in each cylinder.
RGBLed ultrasonicRGB(RGBpin, 6);
// defines variables
long duration;
int distance;
void setup() {
// Set the 3 leds in the first cylinder to one colour,
// passing values from 0 to 255 for red, green, and blue.
for(int ledNr = 1; ledNr <= 3; ledNr++) {
ultrasonicRGB.setColor(ledNr, 200, 255, 0);  //yellow
}
// Set the leds in the other cylinder individually:
ultrasonicRGB.setColor(4, 255, 0, 0);  //red
ultrasonicRGB.setColor(5, 0, 255, 0);  //green
// Alternatively you can pass a hex colour value:
ultrasonicRGB.setColor(6, 0x0000FF);  //blue
// Apply the changes:
ultrasonicRGB.show();
pinMode(trigPin, OUTPUT); // Sets the trigPin as an Output
pinMode(echoPin, INPUT); // Sets the echoPin as an Input
Serial.begin(9600); // Starts the serial communication
}
void loop() {
// // Shift the rainbow array's index across [0] to [5], red to purple:
// index += 1;
// if(index > 2) {index = 0;}
// // Set the colours for all leds, shifting at each loop:
// for(int ledNr = 1; ledNr <= 6; ledNr++) {
// int colourNr = (index + ledNr % 2) % 6;
// ultrasonicRGB.setColor(ledNr, RAINBOW[colourNr]);
// }
// ultrasonicRGB.show();
// // Change the colours with a certain interval.
// // The smaller the delay, the faster the animation.
// delay(150);
// Clears the trigPin
digitalWrite(trigPin, LOW);
delayMicroseconds(2);
// Sets the trigPin on HIGH state for 10 micro seconds
digitalWrite(trigPin, HIGH);
delayMicroseconds(10);
digitalWrite(trigPin, LOW);
// Reads the echoPin, returns the sound wave travel time in microseconds
duration = pulseIn(echoPin, HIGH);
// Calculating the distance
distance = duration * 0.0343 / 2;
// Prints the distance on the Serial Monitor
Serial.print("Distance: ");
Serial.println(distance);
}
This code turns on the LEDs and also prints ultrasonic distance readings in centimeters. Uncomment the code in the loop() for a rainbow effect. For more details please watch the video above and consider subscribing to the channel. One again, if you are interested you can buy the sensor here.
Credits
mahmood-m-shilleh
Mechanical and Software Engineering Background. University at Buffalo 2019 Texas A&M 2021 I make data pipelines for my day job. Outside of work, I participate in online communities regarding Full Stack Engineering, Microelectronics, and more. You can find more details about me on my Youtube Channel. https://www.youtube.com/@mmshilleh Feel free to reach out!
Related products


Leave your feedback...