

Haunted Home Automation

Made by benrules2 / Home Automation
About the project
Scare your guests by flickering Hue lights and playing a scary movie. Couple with smart mirror and Alexa for full effect.
Project info
Difficulty: Easy
Platforms: Amazon Alexa, Philips hue
Estimated time: 1 hour
License: GNU General Public License, version 3 or later (GPL3+)
Items used in this project


Story
Haunted Home Automation
Halloween is one of my favourite holidays of the year. This is in a large part because DIY is so deeply ingrained in the traditions. There's pumpkin carving, costume making, haunted houses in a garage, and a lot more.
Naturally as a DIY fan, I've been thinking of how to incorporate technology into a good scare. Home automation has a lot of potential here, and it pairs nicely with the smart mirror in our house. Check out the video below to see what I came up with (with some help)!
Haunted Smart Mirror DemoDo It Yourself
If you like this effect and want to do it yourself, a good starting point is a smart mirror with Alexa and a custom skill to run scripts. You'll also need some Philips Hue lights.
Resources and Supplies:
- Smart Mirror with Alexa
- Alexa Skill to run Scripts on a Raspberry Pi
- Philips Hue Lights
- The haunted mirror video file
Starting from scratch, its probably a day or two of work to build the smart mirror, and setup the custom skill. If you just replace the smart mirror with a regular computer monitor, you can probably get a similar effect going with less effort!
Controlling Philips Hue Lights
Most of the instructions for this demo are included in previous blog posts. The one new piece of technology was the use of the Philips Hue API, which I'll go over here.
Philips has a great walk through to get you started with their API which can be found here. What you need from that link is your username, your Hue Bridge IP address, and the ids of your lights.
To find your IP address, you'll have to log onto your wireless router and look at the DHCP table to find the Philips Hue assignment. Through the Hue app, you can configure this to remain static as well to avoid unexpected changes in the future.
The username will be a random alphanumeric string.
In the Philips examples it is: 1028d66426293e821ecfd9ef1a0731df
The id of your lights can be found my using their debug API tool, and sending a GET request to http://<bridge ip address>/api/<username>/lights
Once you've got that information, you just need to plug in the username, my_lights, and bridge_ip_address variables in this script flicker.py. You will also have to run "python -m pip install qhue" to install the qhue python module.
Once that is done, test it by running the script with one argument to describe how many seconds to flicker the lights for as follows:
$>python3.4 flicker.py 5
This should cause your house lights to 5 seconds. Finally, you just have to place the script on your Raspberry Pi (or desired platform), download the video file, and run this script to play the video and flicker the lights simultaneously:
Alexa Integration
If you are using the custom skill described in the previous post, there are three steps to integrating this new capability.
Note, instructions from here on out are very closely tied to this post. If something doesn't make sense, make sure you've followed the steps there already!
Alexa Developer
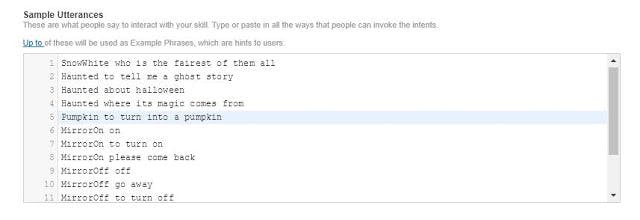
The first step is adding a new intent to your skill in the Amazon Developer portal. To do so, go to your Amazon developer page and edit your Magic Mirror interaction model to include a new intent (I called mine "Haunted").
Setup a sample utterance as well for this intent, such as "Haunted to tell me a ghost story".
AWS Lambda
Next, you will need to modify your AWS Lambda function to post a message to your command queue containing the word "haunted". This can be done by going to your AWS Lambda portal, and editing the python file lambda_handler function to include:
    elif intent_name == "Haunted":
        post_message(client, 'haunted', queue_url)
        message = "uh oh... get out of here while you can!"
This will post a message to the command queue with the content "haunted".
Raspberry Pi Queue Checker
Finally, ssh into your Raspberry Pi and find your check_queue.py file. Add one more option to the if statements to handle the new message "haunted". That will look something like:
    elif message == "haunted":
        os.system("~/haunted.sh")
That's all! Now you should be able to ask your mirror to tell you a ghost story, and have the video play.
Code
Credits
benrules2
I like to make projects that are beginner to intermediate in difficulty, with the hope of encouraging new makers to try something out for the first time. There are lots of opportunity for pretty exciting outcomes with only one or two days work. I have a mixed background of physics and computer science as well, so I like to work in a little science to my projects when I can.


Leave your feedback...