
Gps Tracker With Raspberry Pi Pico - Complete Guide

Made by electroscope_archive / Security
About the project
DIY Raspberry Pi Pico GPS tracker sends live location updates via cellular.
Project info
Items used in this project
Hardware components

|
Breadboard and jumper wires | x 1 | |
|
|
2G capable SIM card | x 1 | |
|
|
LEDs (Red, Yellow, Green) | x 1 | |
|
|
GSM antenna | x 1 | |
|
|
GPS antenna | x 1 | |
|
|
Neo-6M GPS module | x 1 | |
|
|
SIM800L GSM/GPRS module | x 1 | |
|
|
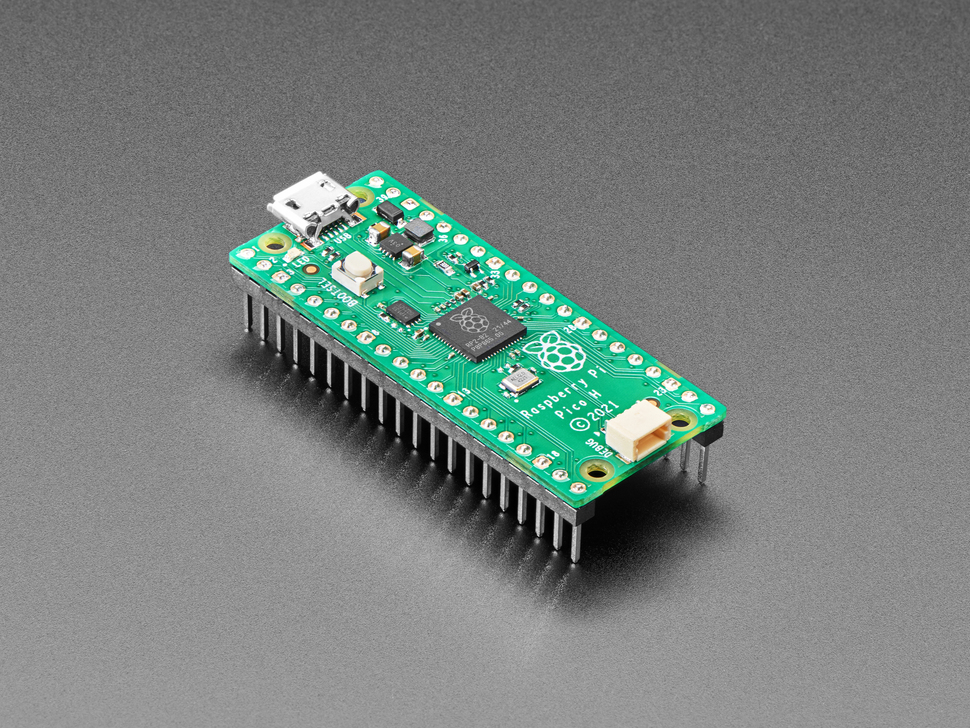
Raspberry Pi Pico or Pico W | x 1 |
View all
Story
So, you want to know where your stuff is at all times? Or maybe you just like the idea of slapping a GPS tracker on things because… why not. Either way, building your own real-time GPS tracker with a Raspberry Pi Pico is totally doable now. The hardware’s cheap, the libraries are decent, and you don’t need to sell your kidneys to get it working.
For this build, I used a Raspberry Pi Pico, a SIM800L GSM module, and a Neo 6M GPS module. The GPS gives you coordinates, the SIM800L beams them up over a cellular network, and the Pico glues everything together. End result: a pocket-sized IoT tracker that can send its location to the cloud in real time.
It’s kind of like the ESP32 GPS tracker and Arduino GPS tracker projects I’ve tinkered with before, just this time it’s Pico’s turn to shine.
Parts You’ll Need
Here’s the shopping list. Most of this is easy to find online.
- Raspberry Pi Pico or Pico W
- SIM800L GSM module (needs a solid power supply, more on that in a sec)
- Neo-6M GPS module + antenna
- GSM antenna
- A couple LEDs (red, yellow, green)
- A 2G SIM card (I used Airtel)
- Breadboard and jumper wires
Heads up: SIM800L is a bit picky. It wants a stable 3.7–4.2V supply and can pull up to 2A in short bursts. If yours doesn’t have a built-in regulator, don’t just plug it straight into 5V from the Pico unless you enjoy smoke. A LiPo or a proper buck converter is the safe way to go.
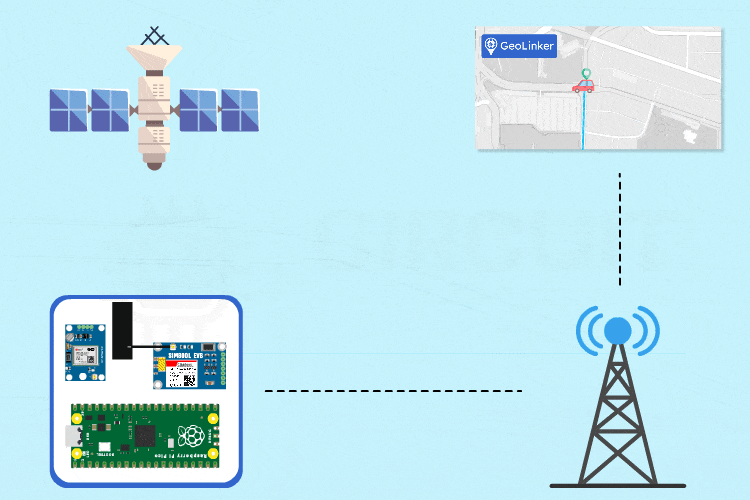
How It Works
- The Pico sits in the middle, doing microcontroller things.
- The GPS module grabs your location from satellites and spits out latitude/longitude over serial.
- The SIM800L takes that data and sends it over the cellular network with simple HTTP requests.
- A cloud backend (GeoLinker API, from Circuit Digest Cloud) logs and plots your points on a map.
- So you log in to your account, and you see the route traced out in real time.
One nice feature: if the network drops (because of course it will at the worst possible moment), the Pico stores data locally. When the connection comes back, it uploads the backlog before continuing live updates. So you don’t lose track of where your tracker’s been hiding.
The Modules
SIM800L GSM/GPRS
Cheap little board that lets you talk over 2G networks. It can do voice, SMS, GPRS data, and even HTTP requests using AT commands. It’s small, UART-friendly, and basically perfect for this type of project. Just remember it’s voltage-sensitive and gets cranky without a proper antenna.
Neo 6M GPS
A classic GPS receiver from u-blox. Reads satellites, gives you standard NMEA sentences like $GPGGA and $GPRMC. Works at 9600 baud. Accuracy is decent (around 2.5m on a good day). It has a blinking LED that lets you know it’s locked onto satellites, which is honestly my favorite feature because it feels like a little heartbeat saying “yep, still alive.”
Wiring It Up
The wiring is dead simple once you get the pin mapping sorted:
- SIM800L TX → Pico GP1 (RX)
- SIM800L RX → Pico GP0 (TX)
- SIM800L VCC → external battery (3.7–4.2V)
Ground everything together
- Neo 6M TX → Pico GP5 (RX)
- Neo 6M RX → Pico GP4 (TX)
- Neo 6M VCC → 3.3V supply
Again, common ground is a must
Both modules should share ground with the Pico, or you’ll chase ghost bugs forever.
Cloud Setup (GeoLinker API)
The cloud side is handled by CircuitDigest Cloud. You make an account, generate an API key, and that’s what your Pico uses to send data.
Steps:
- Go to circuitdigest.cloud and register.
- Log in, hit API management, and generate a key.
- Copy it somewhere safe. That’s the magic string your device will use to push location updates.
By default, you can log about 10,000 GPS points per key. If you run out, just generate a new one.
Arduino IDE Setup
Yes, we’re coding the Pico in Arduino IDE. It’s surprisingly painless:
- Install RP2040 board support from the additional JSON URL.
- Install the GeoLinker library by Jobit Joseph from Library Manager.
- Restart the IDE if the examples don’t show up (classic Arduino quirk).
- After that, you’ll find example sketches under File > Examples > GeoLinker.
Complete Code
#include <GeoLinker.h>
// ==================================================================
//                   GPS SERIAL CONFIGURATION
// ==================================================================
#define gpsSerial Serial2  // UART1
#define GPS_RX 4
#define GPS_TX 5
#define GPS_BAUD 9600   // Standard NMEA baud rate
// ==================================================================
//                   GSM SERIAL CONFIGURATION
// ==================================================================
#define gsmSerial Serial1  // UART0
#define GSM_RX 0
#define GSM_TX 1
#define GSM_BAUD 9600   // Standard modem baud rate
// ==============================
//         LED DEFINITIONS
// ==============================
#define LED_GREEN 21   // Success indicator
#define LED_YELLOW 20  // GPS error indicator
#define LED_RED 19     // GSM error indicator
// ==============================
//       TIMING AND STATE
// ==============================
bool greenLedOn = false;
unsigned long greenLedTimer = 0;
bool gpsErrorActive = false;
bool gsmErrorActive = false;
unsigned long lastGPSStatusTime = 0;
unsigned long lastGSMStatusTime = 0;
const unsigned long errorTimeout = 8000; // 8 seconds to auto-clear error
// ==============================
//     NETWORK CONFIGURATION
// ==============================
const char* apn = "gprs"; // Cellular APN
const char* gsmUser = nullptr;  // APN username if required
const char* gsmPass = nullptr;  // APN password if required
// ==============================
//    GEO LINKER CONFIGURATION
// ==============================
const char* apiKey = "xxxxxxx";  // Your GeoLinker API key
const char* deviceID = "GeoLinker_tracker_test1"; // Unique device identifier
const uint16_t updateInterval = 3;  // Data upload interval (seconds)
const bool enableOfflineStorage = true; // Enable offline data storage
const uint8_t offlineBufferLimit = 20;  // Max stored offline record, Keep it minimal for MCUs with less RAM
const bool enableAutoReconnect = true;  // Enable auto-reconnect Only for WiFi, Ignored with GSM
const int8_t timeOffsetHours = 5; // UTC + Hours
const int8_t timeOffsetMinutes = 30;  // UTC + Minutes
GeoLinker geo;  //GeoLinker instance
void setup() {
 Serial.begin(115200);
 delay(1000);
 // GPS UART
 gpsSerial.setTX(GPS_RX);
 gpsSerial.setRX(GPS_TX);
 gpsSerial.begin(GPS_BAUD);
 // GSM UART
 gsmSerial.setTX(GSM_RX);
 gsmSerial.setRX(GSM_TX);
 gsmSerial.begin(GSM_BAUD);
 // LED Setup
 pinMode(LED_GREEN, OUTPUT);
 pinMode(LED_YELLOW, OUTPUT);
 pinMode(LED_RED, OUTPUT);
 digitalWrite(LED_GREEN, LOW);
 digitalWrite(LED_YELLOW, LOW);
 digitalWrite(LED_RED, LOW);
 // GeoLinker Init
 geo.begin(Serial2);
 geo.setApiKey(apiKey);
 geo.setDeviceID(deviceID);
 geo.setUpdateInterval_seconds(updateInterval);
 geo.setDebugLevel(DEBUG_BASIC);
 geo.enableOfflineStorage(enableOfflineStorage);
 geo.setOfflineBufferLimit(offlineBufferLimit);
 geo.enableAutoReconnect(enableAutoReconnect);
 geo.setTimeOffset(timeOffsetHours, timeOffsetMinutes);
 geo.setNetworkMode(GEOLINKER_CELLULAR);
 geo.setModemCredentials(apn, gsmUser, gsmPass);
 geo.beginModem(Serial1);
 geo.setModemTimeouts(5000, 10000);
 Serial.println("GeoLinker setup complete.");
}
void loop() {
 unsigned long now = millis();
 // Example payload
 geo.setPayloads({
   {"temperature", 27.5},
   {"humidity", 65.3}
 });
 geo.setBatteryLevel(90);
 uint8_t status = geo.loop();
 // =========================================
 //  SUCCESS: Green LED for 1 second
 // =========================================
 if (status == STATUS_SENT) {
   Serial.println("Data sent successfully!");
   if (!greenLedOn) {
     digitalWrite(LED_GREEN, HIGH);
     delay(500);
     greenLedOn = true;
     greenLedTimer = now;
   }
   gpsErrorActive = false;
   gsmErrorActive = false;
 }
 if (greenLedOn && (now - greenLedTimer >= 1000)) {
   digitalWrite(LED_GREEN, LOW);
   greenLedOn = false;
 }
 // =========================================
 //  GPS ERROR LED Handling
 // =========================================
 if (status == STATUS_GPS_ERROR || status == STATUS_PARSE_ERROR) {
   gpsErrorActive = true;
   lastGPSStatusTime = now;
 } else if (gpsErrorActive && (status == STATUS_SENT || status == 0)) {
   if (now - lastGPSStatusTime > errorTimeout) {
     gpsErrorActive = false;
   }
 }
 digitalWrite(LED_YELLOW, gpsErrorActive ? HIGH : LOW);
 // =========================================
 //  GSM ERROR LED Handling
 // =========================================
 bool gsmError = (
   status == STATUS_NETWORK_ERROR ||
   status == STATUS_CELLULAR_NOT_REGISTERED ||
   status == STATUS_CELLULAR_CTX_ERROR ||
   status == STATUS_CELLULAR_DATA_ERROR ||
   status == STATUS_CELLULAR_TIMEOUT ||
   status == STATUS_BAD_REQUEST_ERROR ||
   status == STATUS_INTERNAL_SERVER_ERROR
 );
 if (gsmError) {
   gsmErrorActive = true;
   lastGSMStatusTime = now;
 } else if (gsmErrorActive && (now - lastGSMStatusTime > errorTimeout)) {
   gsmErrorActive = false;
 }
 digitalWrite(LED_RED, gsmErrorActive ? HIGH : LOW);
}
Common Gotchas
- Library not showing up? Restart IDE.
- Still missing? Check that the folder name is exactly GeoLinker.
- Board not compiling? Make sure you picked Raspberry Pi Pico / Pico W in Tools > Board.
- Power issues? Nine times out of ten, it’s the SIM800L not getting enough stable current.
Testing
Once everything’s wired and flashed, give the GPS a minute to lock onto satellites. If the LED starts blinking steadily, you’re good. Check your CircuitDigest Cloud dashboard and you should see your tracker popping up on the map.
If you’re indoors, don’t be surprised if the GPS sulks. These modules really prefer open skies.
Wrapping Up
So that’s it: a cellular GPS tracker using Raspberry Pi Pico you can build in an afternoon without spending much. It’s cheap, reliable (as long as 2G still works in your area), and a fun little project if you’ve got a Pico sitting around.
You can use it on a vehicle, stash it in your backpack, or stick it on your cat (not recommended, unless your cat is very patient).
Schematics, diagrams and documents
Code
Credits
Related products


Leave your feedback...