
Face Mask Detection System Using Ai And Nvidia Jetson Board
Made by shakhizat / Artificial intelligence / Photos & Video / Robotics
About the project
In this project, we'll learn how to easily train a face mask detector and deploy it on a NVIDIA Jetson board using PyTorch and TensorRT.
Project info
Difficulty: Difficult
Platforms: Raspberry Pi, NVIDIA
Estimated time: 1 hour
License: GNU General Public License, version 3 or later (GPL3+)
Items used in this project

Story
Due to COVID-19 pandemic, at present time, there are various facial recognition technology applied to people wearing masks. Detection of face masks is an extremely challenging task for the face detectors.
In this tutorial, I’m going to show you how to set up Face mask detection system using the machine learning framework PyTorch on the NVIDIA Jetson board with a help from TensorRT. We will start by performing face mask detection with images, videos and then advance to real-time face mask detection.
The first thing to do is to choose your object detection algorithm between Faster RCNN, SSD, FPN, YOLO and more. For this project, we want something fast since we will implement the model on a small machine such as NVIDIA Jetson board. So, the most appropriate algorithms are single shot methods such as YOLO or SSD. For this tutorial, I’ll use SSD-MobileNet, which is the fastest model available.
Because the Jetson boards is an embedded device, it is not nearly as powerful as a modern desktop or server built with a powerful graphics card. As a result, if you plan to train a deep neural network (or other large model) from scratch, I recommend doing so from a laptop, desktop, or server. Generally, desktop PCs or server-level graphics cards (such as Nvidia 3080Ti, etc.) are very expensive, not suitable for edge computing needs, and are too bulky. Therefore, here we are going to use Transfer leaning approach. Transfer learning is the task of using a pre-trained model and applying it to a new task, i.e. transferring the knowledge learned from one task to another.
PrerequisitesBefore you get started with the tutorial, you will need the following:
- NVIDIA Jetson Nano Developer Kit. Here, I will be using Nvidia Xavier NX board. Compared to the Jetson Nano, the Xavier NX is anywhere between two to seven times faster, depending on the application.
Jetson Xavier NX Developer Kit

Jetson Xavier NX Developer Kit
- Laptop or standalone PC(optional)
- High-performance microSD card: 32GB minimum
- MicroSD to SD adapter
- 5V 4A power supply with 2.1mm DC barrel connector
- USB WebCam for use with real-time applications. For live camera demonstrations, cameras like the Raspberry Pi Camera module are required. Here we’ll be using Arducam Complete High Quality Camera Bundle.
Arducam IMX477 HQ Camera Board

Arducam IMX477 HQ Camera Board
Additional Requirements- Like the Raspberry Pi, you will need a monitor, keyboard, and mouse (at least for the initial setup).
- A computer with an internet connection and the ability to flash your microSD card. Here we’ll be using laptop.
- Some experience with Python is helpful but not required.
- The Jetson Nano Developer Kit doesn’t include a WiFi module, so you have two options. You can either connect your Jetson Nano directly to your laptop using an ethernet cable and then set up a static IP and share your network, or you can add a USB WiFi adapter and connect the Nano to the same WiFi network that your laptop is using.
- To use a 5V 4A supply you will need a 2-pin jumper. I would strongly recommend to buy a 5V 4A power supply for your Jetson Nano in order to have better performance and run a high-load AI and DL applications.
- DL applications use a lot of compute resources and the heat sink may not be enough for the heat generated. Consider adding a cooling fan.
- To run the Nano board headless(without the monitor), set up either SSH access or RDP connection from your laptop. I recommend to use NoMachine application.
- This tutorial would benefit developers working on Jetson modules implementing deep learning applications. It assumes that readers have a Jetson module setup with Jetpack installed, are familiar with the Jetson working environment and with deep learning frameworks.
So, Let’s get started!
Installing prerequisitesNow, that the Jetson board is ready to go we will go through creating a deep learning environment. Here, I assume that you have already installed JetPack on the NVIDIA Jetson board.
To update everything, all you need to do is run the following two commands.
sudo apt update
sudo apt upgrade
Run the following command to install all of the required packages to your Jetson:
sudo apt-get install git cmake python3-dev nano
sudo apt-get install libhdf5-serial-dev hdf5-tools libhdf5-dev zlib1g-dev zip libjpeg8-dev
Depending on how long it’s been since you’ve updated your Jetson board, the upgrade could take anywhere between a minute and an hour.
Configuring your Python environment(optional)I will recommend that you use virtualenv to create a separate Python working environment. This includes downloading pip3 and virtualenv.
Install pip:
sudo apt-get install python3-pip
sudo pip3 install -U pip testresources setuptools
For managing virtual environments we'll be using virtualenv, which can be installed like below:
sudo pip install virtualenv virtualenvwrapperTo get virtualenv to work we need to add the following lines to the ~/.bashrc file:
# virtualenv and virtualenvwrapper
export WORKON_HOME=$HOME/.virtualenvs
export VIRTUALENVWRAPPER_PYTHON=/usr/bin/python3
source /usr/local/bin/virtualenvwrapper.sh
To activate the changes the following command must be executed:
source ~/.bashrcNow we can create a virtual environment using the mkvirtualenv command.
mkvirtualenv ml -p python3
workon ml
Alright, that’s everything we need it till now!
Add Swap Memory(optional, only for Jetson Nano)You can skip this step, if you are using NVIDIA Jetson Xavier board, since it has 8GB RAM memory. By default the Ubuntu 18.04 distribution of Jetson Nano comes with 2 GB of Swap memory.
To increase it we need to open the terminal and type the line:
sudo apt-get install zram-configThe zram module, on the Jetson nano allocates by default 2gb of Swap memory, so now we’re going to extend the size to 4gb by changing the configuration file.
Just type on the terminal:
sudo gedit /usr/bin/init-zram-swappingAnd Replace the line:
mem=$(((totalmem / 2 / ${NRDEVICES}) * 1024))with this line:
mem=$(((totalmem / ${NRDEVICES}) * 1024))And then reboot your Jetson Nano.
Monitoring Jetson board performance(optional)By default, The Jetpack provides the tegrastats utility, which reports memory usage and processor usage for Tegra-based devices. You can use the following command to get some details about the device
tegrastatsYou probably have to install jtop tool, which is debug tool created by Raffaello Bonghi and especially made for the Jetson family. It gives you all the information you are looking for during model training and inference, just like htop. You can install it with the following command.
sudo -H pip3 install -U jetson-statsThen, reboot your board.
sudo reboot nowYou can start the app with the simple command
jtopNow we're ready to actually run a real DL application.
Hello AI World (jetson-inference) InstallationHello AI World is a library for deploying deep learning inference networks and deep vision primitives using NVIDIA Tensor RT and NVIDIA Jetson boards developed by NVIDIA. Hello AI World can run completely on your Jetson, including using TensorRT for inference and PyTorch for transfer learning.
There are two ways to use it: (1) a pre-built Docker container and (2) a source project build. Here, we are going to use second way to implement it.
To install Jetson Inference, you need to run the following command to clone the project:
git clone --recursive https://github.com/dusty-nv/jetson-inferenceGo to jetson-inference folder,
cd jetson-inferencethen run,
mkdir build && cd buildThen you can proceed with the build action
cmake ../Compiling can take significant time on the Jetson so be patient. This will take approximately 45 minutes. Throughout the build process, you will be asked for your password, and at some point, you will be asked to download pre-trained models.
Deselect all the models and press ENTER to continue.
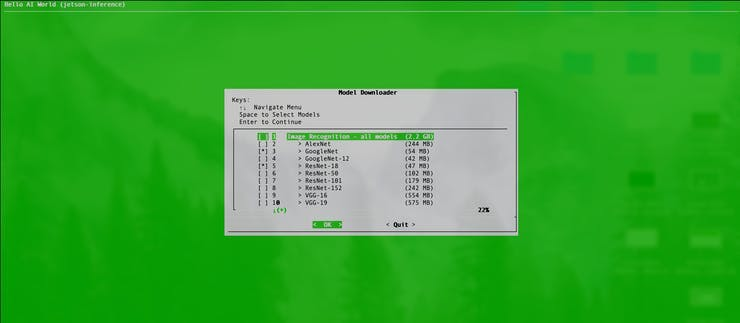
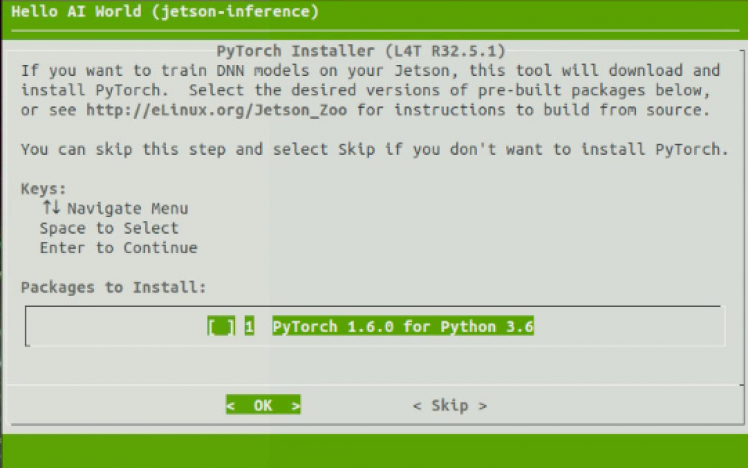
We’ll also be prompted to install PyTorch, which is needed if we wanted to run a demo that involves transfer learning, where an already trained model is used as the starting point on a model for another task.
Compile the code by running the command below.
make
sudo make install
Now, run the command below to update the link cache.
sudo ldconfigThe installation will probably take quite awhile.
The project will be built to jetson-inference/build/aarch64, with the following directory structure:
|-build
  aarch64
      bin             where the sample binaries are built to
        networks      where the network models are stored
        images        where the test images are stored
      include         where the headers reside
      lib             where the libraries are build to
Once you’re done, you also need to install torchvision. This is slightly more involved than usual as well, since you’ll need to install from source
Install some build dependencies we’ll need
sudo apt-get install libjpeg-dev zlib1g-dev libpython3-dev libavcodec-dev libavformat-dev libswscale-devClone the torchvision source code:
git clone --branch v0.7.0 https://github.com/pytorch/vision torchvisionCompile and install torchvision
cd torchvision
export BUILD_VERSION=0.7.0
python3 setup.py install --user
When installing torchvision, running sudo python setup.py install takes a long time. Be patient!
Then run,
cd ../To install pillow in Python using pip, run below command:
pip install 'pillow<7'Now, we’ll download the MobilenetV1-SSD. The model is collection of pre-trained object detection models that have various levels of speed and accuracy.
Open a terminal and navigate to the ssd directory :
cd jetson-inference/python/training/detection/ssdDownload it using wget command:
wget https://nvidia.box.com/shared/static/djf5w54rjvpqocsiztzaandq1m3avr7c.pth -O models/mobilenet-v1-ssd-mp-0_675.pthNow the model is in the ssd directory and ready to be used.
Download custom dataset from KaggleAny deep learning model would require a large volume of training data to give good results on the test data.
To use Kaggle resources and you need to log in to the Kaggle website. If you searching for custom Dataset you've come to the right location. As a first step, download the dataset from Kaggle. This dataset is available for download at the following link. Unzip a zip file.
The dataset contains 853 images files as png images.
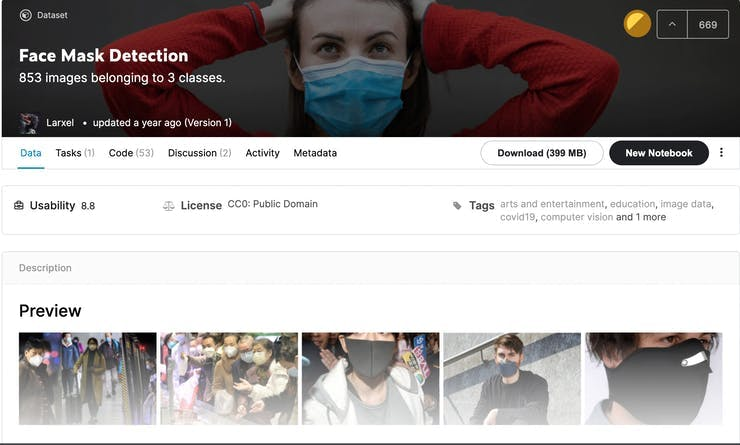
The classes are:
- With mask
- Without mask
- Wearing the mask incorrectly.
To train our object detector, we need to supervise its learning with bounding box annotations. We draw a box around each object that we want the detector to see and label each box with the object class that we would like the detector to predict. Fortunately, this dataset comes pre-labeled annotation files, so we can jump right into preparing our images and annotations for our model.
Just FYI, If you already have your own pictures, you can use CVAT tool to annotate them. Then export them in Pascal VOC format.
Prepare Pascal VOC Format DataThe mainstream data set is mainly COCO and Pascal VOC Format. We are going to follow the PASCAL VOC XML format, which is a very popular format.
PASCAL (Pattern Analysis, Statistical Modelling, and Computational Learning) is a Network of Excellence by the EU. They ran the Visual Object Challenge (VOC) from 2005 onwards till 2012.
We need to make sure that our dataset looks like Pascal VOC format and directory structure:
- Annotations/
      - *.xml
- ImageSets/
      - Main
            - test.txt
            - train.txt
            - trainval.txt
            - val.txt
- JPEGImages/
      - *.jpg
- labels.txt
First of all you have to go to the folder:
cd /jetson-inference/python/training/detection/ssd/dataThen, create MaskDetector folder and subfolders Annotations, ImageSets and JPEGImages.
mkdir -p MaskDetector/{Annotations,ImageSets,JPEGImages} && cd MaskDetectorJPEGImages is the folder containing original images. You have to put your xml files into Annotations folder. And copy dataset images to JPEGImages folder.
Create a text file called labels.txt as well. The labels.txt file should the classes you want to train on e.g., dog, cat, etc. This is the most straightforward part, you just need to list name of the class you are going to train like this. In my case, the file contains the three classes:
nano labels.txtContent of the file:
with_mask
without_mask
mask_weared_incorrect
Also, we need to generate our paths files - trainval.txt and test.txt. These files will hold all the paths to the training and validation data.
Create a new file called prepare.py and place it in the jetson-inference/python/training/detection/ssd folder.
nano prepare.pyThen populate it with the following.
import glob, os

# Current directory
current_dir = os.path.dirname(os.path.abspath(__file__))

print(current_dir)

current_dir = 'JPEGImages'

# Percentage of images to be used for the test set
percentage_test = 10;

# Create and/or truncate trainval.txt and test.txt
file_train = open('ImageSets/Main/trainval.txt', 'w')
file_test = open('ImageSets/Main/test.txt', 'w')

# Populate trainval.txt and test.txt
counter = 1
index_test = round(100 / percentage_test)
for pathAndFilename in glob.iglob(os.path.join(current_dir, "*.jpg")):
    title, ext = os.path.splitext(os.path.basename(pathAndFilename))
    if counter == index_test:
        counter = 1
        file_test.write(title  + "n")
    else:
        file_train.write(title + "n")
        counter = counter + 1
The picture format must be JPEG or JPG format. In order to convert all images in a directory from PNG to JPG we can use imagemagick library.
Navigate to folder JPEGImages
cd JPEGImagesInstall ImageMagick library using below command:
sudo apt-get install imagemagickThen run:
mogrify -format jpg *.pngDelete png images, since we don't need then.
rm *.pngGo back to the MaskDetector directory
cd ..Finally, run the prepare script by issuing:
python prepare.pyThis prepare.py script creates the files trainval.txt and test.txt where the trainval.txtfile has paths to 90% of the images and test.txt has paths to 10% of the images.
Now that we have put together our dataset, we are ready to train our model.
Re-training SSD-Mobilenet using custom Face Mask detection datasetWe now know everything we need to get started, so its time to get hands-on!
First of all you have to navigate to the folder:
cd /jetson-inference/python/training/detection/ssd/Then open another terminal and run:
jtopTurn on jetson_clocks functionality.
In first a terminal, type:
python3 train_ssd.py --dataset-type=voc --data=data/MaskDetector --model-dir=models/mymodelHere we are training our network for 30 epochs along with the default batch size of 4.
During training, you will be watching the progress. The training time taken might very long depending on the performance of Jetson board.
When it’s done, we will need to export the model to the Open Neural Network Exchange (ONNX) format:

ONNX is an open format for machine learning and deep learning models. It allows you to convert deep learning and machine learning models from different frameworks such as TensorFlow, PyTorch, MATLAB, Caffe, and Keras to a single format.
Open a terminal and run below command:
python3 onnx_export.py --model-dir=models/mymodelAlso, if you want to visualize the onnx model, here is a recommendation Netron. This tool makes it very convenient to open the onnx file directly to see the model structure.
The next step is to invoke the model with the TensorRT interface, create the engine, and make inferences.
Face Mask Detection From Images and VideosAlright! Now that we have everything installed, let’s run the Face Mask Detection model.
First, let's try using the detectnet program to locates face mask in static images. In a terminal, type:
NET=models/mymodelDetectnet will automatically generate the TensorRT engine file and then run inference. TensorRT engine generation can take some time depending on size of the model and type of hardware. Then run below command:
detectnet --model=$NET/ssd-mobilenet.onnx --labels=$NET/labels.txt --input-blob=input_0 --output-cvg=scores --output-bbox=boxes --threshold=0.3 1.jpg output.jpgThe ONNX model is parsed through TensorRT, the TensorRT engine is created, and forward inference is made. It can take around 5 minutes for the engine to start up, so be patient with this one. TensorRT creates an engine file or plan file, which is a binary that’s optimized to provide low latency and high throughput for inference.
You can find TensortRT engine file aka plan file inside of model folder.
ssd-mobilenet.onnx.1.1.7103.GPU.FP16.engineThe detection results are as follows, you can see that the face masks is detected and framed.
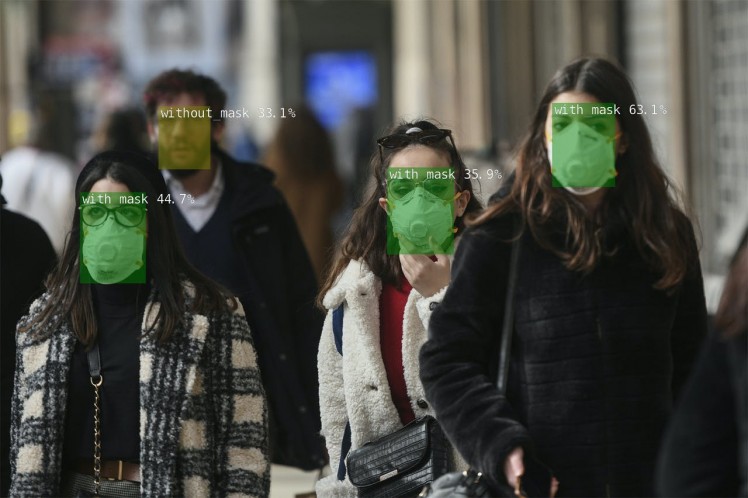
Congratulations! you have trained your Jetson Nano to recognize your face mask.
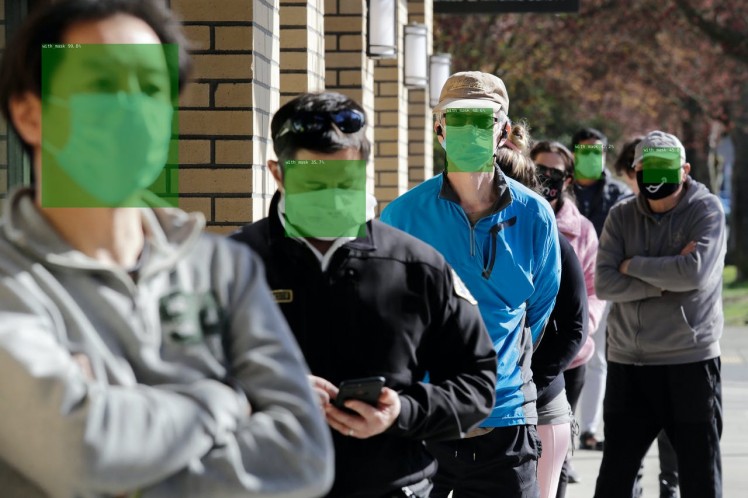
Let's try to execute another example image:
detectnet --model=$NET/ssd-mobilenet.onnx --labels=$NET/labels.txt --input-blob=input_0 --output-cvg=scores --output-bbox=boxes --threshold=0.2 2.jpg output.jpgYou will see an output like this:
The next step is to feed a video file as input for detectnet.
detectnet --model=$NET/ssd-mobilenet.onnx --labels=$NET/labels.txt --input-blob=input_0 --output-cvg=scores --output-bbox=boxes --threshold=0.3 video.mp4 output.mp4The output will be as follows:
Now that you’ve tested your model, let’s put it to the test in a real time experience using camera!
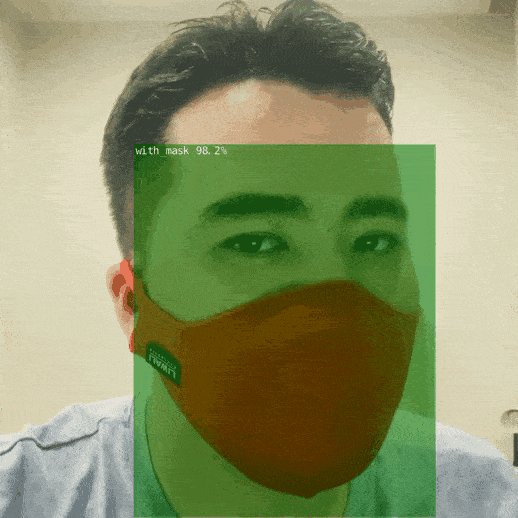
Face Mask Detection in Real-Time Using CameraNow that we know that the camera is working we can test face mask detection. Check is any video node in the /dev
ls /dev/video*The output will be as follows:
/dev/video0Execute the following command to let your USB/CSI camera stream images for face mask detection:
detectnet --model=$NET/ssd-mobilenet.onnx --labels=$NET/labels.txt --input-blob=input_0 --output-cvg=scores --output-bbox=boxes --threshold=0.2 --flip-method=rotate-180 csi://0If all went well, you should be seeing something similar to the below. If not, you will want to check your camera connectivity and GStreamer pipeline.
It is seen that the detection times are fast due to the implementation of NVIDIA TensorRT.
Sometimes the camera driver doesn't close properly that means you will have to restart the nvargus-daemon:
sudo systemctl restart nvargus-daemon
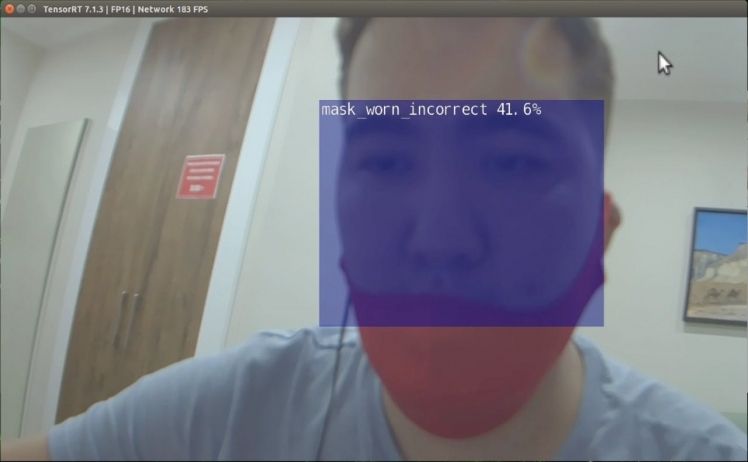
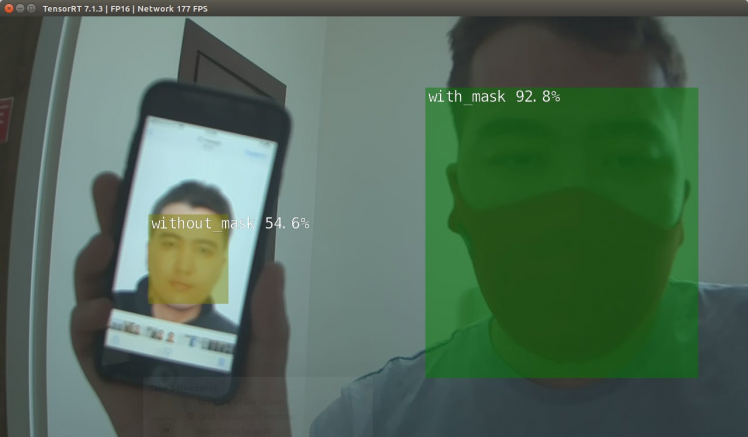
Seems like converting to TensorRT improves performance significantly. With the TensorRT, the Jetson NX performs fairly well, achieving a frame rate higher than 100FPS. This is fast enough for most real-time object detection applications.
Frankly speaking, this face make recognition system is not 100% accurate, but it works well in good light conditions in a real time. The art of Deep Learning involves a little bit of hit and try to figure out which are the best parameters to get the highest accuracy for your model. There is some level of black magic associated with this, along with a little bit of theory. To train a model you need to select the right hyper parameters, specifically, learning rate, batch size, momentum, and weight decay.
That’s it for today! You have Face mask detection system installed and ready to use! Thanks for following through this guide, I hope you found it useful. Good luck with your other object detection applications on the embedded devices.
Please do leave a comment if you expand this project or have any feedback!
All the code referenced in this story is available in my Github repo.
References- Nvidia Jetson Nano Face Mask Yolov4 Detector
- Hello AI World guide to deploying deep-learning inference networks and deep vision primitives with TensorRT and NVIDIA Jetson.
- How to Speed Up Deep Learning Inference Using TensorRT
- PyTorch for Jetson - version 1.9.0 now available
- TRAIN A CUSTOM YOLOv4 OBJECT DETECTOR (Using Google Colab)
- Getting Started With NVIDIA Jetson Nano Developer Kit
- Accelerate PyTorch Model With TensorRT via ONNX
Credits
Related products


Leave your feedback...