

Creating A Wireless Network With Raspberry Pi Pico W Part 1

Made by mahmood-m-shilleh / Home Automation
About the project
Learn how to create your own WiFi network using the Raspberry Pi Pico W in AP Mode.
Project info
Difficulty: Easy
Platforms: Raspberry Pi, MicroPython
Estimated time: 1 hour
License: GNU Lesser General Public License version 3 or later (LGPL3+)
Items used in this project

Story
The Raspberry Pi Pico W is a powerful microcontroller that can be used for a variety of projects. One of its most interesting features is its ability to function as an access point (AP). This means that you can use the Pico W to create your own wireless network, which can be used to host a web server, control other devices, or simply share files.
In this blog post, I will show you how to use the Pico W in AP mode to host a web server.
What is AP mode?
AP mode is a mode in which the Pico W can function as a wireless access point. This means that the Pico W can create its own wireless network, which other devices can connect to.
Potential use cases
There are a number of potential use cases for using AP mode on the Pico W. Here are a few examples:
- Hosting a web server: You can use the Pico W to host a simple web server, which can be used to display information or control other devices. (Which we will show in this tutorial)
- Controlling other devices: You can use the Pico W to control other devices over the network. For example, you could use it to control a light bulb or a motor.
- Sharing files: You can use the Pico W to share files with other devices over the network.
- Creating a temporary network: You could use the Pico W to create a temporary network for debugging or testing.
Before we get started, be sure to subscribe and support the channel if you have not!
Subscribe:
Support:
https://www.buymeacoffee.com/mmshilleh
Step 1-) CodeIn order to get started all you will need is a Raspberry Pi Pico W with some sort of MicroPython environment to code on. I am using Thonny and it is probably the most common IDE to write MicroPython code.
In Thonny we use the following code:
import network
import time
import socket


def web_page():
  html = """<html><head><meta name="viewport" content="width=device-width, initial-scale=1"></head>
            <body><h1>Hello World</h1></body></html>
         """
  return html

# if you do not see the network you may have to power cycle
# unplug your pico w for 10 seconds and plug it in again
def ap_mode(ssid, password):
    """
        Description: This is a function to activate AP mode

        Parameters:

        ssid[str]: The name of your internet connection
        password[str]: Password for your internet connection

        Returns: Nada
    """
    # Just making our internet connection
    ap = network.WLAN(network.AP_IF)
    ap.config(essid=ssid, password=password)
    ap.active(True)

    while ap.active() == False:
        pass
    print('AP Mode Is Active, You can Now Connect')
    print('IP Address To Connect to:: ' + ap.ifconfig()[0])

    s = socket.socket(socket.AF_INET, socket.SOCK_STREAM)   #creating socket object
    s.bind(('', 80))
    s.listen(5)

    while True:
      conn, addr = s.accept()
      print('Got a connection from %s' % str(addr))
      request = conn.recv(1024)
      print('Content = %s' % str(request))
      response = web_page()
      conn.send(response)
      conn.close()

ap_mode('NAME',
        'PASSWORD')
Explanation of Code:
- The code begins by importing the required modules:
network,time, andsocket. - There is a function defined called
web_page(), which returns an HTML string. This is what the WebServer we create will show once we visit the server from an external device. You can customize this as you like. - The
ap_mode()function is defined. It is responsible for activating the Access Point (AP) mode on a device and creating the web server on the Pico W. - The function takes two parameters:
ssid(the name of the internet connection) andpassword(password for the internet connection). The name of the network along with the password is up to you, if you are concerned about security be more creative with the names. - Inside the
ap_mode()function, an Access Point (AP) object is created usingnetwork.WLAN(network.AP_IF). Very simple to do this and any Pico W should be able to do this. - The configuration for the AP is set using the provided
ssidandpasswordvalues as you defined. - The AP is activated by setting
ap.active(True). Otherwise, it will not be shown in other devices. - The code enters a while loop and waits for the AP to become active, this while loop usually never runs because AP mode activates pretty quickly.
- Once the AP is active, it displays a message indicating that AP mode is active and provides the IP address to connect to.
- The remainder of the code is very simple client-server code
- A socket object
sis created usingsocket.socket(socket.AF_INET, socket.SOCK_STREAM). - The socket is bound to port 80 with
s.bind(('', 80)). This is a general port. - The socket starts listening for incoming connections with
s.listen(5). We can connect up to 5 devices in AP mode. - The code enters another while loop to continuously handle incoming connections. This will run forever until we stop the code or unplug the Pico W.
- When a connection is received, it prints the address of the client.
- The received request from the client is stored in the
requestvariable usingconn.recv(1024). - The
web_page()function is called to generate an HTML response, which is stored in theresponsevariable. - The response is sent back to the client using
conn.send(response). - The connection is closed with
conn.close(). - Finally, the
ap_mode()function is called with the desiredssidandpasswordvalues.
This code essentially sets up a device to act as an Access Point, allowing clients to connect to it. When a client connects, it receives a simple "Hello World" HTML page as a response.
Step 2-) Connect from a DeviceIn order to connect to the network simply go to the WiFi on your device (Computer or Phone) and find the network. If the code runs and the network can’t be found just simply Power Cycle the Pico W by turning it off and leaving it off for 10 seconds, then rerun the code. In this case, I see the following WiFi network.

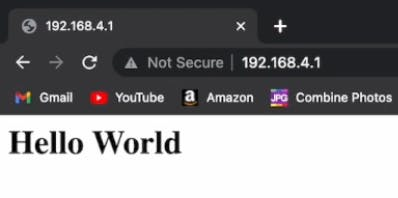
On a web browser, I go to the HTTP webpage as follows. Just use any web browser. Your IP address for your Pico W will be different; you can get it from the console in the code provided.

The result:
That is the first part of using a Raspberry Pi Pico W in AP mode, you can use this to host a Web Server without access to the World Wide Web. Next, we will be using it to relay messages between Pico W’s. It is pretty interesting because, in its base form, this is essentially how the internet we all know and love works, just a series of networks intertwined and routed to different IP addresses serving different clients. If you are impressed with the Pico W or enjoyed this content, a subscription to the channel would be awesome. Let us know if you have any questions. Thanks!
Credits
mahmood-m-shilleh
Mechanical and Software Engineering Background. University at Buffalo 2019 Texas A&M 2021 I make data pipelines for my day job. Outside of work, I participate in online communities regarding Full Stack Engineering, Microelectronics, and more. You can find more details about me on my Youtube Channel. https://www.youtube.com/@mmshilleh Feel free to reach out!
Related products


Leave your feedback...