

Create An App In Ionic Framework

Made by gusgonnet / Home Automation
About the project
Use the Ionic framework to build an app that can control your hardware or hit any REST API.
Project info
Difficulty: Moderate
Platforms: Amazon Web Services, Bluz, Blynk, Particle, Ubidots
Estimated time: 1 hour
License: MIT license (MIT)
Items used in this project
Story
In this article I will show you how I wrote my very first hybrid app, and how you can write your own too.
This app can run in Android, iOS, Windows phones and your browser.
I will show you how the code to make this app send an http GET and POST to the API of your choice. In my case, I will use the Particle Cloud, but you can use any other API - the Blynk API, the Ubidots API, your very own API in Amazon Web Services to name a few.
But first, what is a hybrid app?
Types of mobile apps
According to this site, there are three types of mobile apps:
- Native apps are specific to a given mobile platform (iOS or Android) using the development tools and language that the respective platform supports (e.g., Xcode and Objective-C with iOS, Eclipse and Java with Android). Native apps look and perform the best.
- HTML5 apps use standard web technologies—typically HTML5, JavaScript and CSS. This write-once-run-anywhere approach to mobile development creates cross-platform mobile applications that work on multiple devices. While developers can create sophisticated apps with HTML5 and JavaScript alone, some vital limitations remain at the time of this writing, specifically session management, secure offline storage, and access to native device functionality (camera, calendar, geolocation, etc.)
- Hybrid apps make it possible to embed HTML5 apps inside a thin native container, combining the best (and worst) elements of native and HTML5 apps.
And there seems to be a fourth type of apps emerging lately (here and here) :
- Progressive Web Apps: Progressive Web Applications take advantage of new technologies to bring the best of mobile sites and native applications to users. They're reliable, fast, and engaging.
Hybrid frameworks
There a number of frameworks that allow you to write hybrid apps: Ionic, PhoneGap, Kendo UI, Sencha Touch, just to name a few. If you want to learn more, you can take a look at this list.
The one I chose was Ionic. No specific reason, besides that it looks nice and there is a lot of material and online courses around the web.
Ionic Framework
From their site:
Free and open source, Ionic offers a library of mobile-optimized HTML, CSS and JS components and tools for building highly interactive native and progressive web apps. Built with Sass, optimized for AngularJS.
In other words, you can:
- write your own app by using HTML and JavaScript
- once installed in your phone, it will run as a regular app
- publish your app in the Google Play Store and/or the Apple App Store if you wanted to
- share your apk file with friends (on Android) if you are not ready to hit the stores
Please note that I am using Ionic 1 in this article since Ionic 2 is in currently in beta with many interesting changes coming.
Ionic Framework stack
This is how the Ionic Framework stack looks like:
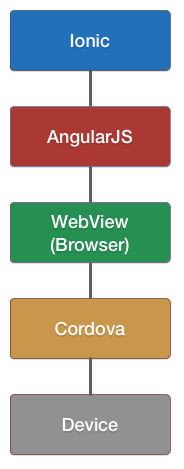 The Ionic Framework stack
What does this stack mean to regular guys like you and me? It means that the ionic app you can write will use Angular JS and a WebView to run your code. Cordova is there so your app can access and use native functionality of your phone if needed (think the camera or the GPS).
Installing Ionic
From the Getting Started with Ionic page, you have to do the following:
First, install Node.js. Then, install the latest Cordova and Ionic command-line tools. Follow the Android and iOS platform guides to install required platform dependencies.
Creating the app
Create an ionic directory somewhere in your computer. Open a terminal in that directory and run the following command:
$ ionic start myFirstApp blank
This will create the myFirstApp folder with a bunch of files and subfolders in it. We'll take a look at them shortly.
Running the template app
$ cd myFirstApp
$ ionic serve
This opens a browser in your computer and runs the app in it.
Leave this command running, since this starts a live-reload server for your project, which means that any changes we make in the source files will be reflected as soon as we save them, according to the docs.
The source files
The two interesting files in the context of this article are:
- myFirstApp/www/index.html
- myFirstApp/www/js/app.js
The index.html file defines what will be displayed in our app. The app.js file contains the javascript code that defines the actions and business logic of the app.
Now download the files from the code section in this article (see below) and copy them over to the proper places in the project folder.
Looking at index.html
These are the important changes I made to the default index.html.
APP/CONTROLLER: In the HTML section called body, we declare the name of the ng-app and the controller our app will use:
<!--  this tells angularJS what code to run -->
<!--  so it will run the controller indicated by ng-controller in that ng-app -->
<body ng-app="MY_APP" ng-controller="MyFirstAppCtrl">
TITLE: This declares the title:
<h1 >My First App</h1>
TEXT: This declares a text label with a live connection between the html and the js code. This is indicated by the use of double curly brackets:
temperature: {{temperature}}
DEBUG: I will use this for debugging the http responses. You can remove it at any time later on:
 <h3>Debug info</h3><br>
 response status: {{responseStatus}} <br>
 response body: {{responseDescription}} <br>
I'll leave the rest of the code for later.
Looking at app.js
In this file we declare the actions we want for our app.
APP: this declares an app variable:
//we declare here our app. This is called by index.html with the directive ng-app
//<body ng-app="MY_APP" ng-controller="ParticleCtrl">
var app = angular.module('MY_APP', ['ionic'])
CONTROLLER: this declares the controller our app will use:
//we declare here our controller. This is run in the index.html by the directive ng-controller
//<body ng-app="MY_APP" ng-controller="ParticleCtrl">
app.controller('MyFirstAppCtrl', function($scope, $http) {
VARIABLES: these are the variables we can reference with the double curly brackets in index.html (hint: {{temperature}} ):
$scope.temperature = "";
$scope.responseStatus = "";
$scope.responseDescription = "";
MAGIC: this statement runs our app when the index.html page is loaded:
app.run(function($ionicPlatform) {
Let's talk about the rest of the code later.
Your app talking to your hardware
Let's look at the code that adds a button:
 <!-- this creates a button and when clicked it calls the function
  callFunctionOnTheParticleCloud() in our controller -->
 <div >
   <button  ng-click="callFunctionOnTheParticleCloud()">
     Tap here to send a POST
   </button>
 </div>
Tapping on this button triggers the function callFunctionOnTheParticleCloud(). Where is the function defined? Yup, you guessed it, in the app.js file:
$scope.callFunctionOnTheParticleCloud = function() {
the var requestVariable contains the request our app will be sending, so here is the place where you configure your API endpoint. In the case of the Particle API, it looks like this (more info on Particle access token can be found here):
 var requestVariable = {
   method: 'POST',
   url: 'https://api.particle.io/v1/devices/0123456789abcdef01234567/pool_get_tmp',
   headers: {
     'Authorization': "Bearer 1234"
   },
   data: {
     test: 'test'
   }
 }
More info here regarding the Particle API.
For other hardware or APIs, this is the variable one needs to modify and adapt.
In my particular case, the http POST request will trigger a cloud function in my hardware (a Particle Photon) called pool_get_tmp(), which sends me a pushbullet notification as described in this project.
This line then sends the http request:
$http(requestVariable).then(function(response) {
These lines take care of the positive case, i.e.: when a response is received, and update the debug variables (consequently showed on screen):
   $scope.responseStatus = response.status;
   $scope.responseDescription = response.data;
And these lines get activated when something goes wrong:
   $scope.responseStatus = response.data || "Request failed";
   $scope.responseDescription = response.status;
Running the app
In case you missed it, you can run your app and try it out right away on your computer. Open a terminal and type:
$ cd myFirstApp
$ ionic serve
This opens a browser in your computer and runs the app in it.
It will look like this:
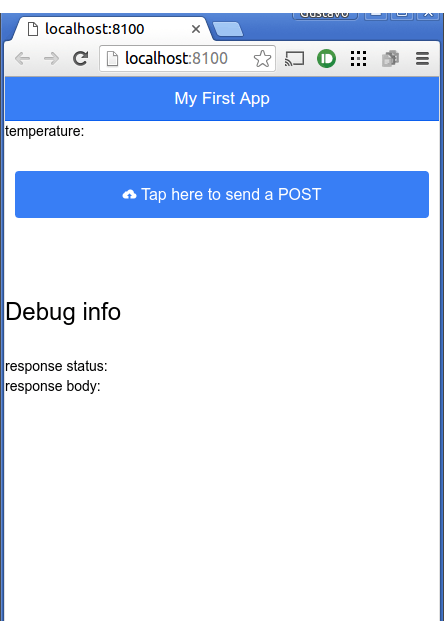 Ionic running the app in a browser
Extra feature: pull to refresh
Let's add a cute feature to our app: pull to refresh.
These are the relevant lines in the index.html page:
   <ion-refresher
     pulling-text="Pull to send a GET..."
     on-refresh="getVariableFromTheParticleCloud()" >
   </ion-refresher>
And this is the action defined in app.js:
$scope.getVariableFromTheParticleCloud = function() {
Modify the getVariableFromTheParticleCloud function to your liking (i.e.: to match your credentials, or your API - read here in the case you are using the Particle API), save your changes and boom, the temperature will refresh in our app every time we pull down. This happens with this line:
$scope.temperature = parseInt(response.data.result.replace(/[^0-9.]/g, ''), 10);
In this case, the json response contains a result field that can be accessed with response.data.result. The hocus pocus you see with replace() and the regex is to extract the integer numbers from it.
Here is a screenshot:
 Pull to refresh in action
Running the app on your Android
Ionic makes this very easy. Point a terminal to the directory of your project, connect your device via USB and run:
$ cd myFirstApp
$ ionic run android
Ionic will add the android platform to the project, build an apk, deploy and run the app on your device.
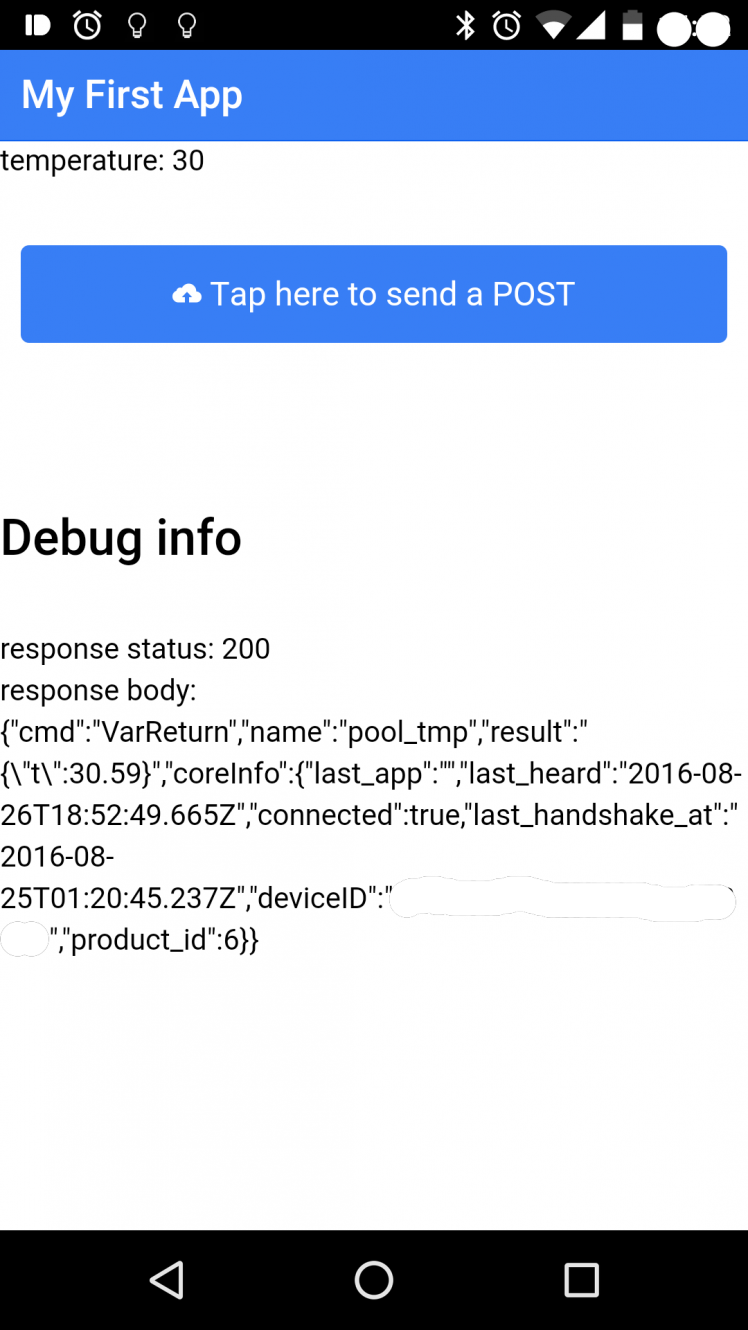 The app running in my phone
Running the app on your iPhone or Windows Phone
I don't own an iPhone or a Windows Phone, but if you try this in one please share your experience by leaving a comment below.
Troubleshooting
If you are hitting trouble here are some tips:
1- Verify the code integrity:
Run the app in your browser, then hit the button. Does the response status under the Debug info change to "Calling a function on the Particle cloud" in your app?
If yes, then the code seems alright.
If there are no changes, then you might have an issue in your code.
I recommend downloading the source files and carefully replacing the tokens a second time. Perhaps while fiddling with the code you deleted by mistake a bracket or parenthesis? This could get hard to troubleshoot, but if you are stubborn and want to find your mistake you can compare your files with the original index.html and app.js side by side with a tool like this one.
2- Use the Google Chrome Developer Tools to verify there are http messages coming out:
Run the app in Google Chrome, then open the Developer Tools from the menu (under menu -> More tools...). This will open a window next to your app with many tabs, hit on the Network tab.
Now click on the button of the app and check if there is a request coming out of your app to the API. Also check if there is a response coming back:
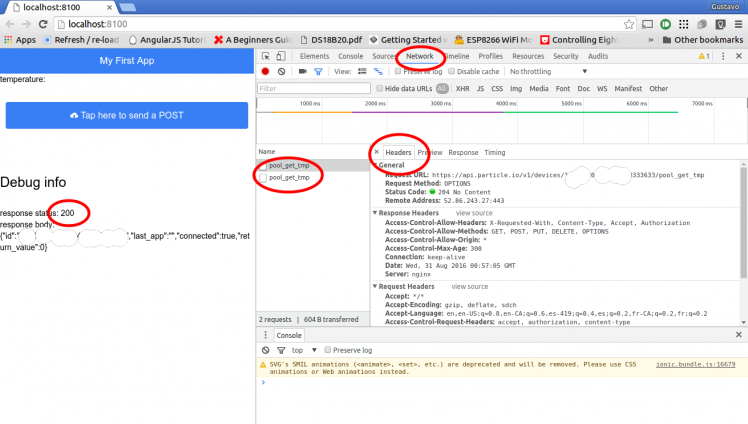 Google Chrome Developer tools to the rescue
Other tricks
Ionic Lab allows you to run the app in a simulator or even side by side to let you see how it will look in Android and iOS, side-by-side. You can check it out by running your project with the --lab switch:
$ ionic serve --lab
If you want to share your app with friends, family or clients, you can use Ionic View. This does not require you to go to the App Store or send your friends or customers an apk file.
Resources
If you want to learn more about Ionic, you can head to the docs page.
Josh Morony writes pretty often about Ionic.
I also took the time to follow this Ionic by Example online course in Udemy. I found the course easy to follow and it allowed me to start writing my apps and making sense of Ionic, HTML, CSS, Javascript and Angular JS. It also allowed me to write this article.
Note: I don't have any deals with Udemy and/or the author of the course, Mirko.
Another interesting link is this one (thanks Craig).
This list contains few of the trillion links there are out there.
Next steps
My next step is to learn about Angular js 2 and Ionic 2. I hope to publish another article in the near future about them.
Conclusion
Hope you find value in this article. Feel free to respect it and/or check my other projects here.
Leave a comment below if you struggle with something, maybe we can figure it out together.
Gustavo.
Need help?
If you require professional help with your projects, don't hesitate to write me a line about your needs at gusgonnet@gmail.com. Thank you!
Code
Credits
Related products


Leave your feedback...