
Control Arduino Robot Arms And Legs With Your Body Movement
Made by The Tactigon / Robotics / Wearables
About the project
We used two Arduino base scales to control robot legs, two T-Skins to control arms, and a RPi. We made a special version of T-Skin:Fight!
Project info
Difficulty: Expert
Platforms: Everything ESP, NodeMCU, Raspberry Pi
Estimated time: 2 weeks
License: MIT license (MIT)
Items used in this project
Hardware components


Story
Introduction
Hard work and fun can match: we made a special version of T-Skin: Fight! We used two scales to control legs, two T-Skins to control arms. The system is powered by a Raspberry Pi 3 B+ as central unit, reading T-Skins data, Arduino based scales data and transmit with MQTT to a NodeMCU (ESP8266) as shield on each IronBoy (with Arduino Leonardo on his backpack). 3D Printed swords (Frostmourne lopoly) made the fight happen!
Connecting Arduino UNO to Scales and Use Them to Move Legs
Serial Plotter used to show scales dataThe scales are connected to Arduino UNO through 2 INA125 IC, as they read wheatstone bridges very well (at least for our purposes). They are connected to Analog Pins of Arduino UNO.
Hardware Architecture
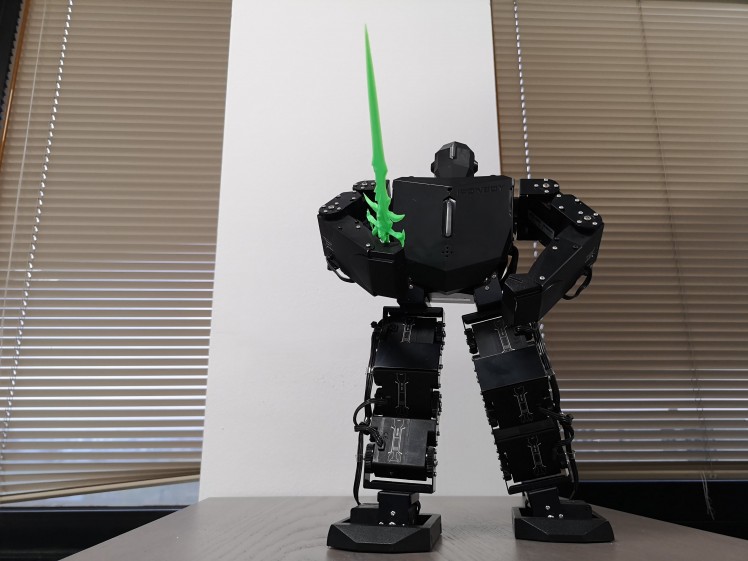 Our "Green" IronBoy
As said, this project involve a lot of components, from Arduino to Raspberry, from Scales to an Humanoid Robot!
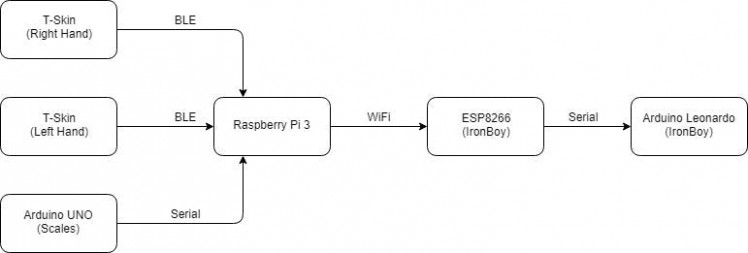 Hardware Architecture
The Raspberry Pi 3's Bluetooth Low Energy is used to communicate with 2 T-Skins weared on the hands, to control the humanoid robot's arms, and make him move.
The 2 scales used, are connected to an Arduino UNO, with two INA125 IC to read the load cells bridges. This Arduino is connected to Raspberry Pi using USB cable (Serial).
The NodeMCU is connected to the Raspberry Pi over WiFi (the Raspberry Pi is configured as HotSpot) and communicate to Arduino Leonardo over Serial Port.
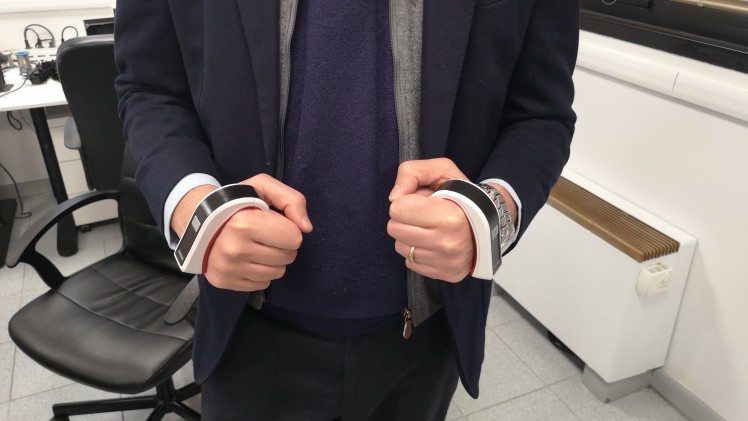 One T-Skin for each hand!
Software Architecture
Each device is running a different piece of software, but everything is connected.
Raspberry Pi runs a Python Script which handles Bluetooth Low Energy communication with 2 T-Skins, reads Scale's data from Arduino UNO over Serial, packets this data into an MQTT message, and publish it into different ironboy/ subtopics. The MQTT Broker, mosquitto, is running on the Raspberry Pi itself.
We have a subtopics for each arm, each leg and a "jolly" subtopic for status purpose.
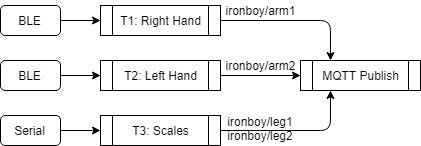
Each device is binded to a different thread: T1 and T2 connects to 2 T-Skins, handling hands movements, while T3 reads Scales data from Serial Port.
Each thread publishes gathered data to the specific MQTT topic.
Right Hand T-Skin handles the status: Arms control or Walk. Since balance is still a trouble we prefer to walk OR move hands. This state is handled by pushing button 4 on the Right Hand T-Skin.
Left Hand T-Skin is used only when Arms control state is enabled. By using Tactigon Libraries to get Euler's Angles we translate hand positions to arms positions.
The Arduino UNO reads the Scales with two INA125 IC, each capable of reading a wheatstone bridge made of load cells, as our scales. The Arduino Sketch makes a calibration with no load, full load and balanced load and stores data in EEPROM to avoid recalibration during future usages.
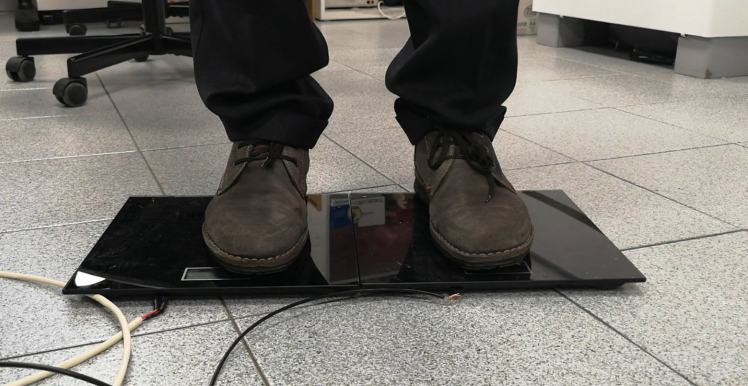 Two scales connected to Arduino UNO
NodeMCU ESP8266's Firmware will subscribe to ironboy/# MQTT topic and send data over serial port to Arduino Leonardo to control the humanoid robot movements with received data.
The Arduino Leonardo, mounted on the IronBoy's backpack, gets this data from the serial port, parses it and move arms and legs servos by using received informations.
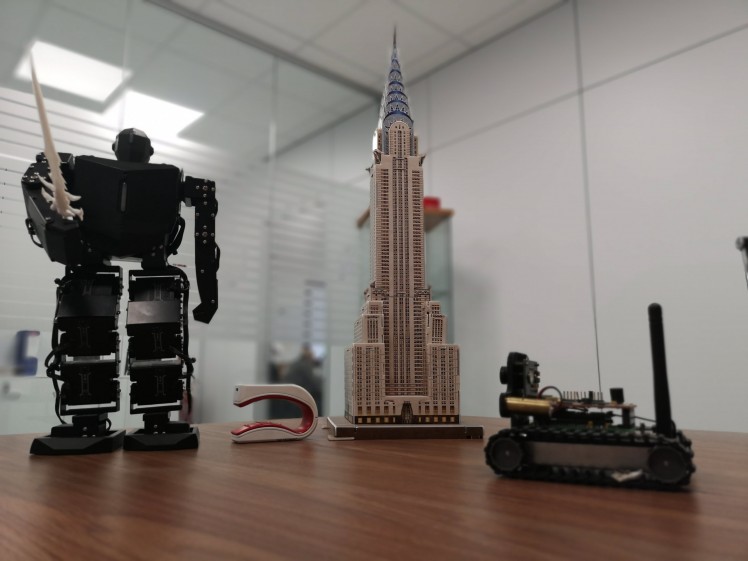 White one!
Conclusions
Well, now we control arms and legs of our humanoid robot. We could push it further by using more Tactigon on the arms, like our previous How to make Shadow Robot Arm Project! In this way our movement won't be interpolated anymore, but the robot will move arms as we do!
Credits
The Tactigon
The Tactigon is a brand of Next Industries Milano. Next Industries is a born of a passion to develop devices and sensors fit for Iot Technology. Our team is made of incredible experts in movement detection for big structural monitoring systems, software development and wearable device.
Related products


Leave your feedback...