
Complete Raspberry Pi / Nova Wireless Home Monitoring

Made by Jade7272 / Home Automation
About the project
The Raspberry Pi is an awesome little device. I will show how you can have a complete standalone wireless/wired home automation system.
Project info
Items used in this project
Hardware components


Story
Introduction
The Raspberry Pi is an awesome little device. I will show how you can have a complete standalone wireless security / home automation system on one device. We will be installing:
Tying them all together seamlessly and adding Particles as wireless sensor inputs and controls. We will make our own PCBs and solder them up. We will make wireless sensor shields, wireless relay shields, screw shields (for the ParticlePi). We will wire them up program them and showcase the final product.
A special note:
You can incorporate as many Raspberry Pi's and Particles and Holograms into this project as you want. You can even deploy them all over the world as have everything come back to the central monitoring station. I love IoT.
Step 1: The Raspberry Pi 0
This is a beautiful little computer. I’ll solder on the headers and then add the ParticlePi shield.
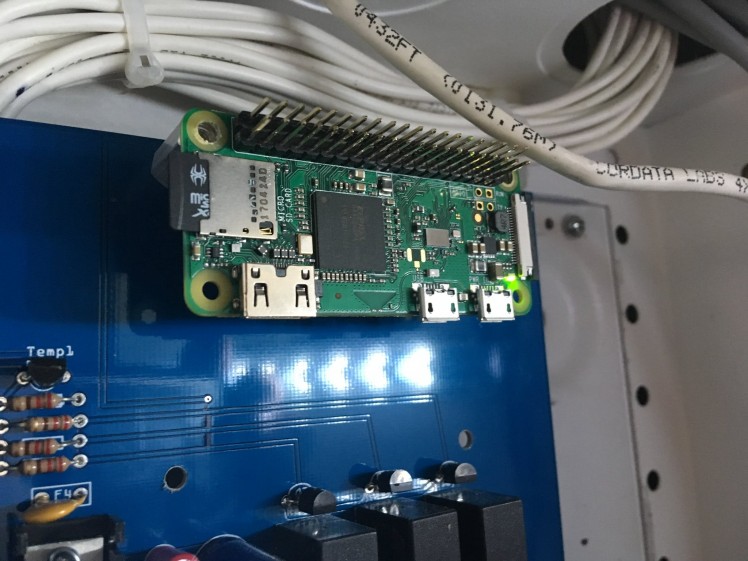 Raspberry Pi0 Mounted to the Security Board
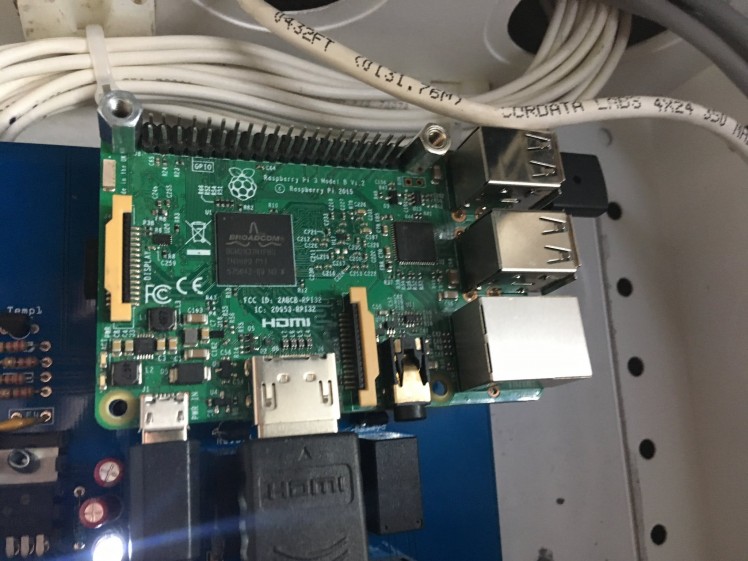 Raspberry Pi3 added to the Security Shield
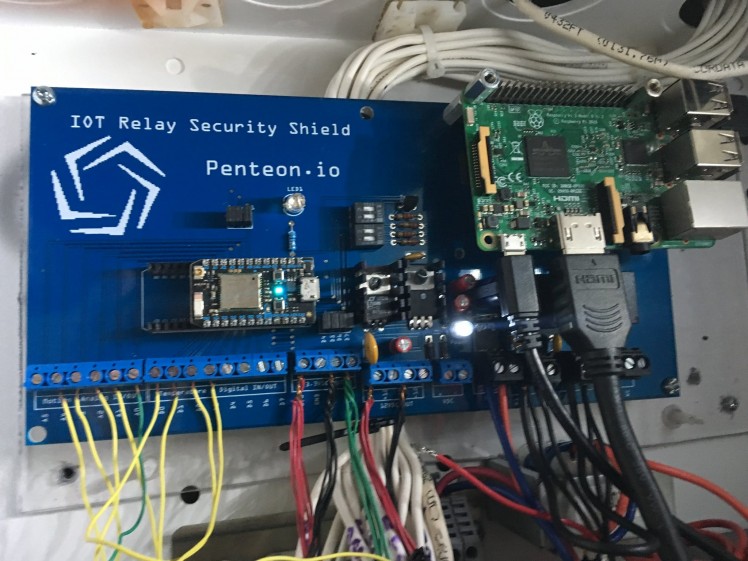 Wired and runnning
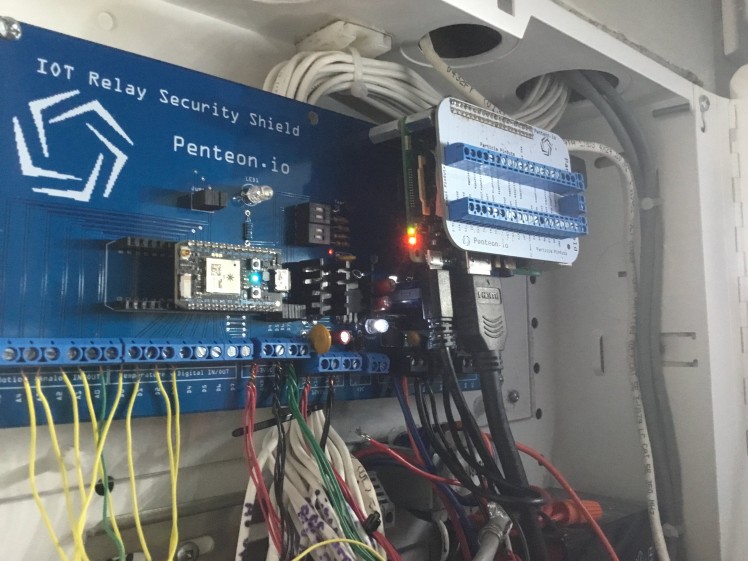 Full operation With HDMI plugged into the Board
Step 2: Hologram Nova Wireless IOT
 Hologram Nova IOT cellular
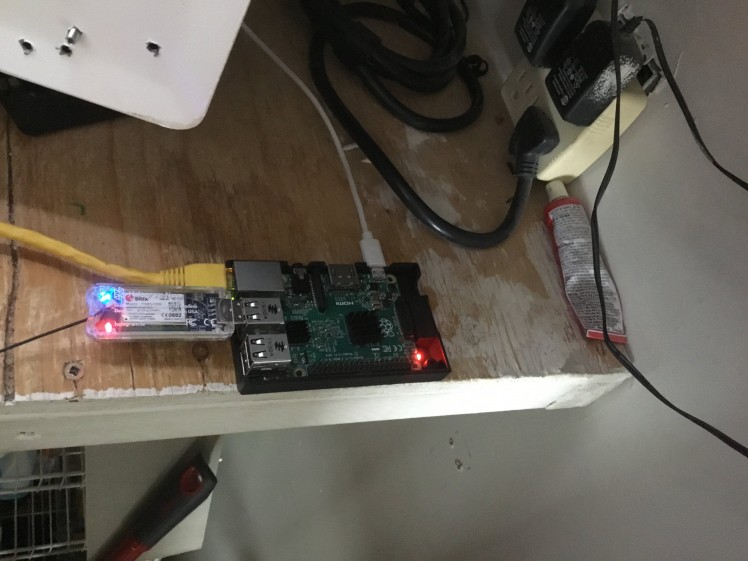 2nd Raspberry Pi2 Running Hologram Nova and Particle Pi Program and Node Red
The link to the Hologram site is here https://hologram.io
The Hologram Nova is a new connectivity platform for the IOT world and the Raspberry Pi. It is configured by Linux but it is a great learning platform. I am going to use it as an alarm transmitter for temperatures, motion, smoke alarms and any important notifications.
I use two Raspi's as my Pi3 wouldn’t take the Hologram Program (dependencies issues that I couldn’t resolve) so I used my Pi2 and cross integrated it with my system.
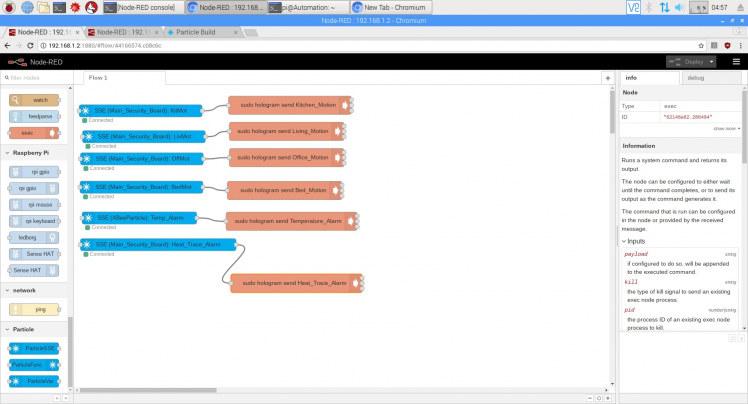 particle andexec nodes
Instructions on how to get your Hologram Nova talking to your Raspberry Pi are here: https://www.hackster.io/hologram/add-cellular-to-a...
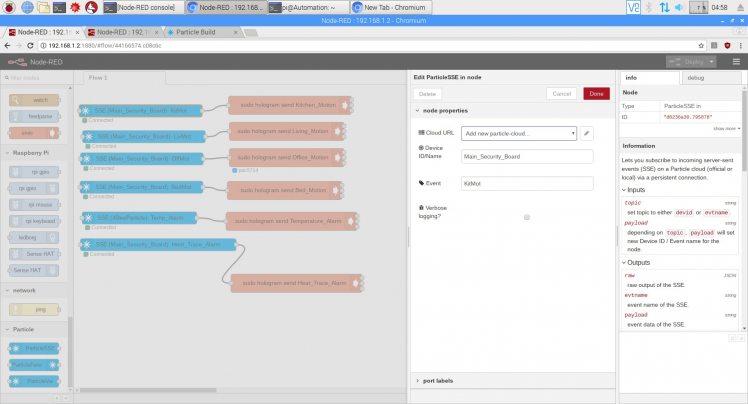 Particle node configuration
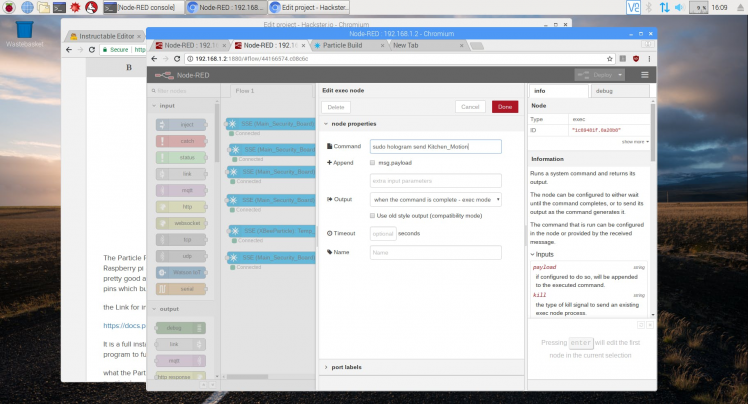 Hologram (Exec)Node
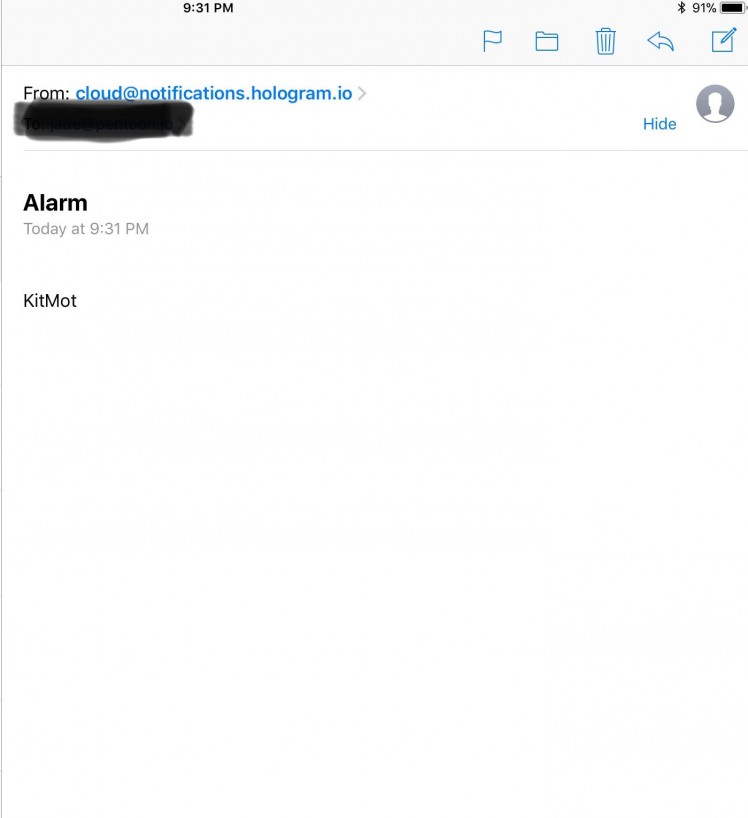
It’s pretty simple (Sudó Hologram send “your Alarm message”). That's it. The Particle sends a message when there is an alarm it triggers the Hologram.
Here is my setup for sending messages to the Hologram IDE and having it emailed to myself. The above pictures are of my emails. All you really need is to install the Node Red Particle node and a node called Exec configure as shown and you will get emailed notifications when your particle publish is sent:
 1 / 2 • Email From Hologram
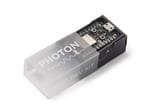
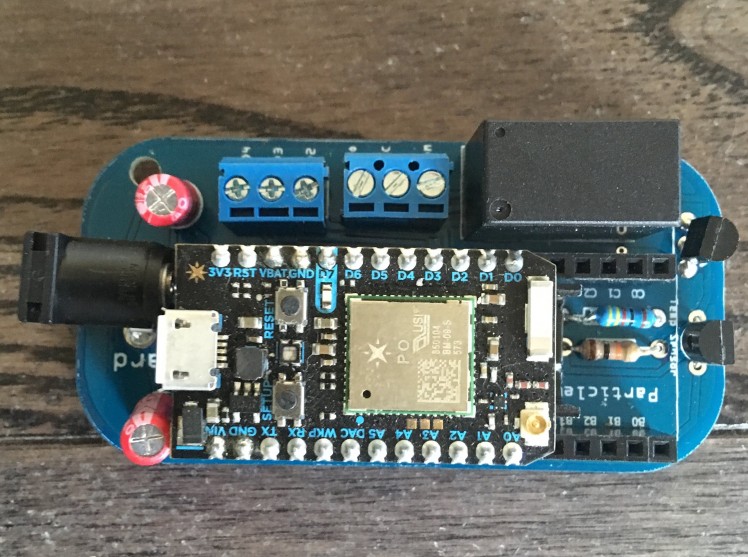
Step 3: The Particle Photon
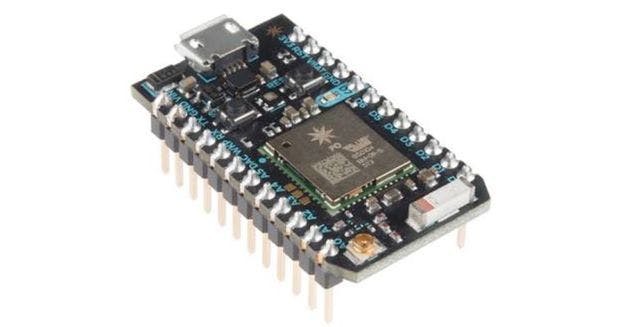 Particle Photon
This is a pretty nifty device for connecting all your homes devices. For $19 US they are a really good deal. I generally hate using jumper wires and breadboards for anything so I developed boards for just about everything including the Particle.
It can be purchased here: http://particle.io
Step 4: Particle PI Program & Screw Shield
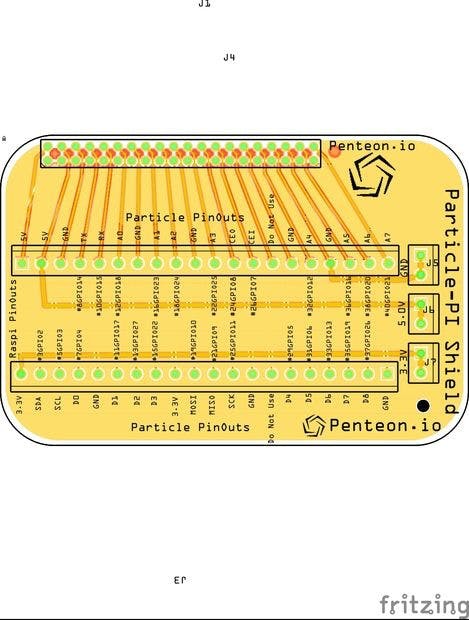 Particle Pi Shield
 Particle Pi Shield
 Back Side with Gorilla Tape to prevent Shorting
The Particle Pi shield I developed a long time ago it includes labeling for the Raspberry Pi as well as the ParticlePi pinouts that the program uses. It works pretty good and enables me to us screw terminals as opposed to little insert-able pins which bug me when they come out.
The link for installing the Particle Pi program is here: https://docs.particle.io/guide/getting-started/sta...
It is a full install to do from opening up your raspberry to installing the raspian program to full particle pi install. What the ParticlePi allows me to do is to use it like a Particle and remote program it with IO's and specialized sensors.
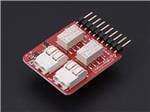
Step 5: The Relay Board
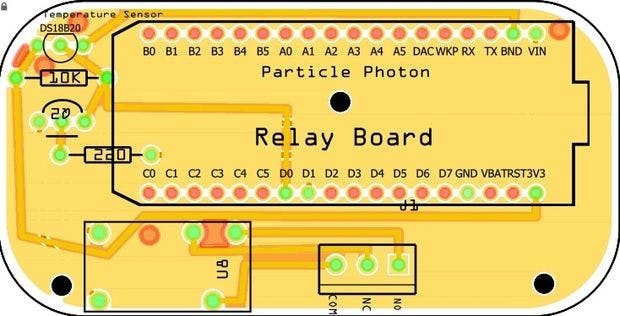 Relay Shield rev 2
 Relay Shield
The 12 volt relay board can be used as a garage door opener, you can turn your hot tub on and off by integrating a relay into it. Diagram is above. You can also turn heating on and off as well, and larger loads. You really don’t even need to Program it you can use the Particle App and just use the tinker to turn stuff off and on. But we are getting more complicated than that.
Step 6: The Motion Sensors
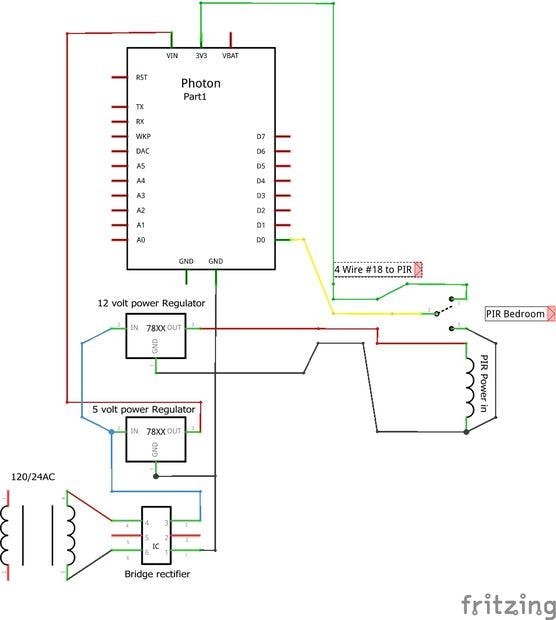 Security Wiring Diagram
 1 / 2 • Security PIR
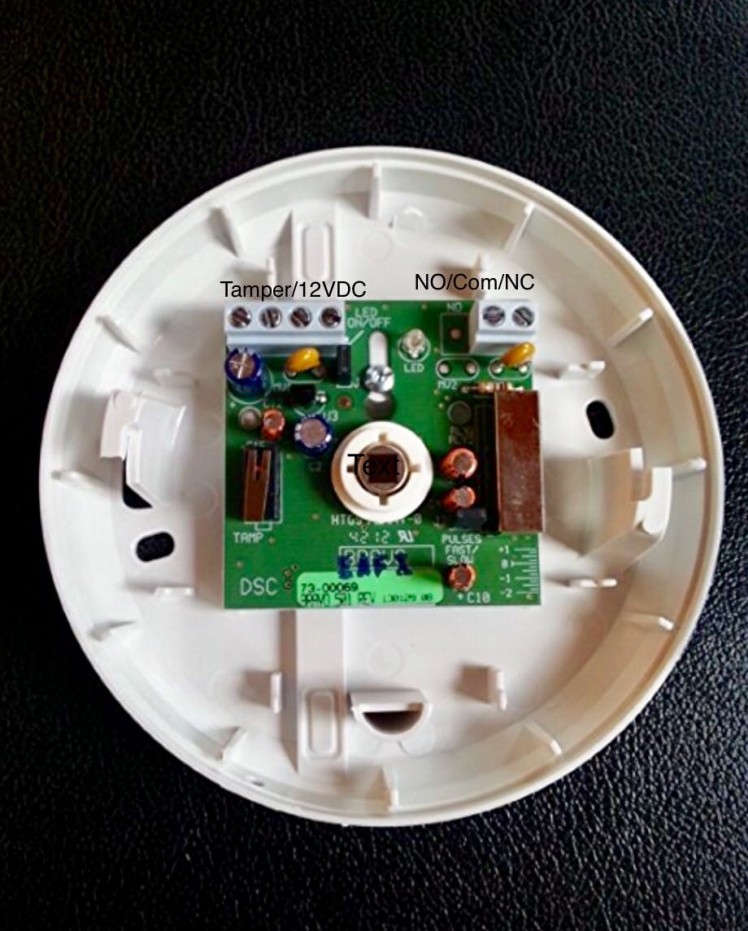
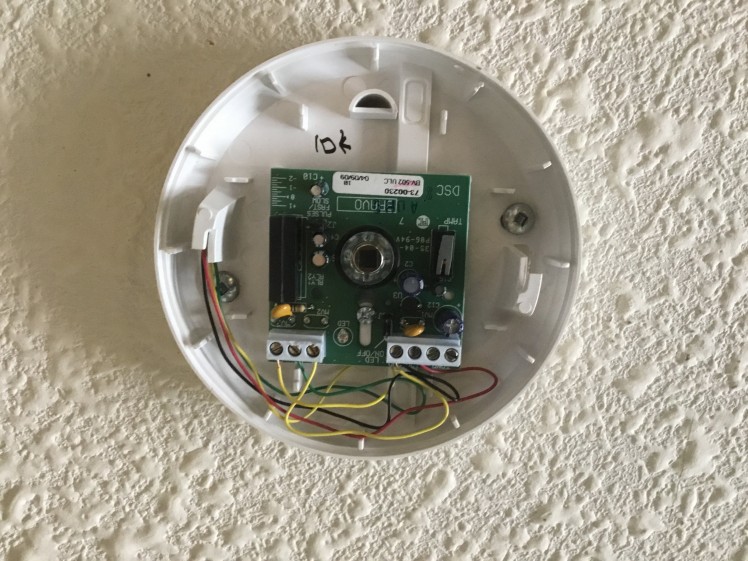 My PIR with NO/NC contacts
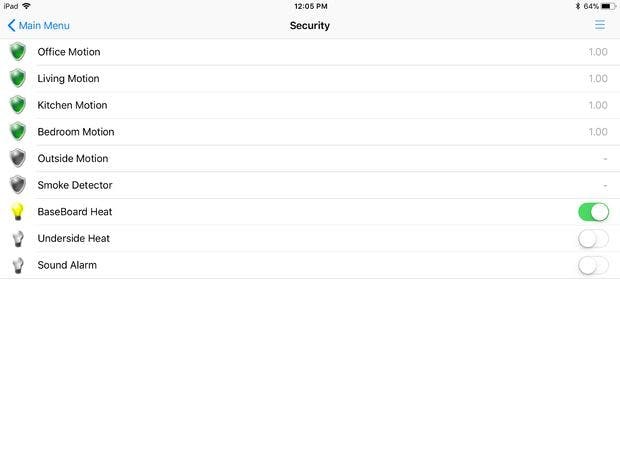
These sensors are available off of Amazon and come in many configurations and are wired with a 4 wire #18 gauge security wire. As we need +12VDC and 3.3VDC a ground and a return alarm circuit. Please see picture 1 the Return Wire is wired to the common of the Switch circuit so the input yellow gets either 3.3 volts (NC state no motion and 0 Ground state Motion Detected). Driving the input to the ground is necessary to make the input to definitely change state quickly. The ground is common to both the 12 and 3.3 circuit so its okay to jumper it over to the switch. If the grounds were not common (different power supplying 12VDC then it wouldn't be a good idea. As you could get a difference of potential (BAD), or it wouldn't be a dependable state change.
Adding a Smoke detector To the Home Automation Circuit
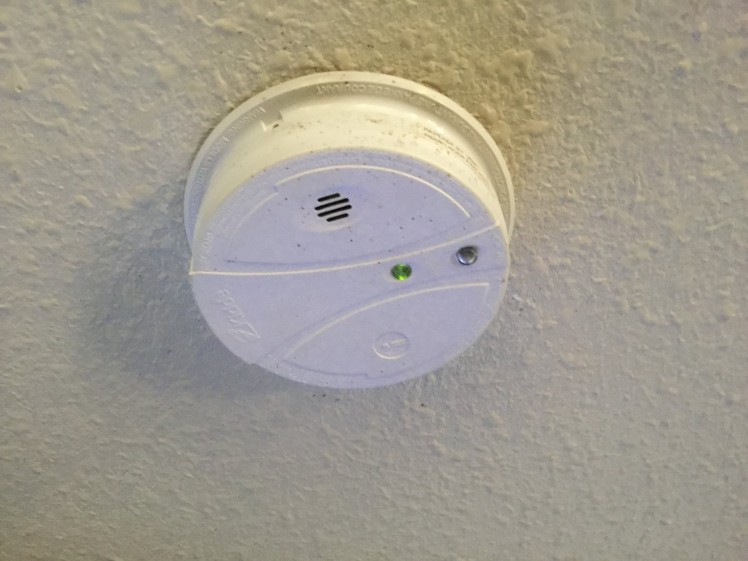 Kidde Smoke a Detector
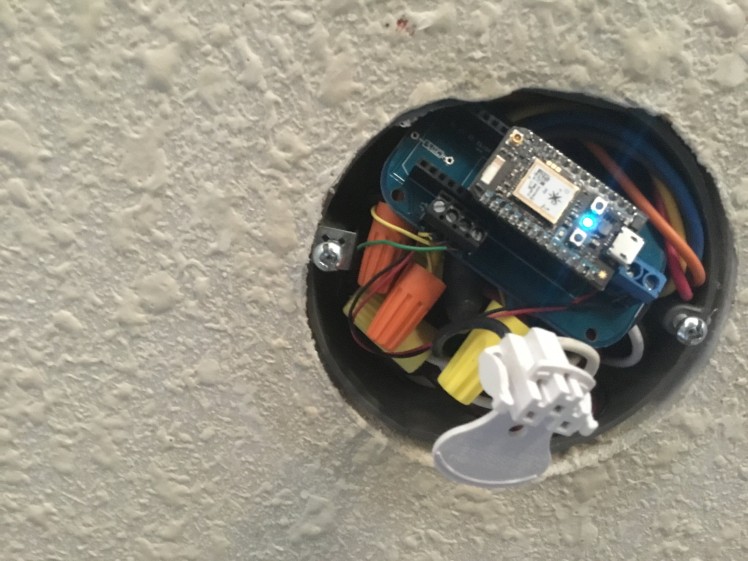 Particle Attached to system
 Kidde Smoke Module
The Kidde Smoke Module is easily installed into the system and is approved for use
it can be purchasssed here
http://www.kidde.com/home-safety/en/us/products/fire-safety/safety-accessories/auxiliary-devices/sm120x/
 Reporting by pressing the test button on the smoke detector
Step 7: Temperature Sensors
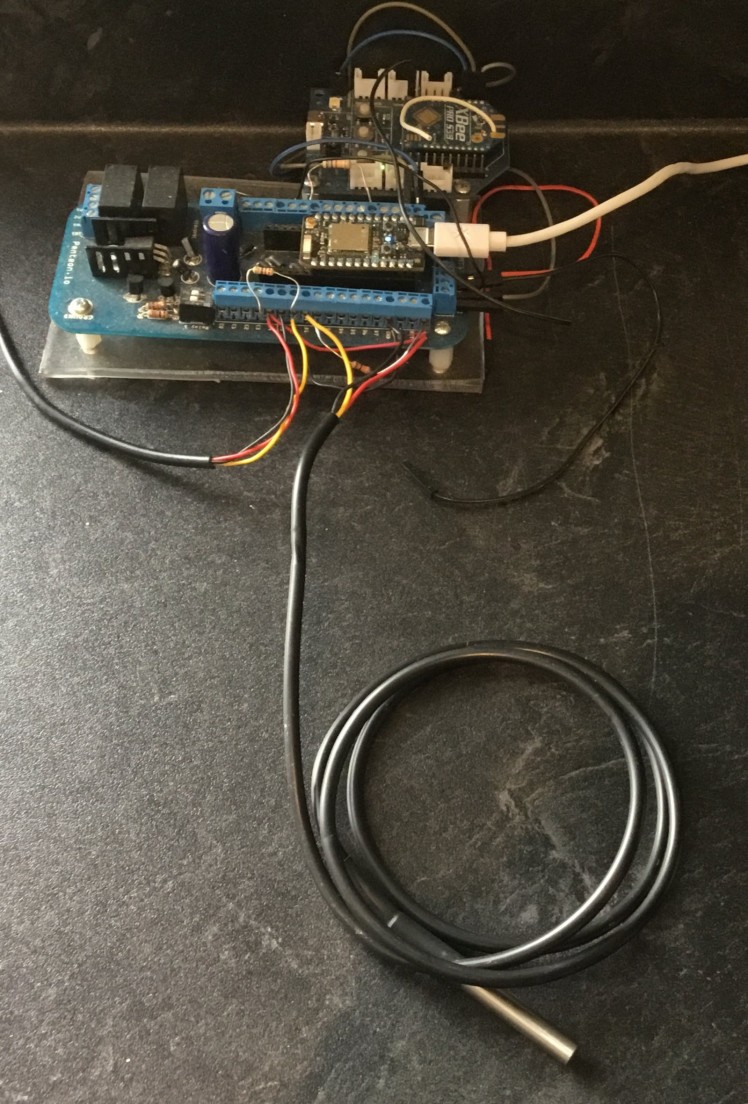
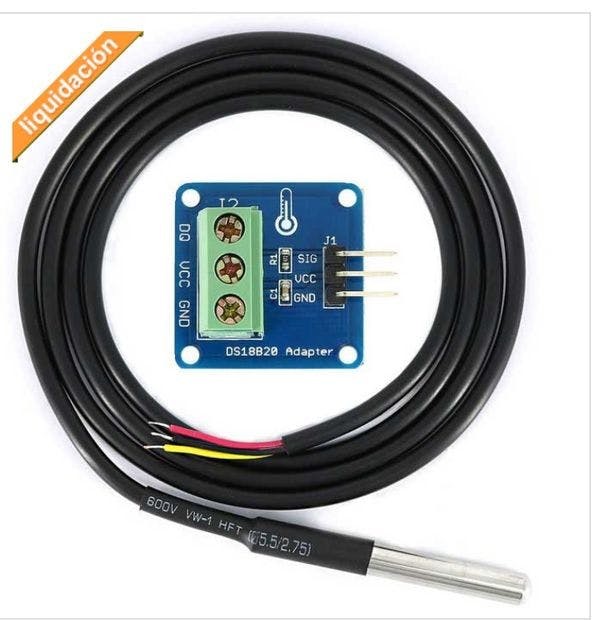 DS18B with Waterproof Wiring
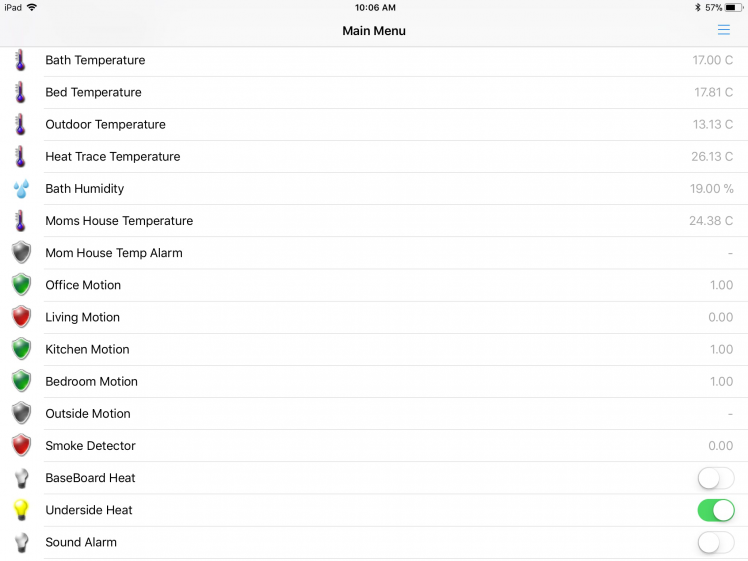
 Indoor And Outdoor Sensors Hooked Up
I am partial to the DS18B temperature sensor. They are dependable and last a very long time and come pre-wired in a kit so installing them in the real world is a lot easier. Special note if you don't use the supplied shield you need to use a 10K resistor between the +3.3 and the yellow data wire. The same goes for the DHT22 a 10K resistor is required (if you don't they may melt).
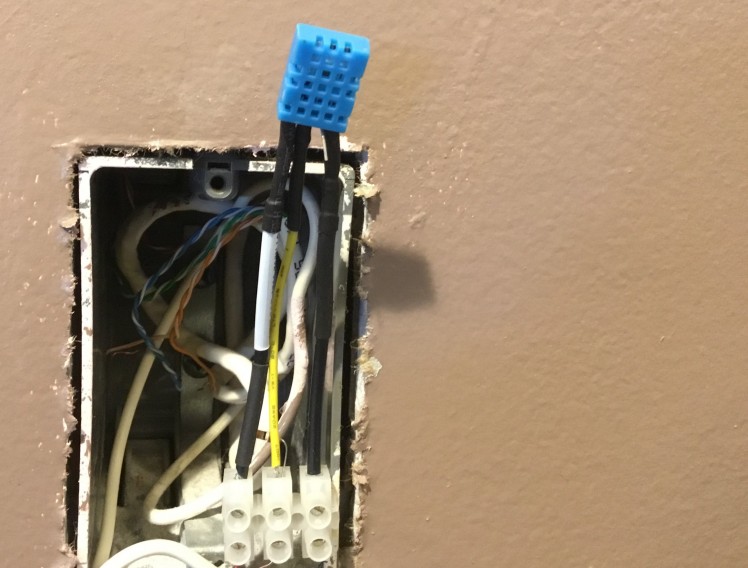 DHT22 in Wall Wiring For the Bathroom
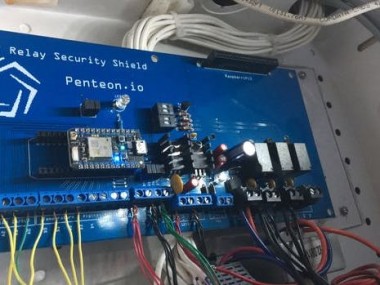
Step 8: The Security Board
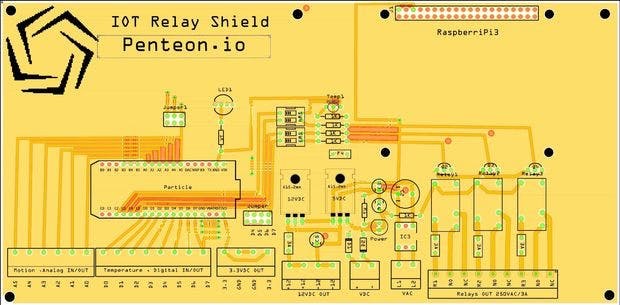 Security Shield
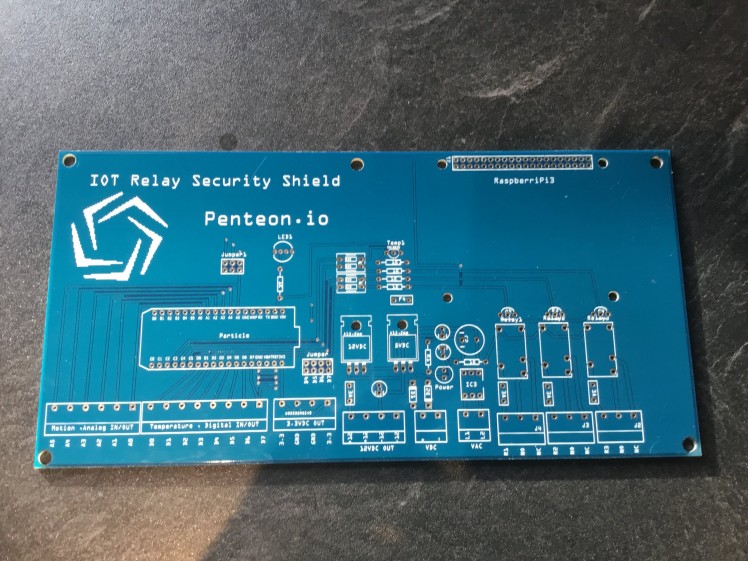 Security/Automation Shield
For the main control board that sits in the control cabinet. I have included a Gerber file for the enthusiast that doesn’t want to go through the hassle of doing a total design work up. I have 3 relays designed into the Board.
- Can be used for an alarm Bell
- Can be used for turning on and off the solenoid
- Can be used for turning heating or Air conditioning on and off.
The Raspberry Pi Zero can be soldered into place in the spots provided to get power from the Board or you can use a header. It utilizes a 18-24 volt AC input and has a 12 Volt and 5 volt power supply for your devices.
A Particle Photon or electron can be used. The Electron has more IO points but is Cellular and can cost more in data but is more dependable as it has a battery input for redundancy.
Step 9: Install the OpenHab Programand the Openable App

The following links will get you started as well:
Installing the Openhab program on the Raspberry Pi is SUPER EASY follow these steps:
- Right Click on the Download Button on the Run Time 1.8.3 (Copy Link)
- ssh into your Raspberry Pi from another computer or just open the command prompt you can get a good program called Putty here its for SSH'ing into devices like the Pi http://www.putty.org/
- Type in:
sudo mkdir /opt/openhab
- Press enter.
- Then
cd /opt/openhab
- Press enter
- Once your in the file location type in:
sudo wget https://bintray.com/artifact/download/openhab/bin/...
Press enter, then type in:
ls
You will see the file. Copy that file name (easier than typing it in)
sudo unzip (paste in file name) press enter
Then type in:
sudo rm -r (paste in file name again)
Then type in:
ls
You will see all the files there. Then type in:
sudo mkdir addons_repo
Then go to that file:
cd addons_repo
Then type in:
sudo wget https://bintray.com/openhab/mvn/download_file?file... (this will take a while)
ls
You will see the file. Copy that file name (easier than typing it in):
sudo unzip (paste in file name)
Press enter then type in:
sudo rm -r (paste in file name again)
Then type in:
ls
You will see all the addons in this file you don't install them in the addons folder because the program takes 20 minutes to start if you do. Ok now you need to copy a couple of things over to the addons file, to do this type in:
sudo cp org.openhab.persistence.mqtt-1.10.0.jar /opt/openhab/addons
You need these addons copy past and enter each time:
sudo cp org.openhab.action.mqtt-1.10.0.jar /opt/openhab/addons
sudo cp org.openhab.binding.mqtt-1.10.0.jar /opt/openhab/addons
sudo cp org.openhab.persistence.rrd4j-1.10.0.jar /opt/openhab/addons
Ok now that the program is installed (ish). Now comes the fun part. There are tutorials and help in doing some programming but I will paste in what I have to get you started. Type:
cd ..
Include the two dots that takes you back one level. If you typed in cd
just type in
cd /opt/openhab
That'll get you back. Now type in:
cd configurations
Then type in ls to see all the files your going to play with. Now type in:
sudo nano openhab_default.cfg
That gets you into the default configurations folder. Type "Ctrl" w (control Button) that's basically "where is". It's a big file. Type in mqtt in the upper filed. Do it once scroll down. You have to use arrow keys to navigate here 10 lines ish then again "Ctrl" w then up arrow. You will see MQTT Transport. There are a few things to change here. Make the changes as below:
# Define your MQTT broker connections here for use in the MQTT Binding or MQTT
# # URL to the MQTT broker, e.g. tcp://localhost:1883 or ssl://localhost:8883 ((((mqtt:mymosquitto.url=tcp://localhost:1883)))))
This is what you change it to without brackets. Then (Ctrl) of that's a save as. Then change the file name to openhab.cfg "enter" then your done (Ctrl)x "enter". Now type in:
cd items
That takes you to the items folder then paste in the following:
sudo nano default.items
Enter. Then look at the attached notepads. There is an items file, copy paste the whole thing in there.
"Ctrl" onto save. Then type: "Ctrl"x to exit. Type:
cd .. (go back one space)
cd sitemaps
sudo nano default.sitemap
Paste in all the files in the sitemaps folder from sitemaps notepads. "Ctrl" onto save. Then type "Ctrl"x to exit.
There are some dependencies to install like MQTT the instructions to install it are here as well as a full instruction set on installing openhab.
You need to install it before you start the program. Once you have done everything I posted and followed the instructions in the http://homeautomationforgeeks.com site, please do what I posted then go back and follow that they say in the site as well. There are some addons you need to copy over to the addons folder as well as some other small things like starting automatically and shortcuts etc.
Type:
cd /opt/openhab
sudo ./start.sh
Then go to your browser and type in the IP address of the pi:8080 the program should show you some stuff if you don't have the Node Red set up yet and the Particles you wont see much happening but it'll look nice:
Step 10: Node Red Program & Special Notes

I use Node red as an intermediary to the Particle and the Raspberry Pi to send MQTT Data from the Particle to the OpenHab Program. It is quite easy and you can integrate it into just about anything you can also post from your OpenHab switches to the particle to activate switches etc. Wayyy easy. You can also program the node Red to start automatically. Detailed instructions are on the nodered.org website.
Step 11: DIY Water Leak Sensor Board
 Water leak and Temperature
Please see my other tutorial for the full build and alarm notifications. This a neat box that alerts you to the presence of flooded basements, toilets, cold temperatures vía an app called Twillio. Very cool.
Step 12: Particle Security Program
Below is the link to a clean security program I will paste in the code with descriptions as well for learning purposes: https://go.particle.io/shared_apps/59f8d232f51fc8c...
// This #include statement was automatically added by the Particle IDE.
#include <Adafruit_DHT.h>
#include <onewire.h>
#include "DS18.h"//Note this is added when you search the library for onewire..(add to sketch)
#define DHTTYPE  DHT11       // Sensor type DHT11/21/22/AM2301/AM2302
#define DHTPIN   D0         // Digital pin for communications
DHT dht(DHTPIN, DHTTYPE);
DS18 sensor(D1);
DS18 sensor1(D2);
DS18 sensor2(D3);
int n;      // counter
int RelayPin1 =  D6; //Relay 1(Underside Heat On)
int RelayPin2 =  D5; //Relay 2(Alarm Bell)
int RelayPin3 =  D7; //Relay 3(Heat On)
int digitalin2 = A2; //Office Motion
int digitalin4 = A3; //Living Motion
int digitalin3 = A4; //Kitchen Motion
int digitalin1 = A1; //Bed Motion
int digitalin5 = A0; //Office Thermostat
int Smoke = A1; //Smoke Detector
int sensorValue = 0;
int buttonstate = LOW;
void setup() {
Serial.begin(9600);
dht.begin();
digitalWrite(RelayPin1,LOW);
digitalWrite(RelayPin2,LOW);
digitalWrite(RelayPin3,LOW);
pinMode(RelayPin1, OUTPUT); //Alarm relay
pinMode(RelayPin2, OUTPUT); //Heating relay
pinMode(RelayPin3, OUTPUT); //Water Shut off relay
pinMode(digitalin1, INPUT);
pinMode(digitalin2, INPUT);
pinMode(digitalin3, INPUT);
pinMode(digitalin4, INPUT);
pinMode(digitalin5, INPUT);
pinMode(Smoke, INPUT);
Particle.function("Heating", HeatOn);
Particle.function("Heating1", HeatOn1);
Particle.function("Alarm", AlarmOn);
}
void loop() {
char message[56];
//**************DHT Sensor************************
float h = dht.getHumidity();
float t = dht.getTempCelcius();
float f = dht.getTempFarenheit();
if (isnan(h) || isnan(t) || isnan(f)) {
Serial.println("Failed to read from DHT sensor!");
Particle.publish("Failed to read from DHT sensor!","0",PRIVATE);
return;
}
float hi = dht.getHeatIndex();
float dp = dht.getDewPoint();
float k = dht.getTempKelvin();
Serial.print(h);
Serial.print(t);
sensorValue =(t);
sprintf(message, "%d",sensorValue);
Particle.publish("Bath_Temp", message, PRIVATE);
sensorValue =(h);
sprintf(message, "%d",sensorValue);
Particle.publish("Bath_Hum", message, PRIVATE);  delay(100000);
//********************Security PIR input section*******************************88
sensorValue = digitalRead(digitalin1);//Bed Motion
if (sensorValue == LOW) {     Particle.publish("OffMot","0",PRIVATE);
digitalWrite(RelayPin1,HIGH);//*****Uncomment to turn Alarm System On)****
}
else if (sensorValue == HIGH) {
Particle.publish("OffMot","1",PRIVATE);  //Particle publish sensed by node red sent on to Openhab as MQTT
}
sensorValue = digitalRead(digitalin2); //Kitchen Motion
if (sensorValue == LOW) {
Particle.publish("BedMot","0",PRIVATE);
digitalWrite(RelayPin1,HIGH);//*****Uncomment to turn Alarm System On)****
}
else if (sensorValue == HIGH) {
Particle.publish("BedMot","1",PRIVATE);
}
sensorValue = digitalRead(digitalin4); //Living Motion
if (sensorValue  == LOW) {
Particle.publish("LivingMot","0",PRIVATE);
digitalWrite(RelayPin1,HIGH);//*****Uncomment to turn Alarm System On)****
}
else if (sensorValue == HIGH) {
Particle.publish("LivingMot","1",PRIVATE);
}
sensorValue = digitalRead(digitalin3); //Office Motion
if (sensorValue  == LOW) {
Particle.publish("KitMot","0",PRIVATE);
digitalWrite(RelayPin1,HIGH);//*****Uncomment to turn Alarm System On)****
}
else if (sensorValue == HIGH) {   Particle.publish("KitMot","1",PRIVATE);
}
sensorValue = digitalRead(Smoke); //Smoke Detector
if (sensorValue  == LOW) {
digitalWrite(RelayPin1,HIGH);//(*****Uncommented to turn Alarm  On in Case of Fire)****
Particle.publish("Smoke","1",PRIVATE);
}
else if (sensorValue == HIGH) {
Particle.publish("Smoke","0",PRIVATE);
}
sensorValue = digitalRead(digitalin5); //Thermostat
if (sensorValue  == HIGH) {
digitalWrite(RelayPin1,HIGH);
Particle.publish("Thermostat","1",PRIVATE);
}
else if (sensorValue == LOW) {
Particle.publish("Thermostat","0",PRIVATE);
}
sensorValue = digitalRead(D6);  //Relay 1(Under Heat)
if (sensorValue ==  HIGH)  {
Particle.publish("Alarm_On","1");
}
else if (sensorValue == LOW) {  //do nothing
}
sensorValue = digitalRead(D5); //Relay 2(Alarm)
if (sensorValue ==  HIGH)  {
Particle.publish("Underside_Heating_On","1");
}
else if (sensorValue == LOW) {
Particle.publish("Underside_Heating_Off","0");
sensorValue = digitalRead(D7); //Relay 3(BaseBoardHeat)
if (sensorValue ==  HIGH)  {
Particle.publish("BaseHeat_On","1");
}
else if (sensorValue == LOW) {
Particle.publish("BaseHeat_Off","1");
}
n++;
}
if (sensor.read()) {     // Do something cool with the temperature
Serial.printf("Temperature %.2f C %.2f F ", sensor.celsius(), sensor.fahrenheit());
Particle.publish("Bed_Temp", String(sensor.celsius()), PRIVATE);
}
if (sensor1.read()) {
Serial.printf("Temperature %.2f C %.2f F ", sensor.celsius(), sensor.fahrenheit());
Particle.publish("Living_Temp", String(sensor.celsius()), PRIVATE);
}
else {
if (sensor.searchDone()) {
}
}
delay(100000);
}
int HeatOn(String command) {   //(((This is your Function commands from Openhab switches to Node-red to here))))
if(command =="1")  {
digitalWrite(D7,HIGH);
Particle.publish("Base_Heat_On","1",PRIVATE);
}
if(command =="0") {
digitalWrite(D7,LOW);
Particle.publish("Base_Heat_Off","0",PRIVATE);
}
return 1 ;
}
int HeatOn1(String command) {   //(((This is your Function commands from Openhab switches to Node-red to here))))
if(command =="1")  {
digitalWrite(D6,HIGH); Particle.publish("Under_Heat_On","1",PRIVATE);
}
if(command =="0") {
digitalWrite(D6,LOW);
Particle.publish("Under_Heat_OFF","0",PRIVATE);
}
return 1 ;
}
int AlarmOn(String command) {   //(((This is your Function commands from Openhab switches to Node-red to here))))
if(command =="1")  {
digitalWrite(D5,HIGH);
Particle.publish("Alarm_On","1",PRIVATE);
}
if(command =="0") {
digitalWrite(D5,LOW);
Particle.publish("Alarm_OFF","0",PRIVATE);
}
return 1 ;
}
Step 13: Particle Relay Program
The Particle Relay shield is here. It is really simple and can either be used with the Openhab app and program or as a stand alone device for Just using the Tinker app.
https://go.particle.io/shared_apps/59bdc5d0cf7cb9e...
Note is in Libraries just do a search "DS18.h" is included in the library#include.
#include "DS18.h"
DS18 sensor(D0);
int Relay1(D1); i
nt sensorValue = 0;
void setup() {
Serial.begin(9600);
pinMode(Relay1, OUTPUT);
Particle.function("Relay1", Activate);    }
void loop() {
char message[120];
sensorValue = digitalRead(Relay1);  //Relay 1
if (sensorValue ==  HIGH)  {
Particle.publish("Relay1","1");
}   else if (sensorValue == LOW) {
Particle.publish("Relay1","0");
if (sensor.read()) {
Serial.printf("Temperature %.2f C %.2f F ", sensor.celsius(), sensor.fahrenheit());     Particle.publish("Temperature", String(sensor.celsius()), PRIVATE);//You can adjust ("Temperature") to say what you want
}
else
{
if (sensor.searchDone()) {
Serial.println("No more addresses.");
delay(2500);     }
else {
}
}
}
}
int Activate(String command) {
if(command =="1")  { digitalWrite(D1,HIGH);
Particle.publish("D1_HIGH", "1",PRIVATE);
delay(20000);
digitalWrite(D1,LOW);
Particle.publish("D3_Reset", "0",PRIVATE);
}
return 1 ;
}
The Alarm Bell
I am going to be using a 12 volt Fire Alarm Sounder. They are really freaking loud and have a strobe. I’m going to try and integrate a Raspberry Pi Camera into it to take pictures of the house when away as well as producing pictures for the COPs.
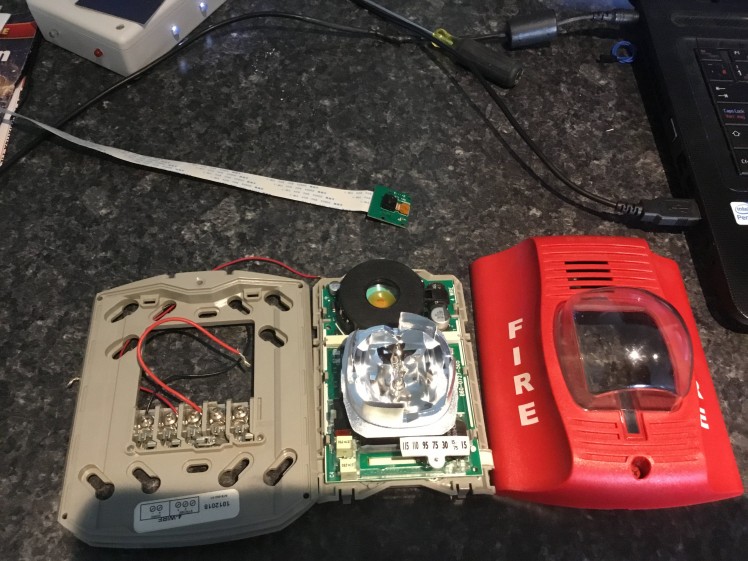 Alarm and Strobe Unit
 1 / 4 • Fire Alarm Module
Step 14: Fritzing Files and Program to Make Your Own PCBs
These files are opened with the fritzing program you can download and install from here http://fritzing.org/home/
Credits


Leave your feedback...