

Coffee Bird!

Made by electrouser810 / Home Automation
About the project
Simply ask the Coffee Bird if there is fresh coffee and avoid disappointment or deep depression when encountering an empty pot of coffee!!!
Project info
Difficulty: Difficult
Platforms: Amazon Alexa, Amazon Web Services, Arduino
Estimated time: 1 hour
License: MIT license (MIT)
Items used in this project
Hardware components


Software apps and online services
Story
I called this projec Coffee-Bird, because:
 At the end I realized it looks like a bird!
The Projects skill is available here.
WHAT?
It's simple, Coffee Bird keeps an eye on the coffee machine and will let you know if the pot is empty or full!
WHY?
Because we don't want your hopes for a fresh, hot cup of coffee gets crushed!
This birdy can also be repurposed to watch any other thing you may be in to! and you can ask Alexa about its status.
WHIT?
- Alexa
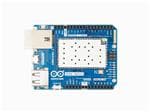
- Arduino ( We used Yún, otherwise add a wifi shield )
- AWS ( Lambda, API Gateway, IOT, CLI & SDKs )
- A light sensor ( for simplicity we also use a shield )
- Card-board
HOW?
So we have an Arduino YÚN and a light sensor that reads the brightness of the scenery in front of it! and since a full pot of coffee is darker than an empty glass pot ( because coffee happens to be black and black reflects less light and that results in less brightness that we can detect using our itsy-bitsy senspider ), then our friend Arduino asks its comrade YÚN to send a signal to an API Gateway endpoint containing a bit of information about the fullness-ness of the coffee pot being observed.
API Gateway then will ask his guys at Lambda city to inform the Thing who's representing the pot on AWS IOT to update its status accordingly ( Full or Not Full )
Our little lambda, also, returns an Integer back to Arduino, which she'll use as a threshold to distinguish between the real deal ( Black coffee ) and bright emptiness of a hollow coffee pot!
In the other hand, there is another guy, quietly hanging around the Lambda city, constantly waiting for a call! and once he gets it, he'll report back all he knows about the coffee pot! the call comes from a skill-full Alexa Skill, enabled by a shameless User of an Alexa Device and commissioned to find out who's this Coffee-Pot and if there is any coffee left in it! The question everybody wants the answer of!
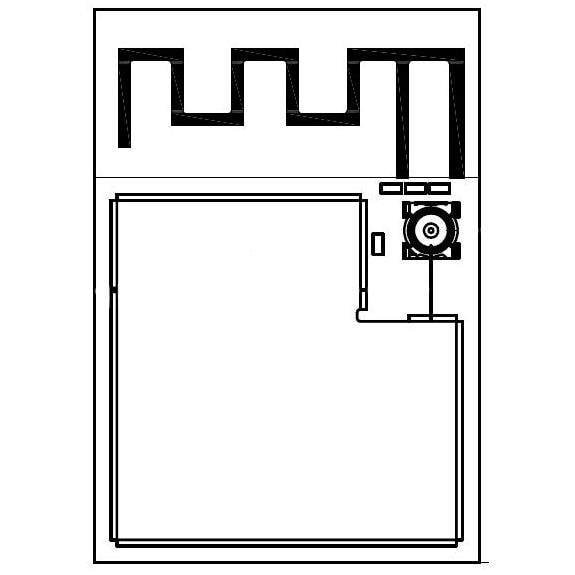
Diagram?
To have better overall look of the system and its components here is standard UML diagram we use in the industry:
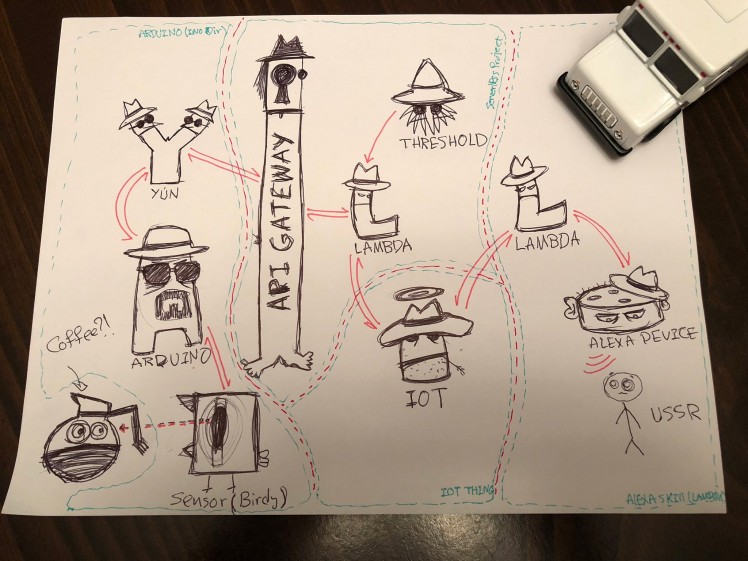 The four different areas have different source code / environment. The car is my kids.
LET'S DO IT! (TM)
The diagram above is really all that's in to it.
I'll put the source code for the Arduino section ( on the left of the diagram ) and the hardware and connections, plus the making of the casing ( the birdy ) on the Section #1.
On the Section #2, I'll put the source code for the application I developed using the Serverless platform ( which does create and deploy to all the necessary components including API Gateway, lambdas and IAM Security roles, etc.)
On Section #3, I'll put the source code and information about the Alexa skill and the lambda function that goes with it.
And finally on Section #4, I'll explain how to create and integrate an IOT thing to your thing, .. I mean to this whole thing, .. system, ya know what I'am say'n? just like I did above, there ^^^^.
Ok, let's get to it:
================ Section #1 ================
We used an Arduino Yún to avoid the scope of explaining how to connect and communicate between Arduino and internets! that's easy peasy, just googool it and you're good ( Essentially power up your Yún and connect to the wifi network it creates and visit http://192.168.240.1, the rest of it is explanatory ).
We also used the Grove I / O base shield to avoid having circuit diagrams and stuff ( I AM NOT LAZY, I AM JUST PRESERVING ENERGY. ) so just connect the Grove Light sensor to the Grove I/O base shield A0 port and voila, beautiful!
The source code for the Arduino sketch is following ( Please note that you need to put the end-point URL you'll get from the Step ( whatever step it is ) in this sketch! ( The code is commented/documented so feel free to just copy paste it without looking, ... it's really simple stuff )
#include <Bridge.h>
#include <HttpClient.h>
int temt6000Pin = A0;// Analog pin for reading sensor data
int light_value; // Keeps the resings from sensor
String url= "https://YOUR_API_ENDPOINT_GOES_HERE!"; // Our APIGateway endpoint
String isThereCoffee = "undefined"; // this will be set to tru or false later on and send to server
int threshold = 10; // The new threshold value will be pulled from the server and set to this var
String response = ""; // This var stores the response from the endpoint
void setup() {
 pinMode(temt6000Pin, INPUT); //data pin for ambientlight sensor
 // Bridge takes about two seconds to start up
 // it can be helpful to use the on-board LED
 // as an indicator for when it has initialized
 pinMode(13, OUTPUT);
 digitalWrite(13, LOW);
 Bridge.begin();
 digitalWrite(13, HIGH);
}
void loop() {
 // Light intensity calculations:
 int light_value = analogRead(temt6000Pin);
 if (light_value > threshold) {
 digitalWrite(13, HIGH);
 isThereCoffee = "false";
 } else {
 digitalWrite(13,LOW);
 isThereCoffee = "true";
 }
 // Initialize the client library
 HttpClient client;
 // Make a HTTP request:
 client.noCheckSSL();
 client.get( url + isThereCoffee );
 // if there are incoming bytes available
 // from the server, read them and set the response value to the final String:
 response = "";
 while (client.available()) {
 char c = client.read();
 response += c;
 }
 threshold = response.toInt();
 delay(45000); // You can change the intervall to your preferences ( Lambda's cheap but watch your cost! )
 digitalWrite(13, !digitalRead(13)); // Just because an LED blinking loos cool! :P
 delay(99);
 digitalWrite(13, !digitalRead(13)); // Setting it back to it's previous status (blink)
}
PS: it obviously, apparently, is not highlighting the syntax here, so if you don't want to go blind do me a favor and paste it in Arduino IDE before attempting to read it.
After this if you've set up Yún correctly and have put the correct end-point and everything ( should have put this as the last section! too late now! ) it should start sending data to over internet. Please note that for the sake of preserving energy ( and also, honestly, to keep it asap ( as simple as possible ) ) we left the api open to the world, hoping that nobody, ever, never, ever will find out what url to hit to change the status of my coffee machine. BUTT if you are going to go to PRODUCTION with this you should know that this IS NOT ACCEPTABLE! in-fact far from it! look at the UML again! you see that hyper secret, secure, door-lock thingy going on? that needs to be implemented buddy..
Here are some screenshots for setting up YÚN:
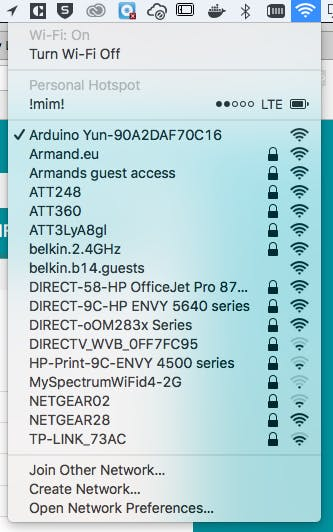 Power up and connect to YÚN wifi network ( if messed it up you can reset it byt pressing the wlan reset btn on the side for 5 -soft reste- or 30 -factory reset- seconds )
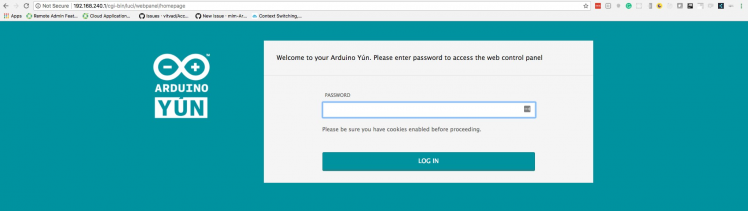 Go to http://192.168.240.1 and LOG IN! ( default password is arduino )
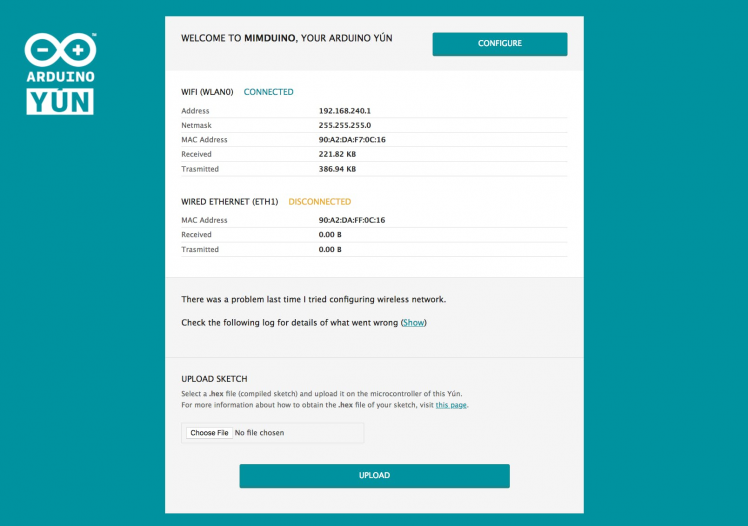 Click on CONFIGURE to CONFIGURE, Duh!
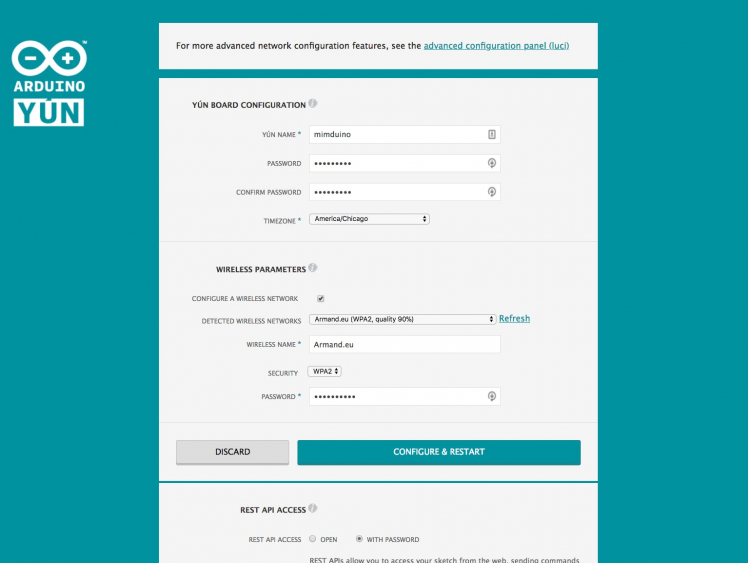 You know what to do!
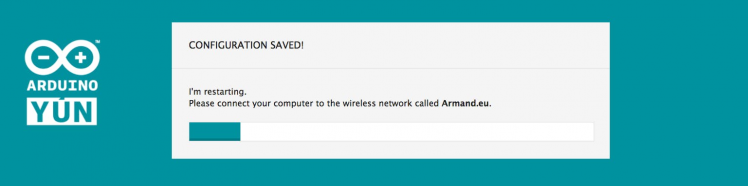 I don't know even!
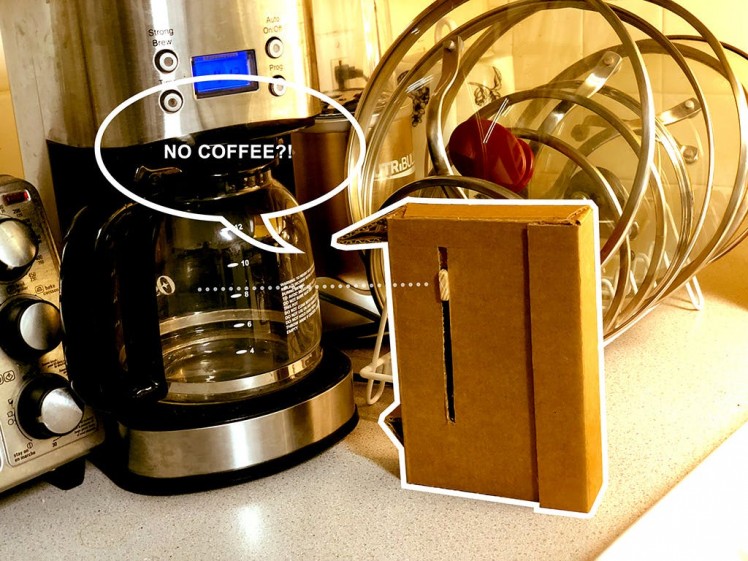
DA BIRDY CASING:
I didn't plan this and made it up as I was doing it, it turned out very pretty and even looked like a birdy! hence the reason I changed the project name from "Coffee Machine" to "Coffee Bird!".
; ;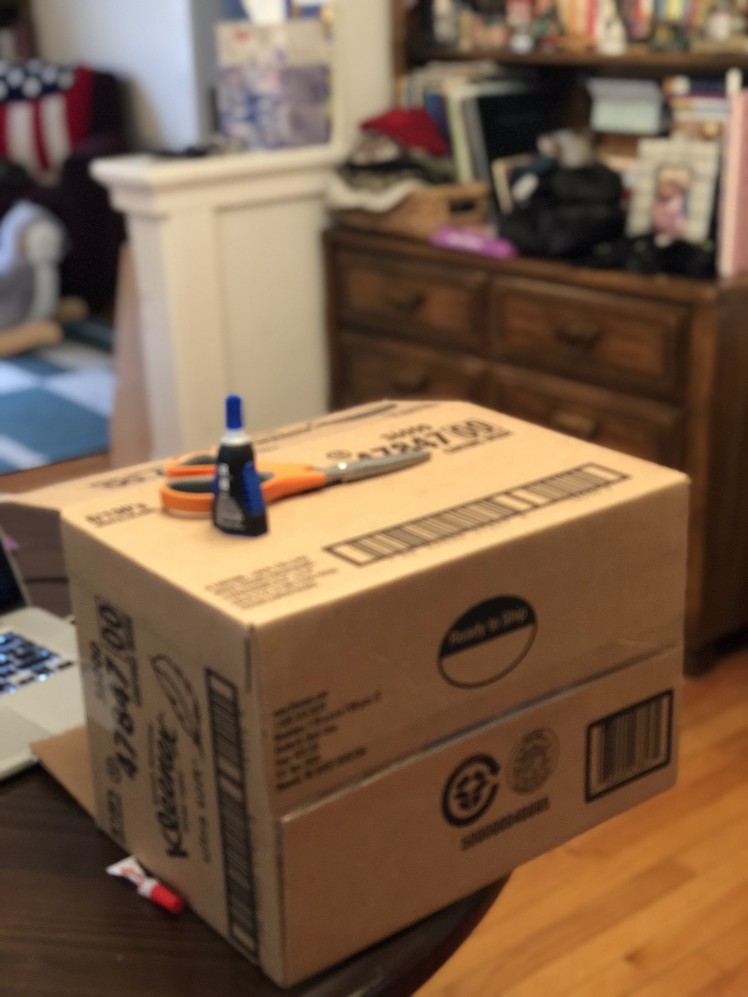 1 / 30 • I used an empty cardborad box I found in the basement.
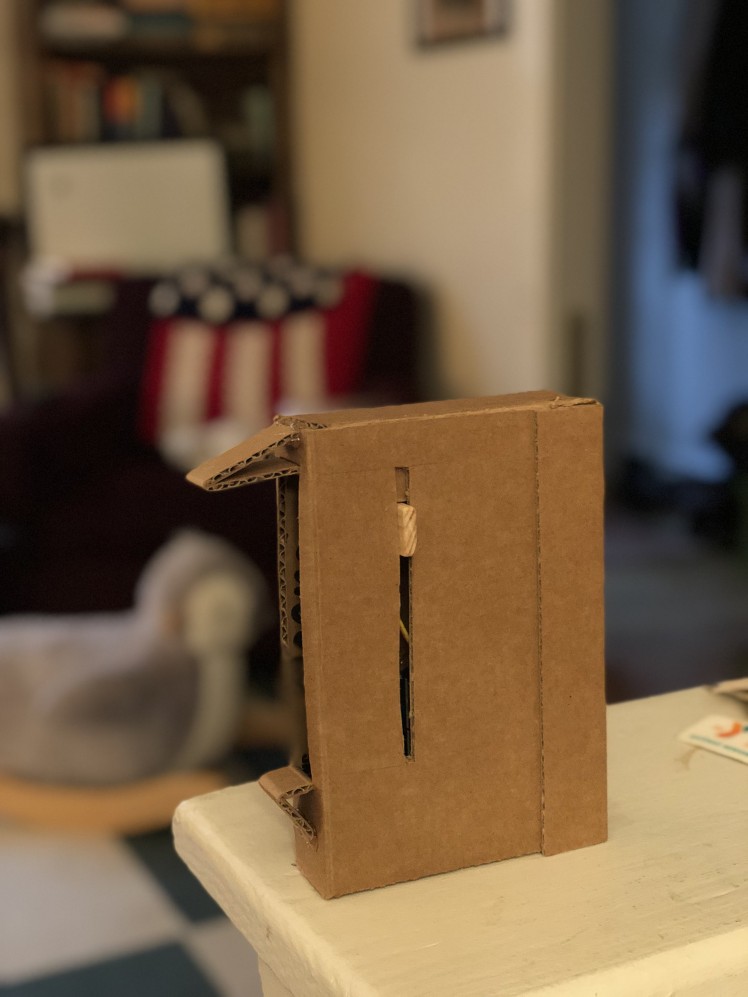 MY NAME IS COFFEE-BIRD! ( always screaming )
================ Section #2 ================
What was this section already?
So, again, we used Serverless, to keep this writing short and followable, butt if you needed more information, you know where to go.. Googoogleit.
Serverless is an awesome framework that ( once you set it up and stuff ), lets you develop and deploy and maintain and whatever extreme ooopplications in a matter of minutes.. or rather hours or days or whatever, but that doesn't matter, because THIS IS DA FUTURE!
Seriously tho, try it, I love it, tremendous.
So here is my serverless YAML file ( which is essentially a modified CloudFormation stack specification ):
service: coffee-bird
provider: name: aws apiKeys:
# - coffeemachineapikey01 # You can use an api key but here we kept it simple runtime: nodejs6.10
# profile: mim # Set this only if you have multiple AWS profiles LIKE I DO! iamRoleStatements: - Effect: Allow Action: - lambda:InvokeFunction Resource: arn:aws:lambda:*:*:function:* - Effect: Allow Action: - iot:* Resource: arn:aws:iot:* stage: ${opt:stage, 'dev'} # So you know this IS NOT PRODUCTION READY! region: us-east-1 functions: helloWorld: handler: handler.coffeebird # You can set it here so API will check for the API key as a min security measure events: - http: path: update/{status} method: get cors: true
The only needed dependency in package.json file:
"dependencies": { "aws-sdk": "^2.199.0"
}
Here is the lambda function referred to in the YAML file:
'use strict';
const AWS = require('aws-sdk');
let iot = new AWS.Iot();
let threshold = 18;
module.exports.coffeebird = (event, context, callback) => { let pathParams = ( event.pathParameters.status == 'true' ) ? true : false; let response = { statusCode: 200, headers: { 'Access-Control-Allow-Origin': '*', // Required for CORS support to work }, body: JSON.stringify({}), }; iot.updateThing( { thingName: "coffeemachine", "attributePayload": { "attributes": { "isFull" : `${pathParams}` } } }, ()=>{ iot.describeThing({thingName: "coffeemachine"}, ()=>{ response.body = JSON.stringify(threshold); callback(null, response); }); } );
};
Please note that you can ( very simply ) create a sample Serverless project ( by running `sls create - aws-nodejs` and modifying the files. you just need to set it up and the best place to find out how is in their getting started docs.
That's it for this section, just know that after deploying the project using `sls deploy -s dev` youll get your endpoint URL in the output of the console, you need that address for the section #1 ( in the sketch file )
Also please note that you don't have to use Serverless, if you hate it, you can use CloudFormation or simply create all the resources ( API Gateway, Lambda function and the needed IAM roles and permissions ) manually and put the lambda code above in your lambda function.
================ Section #3 ================
1st of all please go ahead and enable this skill!
As you can see I was lucky and unfortunate enough to share a coffee-machine* with more than hundred other developers where I work ( all great people**, one of the best places to work for*** ), so Amazon accepted to publish the Skill publicly as it wasn't JUST FOR ME anymore, there where around 200 potential users, and we may add other public places as well.
Butt know that, generally speaking, if you are making an skill that is JUST FOR YOU Amazon will not publish it publicly ( You still have access to and can use it, you can even share it with people that you know ).
While here, please feel free to check my other Alexa skills as well! I have a few of them published, two of which are really cool ( and useful ) skills for Cryptocurrency ( You know Bitcoin stuff ) !
*: It's a big one and there are a couple of them
**: Honestly no sarcasm was intended, please do not fire me! please!
***: If you are a great developer and live in STL and are looking, then look no more!
Alright!
Here is the Lambda function for the Alexa skill ( when you create the skill there is a step that you can link to a Lambda function, this is that ):
/* eslint-disable func-names */
/* eslint quote-props: ["error", "consistent"]*/
'use strict'; const Alexa = require('alexa-sdk');
const AWS = require('aws-sdk'); const APP_ID = 'PUT_YOUR_APP_ID_HERE_PLEASE!'; const iotEndpoint = 'PUT_THE_IOT_ENDPOINT_FROM_STEP_4_HERE_PLEASE!'; let iot = new AWS.Iot(); const languageStrings = { 'en': { translation: { SKILL_NAME: 'Coffee Machine!', WELCOME_MESSAGE: "Welcome to %s. You can ask a question like, Is there fresh coffee?! ... Now, what can I help you with?", WELCOME_REPROMPT: 'For instructions on what you can say, please say help me.', DISPLAY_CARD_TITLE: 'Coffee Machine!', HELP_MESSAGE: "You can ask questions such as, Is there coffee, or, you can say exit...Now, what can I help you with?", HELP_REPROMPT: "You can say things like, coffee machine status, or you can say exit...Now, what can I help you with?", STOP_MESSAGE: 'Goodbye!', RECIPE_REPEAT_MESSAGE: 'Try saying repeat.', RECIPE_NOT_FOUND_MESSAGE: "I'm sorry, I currently do not know ", }, }, 'fr': { translation: { SKILL_NAME: 'Machine de cafè', WELCOME_MESSAGE: 'Bienvenu a l'app de machine de cafè mon ami!', }, },
}; const handlers = { 'LaunchRequest': function () { this.attributes.speechOutput = this.t('WELCOME_MESSAGE', this.t('SKILL_NAME')); // If the user either does not reply to the welcome message or says something that is not // understood, they will be prompted again with this text. this.attributes.repromptSpeech = this.t('WELCOME_REPROMPT'); this.emit(':ask', this.attributes.speechOutput, this.attributes.repromptSpeech); }, 'IsThereCoffeeIntent': function () { const cardTitle = this.t('DISPLAY_CARD_TITLE', this.t('SKILL_NAME'), ':)'); // var d = new Date(); // var minutes = d.getMinutes(); // let timezone = -6; // var hr = d.getHours() + timezone; // let thereCoffee = (hr >= 6 && hr < 20 ) && (minutes % 2 == 0); iot.describeThing({thingName: 'test'}, (err, data) => { if (err) console.log('========ERRRRR=========',err, err.stack); // an error occurred else { console.log('IS THE POT FULL?! ', data.attributes.isFull); // successful response let thereCoffee = (data.attributes.isFull == 'true'); let img = { smallImageUrl: `https://s3.amazonaws.com/alexa-coffee-machine/${thereCoffee?'yes':'no'}_sm.jpg`, largeImageUrl: `https://s3.amazonaws.com/alexa-coffee-machine/${thereCoffee?'yes':'no'}_lg.jpg` }; if (thereCoffee) { this.attributes.speechOutput = 'Good news! there is fresh coffee!'; // this.emit(':tellWithCard', this.attributes.speechOutput, cardTitle, 'YES!nGo get some coffee! ', img); this.emit(':tellWithCard', this.attributes.speechOutput, cardTitle, 'YES!nGo get some coffee! '); } else { let speechOutput = this.t('Sorry! Looks like the pot is almost empty!'); this.attributes.speechOutput = speechOutput; // this.emit(':tellWithCard', this.attributes.speechOutput, cardTitle, `Sorry! looks like the pot is empty atm!`, img); this.emit(':tellWithCard', this.attributes.speechOutput, cardTitle, `Sorry! looks like the pot is empty atm!`); } } }); }, 'AMAZON.HelpIntent': function () { this.attributes.speechOutput = this.t('HELP_MESSAGE'); this.attributes.repromptSpeech = this.t('HELP_REPROMPT'); this.emit(':ask', this.attributes.speechOutput, this.attributes.repromptSpeech); }, 'AMAZON.RepeatIntent': function () { this.emit(':ask', this.attributes.speechOutput, this.attributes.repromptSpeech); }, 'AMAZON.StopIntent': function () { this.emit('SessionEndedRequest'); }, 'AMAZON.CancelIntent': function () { this.emit('SessionEndedRequest'); }, 'SessionEndedRequest': function () { this.emit(':tell', this.t('STOP_MESSAGE')); }, 'Unhandled': function () { this.attributes.speechOutput = this.t('HELP_MESSAGE'); this.attributes.repromptSpeech = this.t('HELP_REPROMPT'); this.emit(':ask', this.attributes.speechOutput, this.attributes.repromptSpeech); },
}; exports.handler = function (event, context) { const alexa = Alexa.handler(event, context); alexa.APP_ID = APP_ID; // To enable string internationalization (i18n) features, set a resources object. alexa.resources = languageStrings; alexa.registerHandlers(handlers); alexa.execute();
};
And here is the Interaction model for the Alexa skill ( As you can see there is only one Intent that we are specifically using right now: IsThereCoffeeIntent and that's what leads us to the lambda function above ^^^ ):
{
 "languageModel": {
 "intents": [
 {
 "name": "AMAZON.CancelIntent",
 "samples": []
 },
 {
 "name": "AMAZON.HelpIntent",
 "samples": []
 },
 {
 "name": "AMAZON.StopIntent",
 "samples": []
 },
 {
 "name": "IsThereCoffeeIntent",
 "samples": [
 "Is there coffee",
 "Is there fresh coffee",
 "coffee there",
 "there coffee",
 "fresh coffee",
 "any coffee left",
 "Is the coffee pot full",
 "coffee",
 "is it full",
 "status",
 "its status"
 ],
 "slots": []
 }
 ],
 "invocationName": "coffee machine"
 }
}
================ Section #4 ================
The IOT stuff!
Go to AWS IOT and create a Thing, then go to Interact section and copy it's HTTPS endpoint, you'll need to put it in your lambda code in the Section #3 to let your lambda communicate with your "thing".
I can't believe it but I think that's it for this section!! Oo)
================ Finale! ================
Thank you and happy hacking!
Please let me know if you have any questions.
feel free to follow me on Twitter
Or on LinkedIn!


Leave your feedback...