Chatbot 2022 Edition
About the project
My previous Chatbot updated to Python 3, using Docker and PostgreSQL
Project info
Difficulty: Moderate
Platforms: Python
Estimated time: 1 hour
License: GNU General Public License, version 3 or later (GPL3+)
Items used in this project
Story
Previously on 314Reactor...
Back in 2018 I made The Raspbinator and it used a chatbot that I had been working on for a number of years.
I made a number of improvements to the Chatbot and then released it here as Chatbot 8 in 2019.
The above timeframe may as well be 2 billion years ago - so recently I began work on bringing the entire Chatbot code up to Python 3, improving performance and sorting out the code to be more PEP 8, modular and more easily importable.
Also, yes, for lack of a better name I went with the UT2003 naming system for this:
Released in 2002, called 2003; why not.

Released in 2002, called 2003; why not.
How it worked
So if you check out the link above you can see how exactly the bot works, learns and how it grows to give somewhat meaningful responses:
Bot says initial “Hello”.
Human responds.
Bot stores the response to “Hello” and searches its database for anything its said before that closely matches what the human input was, then brings up a result from a prior interaction.
By storing human responses to the bots Mongo database and assigning them to things the bot has previously said, then comparing inputs from the person to those items to find appropriate responses, you can get some reasonably decent responses from the bot.
As an example; if the bot says “what's the weather like” and I type in “its raining outside” it will store that response and tie it to that input. Now if someone else comes along and types “how's the weather”, it will search its database for close matches and find the previous response “what's the weather like”, at which point it will search for responses to that and find my response “it's raining outside”. So while its not really ‘thinking’ about its responses it does end up coming back with some reasonable replies.
Main changes
The prior Chatbot used MongoDB which was all good and fine, but I was having to pull out a number of responses and then search through them via code rather than being able to fuzzy match within the DB itself - so I made the tough decision to drop Mongo and move to PostgreSQL, which would allow me to search within the database for fuzzy matches to a sentence.
The matching is done by smlar and Levenshtein which is used to match for the above to find existing sentences. Which is much faster than the old method as it is done within the database rather than having to search the DB, retrieve all the sentences then cycle through the responses for a match.
It means that along with other improvements you can train the bot on a huge amount and have it run and reply in a decent timeframe.
It tries smlar first then if a response is not found it will then use Levenshtein, both of which can be configured for varying levels of accuracy under the new config/bot_defaults.py file.
If both of these fail and no existing sentence is found to find replies from to use as a response, the bot will now resort to using some ML - in the form of markovify which also trains on the text files under data/training/ this is used to dynamically generate a sentence from the training data; so the bot is more likely to give a decent response even with a lack of training data.
This can also be turned on/off using the bot_defaults.py file under
smart_reply_generation=TrueAlong with the thresholds for accuracy for Levenshtein and smlar:
bot_accuracy_smlar_threshold = 0.4
bot_accuracy_lev_threshold = 20
bot_accuracy_lev_config = "6, 1, 5"
See here for information on the thresholds: Levenshtein and smlar.
You can also choose how many random sentences are generated to pick from to reply with:
number_of_sentence_gen = 10If smart replies are set to False, when the bot has no other responses from its training it will generate a completely random sentence with no ML.
Also under the config file you will find:
typing_emulation = FalseThis is supposed to make the bot emulate someone else typing - so while the bot is processing a reply it will display "Bot is typing..." to make it seem like you are talking to someone over chat, although this seems to have broken for me at the moment to I need to find a fix for this.
There is also a config for how fast the bot will 'type' out a response in words per second:
bot_typing_speed = 2.7So the longer the sentence the longer the bot will faux-type.
There is also a new short-term memory function within the bot, so if the bot has already replied with a sentence it will choose something else to reply with, reducing the chance it will repeat itself; the size of the short-term memory is configured with:
max_short_term_memory = 100The training has now been improved, so that instead of having to train on single text files, the bot will now train on any and all text files dropped into the data/training folder; making it much easier to train on a huge number of text files.
On top of all this there is now an option to build 2 databases that can essentially have 2 bots talking to each other, so if you drop different training data into data/training and data/training_2 respectively you can build a conversation bot, kick it off and watch them talk to each other - info about building/running this below.
Also with PostgreSQL the overall speed of training and inserting items into the DB is increased overall, on top of additional optimisations and cleaning up of code.
In terms of installing PostgreSQL I've now moved it into a nice script that will install it within a Docker image - so you can install it locally if you wish, but it's much more manageable to install Docker on either Windows or Linux and just build a container with a port exposed that the bot can use.
The bot itself can also be built and used within a container so you can chuck training files /data/training and then build an individual chatbot with its own personality.
Also for Linux I'd recommend using Portainer for managing Docker containers as the Linux version of Docker doesn't come in with its own GUI. There are install and run scripts available for this within the repo; when installed and running you can access this with localhost:9000 within a browser.
Much better than doing it all through the CLI
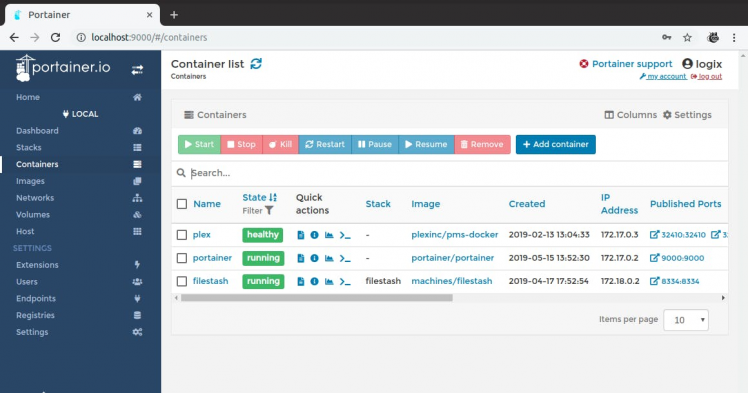
Much better than doing it all through the CLI
Using the bot
First off just clone the repo out with:
git clone https://github.com/LordofBone/Chatbot_8Within the repo there is a readme that goes over the pre-requisites but I'll paste here too - it should work on x86 Windows and Linux as well as Linux on RPi, you will see build files for all:
Before doing any of the below you will need to set a password for the PostgreSQL database, this can be done by going into the 'config' folder and accessing 'postgresql_config.yaml' and adding/changing the password; or you can leave it at the default. This will be used in the construction and login of PostgreSQL container databases.
The windows .cmd files will pick the password up from the YAML, but you will need to manually change it in the inputs for the .sh files, for example: ./build_chatbot_linux.sh *container name *postgres password *postgres port
You will need Docker installed, for linux you can run the script under /build 'install_docker_linux.sh'
On Linux it is handy to have a GUI for Docker as well so run 'portainer_build_linux.sh' and 'portainer_run_linux.sh' and then go to localhost:9000 in a browser - as there isn't currently an official Docker UI for Linux yet.
For Windows just go here and download/install: https://docs.docker.com/desktop/windows/install/
Entire Chatbot as a Docker container:
Drop training files into the '/data/training' folder before building (see 'Training the bot' below).
Set a password for the PostgreSQL DB under '/config/postgresql_config.yaml'
Go into the 'build' folder in this repo and run 'build_chatbot_windows.cmd' or 'build_chatbot_typing_windows.cmd'
Then give the bot a name.
(.sh files available for Linux + Linux on Pi, keep note that the .sh files require the container names, password and port put in as parameters with the command).
You can also run 'build_chatbot_conversation_windows.cmd' or .sh (ensuring there are training .txt files under '/data/training_2' as well as '/data/training') this will configure a container and train 2 different bot databases. This is to see how bots with different training configurations will interact with each other.
Docker PostgreSQL installation:
I would recommend going into the 'build' folder and running 'build_postgresql_container_windows.cmd' or .sh and entering a name and port number (recommended to just use the default: 5432); these scripts will handle it all for you.
However, if you wish to construct the container manually see below:
Manual:
Make sure the DB password is set in '/config/postgresql_config.yaml' and that the password set is used in the command below.
docker run --name postgresdb -e POSTGRES_PASSWORD=<password> -d -p 5432:5432 postgres
Again, you will then need to ensure the requirements are installed:
pip install -r requirements.txt
As above, you will need to install 'smlr' you can exec into the PostgreSQL container and run:
git clone git://sigaev.ru/smlar
cd smlar
USE_PGXS=1 make -s
USE_PGXS=1 make install -s
Local PostgreSQL installation:
Follow the instructions here: https://www.2ndquadrant.com/en/blog/pginstaller-install-postgresql/
Make sure that the password is set and the same as the password in '/config/postgresql_config.yaml'
You will then need to ensure the requirements are installed:
pip install -r requirements.txt
This also uses something called 'smlar' which needs to be installed with PostgreSQL:
git clone git://sigaev.ru/smlar
cd smlar
USE_PGXS=1 make -s
USE_PGXS=1 make install -s
I don't know if there is a Windows installation for smlar so if you are running on Windows I would recommend a Docker based installation.
Training the bot
This is from the readme on GitHub:
Drop training txt files into the '/data/training' folder, these must be formatted as such:
example.txt:
Hello
Hi
How are you
Where each line is a reply, the bot can deal with blank lines and also split names from the text like so:
Me: Hello
You: Hi
Me: How are you
It will split these lines by ':' and return the reply only; this makes it easier to paste in things like movie scripts.
You can then run 'bot_8_trainer.py -f' if running a local PostgreSQL or a PostgreSQL in a container.
The '-f' switch there is for a fresh DB which is required for a first time run and will also completely erase any existing database.
If you are running a bot within a container it will take in whatever is in the training folder and train automatically while creating the container.
You can have multiple txt files within the training folder; it will process them all.
As mentioned above there is a second training folder: '/data/training_2', this is for training a second bot for conversations - both bots can be trained by running 'bot_8_trainer.py -f -m' (-f for fresh DB and -m for multi-bot)
This will also run the training for markovify and put the trained model under models/markovify/
Running the bot
Again, taken from GitHub readme:
Running the bot as a container
Run 'run_chatbot.cmd' and type the name of the built chatbot.
For a two bot conversation container that has been built you can run 'run_chatbot_conversation.cmd' and then type the name of the container. You will then see the two bot personas talk to each other. By default this will be set to 'slow' mode; where there is a one-second delay added between the bots replies, so you can easily see what they are saying (you may notice it runs slower anyway depending on the size of the dataset).
(.sh files for Linux and Linux on Pi, keep note that the .sh files require the container names, password and port put in as parameters with the command).
Running the bot on either a local or containerised PostgreSQL DB
Ensure that PostgreSQL is running, either from the local installation or the container as above.
Run 'bot_8.py' and it should connect to the running local instance or the running container of PostgreSQL.
Run 'bot_conversation.py' to initiate a conversation between two bots (provided above training has been run for both). You can also add a '-f' switch to make it run without an additional delay (it may still run slower depending on the size of the training data).
Integrating the bot into other programs
Same as above, from the readme:
If you want to integrate the bot into another system, such as a robot - you can pull down the repo into the folder of the project you are working on, then append the system path of the Chatbot folder to the system path of the project.
chatbot_dir = os.path.join( path_to_chatbot )
sys.path.append(chatbot_dir)
You will also need to install everything in requirements.txt and/or add the requirements to your project's requirements.txt
Within the Bot8/build folder there is a build_postgresql_container.cmd you can use to quickly build a DB container. Ensure this is running also before proceeding.Within the Bot8 folder you can add training files into '/data/training' then training can be run:from Bot8.bot_8_trainer import bot_trainerbot_trainer()Then simply import the bot and then initialise the BotLoop class.For example:from Bot8.bot_8 import BotLoopchat = BotLoop()reply = chat.conversation("how are you")print(reply)You can also import 'person_manager' and use it to create different names of people to talk to the bot. You could use this functionality with an import of the bot to have multiple conversations running simultaneously; by simply passing in the different names into the 'person_manager' function, using 'get_person_list' to get the dict of initialised classes back and then use that to run different conversations using the names as keys.For example:from Bot8.bot_8 import BotLoop, person_manager, get_person_listprint(person_manager("Joe"))print(person_manager("Bob"))names = get_person_list()reply_1 = names["Joe"].conversation("hello there")reply_2 = names["Bob"].conversation("hows it going")print(reply_1)print(reply_2)
Future improvements
There's a few bugs I've discovered and that have come seemingly out of nowhere, such as the database not always erasing with a fresh DB option, the typing function no longer working and a few other odd things I need to go over.
I am fairly happy with where the bot is at the moment, it's much more coherent talking to the bot now and with a lot of training data it can keep a reasonable conversation without talking so much nonsense or repeating itself endlessly.
So from here I can see it going two ways, either incremental improvements and bugfixes to this version adding in more ML functionality possibly OR rebuilding the entire thing from scratch with a whole new paradigm of how it works, taking everything I've learnt from this one.
This bot was built off of the base idea that I first experimented with back in 2010 so there may be a better central logic to work from in future.
Also as from the readme:
I don't have a Dockerfile setup for this - I am using the scripts above as it is an easier way to get the PostgreSQL DB up and running by initialising the PostgreSQL image via the run command.
This command sets up the DB and everything with the entrypoint for you, then I copy in the bootstrapping files and run those to configure the bot and run training etc.
I have tried to get this working within a Dockerfile but couldn't get it to configure and run the DB after installation, if someone can make a Dockerfile that does what the build scripts do, please let me know.
So that's another improvement I could make.
So please do give it a go - let me know what happens if it works and if there are any bugs/problems you encounter and 100% feel free to use the chatbot in your own projects.
Also let me know of any improvements you think could be made!
I think that covers off everything for now - keep an eye out for more projects in the near future.
They won't be as advanced as this, don't get too excited.

They won't be as advanced as this, don't get too excited.





Leave your feedback...