
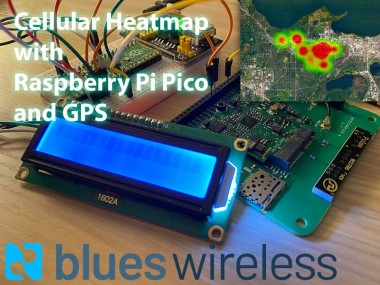
Cellular Signal Heatmap With Raspberry Pi Pico And Gps

About the project
Create a Google Map heatmap with cellular and GPS data acquired by a Raspberry Pi Pico and Notecard, using Python and Google Cloud Platform.
Project info
Difficulty: Easy
Platforms: Google, Raspberry Pi, Blues Wireless
Estimated time: 5 hours
License: MIT license (MIT)
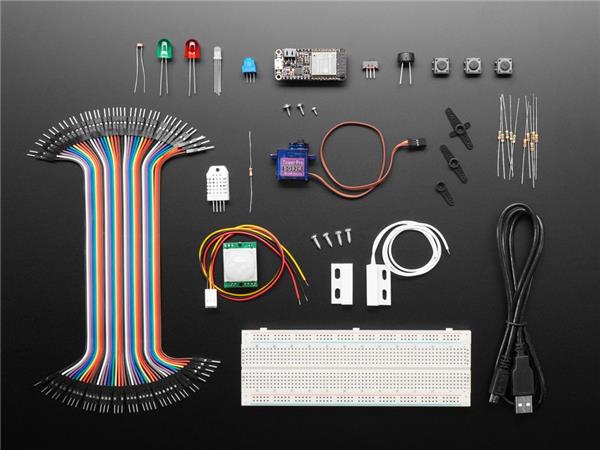
Items used in this project
Hardware components

Story
This project originally appeared on hackster.io.
A heatmap overlaid on satellite imagery is one of the more tantalizing means of displaying map-based data. Considering my newfound love for the Raspberry Pi Pico, and having seen how easy it can be to add cellular connectivity to the Pico, why not combine these loves in a new project?
Today we are going to build a cellular- and GPS-enabled IoT solution that collects cell signal strength and location data at defined intervals, stored in the cloud, with a web app to display said data in a heatmap.

A "heatmap" is a visual representation of data where values are translated into colors.
If you'd like a quick 1.5 minute overview of the project, check out this video:
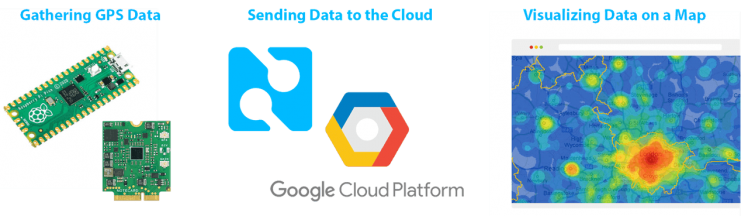
Specifically we will be developing with:
- Raspberry Pi Pico (any compatible MCU works fine too).
- Notecard and Notecarrier from Blues Wireless (for cellular and GPS).
- 1602 LCD module (optional, for displaying in-action status updates).
- Google Cloud Platform (for cloud functions, storage, and maps)
If Google Cloud Platform is a turnoff, you can absolutely swap in your cloud provider of choice for most of the functionality covered. ?
So at the highest level we are:
Ready? Let's get started!
Position Data with GPS and Cellular ?️
If our goal is to collect cell signal strength AND location data at periodic intervals, ideally we want a hardware solution that can handle both simultaneously. All the while being aware that GPS can be very power-hungry.
We can handle this with the Notecard from Blues Wireless. The Notecard is a low power cellular and GPS device-to-cloud data pump that comes with 500 MB of data and 10 years of service for $49. No activation charges, no monthly fees.

To make things even easier, Blues Wireless also provides a series of expansion boards (called Notecarriers) to host the Notecard. For this project, we will use the Notecarrier-A, a board with pre-soldered female headers allowing access to all the pins on the Notecard edge connector.
Now here is the really important part:
The Notecard ships preconfigured to communicate with Notehub.io, the Blues Wireless service that enables secure device-to-cloud data flow. Notecards are assigned to a project in Notehub, which then routes data to your cloud of choice (in our case, that'll be Google Cloud Platform).

Let's Build! ?️
Here's a quick look at what we are going to build:
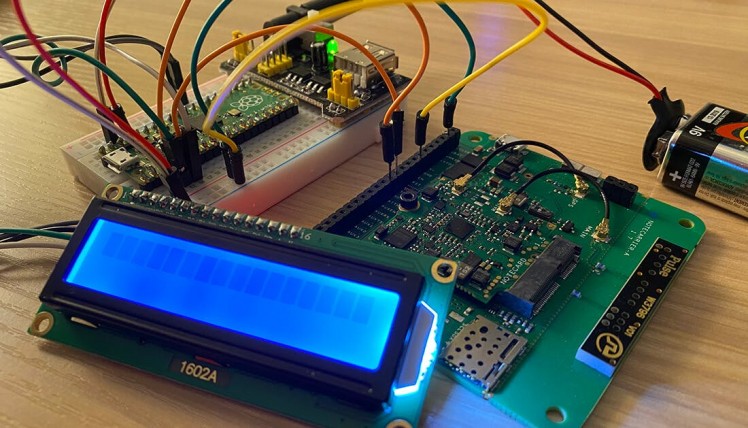
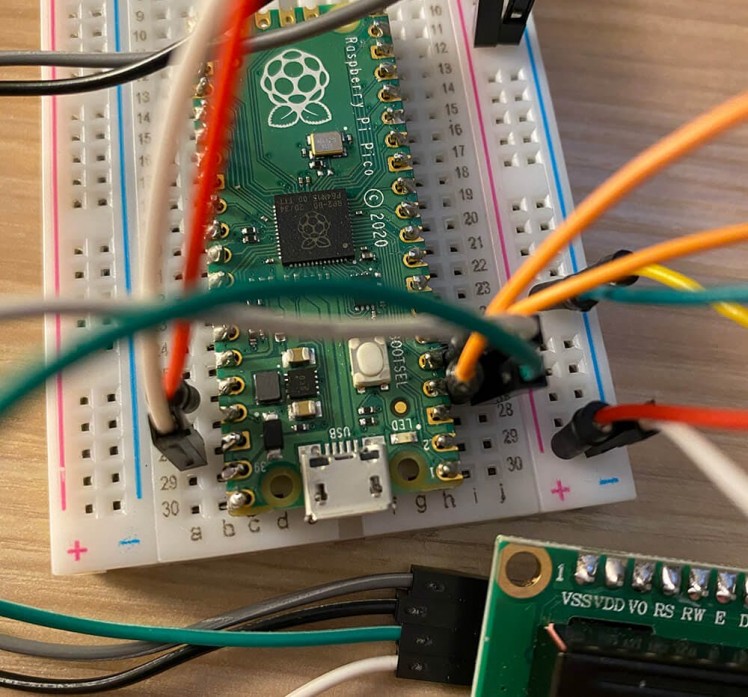
Our Raspberry Pi Pico can supply all the power our Notecarrier needs. Use jumper wires to connect 3V3(OUT) and GND on the Pico to a power rail on the breadboard. Next, connect the power rail to BATT and GND on the Notecarrier.
We'll be using the I2C bus for communication between devices, so we can connect SCL (the clock line) and SDA (the data line) pins on the Notecarrier to any open I2C headers on the Pico (I used pins 4 and 5 which place the Notecarrier on I2C1).
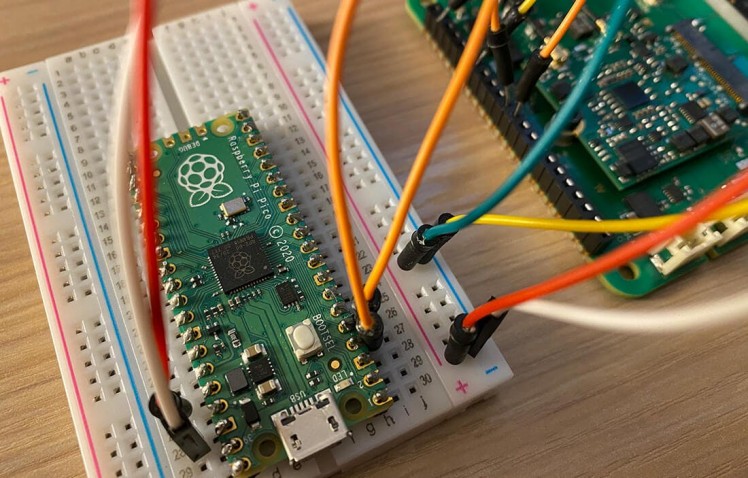
The one downside of the Raspberry Pi Pico is the lack of labels on the top of the board. Therefore, it's always worthwhile to keep a pinout handy.
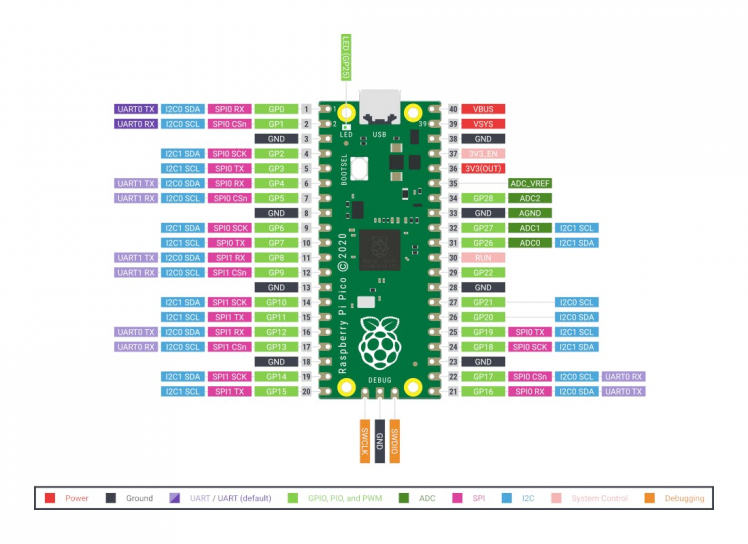
Image source: Rasperry Pi Foundation
Next up is the LCD module. I really like using the 1602A LCD because it has a pre-soldered backpack making I2C and power connections a snap.
Connect GND and VCC on the LCD to the appropriate spots on your breadboard's power rail. The Pico can only supply 3.3V out, but the LCD works best (brightest) with 5V. So, while you can connect the LCD to the same power rail that the Pico is powering, the screen will be fairly dim.
A better solution is a battery-powered breadboard power supply. I like using this with a 9V battery as it can supply 5V of regulated power to whichever rail you want (in this case the opposite rail that the Pico is already powering).
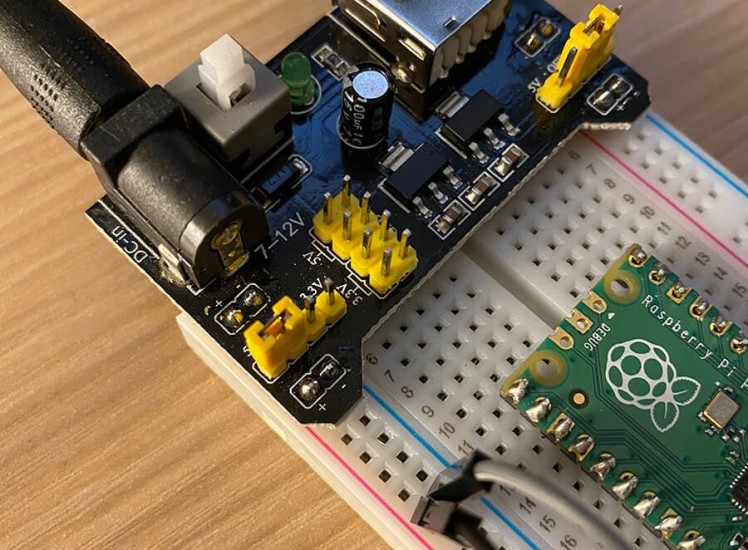
So now we can supply 3.3V to the Notecarrier and 5V to the LCD! ?
Finally, the LCD is going to use the same I2C bus as the Notecarrier. Connect SDA and SCL from the LCD module to the same pins you used for the Notecarrier.
And that's it! Refer to the completed hardware assembly image above if need be.
Let's Write Some (Micro)Python! ?
With our physical hardware configured properly, it's time to program our Pico with some MicroPython.
TIP: Want to skip the step-by-step code writing exercise? You can always view this repository with the completed assets.Set Up Your Pico for MicroPython
The Pico supports MicroPython, just not out of the box. So if you haven't already, you'll need to flash your Pico's firmware.
To install MicroPython, just follow the instructions provided under "Getting Started with MicroPython" in the Raspberry Pi docs.
Start Your IDE
Boot up your favorite code editor. I gravitate towards Visual Studio Code and the Pico-Go extension, but Thonny is a great little IDE as well.
Create two files: main.py and keys.py. You can probably guess that main will store our application logic and keys will store sensitive data that we don't want to commit to public source control.
Our keys.py file is only going to store one key, and that's the Notecard's ProductUID. This associates our Notecard with our cloud-based Notehub project. We'll come back to this in a bit, but for now, just add this line:
PRODUCTUID = "com.company.name:project"Grab Some External Libraries
Our project is going to use three external libraries. Two for communicating with the LCD and one for communicating with the Notecard.
Download the latest note-python library. Create a lib directory on your Pico and copy the notecard directory in there.
Next, download lcd_api.py and machine_i2c_lcd.py from the completed project's source repo. These can be copied to the Pico next to main.py.
Our completed file and folder structure on the Pico should look like this:
/lib
  /notecard
    card.py
    env.py
    ...
keys.py
lcd_api.py
machine_i2c_lcd.py
main.py
Imports and Constants
Open up main.py and add the following import statements to the top of the file:
from machine import I2C, Pin
from machine_i2c_lcd import I2cLcd
from time import sleep
import keys
import notecard
Create a variable that will hold the Notehub ProductUID from keys.py:
PRODUCTUID = keys.PRODUCTUIDInitialize Our Components
Next we need to initialize the I2C bus, our LCD module, and the Notecard.
Since I used GPIO pins 2 and 3 for I2C (which correspond to the I2C1 bus), I can initialize I2C with:
i2c = I2C(1, sda=Pin(2), scl=Pin(3))We need to figure out the I2C address of the LCD module. To do so, there is a helpful scan method we can use. I'm referencing the 2nd device on the I2C bus with [1] as the Notecard has a lower I2C address (0x17 vs 0x27 if you're curious):
lcd_i2c_addr = i2c.scan()[1]Finally, we initialize the LCD (2 rows with 16 characters on each row):
lcd = I2cLcd(i2c, lcd_i2c_addr, 2, 16)
lcd.clear()
Next we'll want to set up our Notecard. The note-python library comes with a handy OpenI2C method that does the dirty work for us:
card = notecard.OpenI2C(i2c, 0, 0, debug=True)
print("Successfully Connected to Notecard!")
Optionally, we can perform a quick reset of the Notecard. I find this convenient when prototyping a lot of different projects that share the same Notecard!
req = {"req": "card.restore", "delete": True}
rsp = card.Transaction(req)
sleep(2)
Next up, let's configure this Notecard to speak with Notehub (recall that Notehub is the Blues Wireless cloud service that is going to route data to our cloud application).
req = {"req": "hub.set"}
req["product"] = PRODUCTUID
req["mode"] = "periodic"
req["inbound"] = 720
req["outbound"] = 15
rsp = card.Transaction(req)
What's going on here? We are creating a hub.set request to set some Notecard/Notehub syncing parameters. We are setting the ProductUID and defining a periodic cellular connectivity mode. The inbound parameter means the Notecard will connect to Notehub once every 720 minutes to check for any data it needs to download. More importantly for us, the outbound parameter tells Notecard to send collected data to Notehub every 15 minutes (but only if there is data to send).
outbound value to avoid interruptions.
We can now set the appropriate GPS mode on the Notecard. Since our program relies on a regular stream of GPS data, we'll want to use continuous mode:
req = {"req": "card.location.mode", "mode": "continuous"}
rsp = card.Transaction(req)
sleep(60) # optional delay to give gps time to acquire signal
Finally, we need a boolean variable that tells us whether or not GPS is active and receiving latitude and longitude coordinates:
is_gps_active = FalseSupporting Functions
At the bottom of main.py we need to add a while loop and associated function that will check to see if GPS is active:
NOTE: Make sure the
- def check_gps(rsp):
- """ checks if gps module is active with location """
- if ("{gps-sats}" in rsp["status"] and "lat" in rsp):
- return True
- else:
- return False
- while not is_gps_active:
- """ if gps module is active, start tracking location """
- req = {"req": "card.location"}
- rsp = card.Transaction(req)
- if check_gps(rsp):
- is_gps_active = True
- lcd_msg("GPS ACTIVATED")
- track_location(rsp["lat"], rsp["lon"])
- else:
- lcd_msg("GPS INACTIVE")
- sleep(20)
while loop remains at the bottom of main.py as we add additional functions.
We know that GPS is active if:
- "{gps-sats}" is returned from a card.location request, signifying one or more GPS satellites have been found.
-
The
latkey is found in the JSON response.
If GPS is active, we display a message on the LCD module with the lcd_msg function (print is nice to use when debugging):
- def lcd_msg(msg):
- """ displays a message on the lcd screen """
- lcd.clear()
- sleep(0.5)
- lcd.putstr(msg)
- print("*****" + msg + "*****")
- sleep(0.5)
Continuing forward, when GPS is active we are ready to start tracking our location with the track_location function:
- def track_location(lat, lon):
- """ if gps is active and location has changed, create a note in notehub """
- loc_changed = False
- while not loc_changed:
- req = {"req": "card.location"}
- rsp = card.Transaction(req)
- # double check that gps is still active!
- if check_gps(rsp) and rsp["lat"] != lat and rsp["lon"] != lon:
- loc_changed = True
- lcd_msg("GPS LOC CHANGED")
- new_lat = rsp["lat"]
- new_lon = rsp["lon"]
- bars = get_cell_bars()
- add_note(new_lat, new_lon, bars)
- sleep(10)
- # start tracking location again!
- track_location(new_lat, new_lon)
- else:
- lcd_msg("NO GPS CHANGE")
- sleep(10)
There is a lot going on in these functions, so let's focus on the important parts:
- We double check that GPS is still active (can never be too careful!).
- We check to see if our lat/lng coordinates have changed.
-
We get the cell signal strength in the
get_cell_barsfunction and queue data to Notehub with theadd_notefunction (see below). -
Finally, we start tracking our location again by calling
track_locationwith the updated lat/lng coordinates.
Here are the two remaining functions referenced above:
TIP: The Blues Wireless Developer Portal provides thorough documentation of all the Notecard APIs.
- def add_note(lat, lon, bars):
- """ uploads the note/event to notehub.io """
- req = {"req": "note.add"}
- req["file"] = "bars.qo"
- req["body"] = {"lat": lat, "lon": lon, "bars": bars}
- rsp = card.Transaction(req)
- lcd_msg("NOTE SAVED")
- def get_cell_bars():
- """ gets the cell signal strength from card.wireless """
- req = {"req": "card.wireless"}
- rsp = card.Transaction(req)
- return rsp["count"]
And that's it! The program on our Pico should be 100% complete and ready to start gathering data.
Before we put it into action, let's see how we finish syncing Notecard with Notehub and what we then can do with our gathered GPS data.
Pumping Data to the Cloud ☁️
Cloud Part I: Google Cloud Platform
Google Cloud Platform (GCP) is Google's answer to Amazon's AWS and Microsoft's Azure. Providing a comparable set of features, GCP is an intriguing third option of big cloud providers. Personally I find AWS and Azure to be more powerful, but GCP more user-friendly. Your mileage may vary.
We need three things from GCP:
- A place to store our accumulated GPS data.
- A means of accepting said data from Notehub.
- An API key for using Google Maps.
We can check the first two requirements off with Cloud Firestore and Cloud Functions, respectively.
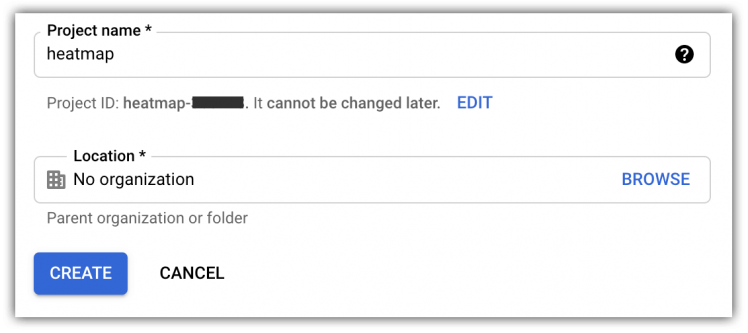
Let's kick off our Google Cloud Platform journey by creating an account at console.cloud.google.com.
Create a new project, naming it whatever you'd like:
Cloud Firestore
Firestore is used for storing, querying, and syncing data. It's a fast and relatively easy-to-use NoSQL database.
Navigate to the Firestore menu item (not to be confused with Filestore!).
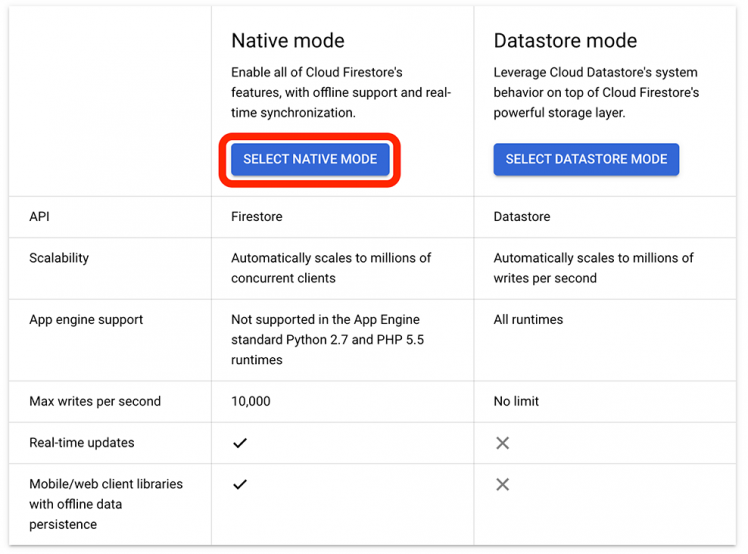
Assuming this is the first time you've created a Firestore instance, you'll be prompted to choose between "Native" and "Datastore" mode. You're welcome to read about the differences, but generally speaking you're best off with "Native":
Choose a geo location close to you and create your database.
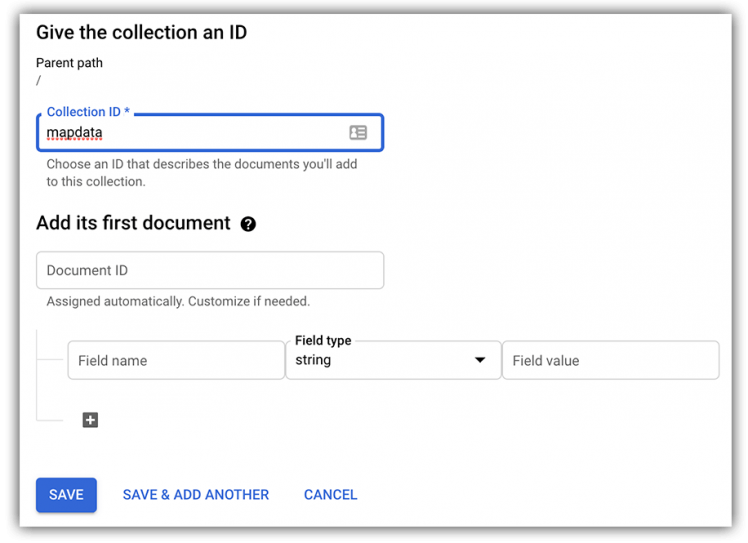
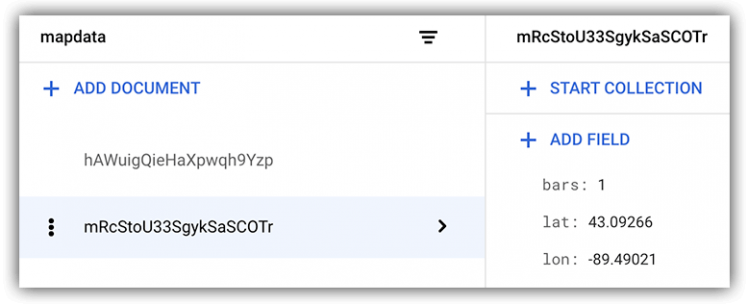
Lastly, you'll be prompted to create your first collection (or "table" for you relational db folks). Name your collection something memorable (e.g. "mapdata").
NoSQL databases, you either love 'em or hate 'em! One big advantage of NoSQL databases is that we don't have to pre-define any additional fields in the data stored...so that's all the Firestore configuration we have to do!
Cloud Functions
Google Cloud Functions are serverless functions you write (in almost any language) that are hosted and executed in Google's cloud. This provides a great way for us to send JSON data from Notehub to GCP.
Navigate to the Cloud Functions menu item and create your first function.
Name it whatever you like and leave all of the defaults as-is, except to check "Allow unauthenticated invocations" under Authentication. In our case, access to this function will not be publicly known outside of Notehub, allowing us to avoid authentication struggles.
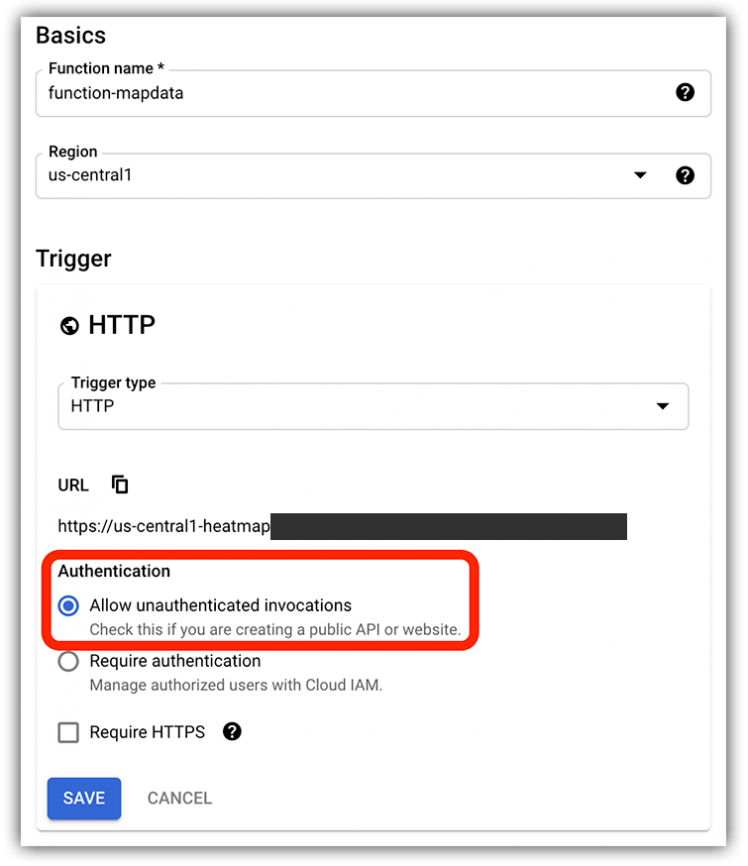
Copy that "Trigger URL" as you'll need it later.
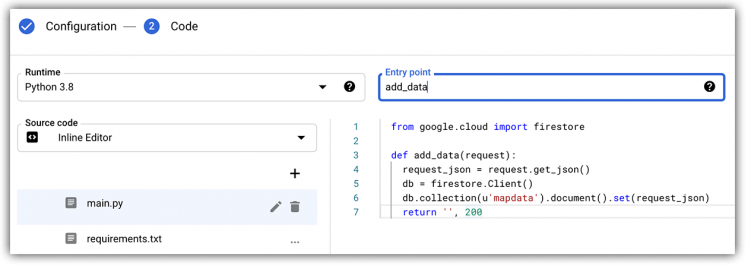
On the next page, you may have to enable "Cloud Build API". You then can choose the language runtime. Since we started in MicroPython on the Pico, we might as well be consistent and choose Python. This will populate two files automatically, main.py and requirements.txt.
By default, Python cloud functions have access to numerous pre-installed packages. In our case, ironically the one missing is google-cloud-firestore. Open up requirements.txt and add:
google-cloud-firestore==2.0.2Next, in main.py we are going to replace the default function with one super simple function called add_data:
- from google.cloud import firestore
- def add_data(request):
- request_json = request.get_json()
- db = firestore.Client()
- db.collection(u'mapdata').document().set(request_json)
- return '', 200
What's happening here? The request parameter is literally going to be the JSON payload we send from Notehub. Here is an example payload Notehub will send:
- {
- "bars": 1,
- "lat": 43.09266,
- "lon": -89.49021,
- "location": "Shorewood Hills, WI"
- }
We are then adding a single document (a "record" for you relational folks) in the mapdata collection with document().set(request_json).
Lastly, we return a 200 status code to let Notehub know all went well with the transfer.
Be sure to change the "Entry Point" to be the same name as the function, add_data, and then Deploy!
If you so desire, you can test the function by pasting in the example JSON payload provided above. If you navigate back to Firestore, you should see your test data appear like magic.
Google Maps
While we are still in the GCP console, let's take a moment to enable access to Google Maps.
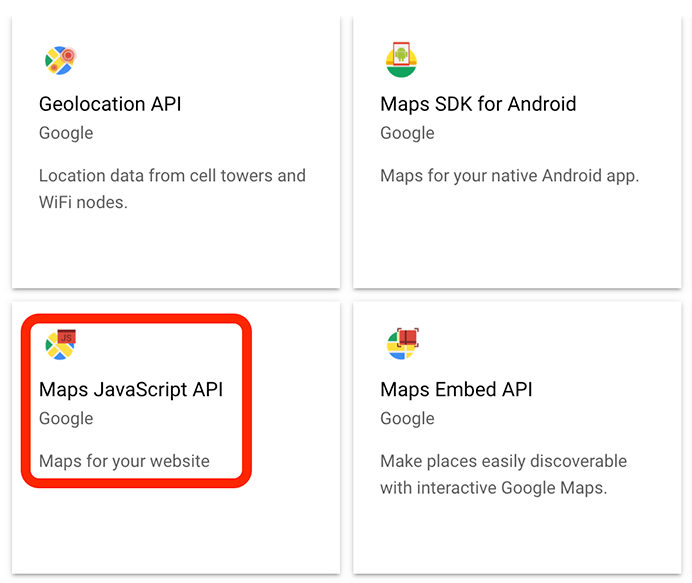
Scroll all the way down to the Google Maps Platform menu option. Select and enable the Maps JavaScript API:
To enable access to Google Maps, you'll need to create a new API key. Navigate to the APIs & Services > Credentials menu option. Choose Create Credentials at the top of the screen and select API Key. You'll need this key for when you configure access to Google Maps in the web app later on.
Cloud Part II: Notehub
While we already went over Notehub and its role in our project, the high level workflow bears repeating:
- GPS data is gathered and processed on the Notecard.
- Notecard sends this data to Notehub over cellular.
- Notehub routes this data to our cloud of choice.

Let's look at how we configure Notehub in a few simple steps.
- Create your free account on Notehub.io.
-
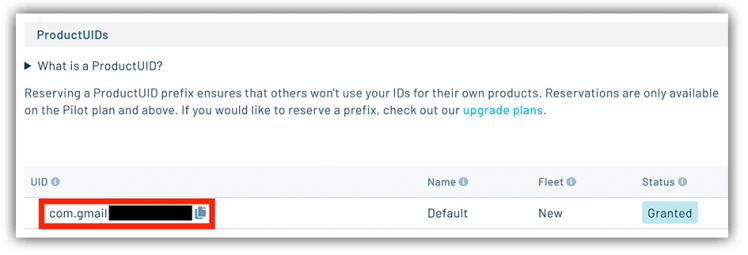
Using the New Project card, give your project a name and
ProductUID.Copy thatProductUIDand paste it inkeys.pyon your Pico. -
Copy that
ProductUIDand paste it inkeys.pyon your Pico.
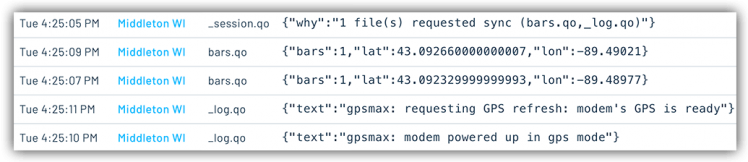
Done? Great! When the program runs, Notecard will automatically associate itself with this Notehub project. Any notes (events) sent to Notecard will travel over cellular and show up in the Events panel when received:
Route Data to Firestore
Remember the "Trigger URL" for your Cloud Function? Great, because we need to now create a route for our data to travel from Notehub to GCP.
Navigate to the Routes menu option and click on Add Route.
Provide a name for your route and choose "Google Cloud Function" as the Route Type. Paste in the Trigger URL as the Route URL.
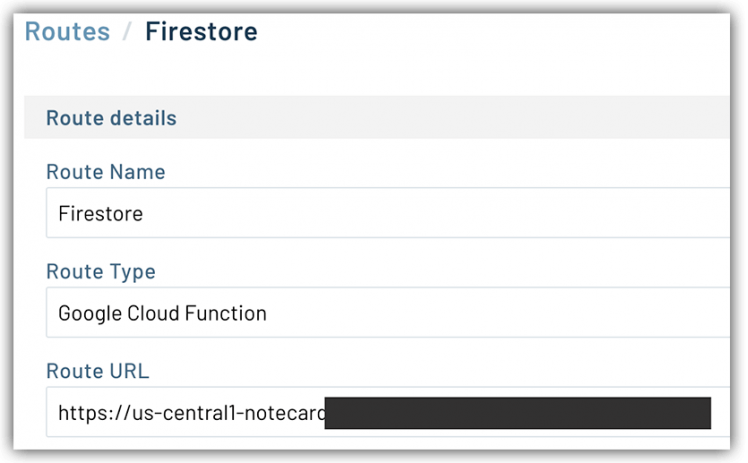
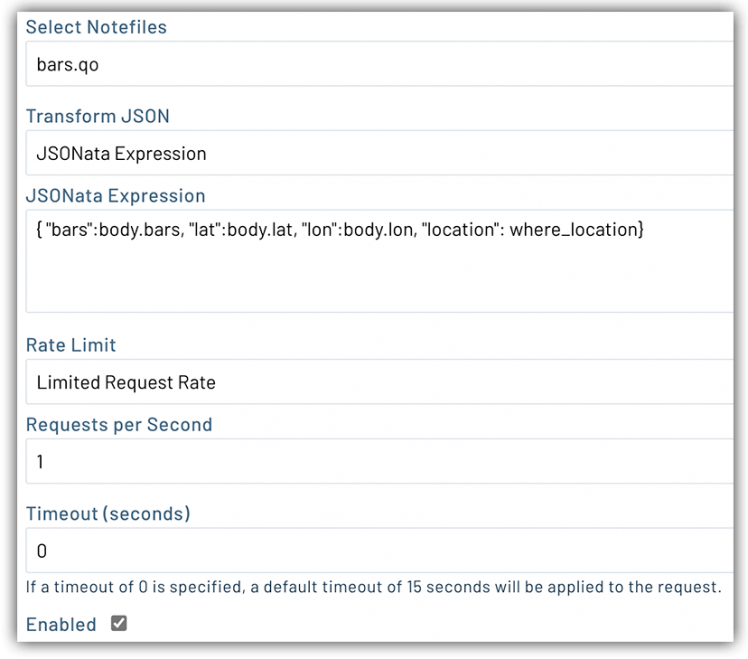
Under Notefiles choose "Select Notefiles". In the field provided, enter bars.qo (or whatever the note file name you specified in main.py on your Pico). We do this because we only want notes sent to GCP that are relevant to the data we want to display.
Next, we are going to use JSONata to create an expression that will allow us to format and process our JSON on the fly.
Why? The full JSON sent as part of the note contains meta data that we don't necessarily want to send along to GCP:
- {
- "event": "dbfb2474-4a4a-4d3d-a171-b122be5f1f",
- "session": "ed8aee23-1f30-4e33-b252-0fd5a5d761",
- "device": "dev:798357841085845",
- "product": "product:com.xxx.yyy:proj",
- "received": 1616534703.063639,
- "routed": 1616534707,
- "req": "note.add",
- "when": 1616534635,
- "file": "bars.qo",
- "body": {
- "bars": 1,
- "lat": 43.092329999999993,
- "lon": -89.48977
- },
- "where_olc": "86MG3GR6+X2Q4",
- "where_lat": 43.0924525,
- "where_lon": -89.48988671875,
- "where_location": "Middleton, WI",
- etc...
- }
This is where JSONata comes in handy. The JSONata Expression will be this:
{"bars":body.bars, "lat":body.lat, "lon":body.lon, "location": where_location}Make sure your route is enabled and save the changes.
We're almost done! So far we have:
- Collected GPS data on the device.
- Sent the data to Notehub.
- Used Notehub to process the data and deliver it to a Cloud Function on GCP.
Last up is creating the web app to display our heatmap with Google Maps.
Displaying our Heatmap on the Web ?
Let's wrap up our project by architecting a relatively simple React web app that will use Google Maps to generate a heatmap of our cell signal data.
Again, you can find all of this code in the GitHub repository if you want to skip the narrative!
Initializing the React App
The defacto means of starting a new React app is by using Create React App. This CLI is a great way to bootstrap a new app. To install, use this command in your terminal:
npx create-react-app map-app
cd map-app
Next, add the react-google-maps/api and the firebase libraries to access Google Maps and Cloud Firestore respectively:
yarn add @react-google-maps/api
yarn add firebase
React Components
Generally speaking, React apps are made up of multiple function and class components.
Our React app has three components:
-
App.jsis our root-level component. -
MapContainer.jsloads the Google Maps script and provides a host container for... -
Map.jswhich shows our map.
In the interest of space (and time) we aren't going to cover every aspect of the web app (especially since the full source is available here). However, we should cover a few critical aspects.
Firebase?
Right. yarn add firebase is an example of the Firebase vs Google Cloud Platform confusion. As noted above, both Firebase and GCP offer access to Firestore. The APIs for accessing Firestore are in the Firebase SDK.
We are going to use the Firebase SDK to access our data from Firestore. For example, to pull in all of the data from our mapdata collection, we use this code in the Map.js component:
let mapData = db.collection('mapdata');
let allPoints = await mapData.get();
Map Container
Our MapContainer.js component is the host of our map. Why do we have to use separate components? Welcome to asynchronous JavaScript land!
MapContainer.js loads the Google Maps script. But you can't use it until it's loaded, right? Thankfully the react-google-maps/api library exposes LoadScript which plays a key part in lazy-loading Map.js:
- <LoadScript
- googleMapsApiKey={getGoogleMapsKey}
- libraries={['visualization']}
- >
- <Suspense fallback={<div>Loading...</div>}>
- <Map></Map>
- </Suspense>
- </LoadScript>
The Map
Finally, our Map.js component exposes the core Google Map, allowing us to set the center of the map (shortcut alert: we are just using the first record from the mapdata collection for the center) and the HeatmapLayer which exposes the Google Maps heatmap API.
- <GoogleMap
- mapContainerStyle={containerStyle}
- center={this.state.center}
- zoom={13}
- mapTypeId={'satellite'}
- >
- <HeatmapLayer data={this.state.mapPoints} options={options} />
- </GoogleMap>
The data property of the HeatmapLayer is an array of all the returned data points from Firestore.
A single object in the array is made up of a location (lat/lng coordinates) and a weight integer (cellular signal strength). The higher the weight, the more intense the heatmap color.
- let point = {
- location: new google.maps.LatLng(doc.get('lat'), doc.get('lon')),
- weight: doc.get('bars'),
- };
We can also tweak the display of the heatmap by supplying options to the HeatmapLayer element. We specify the radius, or how far we want our heatmap colors to spread around a point.
const options = {radius: 40};Running the Web App
With our web app built, back in the terminal we can:
-
Install dependencies with
yarn install. -
Run the app with
yarn start.
Since at this point we don't have any real data accumulated, we can test out our map by using the testPoints array in Map.js instead of the data pulled from GCP.
Go Gather Some Data ?
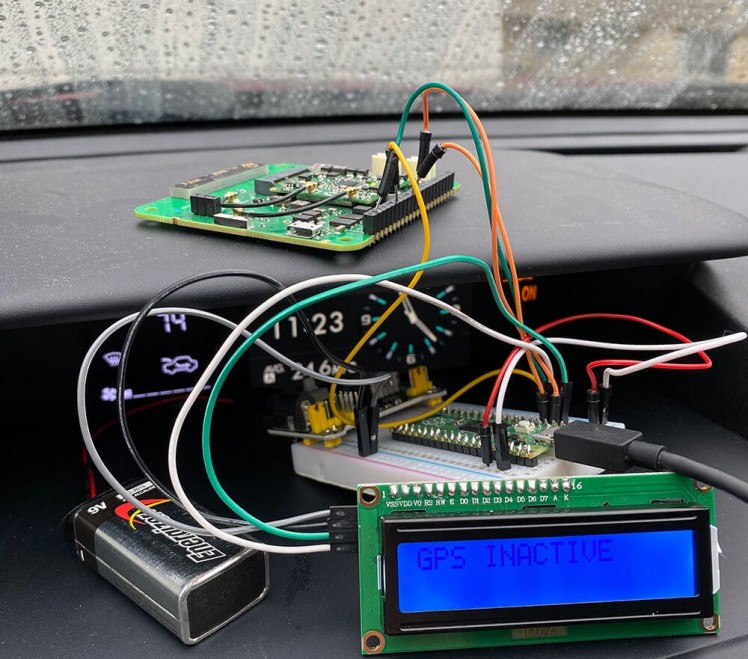
We are ready to take our project on the road! I attached a portable battery pack to my Pico and placed the solution on my car's dashboard (the GPS antenna needs an unobstructed view!).
Now Run the Web App
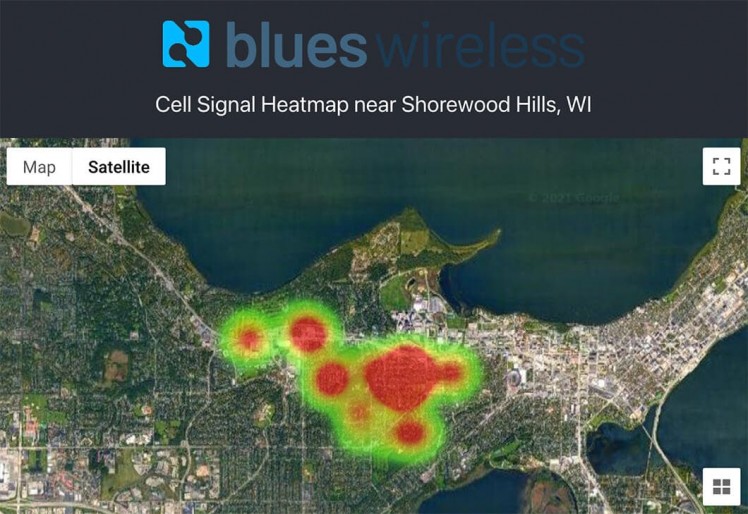
Back home with our accumulated data, it's time to try out the map with some real world results.
GPS Gotchas
If you run into any issues gathering GPS data, be patient, as GPS can be very fickle. It's important to remember that the Notecard is a very power-conscious piece of hardware, and GPS is very power-hungry, so don't expect the same results as using a dedicated GPS receiver.
Take note of these "gotchas" when working with GPS:
-
Regardless of the
modeyou are using, the GPS module will only be activated when it's moving. - The GPS module will only activate itself after the cellular modem has acquired a signal. It can take 2-3 minutes before a reliable signal is acquired.
- The Notecarrier-A (used in this project) has a relatively weak GPS antenna compared to the other Notecarriers (which can also use active external GPS antennas).
Next Steps
Congrats on making it this far as there is A LOT to comprehend when building out a full solution containing components from device to cloud to web.
Even if you just skimmed through, I hope it was evident how easily we can now take on-device data and utilize a modern cellular/GPS device to efficiently move data to our cloud application of choice.
Want some next steps?
- Grab your first Notecard or Notecarrier Dev Kit (and take 10% off with this link).
- Check out the extensive developer documentation at dev.blues.io.
- Build your own cellular- and GPS-enabled solution and tell us about it.
Happy hacking...and mapping! ??️
Code
Credits
Related products

Leave your feedback...