
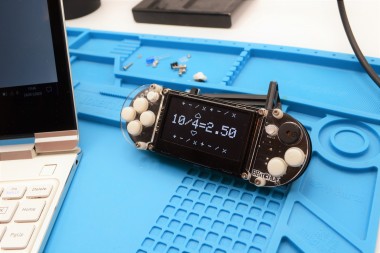
Creating A Calculator With 8bitcade!
Made by 8BitCADE / Games & Gaming / Kids & Family / Productivity / Retro Tech
About the project
This tutorial will explain how to use Arduino to program a calculator for our 8BitCADE/XL You will need to be able to understand basic Arduino syntax and Arduino classes. We advise that the following tutorials are completed before beginning: • Arduino Basic’s: Classes • Arduino Basic’s: Library & Board Setup
Project info
Difficulty: Easy
Platforms: 8bitcade
Estimated time: 4 hours
License: GNU General Public License, version 3 or later (GPL3+)
Items used in this project

Story
8BitCADE Project: Calculator
In this tutorial, we are going to be learning how to use Arduino to program a calculator for our 8BitCADE/XL.
To fully understand this tutorial, you need to be able to understand basic Arduino syntax and Arduino classes. We advise that the following tutorials are completed before starting this project:
- Arduino Basic’s: Classes
- Arduino Basic’s: Library & Board Setup
Note that:
This text showcases a task/challenge that you should attempt – all levels of coders should try and attempt these without seeing the answer.
This text showcases something that you should be doing, regardless of your coding ability. This is usually ensuring that your program is exactly like the one presented.
For beginners we recommend ensuring your software is exactly like the one we present. Your main focus should be on understanding the coding functions, getting use to the coding syntax and understanding why we use specific functions.
For intermediate to advanced coders, we recommend that you do this tutorial first, then try writing your own program with the challenges used as roadmaps/guidelines.
The way this booklet is written is:
1. The brief of what we want the code in this section to achieve.
2. Task: Can you code it by yourself? Here are the functions and what the functions mean
3. Code Explanation
4. Final Code, copy this to get a program just like the one we present!
This allows for the beginners to get a grasp on what each function and coding statement means and dip the deep end by coding some sections by themselves. For intermediate coders it gives a challenge and for advanced coders it allows the code to be planned out ready for you to write it up using your own logic – then all levels can check it with the presented code and adjust it accordingly.
Have fun, if you have any errors with the code. Check your code with the final code, in the final pages of the booklet.
Bring out the learner in you – with 8BitCADE!
-8BitCADE Team
File Breakdown

Calculator: The main Arduino file that contains the setup/loop
Controller.h: Defines the Class Controller, that will be used to read and process the controls
Controller: Creates all of the class methods of the class Controller
Sprites.h: Used to store all of the sprites used in this program.
Controller.h
The controller class deals with the button controls of the 8BitCADE and has methods inside the class to deal with button debounce. In this header file, we define all attributes and methods for the class. We use header and .ino files to help organize our code. Header files are for defining attributes of a class or library and .ino files are for running code or in our case, writing what does inside the actual methods we define.
Your task is to create a new header file called “Controller.h”
_______________________________________________________________________________________
A snippet from the “Classes 101 Booklet”, be sure to look at that before attempting this tutorial.
To create a new file in Arduino, you need to press the toggle menu on the right of the files bar (under serial monitor) and click “NewTab” 
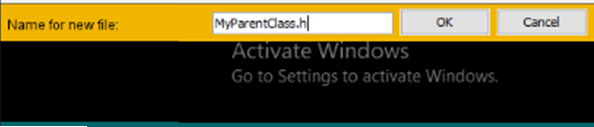
Here we write the file name and then the file extension: ino is for Arduino based programs and will be used for the file that will contain all of the class.

When you create this file, its important to add the file extension (.h) so the program knows it isn’t a default .ino file but rather a header file.

Upon file creation, you’ll notice that Arduino has not produced any void loops or setups. This is as there can only be one of each in the program. Also, as this is a header file, we will only be defining variables and classes.
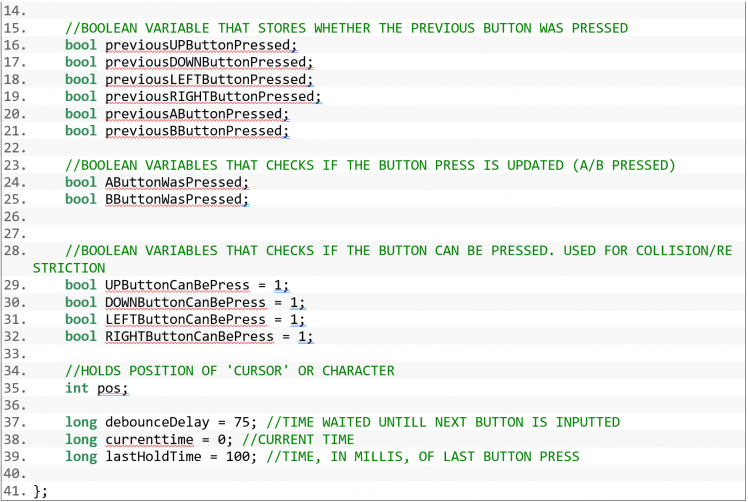
Note that all attributes and methods need to be defined before we can use them, if you reference a variable that hasn’t been created, you will get an error. Below are some helpful definitions before you copy the final code:
point [Variable name] To create a structure with int X and int Y. We defined the structure in the main section of the code.
bool data type is for true and false (or 1/0)
long data types are like integers but have a larger range.
To create a constructor method, simple write [nameOfClass]();
Point, will be defined in the main file, and is a structure. A structure is a defined datatype that holds groups of data, aka int x and int y in this case. We can access these through using point.x or point.y and it will return the integer value of x or y

Controller.h Code
 Here we can see, on line 5, we need a constructor, we can leave this blank if we don’t have any values to pass through upon creating an object. To do this, use the [classname]() and leave the parameters blank. See more about constructors in the “Classes 101” booklet.
Line 7: Point position; defines an attribute from the structure point which we formed in the main Calculator file.
Also note that when defining any variable holding a millis value, ensure you use a data type that can deal with large amounts of data – as recording the time can amount to a lot of data quickly if not updated. Here we used long as it has a large plus and minus range. (see lines 37 to 39).
Please copy this code to ensure you have the correct program – this is important as it defines all the variables we will use. A typo here is usually a major culprit for errors!
Controller
The controller file deals with the methods for the controller class. It’s important when writing in this file to call files using the “outside class” calling method, as discussed in the “classes 101” booklet:
“void [Classname] :: [Method Name]()”
This file mainly focuses on dealing with button debounce. Your task is to create a new tab file, name it “Controller” – it will default to .ino
Before we start implementing debounce algorithms, we have to firstly create the constructor method, we can utilize this to set the controller.position.x and y position values to 0 (or if we needed the player to start in the middle, we could therefore set these values to the centre x and centre y position)
Note that when referencing class attributes in a class, we do not need to write “classname. attribute” we can just write “attribute”. Its only outside of classes where we need to specify the classname.
The way the controls will work, is that we will take in button inputs, and alter the position.x and position.y values accordingly. Remember that “position” is a structure that contains two integer variables “x” and “y”
We also use a Serial.print to check that the object was created correctly.
Your task is to write the constructor method for the class Controller() and create an empty function called “update”. Be sure to use “outside class” method declaration. The below functions might help:
position.x will access the x position of the controller and replacing the x with a y will access the y position for the controller.
Serial.print(“Hello World”); Will print to the console the string “Hello World”
Void [Class name] :: [function name]() { [code] } will create a function for the class specified.
Controller Method Creation Code

Above, is the code you should type in.
What is debounce in a button?
Debounce, in buttons, is when the button input is read multiple times in a short amount of time. Without debouncing, the input could be up to 4 times and therefore would alter the position value too much!
Your task is to write a simple algorithm that takes one button (UP_BUTTON) and ensures that the button is registered as pressed with a debounce algorithm. The below functions will come in handy:
- Aboy.pressed(UP_BUTTON) will return either true or false depending on if the up button is pressed or not (can put any button in: LEFT_BUTTON etc)
- Millis() will return the time in milliseconds since the program started running
- currentTime = Millis(); Will capture that time
Once the button is registered as press, we update the position, use position.y to access the global y positon of the class controller. For up we would add 1, for down we would -1.
Button Debounce Code
To stop this from happening, we use the below algorithm (repeated for each button) to combat this:

Here, if the button is currently being pressed (aboy.pressed(UP_BUTTON)) and it was previously pressed (previousUPButtonPressed would be 1 if it is turned on and 0 if It is off) and the time from the last recorded button press is greater than 150 mili seconds, and the button can be pressed, then change the position accordingly, in this case add one to the position structure y. (structures are accessed using [DOT] StructureName.variableName).
aboy.pressed(UP_BUTTON) = gets the current button status of the “UP_BUTTON”.
PreviousUPButtonPressed = Is the status of the button UP, in the last cycle of code (aka the last reading)

(millis() – A_lastHoldTime) > 150 = This allows us to calculate how much time has passed since we last took a reading. We can see that as A_lastHoldTime, in the if statement is equal to milis(); therefore we record the time it was pressed. If it is less than 150 then we know it is the button bouncing and we know not to record the button.
Note that we have to use separate lastholdtime varaibles to allow both buttons to be read at the same time, if we used the same varaible, when one is read, the other button cannot be read until the time limit is over. Hence using A_lastholdtime and B_lastholdtime.
While we do not use the A and B buttons, its important to note the above code as this “Controller” class is used for a lot of 8BitCADE projects.
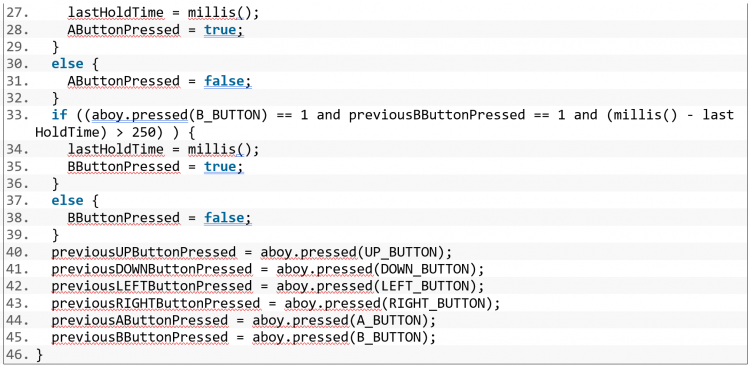
aboy.pressed(A_BUTTON) = Checks if the button is currently pressed
previousAButtonPressed = Checks the status of the button, in the last cycle of code (aka the last reading)
(millis() – A_lastHoldTime) > 250) = only takes the reading if there has been more then 250 miliseconds from now to the last time we took a button reading.
UPButtonCanBePress is our variable used to deal with collisions and boundaries. We can turn on and off each button allowing us to have full control over where the sprite is allowed to go. I’ll go over the function that controls this aspect after this, but for now know that when the player reaches a boundary, we can turn these on and off to stop movement in one direction and to allow movement in the opposite direction.

Here we set the previous button pressed variables to the current button press status for the next loop. This is part of the above algorithm. See the “full code” below to check if your file is correct.
The full code for the methods of the class in file “Controller” is below: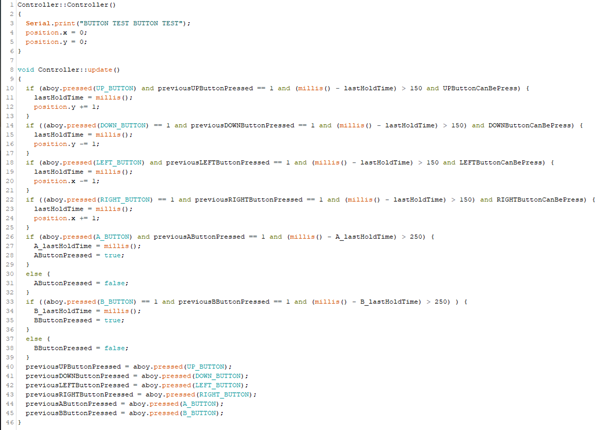
Please copy this code to ensure you have the correct program.
Sprites.h
This file is used as an easy way to store the sprites that we use for the up and down arrows of our calculator. We store them in a header file as they are defined arrays.
Your task is to simply create the header file, the code is presented below and should be copied.

const unsigned char PROGMEM upButtonNoFill[]
PROGMEM = Means the data is stored in the ROM program memory, not the RAM that is the default storage area. We store sprites in ROM/program memory as they tend to be larger and we have a small amount of RAM.
Const = Means it cannot change
Unsigned = means it must be positive (cannot be negative)
Char = means it is a character that is of 8 bit (1 byte) size range from -127 to 128
const unsigned char = A character that is an 8bit value that can only hold numbers that cannot be negative.
upButtonNoFill[] = we are declaring an array of unknown size, however as we are putting the values inside the array but default, it does not matter.(unlike C++ where you must put the number of elements that are present inside of that array)
The first two values of the array are the width and height; the rest are the pixels.
The way the above code was produced was through two websites:
https://www.pixilart.com/ - To create the pixel art. This was exported as a png.
https://teamarg.github.io/arduboy-image-converter/ - To then convert the png file to the code you see above.
I use two kinds of arrows: one with just the arrow outline and one that is filled. This is so then when the user selects the arrow, I can flash the filled arrow so they know it has been pressed. Try doing something similar. You must, however, create the file with a width of 7 pixels and a height of 10 pixels. NOTE that this is not compulsory, you should be using the code presented above. When you have finished this program, you can then personalize.
Now that we have finished the other files, it’s time to piece the puzzle together.
Calculator Mechanism
To create the calculator mechanism, we use a class, within this class we have a method that calculates the equation depending on the sign. This will be written in your “Calculator.ino” file and would be above the void setup.
Your task, is to create the class and see if you can create the method that does this. Note that we utilize the constructor to get the parameters of the equation. (covered in Classes 101). The below functions might be useful:
Switch + case statement: Similar to a bunch of If statements, a switch and case statement compares a value with the case value, aka if ValueToBeCompared was 2, then the 3rd case down would run as that is case 2; and ValueToBeCompared == 2, therefore a value would be returned and the look would break. If no value is matched, then the default block is ran. If the breaks are not used, then any case statement that matches will run and so will the default block of code. See the example below.

Class Math Code
Here we can see, the final class, called math. In this class we have two constructor variables, one for when we create an object with no parameters (we always need this one) and one for when there are parameters present. The parameters required are each part of the equation, value 1, the sign position and value 2. Whatever this function returns is the final answer. Hence using return in the switch statement. The double calculate() is a method to calculate the final answer depending on the sign position. We use double as it has a large range and deals with decimals. When we declare a function we must define the data type of the return values, therefore writing double means that any value we return will be a double. In the comments you can see what each position represents. The default value is 0 ensuring that something is printed to the screen no matter what and that we do not get an error. Hopefully your code looks similar to this format, if not then type in the above code. If not then adjust it accordingly, updating the variables with the ones presented above.
Before we get started on creating the calculator mechanism inside the void loop, we first need to boot up Arduboy, set pins and setup serial.
Your task is to see if you can write the void setup for this program. The things we need to do is boot the Arduboy (to initialize the library), set the pin modes as OUTPUTs of the 3 LEDS (10 = Yellow, 3 = Green, 9 = Red), clear the arudboy screen and then begin serial. The below functions might come in handy:
Void setup() { [CODE] } = code that runs once as soon as the program starts running
aboy.boot() = will boot the Arduboy without the Arduboy splash screen, it will also initialize the library
pinMode([PinNumber],[INPUT/OUTPUT); = Will define if a pin is an input or output, if it will be rexiving data or sending out data
aboy.clear(); = In simple terms, this function (clear) will clear the screen. It will clear the screen buffer and display it. This means it will clear the screen and whatever is on it. Every time we print something, aboy.print(“Hello World”); , it gets stored in the screen buffer. When we use the aboy.display() it will display the screen buffer, aka the “Hello World”.
Serial.begin( [Frequency] ); = will begin the serial and set the rate of transmission (frequency) we will use 9600.
Void Setup Code

Hopefully your code looks similar to this format, if not then type in the above code. If not then adjust it accordingly, updating the variables with the ones presented above.
Now we can move onto the loop.
Your task is to write the code to be able to do the following:
· Prepare the Arduboy for printing/print to screen. This involves clearing/displaying the screen, setting the cursor and text size.
· Calculate and print the equation and result on the screen. A challenge: If the sum is an integer, then remove the ‘.00’ on the end of the double, else keep it.
Useful functions that might come in handy:
aboy.setCursor( [X coord] , [Y coord] ); = This will set the cursor ready to print text. It requires two parameters.
Aboy.setTextSize(); = Will multiply the current text size by a scale factor. Value must be greater then or equal to 1. Current text size is 6x8 pixels. A multiplier of 2 would mean the characters become
([Data Type]) [Variable] = will attempt to turn the variable to the specified data type, this is called Cast. E.g. (int) DecimalNumber would turn the decimal number into an integer.
Aboy.print(); = similar to Serial.print(); will display the content at the set cursor position, if its text it will display it at the text size specified before (default 1).
Aboy.display(); = Displays the screen buffer, aka if you have a print statement without the display, nothing will be shown on the screen – this is used to display the content onto the screen.
Calculator Core Loop
Hopefully your code looks similar to this format, if not then type in the code presented at the end of this mini unit.

The first statements are simply to prepare the program for printing. If your cursor positions are different, please update them to the ones presented above. To ensure your program looks like the one we have, and as the program is designed for these values.
(For beginners, to create an array, we must first DefineDataType ArrayName [Array size] = {“Element 1”,”Element 2”}; E.g. 
We then use a variable called “signOption” that will be updated with the user input and change the printed sign.
Line 79 creates an object called math with the parameters of the equation. We then call the method calculate(); on line 80 and, as we used returns, can make Sum equal to the result of the equation.

The challenge: Here we check the sum, if int_sum is equal to Sum then it is an integer as they are equal (35 is the same as 35.00). In the If statement, we make int_sum equal to the converted value of the sum using a cast function “(int) Sum”. Therefore, if the answer is 35.5, int_sum would equal 35 but Sum would still equal 35.5, therefore the else part of the statement runs and, as we don’t want to lose data and want to display the decimal points, we append (add to the array) the Sum. If they are equal, we make int_sum = (int)Sum, if it isn’t already, and append the integer version of the Sum (without the .00) to the equation to be printed.

We then get each element in the array equation, and add them together (create a single string from the array) using the plus icon (simply “one string” + “two string” adds the strings together “one stringtwo string” ). Allowing us to print the whole equation in one print statement and then display it with aboy.display();
The full code is below. Please update your code accordingly.
Uploading this should give you a simple 0+0=0 on your screen. Now we need to add the special arrows and allow the user to move the “cursor”/arrows around and change the characters to suit there need.
These are the new define variables. Typed in before the void setup()

Update your void loop()

Laying out the Framework for X Movement
The movement utilizes the controller.position.x and .y. In this unit we lay the framework for the movement. The x movement will move between each digit in the equation: our equation will look like “0+0=0” with the 3 digits, 0+0, being altered to the users need.
Task, to create the structure for the x movement. When the position is 0, something needs to happen. For now, write a comment saying the name of each digit. Aka, for 0, simply write //First digit. For 1, //Sign. For 2, //Second Digit. Useful functions that might help are below:
Switch Case: See explanation from before.
Controller.position.x = will store the x value, and is updated when the user changes it (with the LEFT and RIGHT buttons.
Type this switch case after printing “mystring” in the void loop

The Controller.position.x value will control the movement with the LEFT and RIGHT buttons, aka movement along the x axis. For us that is cycling between 3 options, the first value, sign and second value. To achieve this, we use a basic switch statement that compares the Controller.position.x that will change when the user clicks the LEFT or RIGHT button. We can then put the code for each element in the equation based on if it is currently selected or not.
We also need to update the position each loop, therefore we need to call the Controller method update. Write this after clearign the aboy screen (aboy.clear();)
Collision
However, the current code means that we can move the controller.position.x , yes between 0 and 2, but also doesn’t stop us when we reach the boundary (aka move too far), meaning the player can go off screen. Write code that will restrict the player from exceeding controller.positon.x between 0 and 2 (3 values, for each digit) . The functions below might be useful:
Void [FunctionName] (int ArgOne, int ArgTwo){ [ Code ] } = Allows us to create a function with parameters, in this case we created a function that has no returns (as void means there is no return therefore no need to specify a data type). Here we have two parameters that must be met upon using this function.
Controller.LEFTButtonCanBePress ; = was a Boolean variable we defined earlier that switches the movement in a certain direction on/off.
Adding a X Boundary/Collision
For this specific program, we only have one boundary, that is the X boundary of only being able to move between updating the 3 digits of the calculator. To achieve this, we use the below function that can easily be duplicated for the Y coordinates in other programs however in this program, we want the user to be able to type any number and therefore do not have a boundary,
Hopefully your code looks similar to this format, if not then type in the below code. It should be placed after the void loop.

Here you can see, when we define the function we require two numbers, these help make the function dynamic and be able to be used in many different situations. Here we require that we get the range parameters – aka lowest range and highest range. This is then used in the if statement.
If the current positon is lower than the range, then we turn off movement going even lower (left button) as we want the player to stop moving, stopping the movement also stops the player if the player is holding down the right button and moving into a boundary, this function checks it and therefore stops ALL movement. We only allow movement on the X axis to be done via the right button, aka to get back in range. The next statement uses a similar format, however it’s the higher range therefore we turn off movement for the right button, and only allow the position to be updated when the user moves back into range (aka only allow the user to press the left button).
Be sure to write this section of code inside the void loop! 
Here you can see we run it in the main loop, before we update the position values (aka before we check the button controls). This is so we can check if the player is in range, and therefore only allow the correct buttons to be read (I say read because the user can still press the button, however as we set the “ButtonCanBePress” value to false/0, we choose to ignore it regardless.
This ensures that the user can never exceed the values 0, 1 or 2. There are simplier ways to achieve this, however, by simply writing an if statement as shown below:
If (Controller.position.x == 0 or Controller.position.x == 1 or Controller.position.x == 3) { [CODE] }
However, this introduces us to algorithmic design and is a common way to deal with larger boundaries. As, if the boundary was between 0 and 100, we could easily change this.
Adding Sprites
While we can currently cycle between each digit, we cannot actually see this change (you can always add a Serial.print(Controller.position.x); to demonstrate this). To show this, we will use the sprites we added in the sprites.h header file. These will also come in handy when we want to show the y movement.
To show movement, display the arrow spirtes above each digit when it is selected. We will later animate these to fill when we press up and down - however, for now, simply move the arrows between each digits. The below functions might be useful:
Sprites::drawOverwrite(Xpos, Ypos, SpriteName, 0); = This will display the sprite at the specified x and y position. The 0 simply means what frame to show, for this project, we only use one frame animations, therefore this will always be 0.
break; = will exit out of the loop when it is executed.
Tip, the up arrow should be printed with a y value of 15 and the down arrow should be printed with a x value of 42.
Challenge: When the calculator has 2 digits, we need to relocate the arrow to be centred. Write a simple math statement in the X Position of the drawOverwrite function that relocates the arrow accordingly based on the number of digits present. Functions that might come in handy:
String.length(); = will return the amount of characters in a string. E.g. “10” has 2 characters while “hello” has 6.
(string) Variable = is a cast function that converts the variable to a string.
Moving Sprites along the X axis

Hopefully your code looks similar to this format, if not then type in the above code.
This should replace your current switch statement.
The main focous is whats inside the Position X position value. Note that I introduce a new function I coded called ‘numOfDigits();’

This function takes an input integer and returns the amount of digits that integer has. Aka input 10, return 2. We do this by utilizing the [StringVar].length() function that returns the number of characters in a string. To do this, the line before we simply declare a new string variable called string and make it equal to the integer but in string form, therefore 10 becomes “10”. Allowing us t use the .length() function

Why do we use this? As you can see, we use this to calculate the number of digits and therefore adjust the x position to centre the arrow correctly. Below is each x position equation for each case section. The other parameters are all the same: all upButtons are on the same 15 y value and down buttons on the same 42 y value.
Case 0:
X_Constant + (6 * numOfDigits(FirstDigit)) – 5
X_Constant = 9 and is simply the offset from the screen (when we print the text we print is at an x coord of 9. This is constant for all case position X values.
(6 * numOfDigits(FirstDigit)) = This finds the midpoint of the digit (each character has a width of 12 pixels), therefore by multiplying by 6 we can add on the centre of each digit present.
– 5 = as the sprites are 10 pixels wide, we minus 5 from the new centre point as the sprites are drawn from the top left corner. This is constant for all case position X values, as we always calculate the centre point and then have to shift it over by -5 to print the sprite.
Case 1:
X_Constant + (12 * numOfDigits(FirstDigit)) + (6 * numOfDigits(signOption)) – 5
(12 * numOfDigits(FirstDigit)) = Adds the number of digits present in first digit to the position, here we multiply it by 12 as we are using a text size of 2, which has a width of 12. This ensure that when we add the centre point of the signOption digits, it is at the correct offset – regardless of how many digits come before it.
(6 * numOfDigits(signOption)) = calculates the midpoint of the signOption. This allows it to be dynamic
We then -5 to ensure it prints correctly
Case 2:
X_Constant + (12 * numOfDigits(FirstDigit)) + (12 * numOfDigits(signOption)) + (6 * numOfDigits(SecondDigit)) – 5
The case 3 must take into consideration all leading digits. Therefore, we add all of the digits leading up to it (+ (12 * numOfDigits(FirstDigit)) + (12 * numOfDigits(signOption))) and then find the midpoint of the current digits, (6 * numOfDigits(SecondDigit)), then we -5 to ensure it prints correctly.
This allows the printing of the arrows to be dynamic and always be centred.
Be sure to write this value before the void setup.

This part can be challenging, be sure to copy down exactly what we have written.
Adding Y Axis Movement
Now that we have each individual case statement for each digit. We can start allowing the user to set the numbers for the sum. The first and second digit will have the same movement system, while the signOption case will need to be restricted to be move between only the 4 signs.
In each case statement, write code that will update the FirstDigit, signOption and SecondDigit value according to the users Controller.position.y. Note that we will need to apply a boundary to the signOption as it should only change/upate its value if it is between 0 and 3 (4 values, 1 for each sign). The below functions might come in handy:
Switch + Case: See above explanation
Controller.posotion.y = will allow you to access the position value for y that updates with the UP and DOWN buttons.
Case 0 and 2:

For the digits, we use the same code. Here we have a switch statement that firstly checks to see if the controller.position.y has changed. We can see if it has changed by comparing it with the last value, aka minus it from the LastYPos. We will ONLY get 3 results: -1, 0 & 1. Using a switch statement, we can decide if we need to either increase the first digit, or decrease the first digit – this means that each button press will change the FirstDigit by one and therefore allow the user to control the equation digits. If the case is 0, then there is no change and we can just break out of the switch loop. This code is used for both cases, changing the appropriate digits.
Case 1:

The case 1 uses the same switch statement, however we have an if statement before it to only change the digit if it’s between the range of 0 to 3 (as there are only 4 signs).
(signOption + (Controller.position.y - LastYPos )) >= 0 and (signOption + (Controller.position.y - LastYPos )) <= 3
Here we almost predict the value, we add the resultant of Controller.position.y – LastYPos to the signOption and see if it is in range (aka if it is greater than or equal to 0 or less than or equal to 3), if it is within range, then we can go ahead and actually make that calculation. If it isn’t then do not change the value.

Full Switch Statement:

The full code for the switch statement. Please copy to ensure your program is kept up to date with ours
Don’t forget to define the new varaibles we use before the void setup: 
We also need to ensure we update the LastYPos and LasrtXPos variables each loop, this part of the code goes to the end of the loop, before the display command.

Animating the Buttons
Now that we have the basics of the program, it feels very static. To make it feel more dynmic and responsive, we can animate the buttons to help the user see/feel like they have virtually clicked the button.
Your task is to write a “UpButton” and “DownButton” Function that we can reuse for every button. This function will, when the button is pressed: fill the arrow and move the arrow (e.g. if up arrow pressed, move arrow up by -2 to the y coordinate). The Below functions might come in handy:
Millis(); = returns current runtime in milliseconds from the Arduino being turned on.
Sprites::drawOverwrite(xpos, ypos, sprite, 0); = to draw a sprite, requires the x and y position and then the sprite name. the 0 simply means what frame to print. In our case, this will always remain 0.

Here we have two simillar functions. buttonUp, takes two inputs, the x and y position for the arrow (this will be a copy of what we used before when we printed the first arrow). Then we use 3 if statements to decide if the arrow should be filled or not. The first is if the button has been pressed. We can derive this from a change in the Y position (by minusing the current position by the last Y position, if it equals one, then the button is being pressed up and therefore should be filled. We can see how that the buttonDown uses a Controller.position.y – LastYPos == -1. A minus 1 instead as it inidcates that the position is decreasing therefore the down button is being pressed. If the y position does change, then we set the UPLastPressedTime, ready to compare for the next if statement, and then use the local parameters of the function to draw the arrow in the correct place. Note that we use ypos – 2 (for the up button) and ypos + 2 (for the down button). This adds a slight jump to the button. Also note that we are displaying the upButtonFill. However, upon just uploading this, youll release that it switches too fast and the moving animation does not flow well. To fix this, we use milis in the next statement. The next statement is an else if statement, if the button isnt being pressed, then essentially fill the button for 150 miliseconds (as we compare the LastPressedTime to the current time). This helps with debounce and makes each press the same length. If both of these are false, then write the ButtonNoFill at the xpos and ypos.
Add these functions after the void loop. Please copy to ensure your program is kept up to date with ours.

We ofcourse need to declare the varaibles we use in this function before the void setup before we can upload the code. To integrate the se functions, we simply replace the Sprites::drawOverwrite(xpos, ypos, sprite ,0); with the new functions. Copying in the x and y parameters we used on the arrows to the functions. The below code shows how we would implement these new functions:
Implementation of the functions below, copy it to ensure your program is up to date and correct:

Now that we have the corse functinal aspects of the calculator, the below code shows what you should have so far – go through it and compare what you have written to ensure you have the correct code.
Final Code
Congratulations for completing this course! Now you have a calculator on your 8BitCADE. Now is your chance to play around with it and see what you can add. Why not add a splash screen, your name or see what else you can do! The world is yours!


Thank you for following along with this tutorial. If you have any programming questions, we strongly advise that you check out the Arduboy community. If you have any 8BitCADE related issues, please email us at 8BitCADE@support.com.
Check out our other tutorials at 8bitcade.com/learn
Leave your feedback...