
Build Your Own Smart Mirror Touchscreen (with Faceid)

Made by EbenKouao / Home Automation
About the project
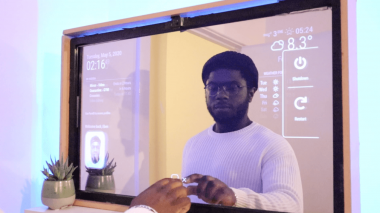
Introducing Smart Mirror AI (SMAI). Build your own Touch Screen Smart Mirror (with face recognition) that you can interact with. Control your favorite music on Spotify, view the latest news. You could even keep track of your latest stocks. Find out how to build this using a Raspberry Pi 4.
Project info
Difficulty: Moderate
Platforms: Raspberry Pi, balena
Estimated time: 1 day
License: GNU General Public License, version 3 or later (GPL3+)
Items used in this project
Hardware components


View all
Story
The term Smart Mirrors could easily be dismissed as a Science Fiction fantasy. I mean, the idea of Magic Mirrors that displays useful information to the user does sound quite far-fetched.
But what if I told you that we could make a Touchscreen Smart Mirror that could do exactly that and more. Imagine a Smart mirror that could work as a central touchscreen interface for your home to control smart home appliances, provide the latest news, stocks, and features Face recognition.
Well, this is possible! In this article, you're going to find out how. This project aims to build a touch screen smart mirror that is built on the back of the MagicMirror platform. We like to call this Smart Mirror AI (SMAI).
Watch Full Youtube Tutorial on How to build a Touchscreen Smart Mirror
Goal: By the end of this article, you’ll be able to build a Touchscreen Smart Mirror with a face recognition module to interact with.
This guide provides you a good overview of how to build one. If you want more details on the Smart Mirror AI, visit our blog Smartbuilds.io. You could even download the Raspbian Face Recognition Image from there.
Now we got that all out the way, let's begin!
Pre-requisite: Raspberry Pi 4 (RAM 2GB+) Recommended:
Cost: The total cost would vary based on your own specification preference. Fortunately, Smart Mirror could be scaled down, and customized to your liking from small 7" Touchscreen displays to 55" large IR Frames. In this example, we’ll use a 32” IR Frame.
Hardware Assembly Smart Mirror Touchscreen - Hardware Configuration
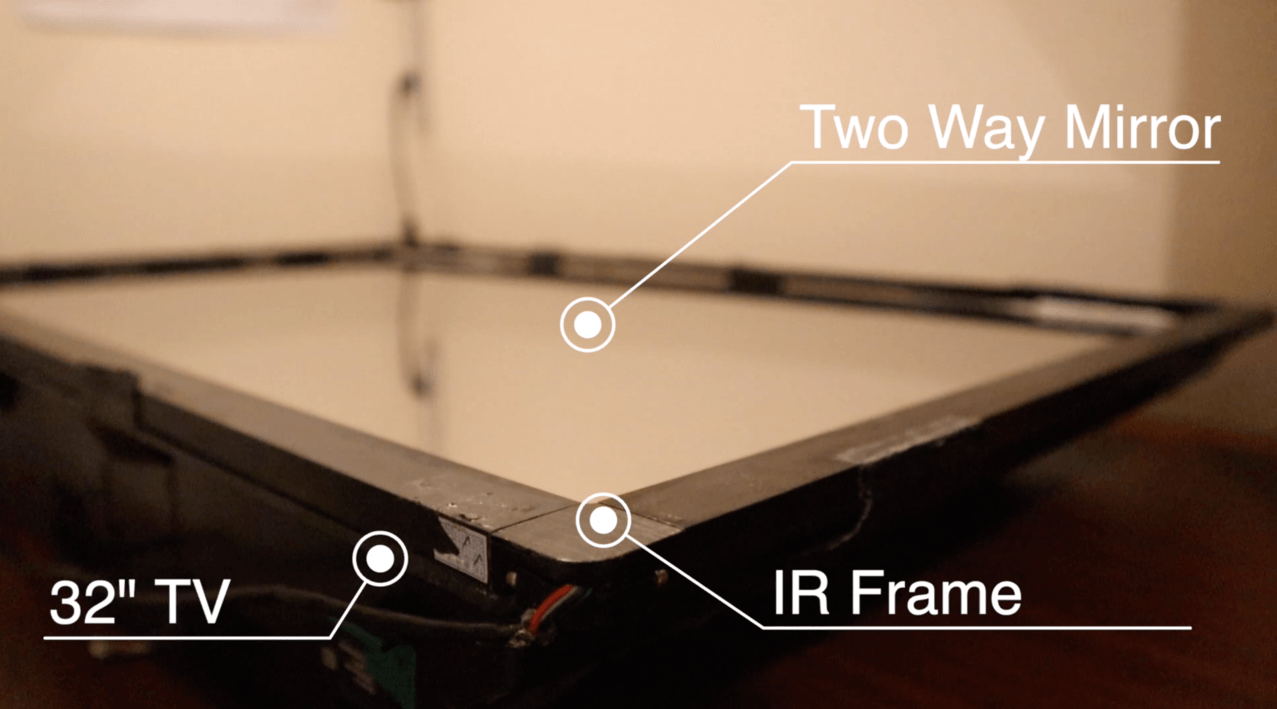
The custom-cut two way-mirror was placed directly on top of the 32" Monitor. In addition, the IR frame was used in order to add a touch interaction with the smart mirror. The IR frame uses a USB 3.0 peripheral to connect to the Raspberry Pi. Some IR frames also support multi-touch gestures on different Operating Systems e.g. Windows and Mac, this makes it useful for future projects.
How IR Frame works
IR frames are based on light-beam interruption. Typically IR frames have LEDs on one side of the frame and Light detectors on the opposite side. Similar to an optical mouse USB peripheral, based on where you touch the frame a beam interruption occurs and the IR sensor is able to co-ordinate where you’ve touched. This information is relayed back to your Raspberry Pi corresponding to your display.
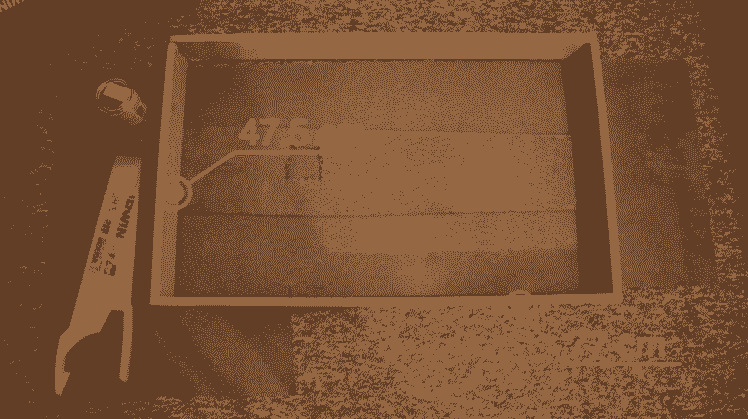
A wooden frame was built In order to encase the 32 inch Monitor. (However, your build can be left to your creativity). This was assembled using 1x4 Fiberwood from your local DIY store, and a hacksaw to cut the dimensions. Strong PVA (Gorilla) glue and nails were used to re-enforce the frame. The final mirror dimensions were W 47.6cm x L 77cm x H 7cm. A monitor strap/ back support was added to secure the support of the Frame. An opening on the strap was made to allow space for HDMI ports on the monitor for the Raspberry Pi display input. An Interior varnish coat was added to the frame to give it a nice glossy finish.
LED Strips:
Smart Mirror - LED Strips Assembly
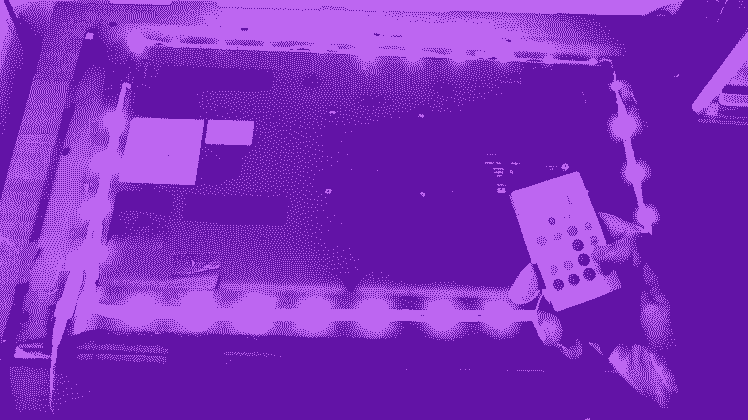
LED strips were added to give the mirror a nice ambient glow. The strips included an adhesive coat to the back which allowed us to peel and wrap the strips around the Monitor.
The LED strips also include a remote for changing LED colors.
Looking from hindsight - We recommend a monitor with HDMI ports on the side of the Monitor
Installing Raspbian Buster Etching Raspbian OS to MicroSD
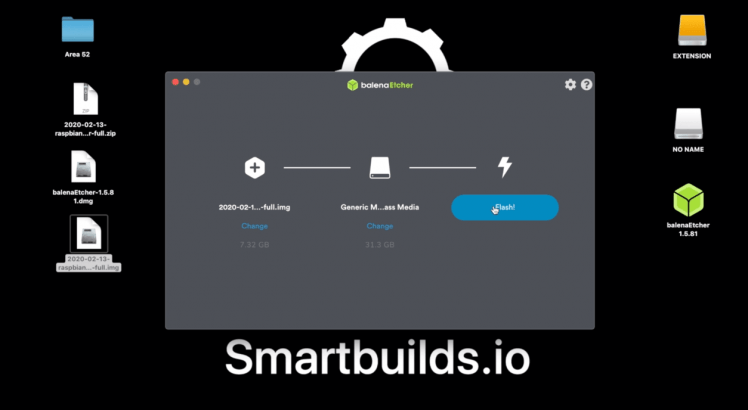
The Raspbian OS was flashed onto the 32 GB Micro SD Card. You could find more information on how to install the latest Raspbian OS on Raspberry Pi site. The YouTube tutorial equivalent also outlines this.
- Download and install The latest Raspbian OS which can be found on Raspberry Pi
- Download Etcher and install the application on your computer. (Compatible with Mac OS X and Windows)
- Plug your Micro SD card Adapter with your SD card to the computer.
- Open Balena Etcher and select extracted the image you’ve downloaded.
- Ensure the correct disk has been selected click “Flash!” to begin writing the image to your SD Card. Note: This process could take 10-15 minutes.
- Remove SD Card and plug in Pi. Whereby you could access Pi via VNC or Mouse and Keyboard
Installing Magic Mirror MagicMirror Installation on Raspberry Pi 4
MagicMirror is an open-source modular smart mirror platform developed by MichMich. It’s has a great community and support which makes this a solid project.
Upon boot-up of the Raspberry Pi, complete the remaining setup, and ensure you’re connected to the internet via LAN/Wi-Fi.
Head off to Magic Mirror for the full Installation & Usage Guide. For simplicity the main snippet has been quoted below:
Run the following commands in terminal
Note: The official support way of installation has been updated from single line command to manual installation. Fortunately, this is just as straightforward.
Terminal - Adding MagicMirror Modules
Download and install the latest Node.js version:
curl -sL https://deb.nodesource.com/setup_10.x | sudo -E bash - sudo apt install -y nodejs
Clone the repository and check out the master branch:
git clone https://github.com/MichMich/MagicMirror
Enter the repository:
cd MagicMirror/
Install the application:
npm install
Make a copy of the config.js sample file:
cp config/config.js.sample config/config.js
Start the application (Recommended for this setup):
npm run start
For Server Only use:
npm run server
.
Note: You could decrease the MagicMirror size of the font with CTRL + -
Auto Starting Magic Mirror – Installing PM2
Note: If you would like to have your MagicMirror working from start-up, we recommend installing PM2 a production process manager. You could do this by following the steps outlined on Auto Starting Magic Mirror.
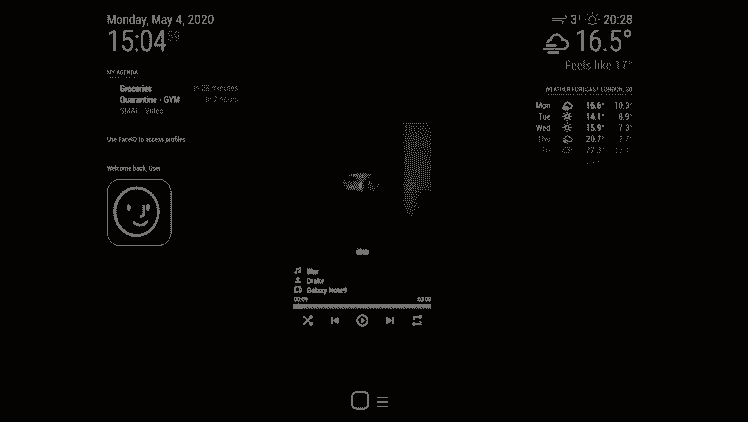
Adding additional Modules Smart Mirror Modules - Including Spotify, Face Recognition and SmartTouch
Adding modules is a great way of customizing your mirror in a unique way. With over 400 modules ranging from Spotify, News to Face Detection customizing your mirror is much more interesting. Visit MagicMirror Third-Party Module
Installing Smart Touch – Touchscreen interactive Smart Mirror Touchscreen - SmartTouch Interaction
In this example, we’ll be adding a module we developed: MMM-SmartTouch
This module allows you to hide all your mirror modules transforming your mirror into a normal “Basic Mirror”. An additional side menu has been developed to safely Power Off / Reboot your pi without the need to pull your power cable. This can prevent SD card corruptions over long term use. If you like this, why not contribute to more features in the MMM-Smart Touch GitHub Repo.
Installing the Magic Mirror Modules
Open up the terminal on your Raspberry Pi and follow the below commands:
cd ~/MagicMirror/modules git clone https://github.com/EbenKouao/MMM-SmartTouch.git cd MMM-SmartTouch npm install
Explanation: The above code clones the SmartTouch module to your git repo whereby npm install in the SmartTouch directory downloads the packages and dependencies.
Adding Module to the Config.js
Copy the following command to config.js
{module: 'MMM-SmartTouch',position: 'bottom_center', // bottom-center Recommended)config: {// The config property is optional.} }
Note: Bottom Center is the preferred default of this module, for an aesthetic module.
Installing Face Detection Module
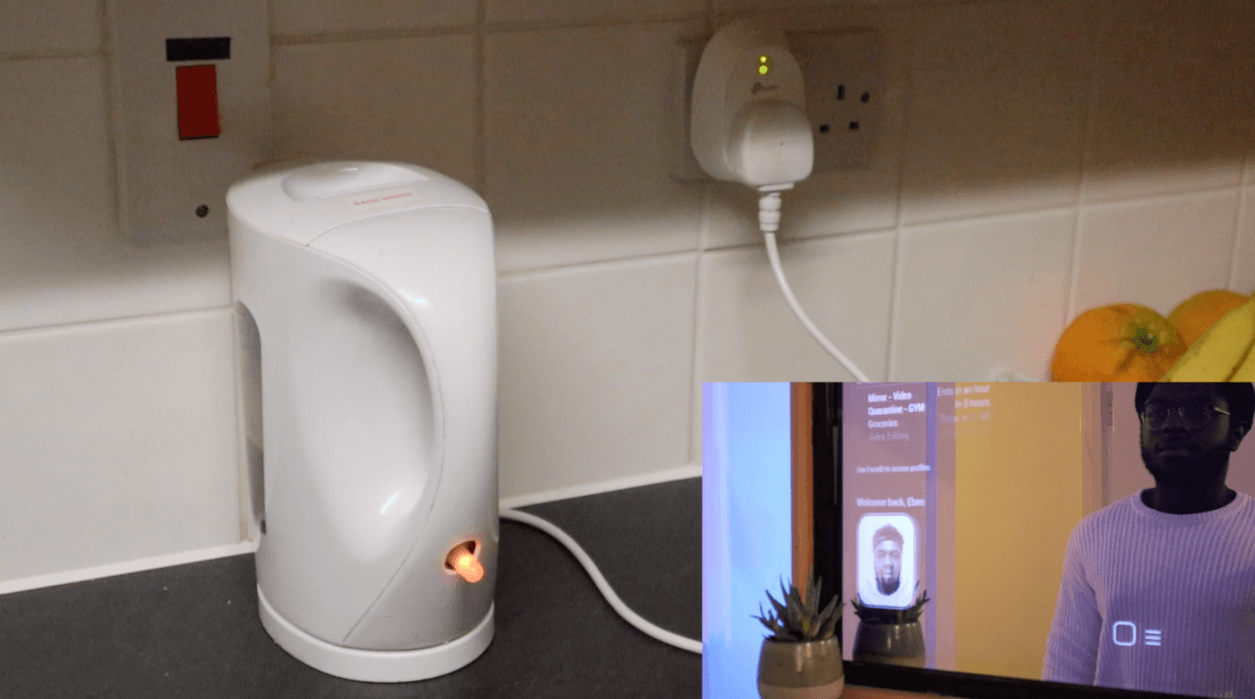
The Face detection module is a nice feature to complement the touch interaction. The use cases for this are endless spanning to home automation. In the below example the Face Detection module was used to trigger smart plugs to turn on the Kettle. You can manually install the face recognition libraries here.
Note: You can find the full face recognition demo Raspberry Pi build on smartbuilds.io along with the full installation guide.
You can find Face Detection Module: MMM-Face-Recognition-SMAI
Next Steps: What will you make?
That's not the end of this project. We've now been able to build the foundations of a smart mirror. Given the additional feature of face recognition and a new touchscreen interaction, the applications are endless:
- Home automation
- Multiple Profiles
- Extension on UI Interaction
Conclusion
Looks like we've reached the end. That's all folks!You are now equipped to create your own Touchscreen Smart Mirror. But don't stop here, it would be great to see what you could develop further with your own mirror. If you have any questions leave a comment below.
Code
Credits
Related products


Leave your feedback...