
Building A Live Web Dashboard On Wio Terminal

Made by CETECH11
About the project
You’ve built a self‑contained IoT dashboard that makes the Wio Terminal interactive and visually engaging over Wi‑Fi.
Project info
Difficulty: Easy
Platforms: Seeed Studio
Estimated time: 1 hour
License: GNU General Public License, version 3 or later (GPL3+)
Items used in this project

Story
The Seeed Wio Terminal is more than just a microcontroller with a screen — it’s a compact IoT powerhouse. In this project, we’ll transform it into a Wi‑Fi enabled web server that hosts a sleek dashboard. From any browser, you can monitor live sensor data (light, microphone, buttons) and even control the TFT screen color in real time.
This tutorial walks through the design, code, and user interface, showing how to blend embedded C++ with modern web technologies.
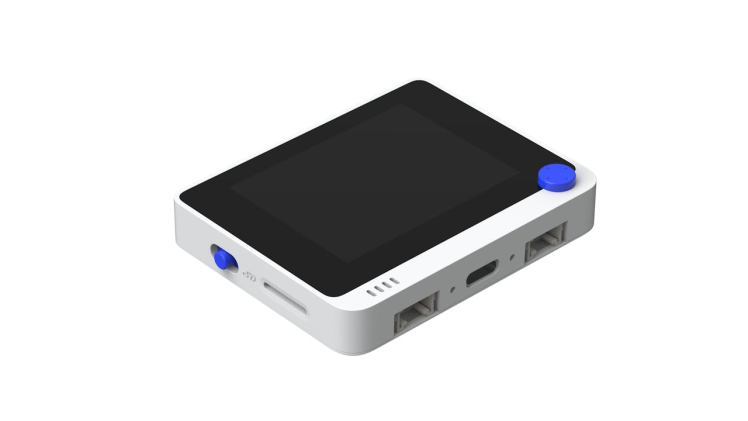
Why Wio Terminal? 🖥️Before diving into the project, let’s appreciate what makes the Wio Terminal such a versatile platform. It’s not just a microcontroller — it’s a complete IoT development kit with built‑in sensors, display, and connectivity.
You must check out PCBWAY for ordering PCBs online for cheap!
You get 10 good-quality PCBs manufactured and shipped to your doorstep for cheap. You will also get a discount on shipping on your first order. Upload your Gerber files onto PCBWAY to get them manufactured with good quality and quick turnaround time. PCBWay now could provide a complete product solution, from design to enclosure production. Check out their online Gerber viewer function. With reward points, you can get free stuff from their gift shop. Also, check out this useful blog on PCBWay Plugin for KiCad from here. Using this plugin, you can directly order PCBs in just one click after completing your design in KiCad.
Wio Terminal Hardware Features ⚙️Here are the standout features that make the Wio Terminal ideal for dashboards and IoT projects:
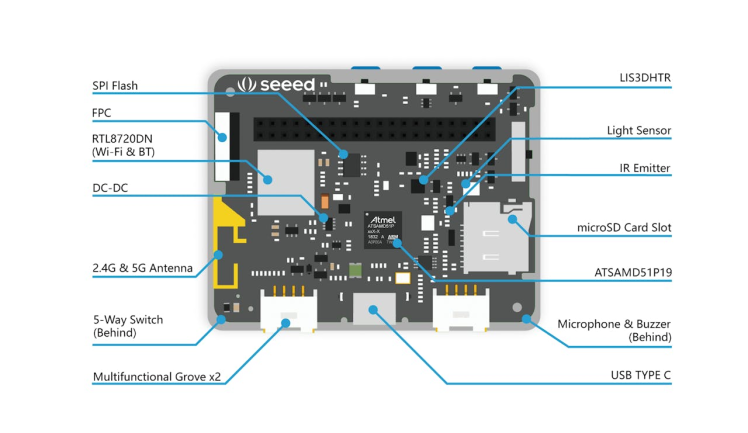
- Processor: ATSAMD51P19 ARM Cortex‑M4F running at 120 MHz (boostable to 200 MHz)
- Memory: 512 KB flash, 192 KB RAM, plus 4 MB external flash
- Wireless: Realtek RTL8720DN module supporting dual‑band Wi‑Fi (2.4G/5G) and Bluetooth 5.0
- Display: 2.4‑inch LCD (320×240 resolution) driven by
TFT_eSPI - Light sensor (400–1050 nm range)
- Microphone (1.0V–10V, −42 dB sensitivity)
- LIS3DH accelerometer (IMU)
- Infrared emitter (940 nm)
- Audio: Built‑in buzzer/speaker (~78 dB @10 cm, 4000 Hz)
- 3 user buttons (A, B, C)
- 5‑way joystick switch
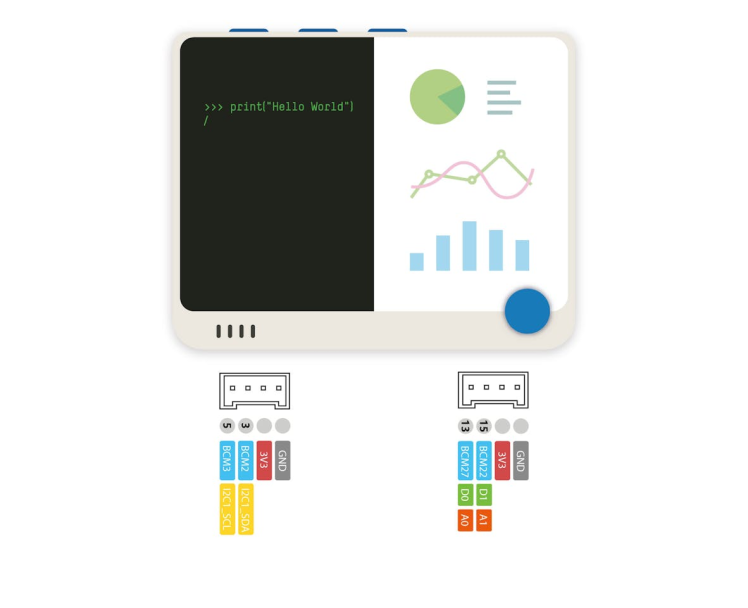
- 40‑pin Raspberry Pi‑compatible GPIO header
- 2 Grove connectors for Seeed’s Grove ecosystem
- Storage: microSD card slot for logging or media
- Connectivity: USB‑C port for programming and power
- 📡 Wi‑Fi Server: Runs on port 80, serving HTML and JSON endpoints.
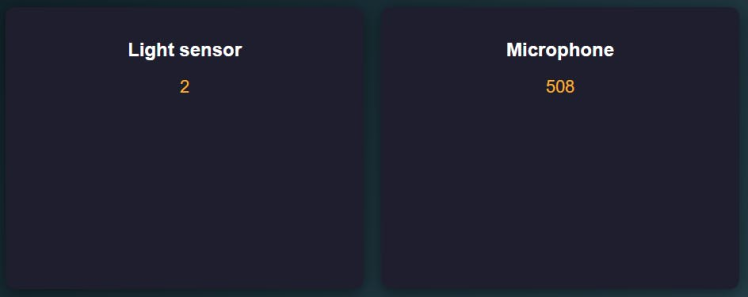
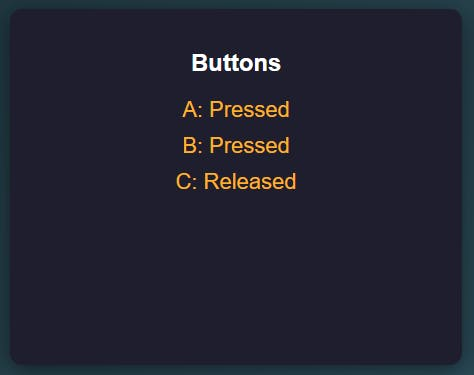
- 🎛️ Live Dashboard: Displays light sensor, microphone values, and button states.
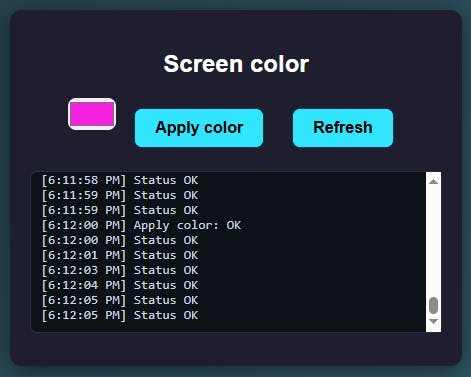
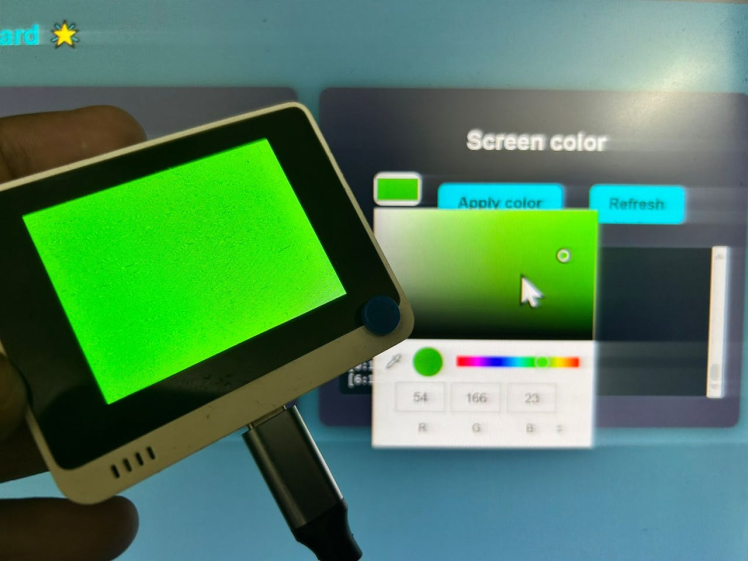
- 🎨 Screen Control: Pick a color in the browser, apply instantly to the TFT.
- 📝 Debug Logs: Both Serial and browser logs for transparency.
- 💻 Responsive UI: CSS grid layout adapts to mobile and desktop.
- Hardware: Wio Terminal (with built‑in sensors and TFT).
- Libraries:
rpcWiFi+WiFiServer→ NetworkingArduinoJson→ JSON serialization/deserializationTFT_eSPI→ TFT display control
The embedded HTML defines a modern, card‑based layout with CSS animations. Each card shows a sensor or control:
- Light sensor →
analogRead(WIO_LIGHT) - Microphone →
analogRead(WIO_MIC) - Buttons A/B/C →
digitalRead(WIO_KEY_X) - Screen color →
<input type="color">+ Apply/Refresh buttons
JavaScript polls /status every second and updates values. Color picker values are converted from #RRGGBB to RGB565 before POSTing to /screen.
JSON Status Endpoint:
String jsonStatus() {
  StaticJsonDocument<256> doc;
  doc["light"] = analogRead(WIO_LIGHT);
  doc["mic"]   = analogRead(WIO_MIC);
  JsonObject btn = doc.createNestedObject("buttons");
  btn["A"] = (digitalRead(WIO_KEY_A) == LOW);
  btn["B"] = (digitalRead(WIO_KEY_B) == LOW);
  btn["C"] = (digitalRead(WIO_KEY_C) == LOW);
  String out; serializeJson(doc, out);
  return out;
}
Apply Screen Color
bool applyScreenColorFromJson(const String& body) {
  StaticJsonDocument<128> doc;
  if (deserializeJson(doc, body)) return false;
  uint16_t c = doc["color565"];
  tft.fillScreen(c);
  return true;
}- Install libraries (
ArduinoJson,TFT_eSPI). - Update Wi‑Fi credentials in the sketch.
Here is the complete code:
#include <rpcWiFi.h>
#include <WiFiServer.h>
#include <ArduinoJson.h>
#include <TFT_eSPI.h>
const char* ssid = "";
const char* password = "";
WiFiServer server(80);
// TFT
TFT_eSPI tft;
uint16_t screenColor = TFT_BLACK;
// Debug helpers
void dbg(const String& s){ Serial.println(s); }
void dbgKV(const String& k,const String& v){ Serial.print("[dbg] ");Serial.print(k);Serial.print(": ");Serial.println(v); }
// HTML dashboard with screen color control
const char index_html[] PROGMEM = R"HTML(
<!DOCTYPE html>
<html lang="en">
<head>
<meta charset="UTF-8">
<title>Wio Terminal Dashboard</title>
<meta name="viewport" content="width=device-width, initial-scale=1">
<style>
body {
margin:0; font-family:Arial, sans-serif;
background:linear-gradient(135deg,#0f2027,#203a43,#2c5364);
color:#fff; text-align:center;
}
h1 { margin:20px; font-size:28px; color:#00e5ff; }
.grid { display:grid; gap:16px; grid-template-columns:repeat(auto-fit,minmax(280px,1fr)); padding:16px; }
.card {
background:#1e1e2f; border-radius:12px; padding:20px;
width:90%; margin:0 auto; max-width:520px; box-shadow:0 4px 20px rgba(0,0,0,.5);
animation: fadeIn 0.6s ease;
}
@keyframes fadeIn { from{opacity:0; transform:translateY(10px);} to{opacity:1; transform:translateY(0);} }
.value { font-size:22px; margin:10px 0; color:#ffb300; }
.btn { display:inline-block; margin:10px; padding:10px 20px; border-radius:8px;
background:#00e5ff; color:#000; font-weight:bold; cursor:pointer; transition:.2s; border:1px solid #273245;
}
.btn:hover { background:#7c4dff; color:#fff; }
.row { display:flex; gap:8px; flex-wrap:wrap; justify-content:center; }
input[type="color"] { width:48px; height:32px; padding:0; border:none; border-radius:8px; }
pre.log { text-align:left; background:#0d1218; border:1px solid #273245; border-radius:8px; padding:10px; height:140px; overflow:auto; color:#cbd5e1; }
</style>
</head>
<body>
<h1>🌟 Wio Terminal Live Dashboard 🌟</h1>
<div >
<div >
<h2>Light sensor</h2>
<div id="light">--</div>
</div>
<div >
<h2>Microphone</h2>
<div id="mic">--</div>
</div>
<div >
<h2>Buttons</h2>
<div id="btnA">A: --</div>
<div id="btnB">B: --</div>
<div id="btnC">C: --</div>
</div>
<div >
<h2>Screen color</h2>
<div >
<input id="screenColor" type="color" value="#000000">
<div onclick="applyColor()">Apply color</div>
<div onclick="refresh()">Refresh</div>
</div>
<pre id="log"></pre>
</div>
</div>
<script>
const logBox = document.getElementById('log');
function log(m){ const t=new Date().toLocaleTimeString(); logBox.textContent += `[${t}] ${m}n`; logBox.scrollTop = logBox.scrollHeight; }
// Convert hex (#RRGGBB) to RGB565 (uint16)
function hexToRgb565(hex){
const r = parseInt(hex.substr(1,2), 16);
const g = parseInt(hex.substr(3,2), 16);
const b = parseInt(hex.substr(5,2), 16);
return ((r & 0xF8) << 8) | ((g & 0xFC) << 3) | (b >> 3);
}
async function refresh(){
try{
const res = await fetch('/status');
const j = await res.json();
document.getElementById('light').textContent = j.light;
document.getElementById('mic').textContent = j.mic;
document.getElementById('btnA').textContent = "A: " + (j.buttons.A ? "Pressed" : "Released");
document.getElementById('btnB').textContent = "B: " + (j.buttons.B ? "Pressed" : "Released");
document.getElementById('btnC').textContent = "C: " + (j.buttons.C ? "Pressed" : "Released");
log('Status OK');
}catch(e){
log('Status error: ' + e);
}
}
async function applyColor(){
const hex = document.getElementById('screenColor').value;
const c565 = hexToRgb565(hex);
try{
const res = await fetch('/screen', {
method:'POST',
headers:{'Content-Type':'application/json'},
body: JSON.stringify({ color565: c565 })
});
const j = await res.json();
log('Apply color: ' + (j.ok ? 'OK' : 'Failed'));
}catch(e){
log('Apply error: ' + e);
}
}
setInterval(refresh, 1000);
refresh();
log('Dashboard ready');
</script>
</body>
</html>
)HTML";
// Serve JSON status
String jsonStatus() {
StaticJsonDocument<256> doc;
doc["light"] = analogRead(WIO_LIGHT);
doc["mic"] = analogRead(WIO_MIC);
JsonObject btn = doc.createNestedObject("buttons");
btn["A"] = (digitalRead(WIO_KEY_A) == LOW);
btn["B"] = (digitalRead(WIO_KEY_B) == LOW);
btn["C"] = (digitalRead(WIO_KEY_C) == LOW);
String out;
serializeJson(doc, out);
return out;
}
// Helpers to send responses
void sendHtml(WiFiClient &client, const char* html) {
client.print("HTTP/1.1 200 OKrnContent-Type: text/htmlrnConnection: closernrn");
client.print(html);
}
void sendJson(WiFiClient &client, const String &json) {
client.print("HTTP/1.1 200 OKrnContent-Type: application/jsonrnConnection: closernrn");
client.print(json);
}
// Apply screen color (RGB565)
bool applyScreenColorFromJson(const String& body) {
StaticJsonDocument<128> doc;
DeserializationError err = deserializeJson(doc, body);
if (err) { dbgKV("screen_json_err", String(err.c_str())); return false; }
if (!doc.containsKey("color565")) return false;
uint16_t c = doc["color565"];
screenColor = c;
tft.fillScreen(screenColor); // apply color
dbgKV("screen_color565", String(screenColor));
return true;
}
void setup() {
Serial.begin(115200);
dbg("[setup] Boot");
// Inputs
pinMode(WIO_LIGHT, INPUT);
pinMode(WIO_MIC, INPUT);
pinMode(WIO_KEY_A, INPUT);
pinMode(WIO_KEY_B, INPUT);
pinMode(WIO_KEY_C, INPUT);
// TFT init
tft.begin();
tft.setRotation(3);
tft.fillScreen(screenColor);
// WiFi
WiFi.begin(ssid, password);
Serial.print("[WiFi] Connecting");
while (WiFi.status() != WL_CONNECTED) {
delay(500);
Serial.print(".");
}
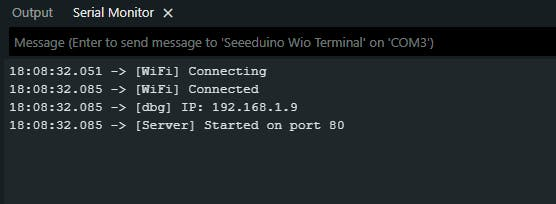
Serial.println("n[WiFi] Connected");
dbgKV("IP", WiFi.localIP().toString());
server.begin();
dbg("[Server] Started on port 80");
}
void loop() {
WiFiClient client = server.available();
if (!client) return;
dbg("[client] connected");
// Wait briefly for data
unsigned long t0 = millis();
while (!client.available() && millis() - t0 < 1000) { delay(1); }
if (!client.available()) { dbg("[warn] no data; closing"); return; }
String reqLine = client.readStringUntil('n');
reqLine.trim();
dbgKV("request", reqLine);
// Read headers; parse Content-Length for POST
int contentLength = 0;
while (client.connected()) {
String line = client.readStringUntil('n');
line.trim();
if (line.length() == 0) break;
dbgKV("hdr", line);
if (line.startsWith("Content-Length:")) {
String v = line.substring(15); v.trim(); contentLength = v.toInt();
dbgKV("Content-Length", String(contentLength));
}
}
if (reqLine.startsWith("GET /status")) {
String js = jsonStatus();
sendJson(client, js);
}
else if (reqLine.startsWith("POST /screen")) {
// Read body
String body = "";
while ((int)body.length() < contentLength) {
if (client.available()) body += (char)client.read();
}
dbgKV("screen_body", body);
bool ok = applyScreenColorFromJson(body);
StaticJsonDocument<64> resp; resp["ok"] = ok;
String out; serializeJson(resp, out);
sendJson(client, out);
}
else if (reqLine.startsWith("GET /favicon.ico")) {
client.print("HTTP/1.1 200 OKrnContent-Type: image/x-iconrnConnection: closernrn");
}
else if (reqLine.startsWith("GET /") || reqLine.startsWith("GET /index.html")) {
sendHtml(client, index_html);
}
else {
client.print("HTTP/1.1 404 Not FoundrnContent-Type: text/plainrnConnection: closernrnNot found");
}
dbg("[client] done");
}- Upload code via Arduino IDE.

- Open Serial Monitor → note IP address.
- Now you can open up the IP Address, and you can play around the tool.
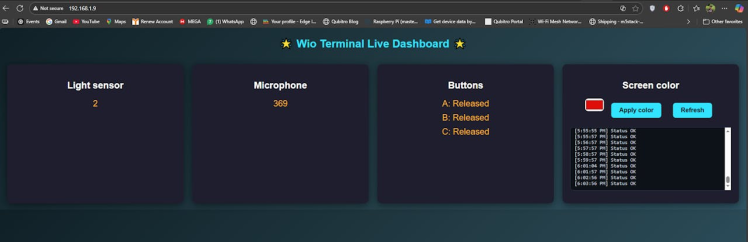
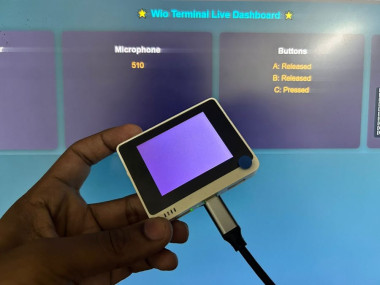
Once connected, you’ll see a gradient background dashboard with animated cards.
- Light and mic values update every second.
- Button states toggle between “Pressed” and “Released.”
- Pick a color → click Apply → the TFT instantly changes and logs show every action with timestamps.
- Add charts (using Chart.js) for sensor trends.
- Use WebSockets for real‑time push updates.
- Secure endpoints with a simple token.
- Extend dashboard with more sensors (temperature, accelerometer).
This project demonstrates how the Wio Terminal can serve as a self‑contained IoT dashboard, blending embedded C++ with modern web design. It’s perfect for classroom demos, maker projects, or prototyping IoT interfaces.
Credits
Related products


Leave your feedback...