
Bluz Wireless Temperature Sensor

Made by gusgonnet
About the project
Add that much needed remote temperature sensor wherever you want, no wall outlet required.
Items used in this project
Hardware components


Story
I recently needed to add a remote temperature sensor to my Minimalist Thermostat and I decided to make it with a Bluz Development Kit (Bluz DK from now on).
What are we going to build here?
We are going to build a low power, BLE (Bluetooth Low Energy) remote temperature sensor connected to the internet so we can access its reading from anywhere.
So, what is bluz?
From their site:
Bluz is a development kit that acts like an Arduino, but has Bluetooth Low Energy (BLE) communication built-in. With this BLE connection, the device can talk to the Particle cloud, a service that allows you to access your hardware anywhere in the world through a REST API. You can call functions, get variables, publish or subscribe to events, trigger webhooks, and even program it over the air through a Web IDE.
Bluz is perfect for wireless applications that require long battery life. Because it uses BLE, bluz can last for months or years on a coin cell battery, all while staying connected to the cloud and fully accessible.
Bluz is programmed with Wiring, the same language used in Arduino, so it will feel familiar to many compatible development kits.
Architecture
This is how the Bluz DK and the Bluz Gateway interact with the Particle Cloud:
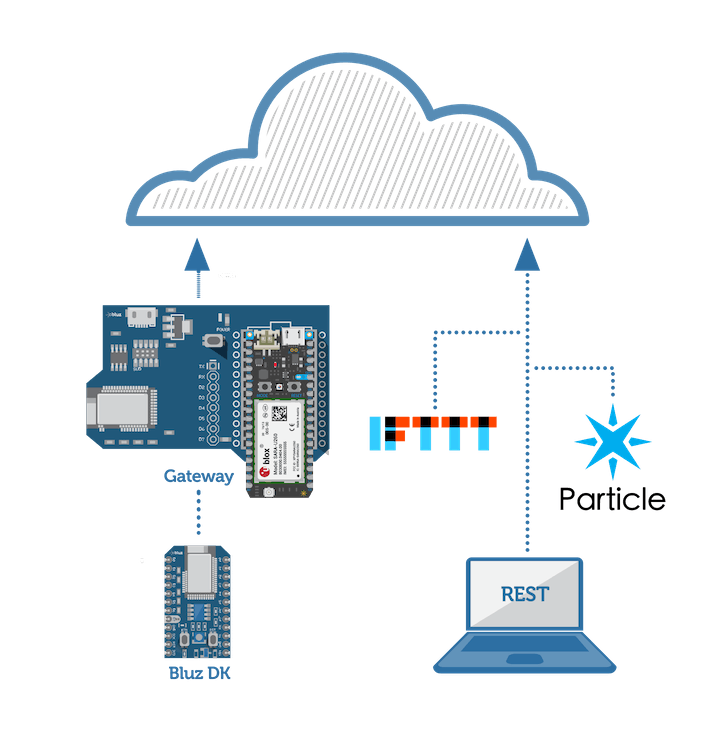 Bluz uses a BLE to WiFi or cellular gateway to connect to the Particle Cloud
Pic source: http://docs.bluz.io/tutorials/gateway_dk_interactions/
In this picture above there is a Particle Electron used in the gateway, which brings cellular connectivity to a Bluz DK. However in my project I've used a Particle Photon, which brings WiFi connectivity instead of cellular.
There are plenty of options for a bluz gateway:
- a gateway shield with a Particle Photon (Wifi) (here)
- a gateway shield with a Particle Electron (cellular)
- a gateway in an usb dongle (here)
- a linux gateway, raspberry pi or C.H.I.P (here)
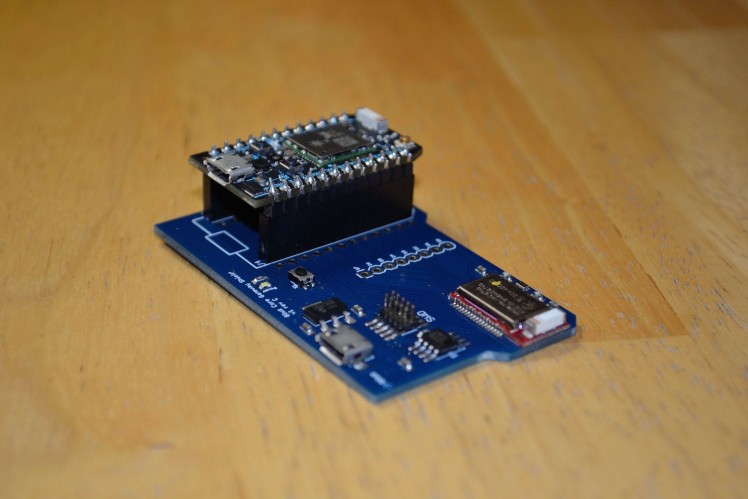 1 / 4 • the gateway shield
Setting up the microcontrollers
First you would need to setup your Bluz DK according to the getting started documentation here. For setting up your gateway shield, please find the docs here.
You would also need to setup your Particle Photon as per the Particle Guides here.
My advice here would be to deal with flashing firmware on the bluz DK FIRST by using your phone as a BLE gateway with the Bluz app all the while leaving the gateway shield OFF. Flashing firmware via your phone will be much, much faster than via the gateway shield (although it can be done). The app for iOS is here and the one for Android is here. See setup 1 in the picture below.
ONLY once you got the bluz DK flashed, you can move ahead, power up the gateway shield (with the photon in it) and flash the photon with the gateway code as explained here. See setup 2 in the picture below.
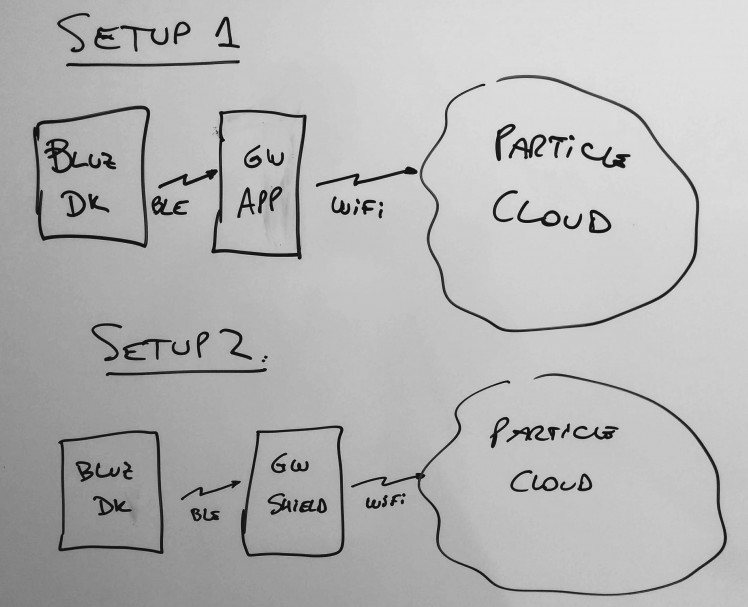 Use setup 1 for flashing firmware to your Bluz DK
You can find this project's code to flash in your bluz DK in the Code section below.
Side note: differences between bluz and the Photon
From their site:
Bluz is meant to have the same footprint as the Core/Photon, therefore it can be used with existing shields and accessories. However, there are a few notable differences:
- A6 and A7 cannot read analog data even though they are still labeled A6 and A7 (which was done for compatible code). There simple weren't enough ADC pins on the nrf51.
- The ADC on bluz is 10-bit, while it is 12-bit on the Photon. This means a value of 0-1023 will be returned instead of 0-4095. This may require code or math changes for libraries or devices that use the ADC.
- The pin between RST and GND is used here for SWD programming. On the Photon, this is VBAT while on the Core it is 3.3V*.
- PWM is not limited to specific pins, however it can only be enabled on 4 at a time.
- The RGB LED does not "breathe", it blinks. There simply aren't enough PWM capable pins (there would have only been one left for the user).
- While the defaults for SPI, UART, and I2C are the same as the Core/Photon, they can be reconfigured to any pins.
- Total current draw across all pins should not exceed 15mA.
- There is no USB connector, all programming must be done wirelessly, or alternatively through UART, and the device must be powered directly to the pins.
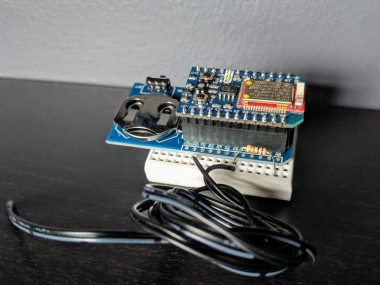
Connecting the temperature sensor
You need to wire the thermistor and the pull up resistor like this:
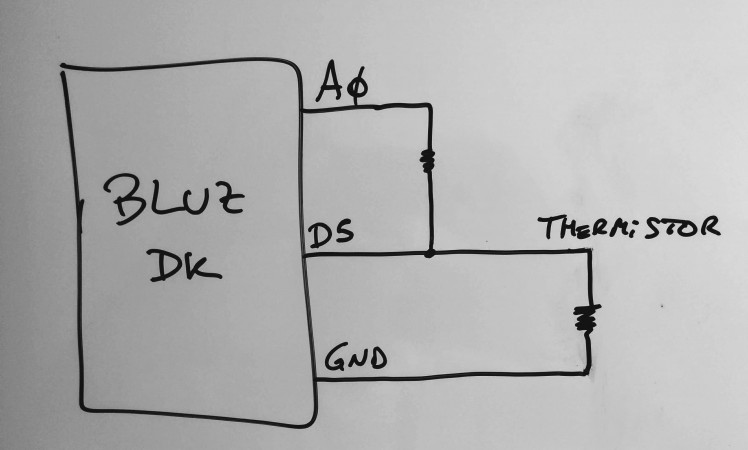 Wiring your sensor to the Bluz DK
I connected them all by inserting the bluz DK into the bluz Battery Shield. Then I placed this combo on my breadboard:
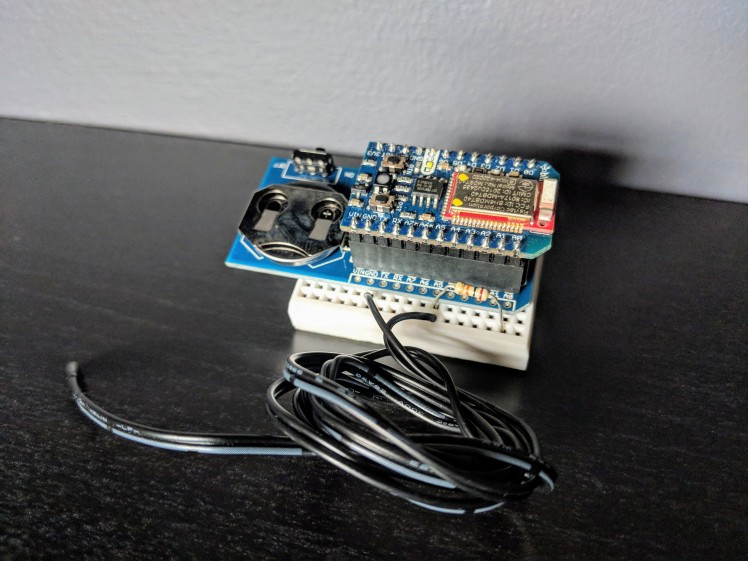 Connect the sensor
You may notice that I connected the pull up resistor to A0 and not to 3V3. This is so the sensor is only powered when we want to measure the temperature.
Note: while developing this project, you might want to save the battery for later and connect a 5V power supply directly to the Gnd and Vin pins in the bluz DK.
Notes about the firmware
If you go through the code (find it in the Code section below) you will notice few things:
- the temperature is not sent to the cloud if the delta (the variation) with the previous reported value is smaller than 0.5 degrees Celsius
- the temperature is sent to the cloud in intervals of 20 minutes
- there is a cloud function that can return you the temperature at that moment
You can learn more about cloud functions here.
Accessing the readings
Now we need a way to access the temperature readings. One way to do this is from the Particle Console, where we can see if the bluz DK is connected, read the temperature variable, etc. Learn more about the Particle Console here.
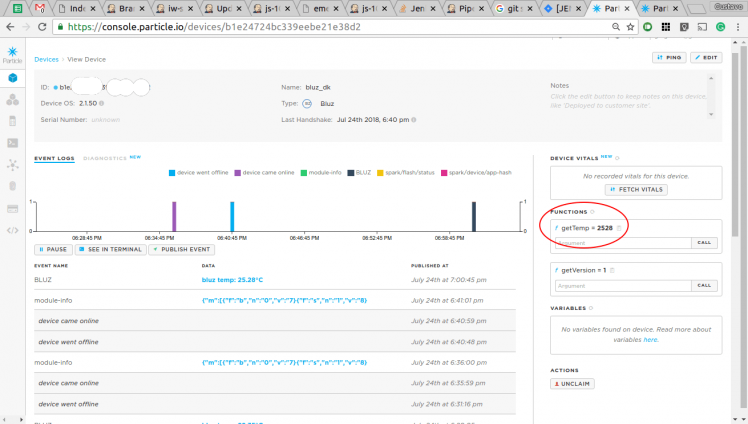 checking the temperature via the Particle Console
See the red circle? Well, that is the temperature multiplied by 100 since the cloud functions in Particle can only return integers.
I'm working on other, more convenient visualization options (most probably Blynk), so stay tuned.
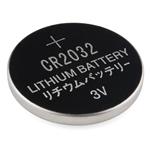
Running on a coin cell battery
I installed this project and ran it for a week on a cheap 2032 from the dollar store, so I consider myself lucky if that battery came with 50% of the promised capacity. That's fine, I think it could run for a month on a 5V battery pack. We'll see.
From the bluz docs:
While CR2032 batteries are convenient, cheap, and small, they also have some drawbacks that should be noted.
A typical CR2032 runs at 3V and has about 200-240 mAh of capacity. However, this can be negatively affected and the battery life reduced if the battery is subjected to adverse conditions. Notably, high current draw can significantly reduce the life of a CR2032 battery.
Typically, a battery is rated at it's highest capacity at a nominal current draw, which depending on the manufacturer, is usually around 0.25 mA. Pulsing the battery quickly with higher current can affect this overall capacity. Even worse, sustained current drawn over a long period of time can quickly wear down a CR2032.
More info on the battery duration can be found here.
I think there are a ton of low power optimizations one could do to the firmware and some are listed here.
Troubleshooting
So many things here can go wrong. Be patient and post where you are stuck in the comments below. I'll do my best to help.
If not, the bluz community is here and the Particle community is here.
Final notes
If this sensor can run on a sub-quality coin cell battery for a week, all the while reporting the temperature to the cloud every 20 minutes, then I can't wait to put a decent battery in it.
Now for the sensor, I do recommend using this as a simple learning project, since the thermistor can be a little bit inaccurate. Better sensors are out there and perhaps I would use a digital sensor like the DS18B20.
Update
If you want to run this sensor with a Blynk app, check this project out.
Need help?
If you require professional help with your projects, don't hesitate to write me a line about your needs at gusgonnet@gmail.com. Thank you!
Check the rest of my projects here!
Schematics, diagrams and documents
Code
Credits
Related products


Leave your feedback...