
Beer Brewery – Powered By A Raspberry-pi

Made by RetroAndGaming / Food & Drinks
About the project
Man invented beer. About 7000 years later I invented this brewery powered by a Raspberry-pi. If you are looking to build your own brewery, upgrade your existing one or just interested in the topic I hope this project can give you some insight and spark your tinkering-flame.
Project info
Difficulty: Moderate
Platforms: Raspberry Pi, Python
Estimated time: 1 week
License: GNU General Public License, version 3 or later (GPL3+)
Items used in this project
Hardware components


View all
Story
Disclaimer
This writeup is not intended as a «this is how you do it» but rather to show how it can be done and some considerations that were made. Join me when I explain how I built my own beer brewery from «off the shelf» parts.
#diy #raspberrypi #beer #brewery #ssr #python #chugger #blichmann #autosparge #ds18b20
Introduction
I started actively brewing with a Speidel Brewmeister (BM) in 2014. As the 20-litre version of the BM has its limitations, especially with regards to how much grain you can use in a recipe, it inevitably came to the point where I wanted and needed to upgrade.
At this point my growing tinkering interest combined with my former professional career as a programmer made me think: Why don’t I just build this myself, the way I want it and maybe have some fun in the process?
Before continuing the read I would recommend to view the tour of my brewery on my Youtube channel. Often a movie tells the story better than a million words would:
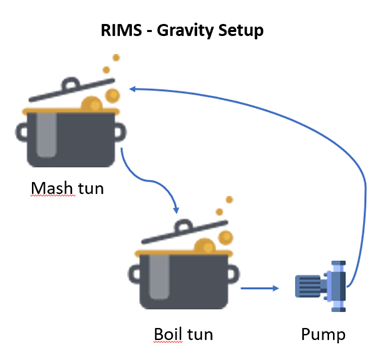
The concept:
The brewery concept is what is known as a RIMS (Recirculation Infusion Mash System). http://brewwiki.com/index.php/Recirculating_infusion_mash_system_(RIMS)
My system also utilizes gravity so that only one pump is needed whereas two would be needed if the tuns were situated on the same level.
The basic of brewing
To enable the readers that are not already well known with the beer brewing process to more easily follow along we need to quickly explain the three steps of the beer brewing process.
Mashing (typically one hour)
The process where heated water and crushed grains are mixed with the purpose of extracting the sugar and flavours from the grain. The result is a liquid full of sugar with a malty flavour which is called wort.
Boiling (typically one – one and a half hour)
The process where the wort is boiled to concentrate, sanitize and boil of any off flavours. Hops are added during this step to add bitterness, flavour, aroma and make the beer last longer.
Fermentation (typically two weeks to several months)
Once the boiled wort is cooled down the yeast is added. The goal is for the yeast to eat the sugar and produce alcohol. Effectively transforming the wort to beer. Like magic!
The process in more detail
The boil kettle heats the water for the mash tun. During mashing the wort constantly circulates between the boil tun and the mash tun. The heating element in the boil tun is controlled by the Raspberry-pi ensuring the correct temperature during mashing. A Blichmann AutoSparge mechanically ensures that the mash tun maintains the correct level of liquid. Meaning that it does not overflow and that the boil kettle is not drained empty exposing the heating element. Gravity pulls the wort back from the mash tun into the boil tun ensuring that you only need one pump in this setup to circulate between the two tuns. Once the mashing is complete the pump stops, and the wort drains back to the boil tun by itself. The mash tun is then disconnected and the wort is boiled, hops are added and finally once the boil is over, the wort is cooled and then drained from the boil tun to the fermentation buckets. Yeast is added and the fermentation buckets are set aside in a temperature-controlled environment to ferment. Once fermentation is done the beer is either kegged or bottled for later consumption.
The controller
The Raspberry Pi runs a custom Python program where you can input the recipe as a set of steps where each step has a duration and a specific temperature. The countdown for a given step starts when the target temperature for that step is reached. In addition, the step also specifies if the pump should be running or not (used during mashing) and if the step needs user verification before it starts. The latter is used on the first step to basically prompt the user if the water has been added to the tun before heating is turned on for the first time and at the first mash step to ensure that the grains are added to the mash tun before continuing.

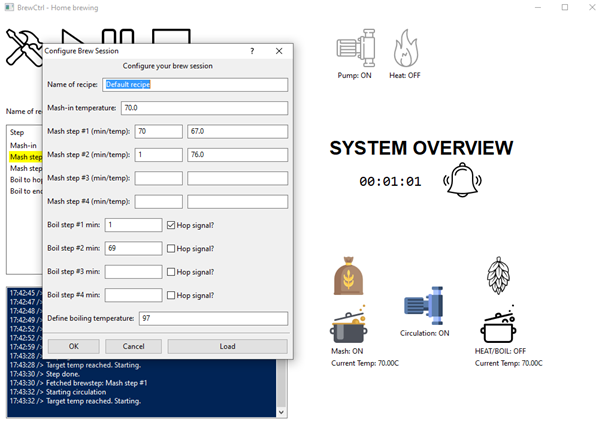
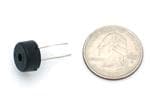
When specifying the recipe, you can also specify a “hop signal” for a boil step. This means that the system will make a beeping sound when the hop should be added. Since the boiling temperature of water (or wort) depends on what elevation your brewery is at and the current atmospheric pressure you can define the boiling temperature. If one only assumed e.g., 100 degrees Celsius then in my case the boil step would never initiate as the wort never reaches 100 degrees and the recipe would never finish. In my brewhouse the wort boils at about 97-98 degrees so I have set the defined boiling temperature to 97.
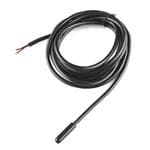
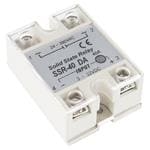
The raspberry-pi reads the temperature from a sensor (ds18b20) in the boil tun and a sensor in the mash tun. The mash tun sensor is just for display purposes as the information is not acted upon. The temperature in the boil tun however is monitored and actively used to control the heating element in the boil tun to ensure we reach the given step’s target temperature. The heating element 220V is controlled by the Raspberry-pi via one of the two solid state relays (SSR). A solid-state relay is just a contraption that lets you control (on/off) high voltage equipment using a low voltage signal (3.3 or 5 volts).
The second SSR is used by the Raspberry-pi to turn the pump on for the steps that needs circulation (mashing) and off otherwise.
 ,
,
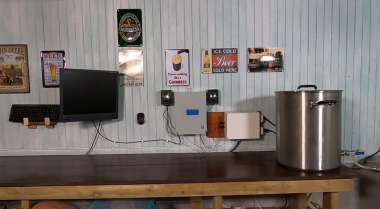
The SSR’s are connected directly to the Raspberry-pi (red and black wires on the right) and the ds18b20 sensors are connected in serial via a prototype board on the left hand side. The case is just a reused controller box from my previous ground water pump system which has been replaced with a newer one. Any case will do ?
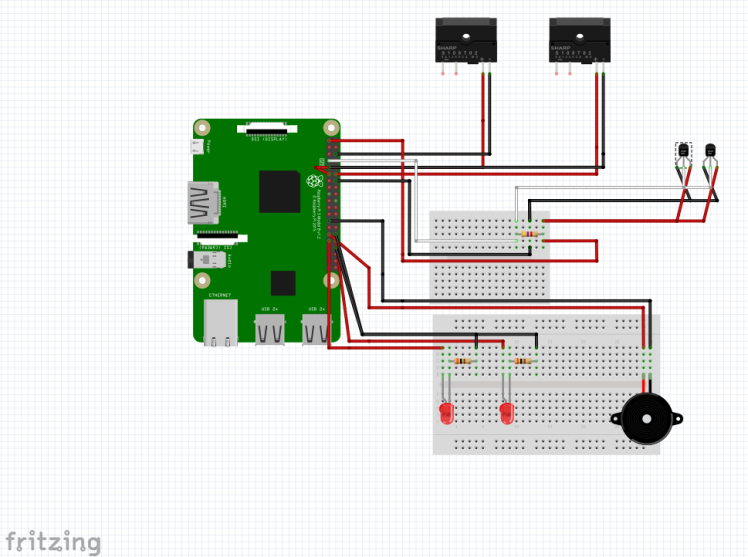
The wire diagram above shows the SSRs at the top, the temperature sensors in the middle to the right and some activity led lights (optional) in the bottom left. A piezo buzzer is used to play a signal when hops should be added based on the hop signals in the recipe.
Safety considerations where made:
Note: The reason we monitor the boil tun and act on the temperature readings here is because we can get a stuck mash causing the circulation to stop. If we instead had monitored the mash tun temperature (or somewhere in-line) and got a stuck mash the temperature in the mash tun would continue to decrease but the system would keep the heating element in the boil tun running (on) to try to increase the temperature in the mash tun causing it to avertedly boil the wort in the boil tun. Monitoring the boil tun thus ensures that even though we get a stuck mash it will only be kept at the target temperature and not boiled and potentially even boiled dry exposing the heating element.
Note: The blichman autosparge ensures that we do not overflow the mash tun or drain the boil tun during normal operation and even if we should get a stuck mash. This is an important feature of this setup as the pump is continuously running and without this mechanical solution to keep the correct level in the mash tun it would be very hard to dial in the system for regular use and also ensure catastrophe if you indeed get a stuck mash.
Final thoughts:
The control setup itself with two SSR’s and two temperature sensors is a fairly easy build. The time-consuming part was to construct the ~2500 lines of code that controls the process based on an recipe as input. The reader should be aware that there are other software solutions out there that is more production ready and user friendly to setup like e.g. Craftbeerpi (http://web.craftbeerpi.com/).
So, why make my own? The reason is that most brewing control software is system centric (turn on that pump, that heating element, open/close that valve etc.). I wanted a recipe centric system where I just input the recipe and the recipe then inherently controls the whole system. At the time I started this project in 2018 this was not the focus of other open-source solutions I found but this might have changed. Either way, one of the goals for me personally was to create the controller software myself just the way I wanted it. If you want to take my code for a ride you are welcome and for personal use it is made available for free here:
https://dev.azure.com/garageinnovation/BrewCtrl
Note: To be able to setup the code you will have to have knowledge about how to setup a pi with raspbian, how to setup Python and wxPython and probably also some coding skills for debugging your setup. Next step for the software will be to move away from wxPython and to the Qt framework. The reason being that wxPython has become notorious for constantly breaking backwards compatibility whenever a new version comes along.
Note: I often get asked about if the code use a PID controller or if it just simply turns the heating on and off based on the current temperature. When testing the setup, it quickly turned out that a PID controller wasn’t needed because of the large volume of liquid in this setup. Basically, heating that much water/wort is slow and when the system hits a specified temperature, and the heating element is turned off the temperature is off by +1 degrees at the most. This is acceptable and to add the complexity of a PID controller to ensure that one never exceeds the target temperature by a maximum of +1 degree seemed a bit overkill. A smaller system or a system with a much larger heating element would probably benefit from a PID controller though. And libraries are readily available in Python to do this if needed.
This project was previously featured at
· Tom’s Hardware back in 2020 after I initially posted about my setup on Reddit: https://www.tomshardware.com/news/raspberry-pi-brewing-project
· Reddit – my initial post about the project: https://www.reddit.com/r/raspberry_pi/comments/fw1t7q/beer_brewery_powered_by_raspberry_pi_3b/
Credits
RetroAndGaming
I like to tinker and code. If you want to view other projects head over to my YouTube channel: https://www.youtube.com/@retroandgaming
Related products


Leave your feedback...