
360 Vision System For Assistant Robot Based On Ricoh Theta V
Made by electrouser865 / Robotics
About the project
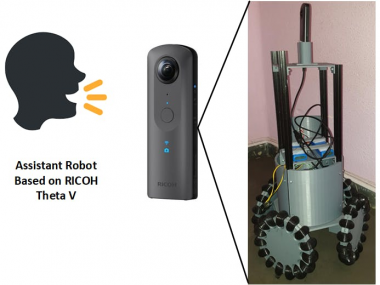
A robot with omnidirectional wheels, which is controlled using a Ricoh Theta V Camera and Snips.
Project info
Items used in this project
Hardware components


Story
Story
When working with assistant robots for the elderly, every pixel of an image counts. In today’s healthcare robotics, this type of camera is not built in, I really don’t know why it’s not done, but I think it’s an important tool for this type of robots. This is mainly because these robots are designed to monitor people who in some cases may suffer some kind of illness or disability. Equipping an assistant robot with a 360° vision will expand its reach and its ability to interact with the human being, as it allows it to detect faces, identify people, emotions and come to detect if the person has fallen.
The main objective of this project is to be able to implement a 360º vision to my assistant robot (Figure 1).
Figure 1, Assistant RobotThis robot was presented in the challenge using the voice wizard Snips (https://snips.ai/), for more information see this link: https://www.hackster.io/jarain78/human-interaction-robot-based-on-the-satellite-kit-platform-ae5906
This robot has a single wide-angle lens camera, which is located on the front of the robot. However, information is being lost from the sides and back, so the idea of using a 360º camera.
Researching thoroughly on the camera (Figure 2). I discovered that it is not only a camera to capture photos or video at 360º, but it is a very complete and interesting image capture system. The technical characteristics of the camera can be seen in the following link:
Ricoh Theta VProduct | RICOH THETA V
You can capture your entire surroundings with the simple press of the shutter button. Enjoy a new world of images you have never experienced before.
Figura 2. Ricoh Camera 360One of the features that most caught my attention was its processor, a Snapdragon 625 (Figure 3).
Figure 3, Snapdragon 625So, I wondered what I could do with this camera, use it to take photos, send them to a web service, analyse them and return the analysed information… mmmmm for me is to it’s a waste of power. That’s why it occurred to me to divide my idea into two parts, a first part (something simple) in which my robot uses the camera in a simple way. Using it as one more camera, so that my robot can have a global vision of its environment.
Part 1
To do this, it is necessary to take in mind that both the camera, the robot and the web service must be connected to the same network. The raspberry pi houses the voice assistant, communication system with IoT devices (in this case Rapid-IoT), engine control and, of course, communication with the camera, which will allow you to make the necessary requests. The information needed to communicate with the camera using an HTTP interface is described in the following link:
https://developers.theta360.com/en/docs/v2.1/api_reference/
Python 3 was used to make this access, using the “requests” library we were able to access the different services offered by the camera. Services as, information of the camera, previous images, among others. The diagram of this first part can be seen in Figure 4.
Figure 4, Main ProcessThe web service was built using Flask (http://flask.pocoo.org/), the process is very simple. The human activates the robot using the Snips activation word (hey snips), the robot using the camera captures an image, which is sent to the web service. The web service is in charge of analyzing the image, this analysis consists of determining the objects that surround it (using YOLO, https://pjreddie.com/darknet/yolo/) and at the same time detects if there are human faces. If this is true, the system identifies the person or persons and sends the names to the robot in text format which is then transformed into sound.
However, this challenge required the programming of a plug-in in Android, as the camera has this operating system within it. This is why the second part of this project is described below.
Part 2:
This second part was very interesting to do, since what I tried was to migrate all my assistant who has my robot to the camera. For this it was necessary to make some modifications to the robot and obviously program a plugin that would be able to incorporate Snips, control the robot, take pictures, etc…
Before starting the description of the steps to follow to be able to use the plug-in, it is necessary that our camera is in developer mode. To program the plug-in was used Android Studio (Figure 5), using this programming environment was created an apk (plug-in) that was then installed inside the camera.
Figure 5, Android StudioPlug-In Creation
Since the camera is not a Smartphone, but has almost the same features. It was necessary for the plugin to have access to the internet, to host the attendee and to have access to the microphone. To do this, it was necessary to give some permissions to the plugin and add the Snips repositories. These permissions are described below:
It is necessary to add permissions to control audio input, audio output, internet and storage. These is some permissions to AndroidManifest.xml:
<uses-permission android:name="android.permission.MODIFY_AUDIO_SETTINGS" />
<uses-permission android:name="android.permission.RECORD_AUDIO"/>
<uses-permission android:name="android.permission.READ_EXTERNAL_STORAGE"/>
<uses-permission android:name="android.permission.INTERNET" />
<uses-permission android:name="android.permission.WRITE_EXTERNAL_STORAGE" />
<uses-permission android:name="android.permission.PRIVATE_EXTERNAL_STORAGE" />
Instructions are added to the build.gradle in the dependencies section:
implementation 'org.theta4j:theta-web-api:1.2.2'
implementation 'com.github.felHR85:UsbSerial:6.0.6'
implementation 'com.theta360:pluginlibrary:2.0.0'
implementation fileTree(include: ['*.jar'], dir: 'libs')
implementation 'com.android.support:appcompat-v7:28.0.0'
implementation 'com.android.support.constraint:constraint-layout:1.1.3'
implementation 'org.tensorflow:tensorflow-android:1.7.0'
testImplementation 'junit:junit:4.12'
androidTestImplementation 'com.android.support.test:runner:1.0.2'
androidTestImplementation 'com.android.support.test.espresso:espresso-core:3.0.2'
implementation 'com.android.support:design:28.0.0'
The next step is to add maven repositories, as is the case with Snips and in the view of allprojectsàrepositories :
maven { url 'https://github.com/ricohapi/theta-plugin-library/raw/master/repository' }
maven {url "https://nexus-repository.snips.ai/repository/snips-maven-releases/"}
maven {url "https://nexus-repository.snips.ai/repository/snips-maven-snapshots/"}
maven { url "https://jitpack.io" }
With these steps we have given you the permissions for storage, internet access, audio and we have added the Snips repositories. (If you need more information on how to do this look at this link: https://docs.snips.ai/getting-started/quick-start-android).
The plug-in consists of four modules:
- Download the assistant from the web service.
- Assistant initialization.
- Connection with the robot through the serial port.
Download the assistant from the web service
Once you have granted the necessary permissions and added the repositories, the next step is to download the assistant. This assistant was developed using the Snips website (https://console.snips.ai/login), once done download the assistant (Fugura 6, 7, 8).
Figure 6, Snips Web Site Figure 7, Snips Assistant Figure 8, Download AssistantTo install flask in our Python environment we use this command: pip install flask. Once you have completed flask installation, download the assistant and move them to the “statics” folder on the web server (Figure 9). It was an interesting challenge, because by default the camera does not allow to paste files into it. For this reason, a web service was developed, which allows the camera to download the assistant in Zip formats.
Figure 9. Move Assistant to static folderThe next step is to connect our web service to the network generated by the camera, the plug-in internally does a sweep of IP addresses from 1 to 50. the moment it finds a valid address, in this case our web service, the camera starts downloading the assistant.zip. Now it is necessary to know our new IP address in order to launch our web service, to know our IP we use the following commands:
- Windows: ipconfig
- Linux/Mac: ifconfig
The next step is to launch the web service and depending on our IDE python (if it is pycharm we look for the terminal window and execute this command: python app.pyhost=our host and if Pycharm is not used from a terminal executes the same command).
One of the main characteristics of an assistant robot is the ability to interact with the human being, this interaction can be achieved through an LCD screen or in our case through voice. The robot uses the text2speech converter of Android to espeech with the user (code below). This allows the assistant to communicate with the user when performing the interaction.
private void init_text2speech() {    t1 = new TextToSpeech(getApplicationContext(), new TextToSpeech.OnInitListener() {    @Override    public void onInit(int status) {         if (status != TextToSpeech.ERROR) {             t1.setLanguage(Locale.US);             t1.setPitch((float) (0.1 / 100.0));         }     } });}

private void text2speech(String text) {    t1.speak(text, TextToSpeech.QUEUE_FLUSH, null, null);}
As the "Camera" is not just a "Camera" :), I have added face detection capability within the assistant. This detection will allow for future identification.
Figure 10, Face DetectionAssistant initialization:
Once the web service is executed, it’s time to connect our camera to the robot and since this plug-in is a bit particular and we want it to only be activated when the camera is connected to the robot. it’s necessary to give extra permission as shown in the Figure 11.
Giving permissions of phone, storage and audio capture . Figure 11, Automatic opening of the pug-inOnce the camera is connected to the robot, we will know that the plug-in has started correctly if led 3 (WiFi) turns yellow. At that time the camera starts downloading the wizard and stores and decompresses it in the download folder of the camera as shown in the Figure 12.
Figure 12, Assistant stored in the download folder.Up to this point everything is going well, we already have our assistant hosted in our camera, the next step is to make the camera can control the robot.
Connection with the robot through the serial port
To be able to control the robot, do several experiments with different development systems such as Arduino UNO, Arduino Mega 2560, M5STACK Fire, and TTGO ESP32 OLED. From these experiments I was able to determine that the only ones that worked correctly were the M5STACK Fire and the TTGO. The problem with M5STACK Fire is that it doesn’t have enough pins to control 4 engines, so use TTGO (Figure 13).
Figure 13, TTGO ESP32 OLED Figure 14, Robot CircuitThis device has a UART CP210x chip, in order for the camera to recognize the TTGO it is necessary to create an XML file called “device_filte.xml” as shown in Figure 15. This is the line of code that has to be placed inside this file:
[CP210X devices](http://www.silabs.com/products/mcu/pages/usbtouartbridgevcpdrivers.aspx) à <usb-device vendor-id="0x10C4" product-id="0xEA60" />
Once this is done, the next step is to make the construction and connection with the robot. It is important to emphasize that this plug-in is not a common plug-in, that is to say that a hardware is required in order for it to work properly.
At the same time a visualization system was developed within the same Flask server, this would allow the camera image to be visualized from anywhere (as a 360º surveillance system) using RICOH THETA API v2.1.
Robot construction:
The robot shown below is an evolution of the robot presented in part 1, this robot has 4 omnidirectional wheels designed by me. The structure is an aluminum conination and part printed in 3D, using PLA and Fila-Flex. The use of wheels will allow the robot to move in several directions, since when performing some experiments with the first version of the robot. The conclusion was reached that it was not worth having a 360º camera and a different robot. Also the robot has Arduino Mega 2560 as expansion card for the ESP32, two H bridges to control the motors and 4 motors of 6 Volts.
1 / 3 • Figure 16, Robot Part 1 1 / 2 • Figure 17, Connection between Esp32 and Arduino Mega Figure 18, Robot Part 2 Figure 19, Robot Part 3 Figure 20, Robot Part 4 Figure 21, Robot Part 5Video:
VideoGitHub repositorie:
jarain78/RICOH_THETA_Dream_Contest
Contribute to jarain78/RICOH_THETA_Dream_Contest development by creating an account on GitHub.
Color coding:
Led 3 WiFi symbol Yellow: the plugin has been started correctly.
Led 3 WiFi symbol Green: The activation word in this case is “hey snips” has been detected correctly.
Led 3 WiFi symbol Red: Error in the plugin
References
AN809.pdf
1676.51 KB
TN_100_USB_VID-PID_Guidelines.pdf
253.65 KB
5 Most Common Problems with Plug-in Store Submissionsplugin
It’s fun to build plug-ins and get feedback from photographers. To make your plug-ins available to everyone with a THETA V or Z1, you need to submit your plug-in to the RICOH THETA Plug-in Store. Although the submission process is documented nicely, there are several small things that may result in a rejection. Here’s the top five problems to look for when you submit your plug-in to the store. 1. Change Package Name of Plug-inIf you start with the official RICOH THETA Plug-in SDK or a plug-i…Schematics, diagrams and documents
CAD, enclosures and custom parts
Code
Credits
Related products


Leave your feedback...