
Transfer Data From Raspberry Pi Pico To Local Computer

Made by mahmood-m-shilleh
About the project
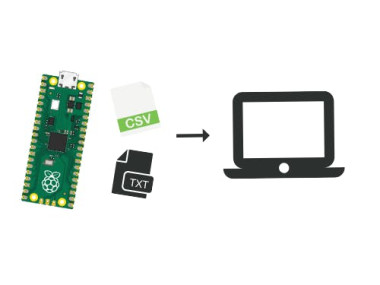
Learn how to write to files on your local computer so that you can save larger files using the Raspberry Pi Pico or Pico W in MicroPython.
Project info
Difficulty: Moderate
Platforms: MicroPython
Estimated time: 1 hour
License: GNU Lesser General Public License version 3 or later (LGPL3+)
Items used in this project

Story
Learn how to write to files on your local computer so that you can save larger files using the Raspberry Pi Pico or Pico W in MicroPython. By the end of this video, you will be able to write/save data on your machine, such as sensor data, without having to use any storage on your Pico! You can also use the same method in this video to write files from Pico to a Local PC! This has great applications for storing large amounts of data collected by your sensors. Best of all? It is super simple and only requires some Python code.
You can find the bme280 sensor I used in the video in our Shop.
Before getting started, please consider subscribing or supporting channel by donating in the link down below to allow us to produce more content!
Subscribe:
Support:
https://www.buymeacoffee.com/mmshilleh
Step 1-) Pip install the pyserial package on your desktopYou need this package to run the local Python script you need to communicate with the Pico.
You need Python on your local computer as a prerequisite.
Step 2-) Prepare Python Code on Local ComputerCreate a python script on your local PC and save it wherever you like. The script will have the following content
import serial

# Configure the serial connection
port = "/dev/cu.usbmodem1101"
baudrate = 115200
serial_connection = serial.Serial(port, baudrate)

# Open a file on your computer to write the received data
destination_file = open("/Users/mahmoodshilleh/Desktop/store_info.txt", "wb")

# Read and write data until the transfer is complete
while True:
    data = serial_connection.read(128)
    if data == b"EOF":
        break
    print(data)
    destination_file.write(data)

# Close the files and serial connection
destination_file.close()
serial_connection.close()
Some notes about this code:
- You need to replace the port with the port for your Pico. You can find this by using the Thonny IDE and looking at the bottom right corner to see the connection port.
- Baudrate does not need to be changed
- The destination file is the full path to the file you have on your local computer, you can change that based on your preference. You can simply create an empty file.
- You do not need to use 128 for the serial_connection read. This is just to specify the number of bytes the local computer accumulates before it writes the data to the file and prints it to the screen. The smaller the value the more frequently/faster it will write.
- I specified an exit condition in the if statement but I never used it. You can use if control to exit or else the serial communication will go indefinitely.
Save the file, and do not run until we set up the Micropython file on the Pico!
Step 3-) Prepare Micropython Code on PicoYou need to create a main.py file on the Pico to add the code. You may already have one. When using MicroPython, the main.py file is automatically executed on boot if it is present in the root directory of the Pico's file system. The reason we want to do this is that when we write code on the Pico with Thonny or another IDE, we actually establish a serial connection to the port in order to send the code over. We cannot, therefore, run the micropython script in Thonny in conjunction with running the Python script on our local computer since both are trying to access the same serial port at the same time, and you will get an error.
To combat this effect, we will write the code on the main.py file in Thonny and save it, followed by unplugging and replugging the Pico. That way, there will no longer be serial communication with the Pico from Thonny and it will automatically run the script upon being powered by your computer. Hope that makes sense. It is a bit of a bootstrap way to do things but it works very simply and nicely.
The code on your main.py file on your Pico is as follows:
import machine
from machine import I2C, Pin
import time
import uos

import bme280

# need this UART to read from BME and be able to send data to local computer
uart = machine.UART(0, baudrate=115200)
uart.init(115200, bits=8, parity=None, stop=1, tx=Pin(0), rx=Pin(1))
uos.dupterm(uart)
i2c=I2C(0, sda=Pin(0), scl=Pin(1), freq=400000)
bme = bme280.BME280(i2c=i2c)

while True:
    temperature, pressure, humidity = bme.read_compensated_data()
    print('{:.1f} C,{:.1f} %,{:.1f} hPa'.format(temperature/100, humidity/1024, pressure/25600))
    time.sleep(1)
Some notes about this code
- You only need the bme280 library if you are using the bme280 sensor, you can download this from the package manager in Thonny.
- We use machine library to interact with the Pico at the hardware level and uos to interact with the Pico’s operating system.
- Time is used to manage the intervals in the while loop.
- UART stands for Universal Asynchronous Receiver-Transmitter. It is a hardware communication interface that allows for serial communication between two devices. UART is commonly used for transmitting and receiving data between microcontrollers, embedded systems, and various peripheral devices. We need to configure some UART settings so that we can both read sensor values and transmit data over the serial port. Without this
initwe will run into sensor connection issues. - The print statement in the while loop attempts to print to the communication port, that is, it is the print statement that tries to send data to your local computer, this is the line you will need to change if you want to include other data. I would imagine most of you are using sensors/data different than Temperature, Pressure, and Humidity. You can edit the info on this line.
Save this on the Pico and unplug and plug it back to power on your computer. It should be executing the main.py file, but it is not writing to the file yet because you have not run the script on your local computer.
You can now run the script on your local computer as follows -> python <path to file> or python3 <path to file>
You should start to see print statements in the terminal or cmd depending on your OS. The file will start filling up with data forever unless there is an exit condition. You can exits with "control + c" in the terminal/cmd to stop the local while loop.
You can improve the code considerably. But I hoped this worked for you and that you got the gist of how to send data from serial communication. Also, note that you can send already existing files, it does not have to be real-time data. You can simply send any form of bytes over the communication channel!
This is a great backbone to do some cool work and projects. Hope it helped someone. More details and better explanations on my channel. Be sure to like, comment, and subscribe… stay tuned ;)
Credits
mahmood-m-shilleh
Mechanical and Software Engineering Background. University at Buffalo 2019 Texas A&M 2021 I make data pipelines for my day job. Outside of work, I participate in online communities regarding Full Stack Engineering, Microelectronics, and more. You can find more details about me on my Youtube Channel. https://www.youtube.com/@mmshilleh Feel free to reach out!
Related products


Leave your feedback...