

Soccer Scarf With Blinking Leds

Made by andyjoyce
About the project
An LED flashing scarf which uses an Adafruit Pro Trinket with a rechargeable Li-Po battery and an Ardunio microcontroller.
Project info
Difficulty: Easy
Estimated time: 1 hour
License: GNU General Public License, version 3 or later (GPL3+)
Items used in this project
Hardware components

View all
Story
Background
My friend is president of an FC Dallas (pro soccer) supporter group called the Dallas Guardians. That’s their official name but they have always been known as the Dallas Beer Guardians because the section they occupy in Toyota Stadium is the beer garden. Anyway, they are a very loud, rabid group of fans and they all have these scarves (see photo). So I thought about adding a bunch of twinkling LEDs to make this one stand out.

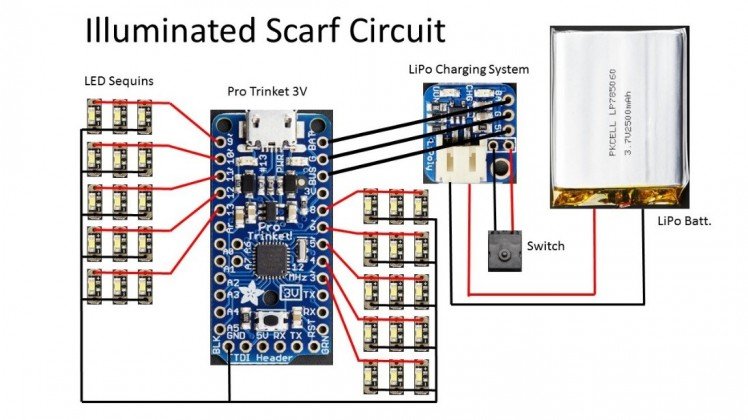
I decided to I wanted it to use an Adafruit Pro Trinket with a rechargeable Li-Po battery. For the LEDs I went with Adafruits LED sequins because they would be easy to solder to and be stitched to the scarf. The Pro Trinket has 10 digital I/O lines that can handle 15mA each. The LED sequins are about 5mA each, so I decided to put three sequins on each digital I/O line for a total of 30 LEDs. Here is what the wiring diagram looks like.
The scarf itself is 5 feet long and I wanted to distribute the LED sequins in somewhat random pattern. I decided I would put the Pro Trinket and battery in the center of the scarf and run half of the LEDs to the left and the other half to the right. I laid out my pattern by pinning the LEDs to a long piece of foam and then I started soldering.

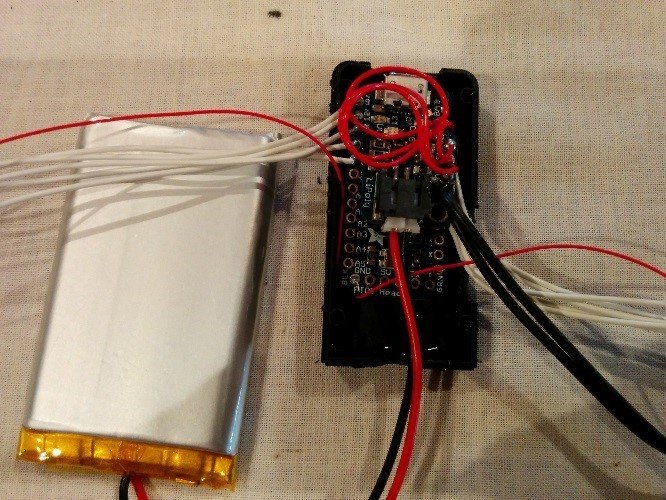
The Pro Trinket needed to go into a very small enclosure and when I first attached the charging system backpack to the Pro Trinket using a header I realized the overall thickness was going to be too much. So I took the backpack off and attached it to the Pro Trinket using some short wires. I added a piece of electrical tape to the bottom of the backpack and I was then able to set it directly on the Pro Trinket and fit it all into the enclosure.

Using the Arduino IDE I played around with simple programs to make the LEDs blink and I decided on a pattern where they would start off slowly blinking in a random pattern and then speed up until all of them are on at one time. I’m sure there are more efficient ways to write this code but I’m an amateur.
The Code
/*
Scarf_blink
Blinks the sequin LEDs repeatedly.
*/
- // the setup function runs once when you press reset or power the board
- void setup() {
- // initialize digital pin 13 as an output.
- pinMode(13, OUTPUT);
- pinMode(12, OUTPUT);
- pinMode(11, OUTPUT);
- pinMode(10, OUTPUT);
- pinMode(9, OUTPUT);
- pinMode(3, OUTPUT);
- pinMode(4, OUTPUT);
- pinMode(5, OUTPUT);
- pinMode(6, OUTPUT);
- pinMode(8, OUTPUT);
- }
- void loop (){
- //These are the functions that will run after loading the code. The number after the function name indicates the delay in miliseconds before the next function runs. In this example there are two different functions. The function
- //called scarfcycle runs through several cycles starting with a 500ms and repeats with shorter delays until the all-on function is called and runs for 1.5 seconds.
- scarfcycle(500);
- scarfcycle(200);
- scarfcycle(150);
- scarfcycle(125);
- scarfcycle(100);
- scarfcycle(75);
- scarfcycle(50);
- scarfcycle(20);
- scarfcycle(10);
- scarfcycle(5);
- scarfcycle(5);
- scarfcycle(5);
- scarfcycle(3);
- scarfcycle(2);
- scarfcycle(1);
- all_on(1500);
- }
- // this function defines the blink pattern for all of the LEDs
- void scarfcycle(uint8_t wait) {
- //digitalWrite(pin#,state) - The ProTrinket has 10 digital lines that can be turned on or off by using HIGH or LOW as the state. The pin# can be 3, 4, 5, 6, 8, 9, 10, 11, 12 or 13.
- digitalWrite(13, HIGH); // digitalWrite with "HIGH" turns on the LEDs attached to the pin
- delay(wait);
- digitalWrite(3, HIGH);
- delay(wait);
- digitalWrite(13, LOW); //digitalWrite with "LOW" turns off the LEDs attached to the pin
- //delay(wait);
- digitalWrite(11, HIGH);
- delay(wait);
- digitalWrite(5, HIGH);
- delay(wait); //by using "wait" in the parentheses the actual delay times will be specified when the functions are called above
- digitalWrite(3, LOW);
- //delay(wait);
- digitalWrite(9, HIGH);
- delay(wait);
- digitalWrite(8, HIGH);
- delay(wait);
- digitalWrite(11, LOW);
- //delay(wait);
- digitalWrite(12, HIGH);
- delay(wait);
- digitalWrite(10, HIGH);
- delay(wait);
- digitalWrite(5, LOW);
- //delay(wait);
- digitalWrite(6, HIGH);
- delay(wait);
- digitalWrite(4, HIGH);
- delay(wait);
- digitalWrite(9, LOW);
- //delay(wait);
- digitalWrite(13, HIGH);
- delay(wait);
- digitalWrite(3, HIGH);
- delay(wait);
- digitalWrite(8, LOW);
- //delay(wait);
- digitalWrite(11, HIGH);
- delay(wait);
- digitalWrite(5, HIGH);
- delay(wait);
- digitalWrite(10, LOW);
- //delay(wait);
- digitalWrite(9, HIGH);
- delay(wait);
- digitalWrite(8, HIGH);
- delay(wait);
- digitalWrite(12, LOW);
- //delay(wait);
- digitalWrite(6, LOW);
- //delay(wait);
- digitalWrite(4, LOW);
- //delay(wait);
- digitalWrite(3, LOW);
- }
- // this function turns all of the LEDs on at one time
- void all_on(uint16_t wait){
- digitalWrite(13, HIGH);
- digitalWrite(3, HIGH);
- digitalWrite(11, HIGH);
- digitalWrite(5, HIGH);
- digitalWrite(9, HIGH);
- digitalWrite(8, HIGH);
- digitalWrite(12, HIGH);
- digitalWrite(10, HIGH);
- digitalWrite(6, HIGH);
- digitalWrite(4, HIGH);
- delay(wait);
- }
Once everything was working on the layout board it was time to figure out how to get it all inside of the scarf. I laid everything out on a piece of muslin that would fit inside of the scarf and I started sewing. I ran a few stiches around each LED and then a lot of stiches around the Pro Trinket enclosure, the battery and the switch.
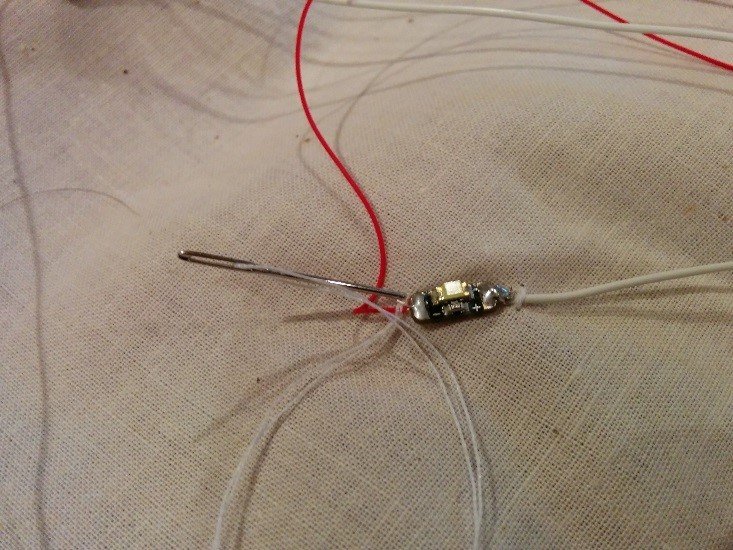
I then opened up one end of the scarf and turned it inside out. I laid the strip of muslin on the scarf with the LEDs facing so that they would shine out of the front of the scarf. I then stitched the muslin to the inside of the scarf in several places so it would stay in place when I turned the scarf back outside. The last steps were stitching the end of the scarf back up and making a small hole in the top center edge of the scarf to get access to the USB port so it the battery can be charged. The switch can be pressed through the fabric of the scarf and LED sequins start shining through.
(I would like to insert a photo here of the finished product but I can’t get a good photo of the scarf with the LEDs shining through. If I do it in the dark the lights are fuzzy and if I do it with the lights on you can’t see the LEDs. Ideas?)

Credits
Related products


Leave your feedback...