
Robot Home Assistant Using A Lego Ev3 And Alexa

Made by electrouser865
About the project
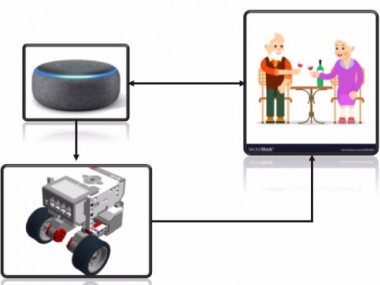
This is an example of an application in which the voice assistant Alexa and the Lego EV3 are integrated as home assistant.
Project info
Items used in this project
Hardware components


Software apps and online services

Story
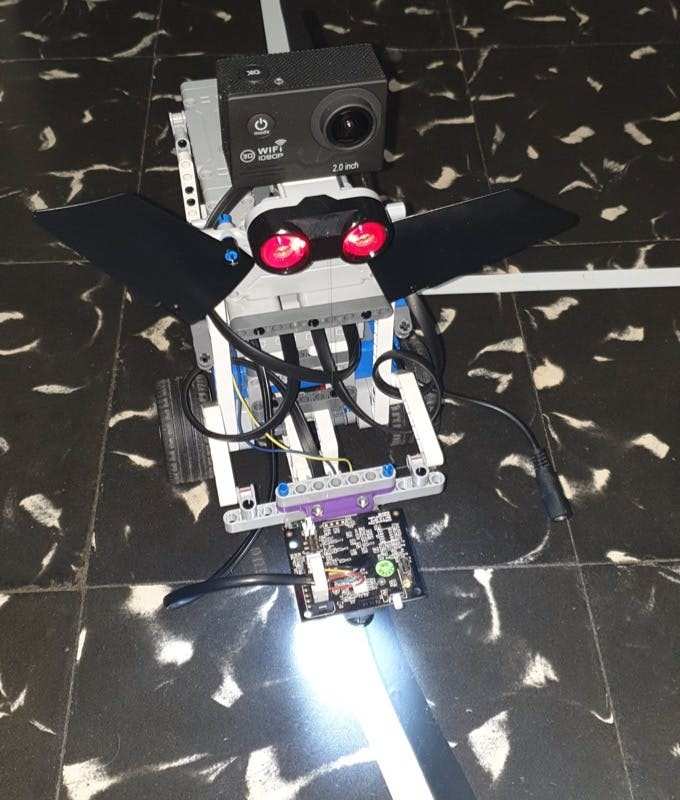
In the project presented in this contest tries to give a small but useful application, which incorporates an Alexa voice assistant and a Lego EV3 kit. The main objective of this project is to integrate these devices, in order to create an application that the integration of these devices comes to have a real utility and can be used in different environments. Some research related to cognitive analysis shows that the use of legos improves cognitive functions. Being used as a pedagogical tool to teach concepts of programming, robotics, physics, etc.. Developed fine motor skills, increasing creativity and problem solving (Figure 1).

Figure 1, Lego EV3
Alexa (Figure 2) has become one of the world's most widely used virtual voice assistants, allowing a large number of people to communicate using natural language. This assistant allows users to perform tasks such as turning on a light, accessing different sensors in your home in order to know the temperature, and so on. Alexa is an excellent voice assistant, its sharpness when speaking, its ease when interacting with it, makes it a useful tool to make applications related to older people.

Figure 2, Alexa Universe
The integration of these two tools allows us to create an application in which we could control a lego robot, using a virtual assistant Alexa. This robot can be used as a help tool for people living alone or living in homes for the elderly. Creating a robot capable of moving through your home, allowing the robot to transport medicines, food or other objects that people need. In order to achieve this, the following steps need to be taken:
1. Define a route that crosses the entire house.
2. Differentiate by colors the places of the house.
3. Build a line follower robot.
4. Create an Alexa Skill.
Path Definition
The definition of the route is an important part, since when using a Lego EV3 it is not possible to have complex navigation tools such as Lidars, depth cameras or any other device that allows you to determine the fastest route to the target site. Not using these devices helps to reduce costs and at the same time anyone can build it. This line will depend on the colour of the floor of our home, that is, if our floor is light we will use a black ribbon and if our floor is dark we will use a white ribbon. However, in order to improve the tracking of the robot line and reduce the noise produced by the colors of the floor, it is necessary to border the main line with the color opposite to the main line.

Figure 3, Line Pattern
Differentiate by colors the places of the house
In order for the robot to be able to differentiate the different places that the robot has to reach, it is necessary to differentiate them by colours. These colors will be detected by a Pixy Cam (Figure 4, Figure 5).

Figure 4, PixyCam

Figure 5, PixyCam port definition
The following video shows the identification of the different colors, which represent each of the places in the house.
Video 1, Identification of the different colors, which represent each of the places in the house.In this project we have defined the following colors for each of the places in the house (Figure 6).
Figure 6, Definition of the colors of the places in the house.

Figure 6, Definition of the colors of the places in the house.
One of the advantages of using this camera is that it has a feature that allows the camera to recognize up to 6 different colors. This ability is used by the robot to recognize the place where the user wants him to move. One important thing to keep in mind is that ambient light conditions can change, this change means that at times the camera can not recognize the color correctly. Therefore, it is necessary to homogenize the light, for this a matrix of white light leds was used. This light allows us to normalize the surface on which we have placed the different colors (Figure 7).
1 / 2 • Figure 7, White light for surface normalization.

Figure 7, White light for surface normalization.
Build a line follower robot
In this section we will talk about how we can get to build our robot line follower, as lego is a versatile tool when making the construction of robots. For this reason I have decided to make a simple construction, using the basic instructions present in the instructions of my Lego kit. However, it is important to emphasize that this robot can have any aspect and shape.
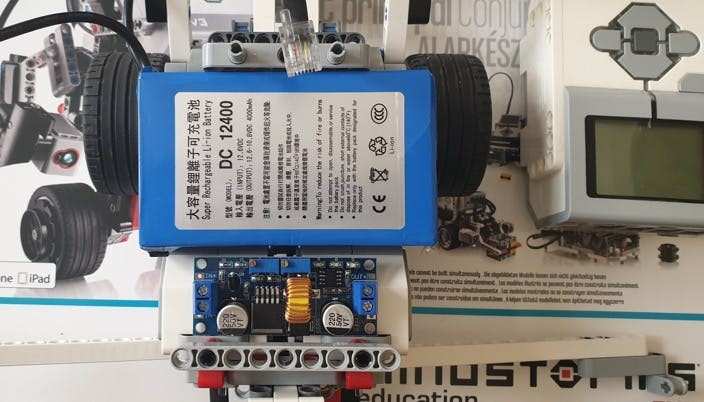
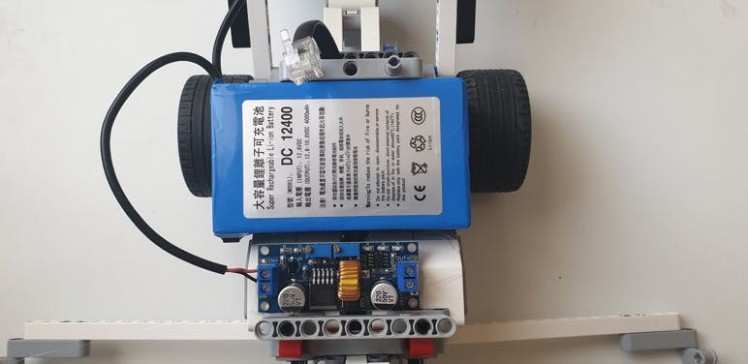
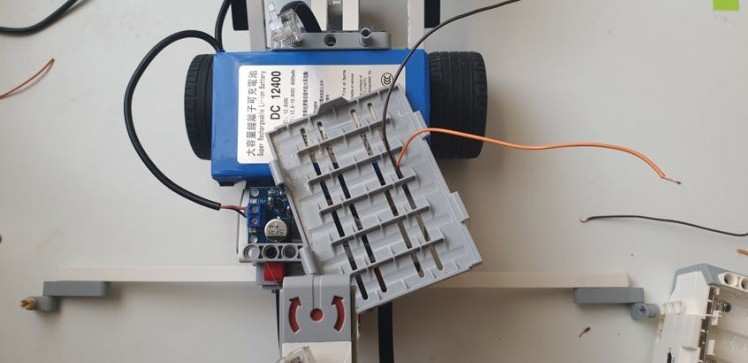
Normally the Lego kit uses AA batteries or in some kits we find a lithium-ion battery. However, the current of these batteries is very low, which is why we modified the battery of the robot. It is for this reason that has been replaced by a battery of 12 Volts and 4000 mA, it is important to keep in mind that the voltage of the brick of lego is 9 Volts. In order to reduce the voltage from 12 to 9 volts, it is necessary to use a voltage reducer (Figure 8).

Figure 8, DC DC Constant Step down Current Regulator Module
The steps for making connections are shown below.
Step 1, locate the battery location inside our robot.
1 / 2 • Step 1

Step 1
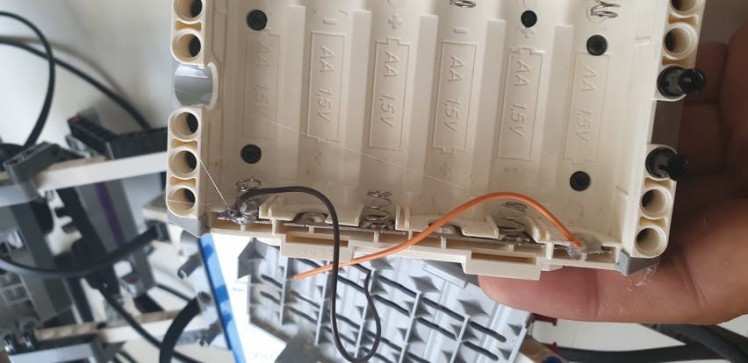
Step 2, Connect the battery to the regulator, note that the positive battery is connected to the positive input of the regulator and the negative battery is connected to the negative input of the regulator.
1 / 2 • Step 2

Step 2
Step 3, Set the regulator voltage to 8.95 Volts.
1 / 2 • Step 3

Step 3

Step 4, connect the output cables of the regulator, in my case in orange is the positive and black is the negative.
1 / 2 • Step 4

Step 4
Step 5, identify the positive and negative inputs of the EV3ego control device.
Step 5

Step 5
Step 6, Solder the output cables of the regulator to the inputs of the control device, take care when making the connection and respect the polarity. Once the soldering is done, use a silicone gun to protect the cables and prevent them from being disconnected.
1 / 2 • Step 6

Step 6
The sensor connections to the Lego brick are described in Table 1 below.
Table 1, Brick Connection

Table 1, Brick Connection
The plan of the house in which the different tests were performed is shown in Figure 9.
Figure 8, Plan of the house where the tests were performed.

Figure 8, Plan of the house where the tests were performed.
Steps to create your Alexa Ability that control the robot
Below we will describe the different steps necessary to perform our Alexa skill. The first thing that we have to have is an account in Alexa Developer, to have this account we go to this link: https://developer.amazon.com/en-IN/alexa/alexa-skills-kit.
Figure 9, Sign-In Alexa Developer

Figure 9, Sign-In Alexa Developer
Once created our account, we choose the products section and click on Create Product (Figure 10).

Figure 10, Alexa developer console
We fill in our product information (Figure 11 A, B):
Figure 11 A, Product Information

Figure 11 A, Product Information
Figure 11 B, Product Information

Figure 11 B, Product Information
Once we have our project, we copy the identification numbers (Amazon ID) and the secret code (Alexa Gadget Secret) (Figure 12).
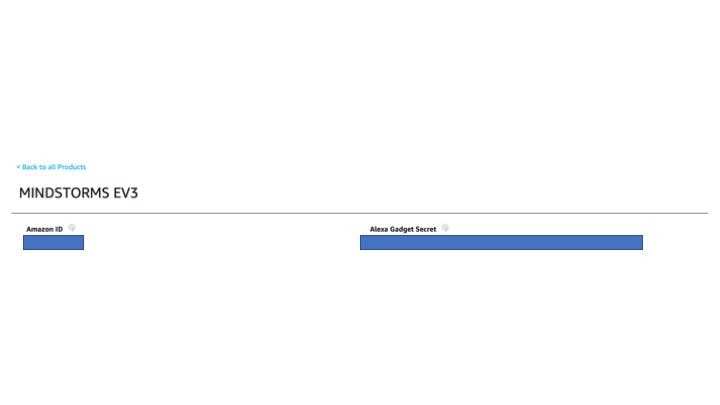
These numbers are necessary for our Lego to receive information about our skill. These numbers are pasted that in the file .ini in the fields: amazonId and in alexaGadgetSecret.
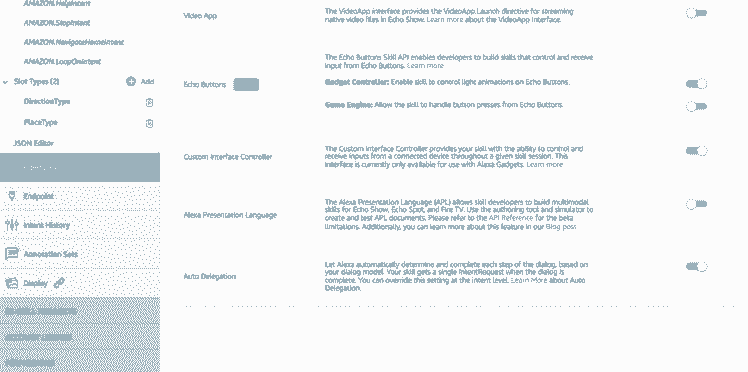
# Copyright 2019 Amazon.com, Inc. or its affiliates. All Rights Reserved.## You may not use this file except in compliance with the terms and conditions# set forth in the accompanying LICENSE.TXT file.## THESE MATERIALS ARE PROVIDED ON AN "AS IS" BASIS. AMAZON SPECIFICALLY DISCLAIMS, WITH# RESPECT TO THESE MATERIALS, ALL WARRANTIES, EXPRESS, IMPLIED, OR STATUTORY, INCLUDING# THE IMPLIED WARRANTIES OF MERCHANTABILITY, FITNESS FOR A PARTICULAR PURPOSE, AND NON-INFRINGEMENT.[GadgetSettings]amazonId = ---alexaGadgetSecret = ---[GadgetCapabilities]Custom.Mindstorms.Gadget = 1.0In order for our skill to send commands to our Lego EV3, it is necessary to activate "Custom Interface Controller". This can be found in the "Intefaces" section (Figure 14).
Below is a video showing the integration of Alexa and Lego EV3.
Video 2References
PixyCam
https://www.ev3dev.org/docs/tutorials/using-pixy-camera/
Lego EV3
https://buildmedia.readthedocs.org/media/pdf/python-ev3dev/latest/python-ev3dev.pdf
https://sites.google.com/site/ev3python/
https://ev3dev-lang.readthedocs.io/projects/python-ev3dev/en/ev3dev-jessie/
Schematics, diagrams and documents
Code
Credits
Related products


Leave your feedback...