
Image Slideshow With Ili9341 Display
Made by Espruino / Displays / Photos & Video
About the project
This example shows you how to use an ILI9341 display to output a series of images loaded from SD card.
Project info
Difficulty: Easy
Platforms: Espruino
Estimated time: 1 day
License: GNU General Public License, version 3 or later (GPL3+)
Items used in this project
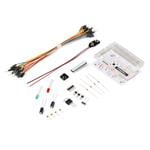
Hardware components


Story
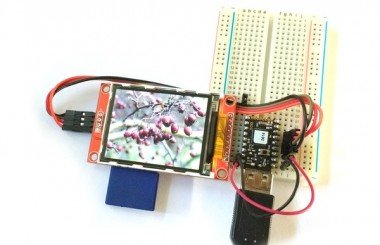
This example shows you how to use an ILI9341 display to output a series of images loaded from SD card (there's an SD card connector on the back of the display).
Wiring
- Put an Espruino Pico into breadboard, with the USB connector facing left
- Place the ILI9341 into the breadboard as show in the image - directly above the Pico
- Connect the top-left pin of the Pico (VCC on the LCD) to 3.3v on the Pico
- Connect the top-2nd-left pin of the Pico (GND on the LCD) to GND on the Pico
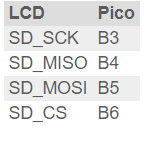
- Now connect the 4 end pins on the LCD (for the SD card) as follows:
Images
Before we can get started, we need to cheat a bit. Espruino can't decode JPEG files on-chip - the display is 320x240 pixels at 16bpp - that's 153600 bytes - which is more RAM than Espruino has in total!
Instead, we're going to store the pictures in a format that Espruino can load directly onto the LCD.
To do that, we need to resize the pictures by 320x240, rotate them (the display is actually 240x320), and convert them to a raw 16bpp RGB565 file formatr.
This is something that you can do with the ImageMagick command-line tools. You just need the command:
- convert -size 320x240 -rotate 90 -depth 8 inputfile.jpg
- -channel R +level 0,31 -evaluate multiply 2048 +channel
- -channel G +level 0,63 -evaluate multiply 32 +channel
- -channel B +level 0,31 -evaluate multiply 1 +channel
- -channel RGBA -separate +channel
- -channel R -evaluate-sequence add +channel
- -depth 16 R:outputfile.raw
There's one final step - the display expects 16 bits per pixel, but those bits are sent as two 8 bit bytes. Unfortunately when ImageMagick writes the file, it writes those two bytes in the wrong order so you need to swap them.
On Linux, this is easy:
- dd if=outputfile.raw of=fixedoutputfile.raw conv=swab
But on Windows/Mac you may have to find another method.
Once you've got the files sorted, copy them into the root of an SD empty card and put in in the LCD.
Software
Just put the code below into the right-hand side of the Web IDE and click upload. It won't work immediately - you'll have to type save() on the left-hand side to load it and start it working.
Comments are inline
Source Code
- /* global variables - as we're going to be directly accessing the display,
- we need to remember what the CE and DC pins are */
- var gspi = new SPI();
- var gce = B14;
- var gdc = B10;
- // graphics object for display - we don't use this directly, but we could do
- // if we wanted to draw text over the image
- var g;
- // List of our files - loaded at power on
- var files = [];
- function onInit() {
- // Set up SD card - load a list of files
- var SPI1 = new SPI();
- SPI1.setup({mosi:B5,miso:B4,sck:B3,baud:10000000});
- E.connectSDCard(SPI1, B6);
- files = require("fs").readdirSync();
- // Turn LCD backlight on
- A6.set();
- // Set up LCD (we're using software SPI to avoid wiring the LCD up properly)
- gspi.setup({sck:A7, /*miso:A5, */mosi:B1});
- g = require("ILI9341").connect(gspi, gdc, gce, B13, function() {
- // When initialised, load an image
- nextSlide();
- });
- }
- // Load an image onto the screen
- function updateScreen(filename) {
- // screen width and height
- var x2 = 239;
- var y2 = 319;
- // this code is copied from the ILI9341 module - we need
- // to send pixels directly....
- // enable SPI bus for LCD
- gce.reset();
- // Write the 'window' - this will be the whole screen
- gspi.write(0x2A,gdc);
- gspi.write(0,0,x2>>8,x2);
- gspi.write(0x2B,gdc);
- gspi.write(0,0,y2>>8,y2);
- gspi.write(0x2C,gdc);
- // Now open a file, and copy the contents in
- // big chunks onto the LCD
- var fd = E.openFile(filename,'r');
- var d = fd.read(8192);
- while (d !== undefined) {
- gspi.write(d);
- d = fd.read(8192);
- }
- fd.close();
- // disable SPI for the LCD
- gce.set();
- }
- // Choose a new image from our list of filenames
- function nextSlide() {
- var r = (E.hwRand()&0xFFFFFF)%files.length;
- // load
- updateScreen(files[r]);
- // reschedule again in 5 seconds
- setTimeout(nextSlide, 5000);
- }
Code
Credits
Espruino
Espruino, Espruino Pico and Puck.js are low-power Microcontrollers that run JavaScript. Espruino is a JavaScript Interpreter for Microcontrollers that is designed to make development quick and easy. The Espruino interpreter is firmware that runs on a variety of different microcontrollers, but we also make Espruino Boards that come with the interpreter pre-installed and are the easiest devices to get started with. However Espruino itself isn't just the interpreter firmware or hardware - there's also the Web IDE, command-line tools, documentation, tutorials, and modules that form a complete solution for embedded software development.
Leave your feedback...