
How To Use Vscode With Raspberry Pi Pico W And Micropython

Made by mahmood-m-shilleh
About the project
This tutorial demonstrates how to start coding on the Raspberry Pi Pico or Pico W using Visual Studio Code.
Project info
Difficulty: Easy
Platforms: Raspberry Pi, MicroPython
Estimated time: 1 hour
License: GNU Lesser General Public License version 3 or later (LGPL3+)
Items used in this project

Story
Connecting to the Raspberry Pi Pico W in VSCode can help you write and debug code more efficiently, and improve your development workflow for embedded systems projects. This integration can help you streamline your development workflow and reduce the time it takes to get your code up and running on the Raspberry Pi Pico W.
Before you get started consider subscribing and donating to the channel above for more useful Raspberry Pi and microcontroller content! We would love your support!
Subscribe:
Support:
https://www.buymeacoffee.com/mmshilleh
Step 1-) Install MicroPython on Pico- Plugin the device into the computer while holding the bootsel button.
- Go to https://micropython.org/download/ and download the latest version for the Pico or Pico W
- Drag the UF2 file onto your Pico once it is done downloading. *It should show up on your Desktop as RP1-RP2.
- Once it is done, the RP1-RP2 will disappear.
- Unplug and replug the Pico (without holding the bootsel). You need to do this so VSCode can find the device.
- Make sure you have Python 3.9 installed on your computer. It is one of the requirements for the extension.
- Go to extensions in VSCode and install the extension. Search “Pico”. Note that it was previously called Pico-Go.
- Create a directory on your local computer, and open the empty directory on VSCode
- Configure the Pico-W-Go environment. Run
Pico-W-Go > Configure Projectcommand viaCtrl+Shift+P(or the equivalent on your platform) VS Code command palette. This will import stubs for autocompletion and the settings into your project folder. For the auto-completion to work, the extension prompts you (after project configuration) to install recommended extensions mentioned. - Create a Python file in the directory and add the following code:
from machine import Pin
from time import sleep

pin = Pin("LED", Pin.OUT)

while True:
    pin.toggle()
    sleep(1)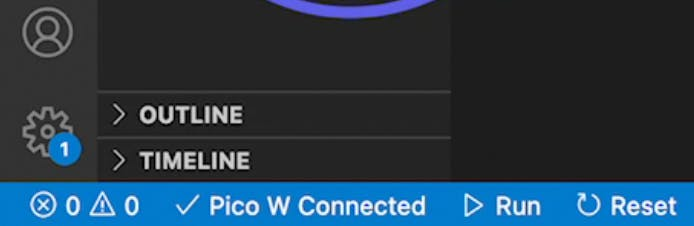
- Make sure the Pico is connected (shown on the bottom of the screen)
- Run the current file (by right-clicking the file name and selecting Run current file)
You should see the LED start blinking! If you did, congrats.
There are other operations you can use in the library, such as deleting all code on your device or downloading files from the Pico, which will help you develop your projects faster. Overall, developing on VSCode has several advantages over Thonny and it may end up being your preferred IDE for developing on the Raspberry Pi Pico.
ConclusionHope I saved you some time, if I did please subscribe to the channel for more useful tips that will help you in your coding endeavors.
Credits
mahmood-m-shilleh
Mechanical and Software Engineering Background. University at Buffalo 2019 Texas A&M 2021 I make data pipelines for my day job. Outside of work, I participate in online communities regarding Full Stack Engineering, Microelectronics, and more. You can find more details about me on my Youtube Channel. https://www.youtube.com/@mmshilleh Feel free to reach out!
Related products


Leave your feedback...