
How To Upload To S3 From The Raspberry Pi Pico W

Made by mahmood-m-shilleh
About the project
Learn how to upload documents, images, and other files to S3 from the Pico W over the internet. Scale your IoT applications with S3!
Project info
Difficulty: Difficult
Platforms: Amazon Web Services
Estimated time: 1 hour
License: GNU Lesser General Public License version 3 or later (LGPL3+)
Items used in this project

Story
In this tutorial, you'll discover the process of transmitting a file over the internet using the Raspberry Pi Pico W. We'll employ an intermediate layer featuring NodeJS hosted on Google Cloud to manage all S3 operations seamlessly. This tutorial not only equips you with the capability to perform advanced tasks with the Raspberry Pi Pico W but also imparts a crucial aspect of software engineering. If you're not acquainted with Node or GCP, do not worry – I guide you through the steps comprehensively in this tutorial.
Before reading the remainder, be sure to subscribe and support the channel if you have not!
Subscribe:
Support:
https://www.buymeacoffee.com/mmshilleh
All Code in this video is available for Level 1 subscribers on my YouTube channel! Join this channel to get access to perks: https://www.youtube.com/channel/UCD13UWk3lJtjka7BoA0KZ5w/join
1-) S3 SetupThe first thing you want to do is create an AWS account by going to
aws.amazon.com
It is free to get started.
Once you enter AWS go into the Console search S3, and select the S3 panel which will allow you to create an S3 bucket. You can click through the steps to generate an S3 bucket with the default settings.
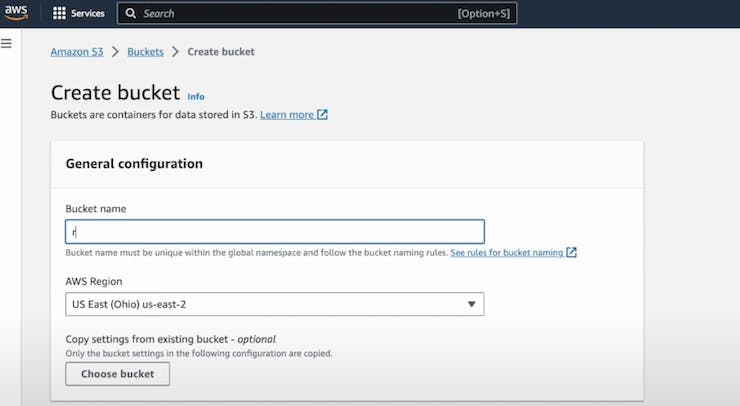
Name the bucket however you like.
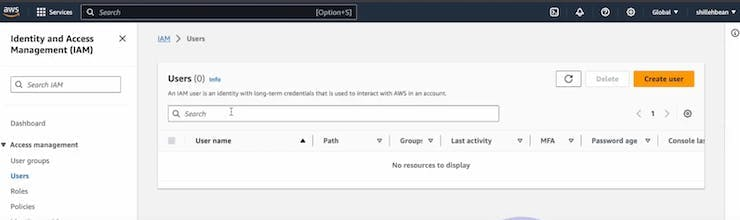
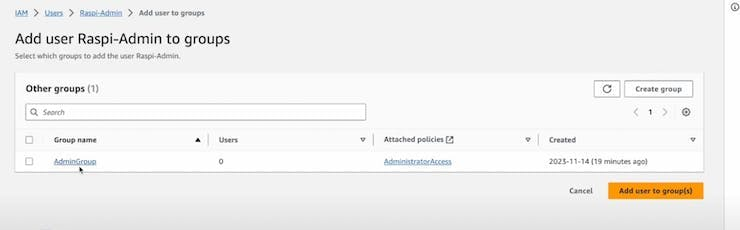
Now that you have an empty bucket the next thing you will need is to create users with admin privileges to that bucket so they can put objects into the bucket from the Python code. Search the terms 'Users' in the console select the Users panel and click Create New User.
You need to then select the user and create a group under the Groups tab (see images), make sure the group has administrative privileges, or else you will get an error when trying to place an item into the bucket.
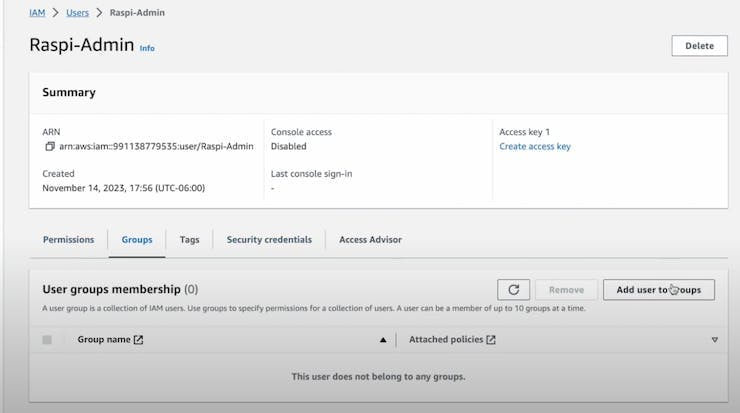
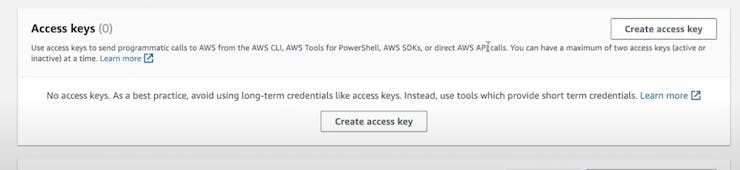
Finally, you want to create an Access/Secret Key pair for the user (See Images), ensure you save the values somewhere safe because this can allow people access to your bucket which can be dangerous for your application security.
Now that you have that, we are done on the S3 side of things and we can jump to the code!
Step 2-) NodeJSTo achieve the described functionality, you'll need to first set up a Node.js project with Express and the AWS SDK for JavaScript in Node.js; I use VSCode as my preferred editor. Here's a breakdown of the code and the tools you need, along with installation instructions:
Tools and Dependencies:- Node.js and npm: Node.js is a JavaScript runtime that allows you to run JavaScript on the server-side. npm (Node Package Manager) is used to install and manage Node.js packages.
Installation: Download and install Node.js from https://nodejs.org/. This will also install npm.
- Express: Express is a fast, minimalist web framework for Node.js.
Installation: In your project folder, run:
npm init -y
npm install express body-parser- AWS SDK for JavaScript: The AWS SDK allows you to interact with AWS services, including S3.
Installation: In your project folder, run:
npm install @aws-sdk/client-s3Import Required Modules:
- Import Required Modules:Import Express, body-parser for handling JSON and form data, and the AWS SDK's S3Client and PutObjectCommand.
Set Up AWS S3 Client:
- Set Up AWS S3 Client:Create an instance of the S3Client with your AWS credentials and the desired AWS region.
Express App Setup:
- Express App Setup:Create an Express app and configure middleware for parsing JSON and form data.
Test Endpoint (/test):
- Test Endpoint (/test):A simple endpoint to test if the server is running.
Upload Endpoint (/upload):
- An endpoint to handle HTTP POST requests containing text data.
- Extract the text data from the request body and validate its presence.
- Generate a unique filename and upload the text data to the specified S3 bucket.
Start the Server:
- Start the Server:The server is configured to listen on the specified port (default: 3000).
Make sure to replace the placeholder values with your own AWS S3 bucket name, access key ID, and secret access key in the s3Client configuration.
Save the code in a file named server.js in your project folder. Then, run the following command in your terminal to start the server:
node server.jsThe server will start, and you can test it by sending a POST request with text data to http://localhost:3000/upload. Additionally, you can check if the server is working by visiting http://localhost:3000/test in your browser. We will use the upload endpoint in the Raspberry Pi Pico W http request to send the file.
Now we will deploy the app to Google Cloud which is easy and I believe has a free tier to get started. Either way we are deploying an incredibly lightweight backend that will use almost no resources. This step is important because it allows us to access the server from any internet connection. This will make it more accessible for the Raspberry Pi Pico W to send files, all you will need is an active internet connection.
First you will need to install the Google Cloud SDK, which includes the gcloud command-line tool. This will allow us to deploy the app through the command line to our Google Cloud account. Of course, be sure to create an account on GCP by simply searching it on Google and following the steps to create an account!
- Follow the instructions for your operating system: Installing Google Cloud SDK.
First be sure to create a new project in your console by going to https://console.cloud.google.com/. Name it however you like!
Next, in your project directory, run the following command to initialize your Google Cloud project:
gcloud initFollow the prompts to select or create a Google Cloud project, configure the default compute region and zone. Also be sure to select the project you just created in the prompt.
Create a file named app.yaml in your project's root directory. This file contains configuration settings for App Engine.
runtime: nodejs18
env: standard
runtime_config:
operating_system: ubuntu22
# This sample incurs costs to run on the App Engine flexible environment.
# The settings below are to reduce costs during testing and are not appropriate
# for production use. For more information, see:
# https://cloud.google.com/appengine/docs/flexible/nodejs/configuring-your-app-with-app-yaml
instance_class: F1
automatic_scaling:
max_instances: 1
min_instances: 0
resources:
cpu: 1
memory_gb: 0.5
disk_size_gb: 10
This is a very minimalistic machine setup and uses very little GCP resources, which is what we want for testing.
Run the following command to deploy your application to Google Cloud App Engine:
gcloud app deploy --project=<project name> --version=1Follow the prompts to continue with the deployment. This command uploads your application code and configuration to Google Cloud, and it may take a few minutes.
Once the deployment is complete, you can access your deployed app using the URL shown in the console log. You can also find your app url by searching App Engine in GCP and clicking Versions on the left panel. You should be able to click v1 which will direct you to the home URL of your app. This is much more clear in the video above.
That's it! Your Node.js application should now be deployed on Google Cloud App Engine, accessible all across the world Make sure to check the Google Cloud App Engine documentation for more advanced configuration options and features. You can hit the /test endpoint to ensure it is working as expected.
Step 4-) Raspberry Pi Pico W CodeNow we just have to configure the code in the Raspberry Pi Pico W side.
The Python script, shown in the video, is designed to run on the Raspberry Pi Pico W, connect to a Wi-Fi network, read the contents of a local text file, encode the file data in base64, and then upload it to a Node.js server running on Google Cloud Platform (GCP) via an HTTP POST request. Below is a breakdown of the script and an explanation of its functionality:
Dependencies and Configuration:
- urequests:This library is used for making HTTP requests.
- config Module:Assumes the existence of a
configmodule where SSID (Wi-Fi network name) and WIFI_PASSWORD (Wi-Fi password) are stored. - network:The
networkmodule is used to connect to Wi-Fi. - ubinascii:The
ubinasciimodule is used for base64 encoding. - gc (Garbage Collection):Invoked to free up memory.
Configuration Parameters:
SSID: The name of the Wi-Fi network.WIFI_PASSWORD: The password for the Wi-Fi network.NODE_URL: The URL of the Node.js server where the text file will be uploaded. This is gotten from step 3 above.LOCAL_TEXT_FILE_PATH: The path to the local text file on the Raspberry Pi Pico W. In todays example we just use a simple text file that contains the text "Hello, World" but really you can upload images, CSV files, and other more complex data files.
Function connect_and_upload_text_file():
- Connect to Wi-Fi:Attempts to connect to the specified Wi-Fi network using the SSID and password.It waits for a maximum of 10 seconds to establish a connection.
- Read Text File:Opens the local text file in binary mode and reads its contents.
- Encode Data as Base64:Encodes the binary data read from the text file into base64 format.
- Set Up Headers and Payload:Defines headers for the HTTP POST request, specifying that the content type is JSON.Creates a payload dictionary with the base64-encoded text data.
- Make HTTP POST Request:Uses
urequests.postto send an HTTP POST request to the Node.js server with the base64-encoded text data.The server expects a JSON payload with a "textData" field. - Print Server Response:Prints the response received from the server.
- Disconnect from Wi-Fi:Regardless of the success or failure of the HTTP POST request, disconnects from the Wi-Fi network.
Notes:
- Ensure that the
urequestslibrary is available on your Raspberry Pi Pico W. - Make sure that the local text file (
sample.txtin this case) exists and contains data. - Adjust the
configmodule and other parameters according to your Wi-Fi and server configurations. You can also just hardcode these into the script if you like. - All code is downloadable if you subscribe to level 1 of my YouTube membership.
Now you should be able to run the script on your Raspberry Pi Pico W and see a successful response. You can go and download this file in your bucket in S3 for a sanity check. Remember this is an incredibly powerful building block for IoT and distributed systems applications. If you managed to do this successfully give yourself a pat on the back. If not, let me know your questions and confusions in the comment section on YouTube. I will do my best to try and help you. Please remember to subscribe, thanks everyone!
Credits
mahmood-m-shilleh
Mechanical and Software Engineering Background. University at Buffalo 2019 Texas A&M 2021 I make data pipelines for my day job. Outside of work, I participate in online communities regarding Full Stack Engineering, Microelectronics, and more. You can find more details about me on my Youtube Channel. https://www.youtube.com/@mmshilleh Feel free to reach out!
Related products


Leave your feedback...