

How To Test Your Projects With Titan

Made by gusgonnet
About the project
Verify your projects behave as intended with a telecom grade test tool.
Project info
Items used in this project

Story
In this article we will explore one way of testing a project with a tool designed to do just that.
Why Bother Testing?
There are many reasons why one would want to test their products or projects. We can enumerate a few from the wikipedia definition:
- it meets the requirements that guided its design and development,
- it responds correctly to all kinds of inputs,
- it performs its functions within an acceptable time,
- it is sufficiently usable
In other words, we test since we want to make sure things work properly.
Why did I want to test my project in particular? Well, since the project I am testing deals with my HVAC at home and that is a pretty expensive piece of hardware, the drawbacks of making a mistake can cost me big bucks. Or injure someone in my family. Or both. So there was no way I could put my project "in production" without testing it first.
Why Automating?
Of course one can test manually all the features of a project. It just takes time to do it. Big time.
Imagine running few tests today to evaluate how good your software behaves. That's fine. Tomorrow you change a little bit and you have to test again to make sure you did not break something. Then the day after tomorrow, then next week and so on. You could end up spending a lot of time verifying your changes didn't break something important on your project or product.
This is when automating your tests starts making sense. From wikipedia, we learn:
In software testing, test automation is the use of special software (separate from the software being tested) to control the execution of tests and the comparison of actual outcomes with predicted outcomes.
Test automation has the advantage to bring down the testing time to minutes or seconds. It also saves you from making mistakes because you may be bored of manually running the tests over and over again.
Some Thoughts on Test Automation
I must admit that all my life I used the term test automation to describe what I do, but after reading this white paper from the folks at Satisfice Inc, I feel the need to change it. From that (very interesting) white paper:
Good testing, like programming, is instead a challenging intellectual process. Tool use in testing must therefore be mediated by people who understand the complexities of tools and of tests. This is true for testing as for development, or indeed as it is for any skilled occupation from carpentry to medicine.
The authors state that testing cannot be automated, same as programming or any other skilled occupation:
To produce high-quality products and services, we need skilled people applying appropriate tools to fulfill the mission of testing.
Conclusion: no more using the test automation term for me. I shall be a toolsmith from now on, since I'd like to follow the suggestion in this paragraph:
Since all testers use tools, we suggest a more interesting distinction is that some testers also make tools—writing code and creating utilities and instruments that aid in testing. We suggest calling such technical testers “toolsmiths.”
The Tool
The tool I will use for creating my tests is called Titan. Titan is TTCN. In 2015, Titan got released as open source. This means I can now use it for my personal projects, and you can too.
Titan celebrated its 15th birthday some days ago so you can believe me when I tell you it's a mature tool:
 Happy birthday Titan!
You can find Titan in the Eclipse site here. Installation instructions for Windows or Linux can be found here. You can look at installationguide.pdf and installationguide.pdf inside the compressed file.
The Test Setup
In this article, I will take one of my existing projects and verify that the main flow (or use case) works properly. For this, I will create a test case. A test case is a script which main goal is to verify the functionality of the project (or at least one aspect, or feature, of it).
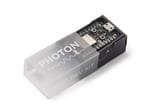
Since I am using a Particle Photon in this project, my test script can take advantage of the Particle's Cloud to communicate with it. My test in this case can "simply" run a command in my laptop, this command would invoke the Particle CLI, which would talk to the Particle Cloud, which then would talk to my Particle Photon and would trigger functions in it or get variables values from it.
Side note: If you have never used a Particle wifi dev kit before I would suggest you give them a shot. They are really easy to start with, since they come standard with cloud connectivity. You can flash them from your browser. There is a whole ecosystem of applications around them and so many other nice things. Go get one!
This is how my test setup looks like:
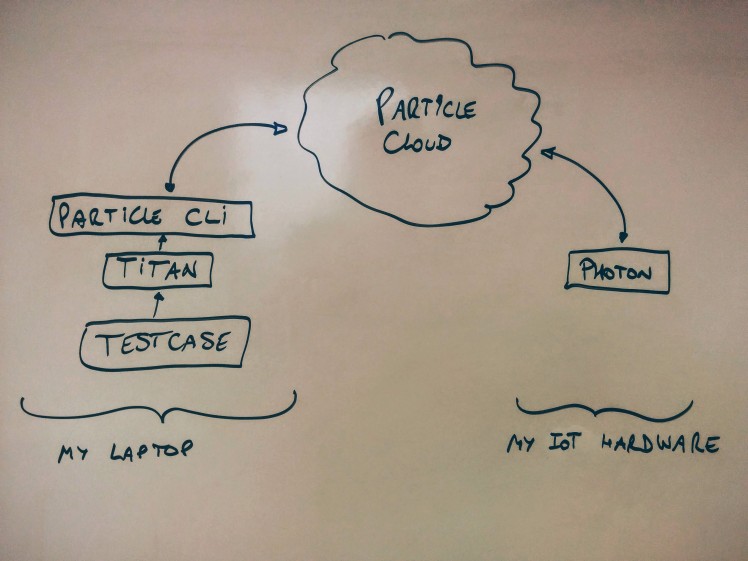 My test setup
The First Test
The first test will focus on testing the main use case of my thermostat, which is to heat my house if the desired temperature is higher than the current temperature.
In other words:
TEST STEP 1: simulate that the current temperature is 20 degrees Celsius
TEST STEP 2: set the desired temperature to 22 degrees Celsius
TEST STEP 3: Verify that the fan and the heat outputs are set to ON
TEST STEP 4: simulate that the current temperature reached 23 degrees
TEST STEP 5: Verify that the fan and the heat outputs are set to OFF
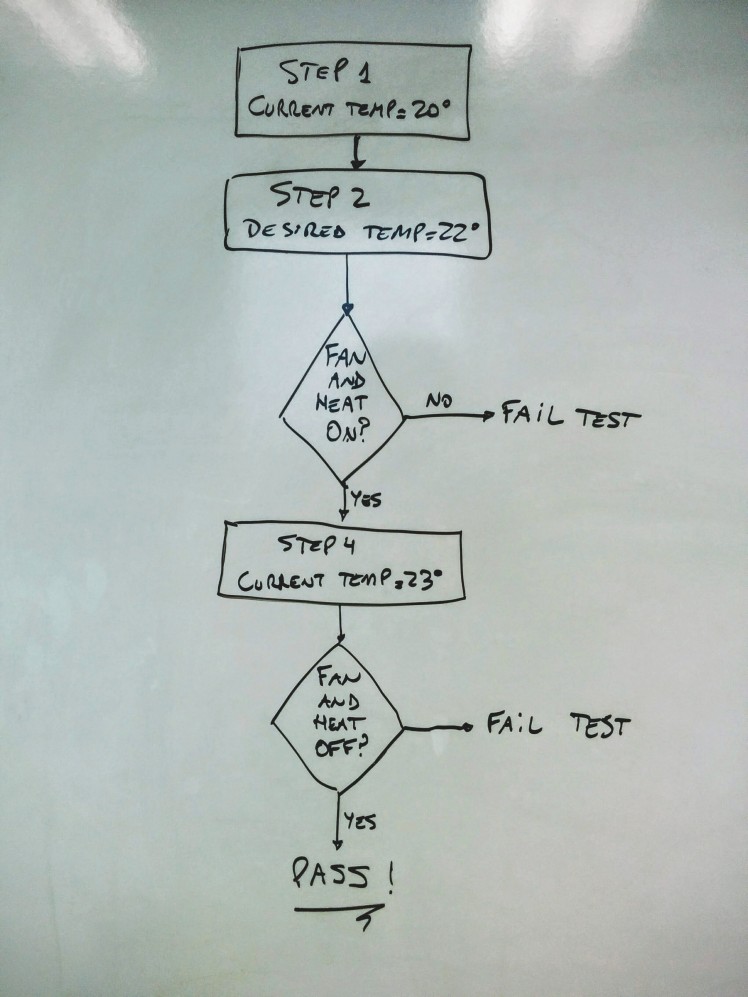 My first test
That's it. In five steps, I would be verifying that my thermostat is not broken by any future change I may make in the firmware of my photon, or at least that the main use case is not broken.
Of course, if you want more scenarios to be covered, then more test cases can be added later.
The TTCN Code
This is the testcase coded in the TTCN language:
testcase test1() {

  //***************************************************************************
  log(" TEST STEP 1: simulate that the current temperature is 20 degrees Celsius");
  //***************************************************************************
  exec(setTargetTmp & " "20.0"", RESPONSE_OK);

  //***************************************************************************
  log(" TEST STEP 2: set the desired temperature to 22 degrees Celsius");
  //***************************************************************************
  exec(setTargetTmp & " "22.0"", RESPONSE_OK);

  //***************************************************************************
  log(" TEST STEP 3: Verify that the fan and the heat outputs are set to ON");
  //***************************************************************************
  exec(getOutputs, FAN_ON_HEAT_ON);

  //***************************************************************************
  log(" TEST STEP 4: simulate that the current temperature reached 23 degrees");
  //***************************************************************************
  exec(setCurrTmp & " "23.0"", RESPONSE_OK);

  //***************************************************************************
  log(" TEST STEP 5: Verify that the fan and the heat outputs are set to OFF");
  //***************************************************************************
  exec(getOutputs, ALL_OFF);

}
I purposely removed some lines to make the intent of the test clearer in this article. For the complete code please refer to the software in github.
Verification Points
If you look closely, you will notice that the test has to verify whether the fan and heat outputs are on or off at certain times (eg: when the thermostat is heating).
Since the photon does not allow you to read a pin when it's configured as output, we have to find another way.
NOTE: technically the photon allows you to read an input when it's configured as output, just that by doing so you don't get the value of the output, but the value of an internal state of the pin. Not exactly what we want.
To overcome this kind of limitation, I created a little trick in the firmware of the Photon to make it testable.
Making your Project Testable
There may be many ways of making a project susceptible to being tested. Here I will list the two I thought of, just have in mind is not a conclusive list:
- read the outputs with another device
- keep track of the outputs states in the firmware itself
Each one is coming with its pros and cons so let's look at them side by side.
Read the outputs with another device
This approach requires an extra piece of hardware. This could be an extra photon you have lying around, or any other board that we could connect to our computer running Titan, the test tool. This extra board would need to be connected electrically to the photon running the thermostat application so it can read the state of the outputs and verify they are high or low at the right times.
Pros: you know for certain what is the state of the outputs at all times, no modifications required to the firmware under test (the thermostat in our current example)
Cons: it requires an extra board
Keep track of the outputs states in the firmware itself
We could make our photon's firmware to keep track of the status of the outputs at all times. In order to achieve this, we would need to modify our thermostat firmware to write to a buffer variable right before writing to the output itself. This could be a simple wrapper function to the digitalWrite() function provided by the photon.
Pros: simple to implement, does not require an extra board
Cons: the project tested needs to be modified to call a wrapper of digitalWrite()
Which one to choose?
I chose the latter for its simplicity. You might differ in your case, and that is ok.
Surely, I had to modify the thermostat firmware. For this you will find a section called TESTING HACKS in the firmware (see minimalistthermostat.ino) with the sole objective of making my project testable without requiring an extra board. In that section you will find a wrapper for digitalWrite() called myDigitalWrite() and this is where the firmware keeps track of the status of its outputs.
This is the implemented wrapper:
void myDigitalWrite(int input, int status){
  digitalWrite(input, status);   //  <<-- this actually writes to the PIN
  if (input == fan){
    fanOutput = status;          //  <<-- this keeps the status of the PIN in memory
  }
}
From there you can infer that fanOutput is saving the status of the pin in the Photon's memory.
All the test has to do to find out if the fan is ON is to query that status variable.
How to query a status variable
The outputs can be queried by the test with the help of this function exposed in the cloud:
int getOutputs(String dummy){
  return coolOutput*4 + heatOutput*2 + fanOutput*1;
}
This function returns 0 (zero) if all outputs are LOW (or OFF), 1 if the fan is ON (or HIGH), 3 if the heat and fan are ON and 5 if the cool and fan are ON.
In this way, the testcase can find out what is on and what is off at any given time by just calling this function via the Particle CLI and parsing the returned value.
Running the Test
Let's describe the steps required in order to run the test.
STEP 1: INSTALL TITAN
You can find Titan in the Eclipse site here. Installation instructions for Windows or Linux can be found here. You can look at installationguide.pdf and installationguide.pdf inside the compressed file.
STEP 2: CLONE THE GITHUB REPOSITORY
In a folder of your choice in your laptop, create a new folder called particle. For instance in Linux, I typed in a console the following:
$ mkdir particle
$ cd particle
$ git clone https://github.com/gusgonnet/minimalistThermostat.git
This creates a particle and a minimalistThermostat folder in it.
STEP 3: BUILD
Before running the test, we have to build it. Open a console and run this command:
$ cd particle/minimalistThermostat/tests/titan
$ ./build.sh
This hopefully created a bin folder and inside you will find the binary called minimalistThermostat.
STEP 4: CONFIGURE
Before attempting to run the test, we need to configure the name of the photon used in the minimalistThermostat.cfg file
[MODULE_PARAMETERS]
photonName := "cowboy_dentist"
My photon is called cowboy_dentist, what is yours?
STEP 5: RUN
We are ready to run now. Open a console and run this command:
$ cd particle/minimalistThermostat/tests/titan
$ ./run.sh
STEP 6: VERIFY
If all goes well, the testcase will execute and we will get a pass.
This is what we are expecting to see in the console:
MTC@linux: Test case test1 finished. Verdict: pass reason: La vie est belle!
That's It
We can now add new features into our project, refactor the firmware to our desire without the fear of breaking things.
By flashing the new firmware and running again our test we can rest assured that everything is working fine.
What do you think? Would you be testing your IoT projects in this way?
Gustavo.
Psst: please find my other projects here.
Help
If you require professional help with your projects, don't hesitate to write me a line about your needs at gusgonnet@gmail.com. Thank you!
Credits
Related products

Leave your feedback...