
How To Stream Video From Raspberry Pi To Local - Usb Camera

Made by mahmood-m-shilleh
About the project
Learn how to stream a video feed using USB-based cameras from the Raspberry Pi to your local computer over the internet with picamera2.
Project info
Difficulty: Easy
Platforms: Raspberry Pi
Estimated time: 1 hour
License: GNU Lesser General Public License version 3 or later (LGPL3+)
Items used in this project

Story
Discover how to stream video from a USB-based camera to your local computer via the local network using Python 3 and Flask with the Picamera2 library. This tutorial builds upon Part 1, where we demonstrated the same process using a Raspberry Pi camera module. Here, we leverage PiCamera2, supported by the Raspberry Pi community, to achieve seamless streaming with your USB-based camera.
Before reading the remainder, be sure to subscribe and support the channel if you have not!
Subscribe:
Support:
https://www.buymeacoffee.com/mmshilleh
Access All Code Related to This Video by Subscribing to the Level 1 Perk on My YouTube Channel
https://www.youtube.com/@mmshilleh/membership
1-) Install the Required LibrariesWe need to install flask, opencv, and picamera2 using the apt installer on our raspberry pi. Go into a terminal and run the following commands
sudo apt update
sudo apt install python3-opencv python3-flask python3-picamera2
If you are still having issues with packages later down the line, try using pip to install these packages.
2-) Code and WalkthroughNow that you have the packages installed you can go ahead and create a python script on your device, name it however you like. Also be sure to have your USB camera plugged in at this point.
The code is as follows:
from flask import Flask, Response
from picamera2 import Picamera2
import cv2

### You can donate at https://www.buymeacoffee.com/mmshilleh

app = Flask(__name__)

camera = Picamera2()
camera.configure(camera.create_preview_configuration(main={"format": 'XRGB8888', "size": (640, 480)}))
camera.start()

def generate_frames():
    while True:
        frame = camera.capture_array()
        ret, buffer = cv2.imencode('.jpg', frame)
        frame = buffer.tobytes()
        yield (b'--framern'
               b'Content-Type: image/jpegrnrn' + frame + b'rn')

@app.route('/video_feed')
def video_feed():
    return Response(generate_frames(), mimetype='multipart/x-mixed-replace; boundary=frame')

if __name__ == '__main__':
    app.run(host='0.0.0.0', port=5000)
This code is a Flask web application that streams video frames from a Raspberry Pi camera module (Picamera2) to a web page. Here's a concise explanation of what the code does:
- It imports the necessary libraries: Flask for creating the web application, Picamera2 for interacting with the camera module, and cv2 (OpenCV) for image processing.
- It creates a Flask application instance and initializes the Picamera2 object.
- It configures the camera settings, specifying the format and size of the preview frames.
- The
generate_frames()function continuously captures frames from the camera, encodes them as JPEG images, and yields them as byte strings with appropriate headers for streaming. - The
/video_feedroute is defined, which calls thegenerate_frames()function and returns a Response object with the appropriate MIME type for streaming the video frames. - Finally, the Flask application is run on the host '0.0.0.0' (accessible from any IP address) and port 5000.
When this code is run on a Raspberry Pi with a camera module, it starts a web server that streams the live video feed from the camera. The video feed can be accessed by visiting the /video_feed endpoint in a web browser.
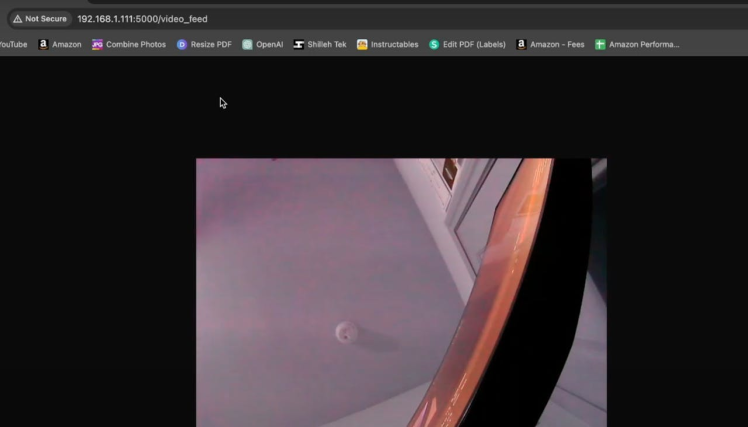
You can access the webstream from your local computer if you go to a browser and type in the following:
http://<Your Raspberry Pi IP>:5000/video_feed
You can get your IP address of your Raspberry Pi by entering a terminal on the Raspberry Pi and typing the command ifconfig. You can then find the IP address in the inet section.
Once this is done you will see a video stream in your chrome browser!
In this tutorial, we've explored how to stream video from a USB-based camera to your local computer using Python 3, Flask, and the Picamera2 library on a Raspberry Pi. By leveraging the power of these tools, you can easily set up a seamless video streaming solution for your projects.
If you found this tutorial valuable and want to stay updated with more exciting content, be sure to subscribe to my YouTube channel. Your support means a lot and helps me continue creating helpful tutorials and projects. Additionally, consider supporting the channel by buying me a coffee at https://www.buymeacoffee.com/mmshilleh. Your contributions directly support the creation of more engaging and informative content.
Don't forget to access all the code related to this video by subscribing to the Level 1 Perk on my YouTube channel. This exclusive perk gives you access to a wealth of resources that will help you take your projects to the next level.
Thank you for following along, and I look forward to sharing more exciting tutorials with you in the future. Stay tuned and happy coding!
Credits
mahmood-m-shilleh
Mechanical and Software Engineering Background. University at Buffalo 2019 Texas A&M 2021 I make data pipelines for my day job. Outside of work, I participate in online communities regarding Full Stack Engineering, Microelectronics, and more. You can find more details about me on my Youtube Channel. https://www.youtube.com/@mmshilleh Feel free to reach out!
Related products


Leave your feedback...