
How To Stream Video From Raspberry Pi Camera To Computer P2

Made by mahmood-m-shilleh
About the project
Learn how to stream video from a Raspberry Pi camera to any wifi-enabled device using Flask and Ngrok.
Project info
Difficulty: Moderate
Platforms: Raspberry Pi
Estimated time: 1 hour
License: GNU Lesser General Public License version 3 or later (LGPL3+)
Items used in this project

Story
Building on our previous journey of setting up a live video feed with a Flask App on a Raspberry Pi, Part 2 dives deeper into the world of remote accessibility. This time, we're unlocking the full potential of your Raspberry Pi security camera by enabling access from anywhere in the world. Discover the simplicity of using ngrok to generate a publicly viewable URL for your video stream, all within a few easy steps and completely free. Whether you're miles away or just on a different network, you'll learn how to seamlessly connect to your real-time security camera. Essential for anyone looking to enhance their home security or just keen on DIY tech projects. Gear up with your Raspberry Pi (4b or any compatible model), a camera, and let's break the boundaries of local networks together!
Also be sure to go through part 1 if you have not:
Before reading the remainder, be sure to subscribe and support the channel if you have not!
Subscribe:
Support:
https://www.buymeacoffee.com/mmshilleh
Hire me at UpWork to build your IoT projects:
https://www.upwork.com/freelancers/~017060e77e9d8a1157
1-) Setting Up ngrok on Your Raspberry PiThe first step towards global access to your Raspberry Pi's video stream involves installing ngrok. This powerful tool creates a secure tunnel from the internet to your locally running Flask application, transforming your private stream into a globally accessible view. Unlike our initial setup, which restricted viewing to your local network, ngrok opens up your project to any Wi-Fi-enabled device worldwide.
Getting Started with ngrok:
- Begin by visiting ngrok's website and signing up for a free account. This account is your key to creating secure tunnels from the internet to your devices.
- With your account ready, turn to your Raspberry Pi. Open a terminal window and follow the instructions provided on ngrok's setup page specifically for Raspberry Pi users: Setup ngrok on Raspberry Pi. This guide will walk you through downloading and installing ngrok directly onto your Pi.
- Installation is straightforward, but crucial. Once ngrok is installed, it's time to establish the tunnel. Execute the following command in your Raspberry Pi's terminal,
ngrok http http://localhost:5000
This command initiates ngrok and directs it to create a tunnel to your Flask application's local server, typically running on port 5000.
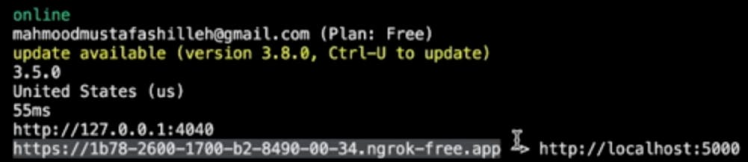
- Upon executing the command, ngrok responds with a publicly accessible URL. This URL is your gateway to accessing the video stream from anywhere. Note that with the free version of ngrok, this URL changes each time you initiate the command, offering a dynamic but effective solution for remote access. For a static URL, consider ngrok's paid plans.
This enhanced setup transcends the limitations of local network access, bringing your Raspberry Pi's video stream to the global stage.
Run the same flask app we created in P1
import io
import picamera
from flask import Flask, Response

app = Flask(__name__)

def generate_frames():
    with picamera.PiCamera() as camera:
        camera.resolution = (640, 480)
        camera.framerate = 24
        stream = io.BytesIO()

        for _ in camera.capture_continuous(stream, 'jpeg', use_video_port=True):
            stream.seek(0)
            yield b'--framernContent-Type: image/jpegrnrn' + stream.read() + b'rn'
            stream.seek(0)
            stream.truncate()

@app.route('/')
def video_feed():
    return Response(generate_frames(), mimetype='multipart/x-mixed-replace; boundary=frame')

if __name__ == '__main__':
    app.run(host='0.0.0.0', port=5000, threaded=True)
The only difference is that I removed the video_feed extension from the @app.route('/') because we want to local host tunnel to tunnel into the base URL. You can run this program on your device in conjunction with ngrok running.
Once we have both running successfully we can visit the URL generated by ngrok in the terminal to view the stream, this is great because the URL is viewable from any device, even devices not on the local network. One thing you will notice is that there is a bit of a lag. You can overcome this by improving your internet connection or by paying for ngrok to enhance the network bandwidth of your ngrok server, which will make the stream smoother.

This is it for todays tutorial, we went over an extension of the first tutorial where we showed how to stream video across the local network. We took it a step further and created a publicly facing stream! Best of all, it was incredibly easy and free to get started. There are some tradeoffs when using ngrok for streaming but I think it can create a decent stream and it is suitable for cool DIY projects. Hope you learned something new and got it working, do not forget to subscribe or ask me questions on YouTube.
Credits
mahmood-m-shilleh
Mechanical and Software Engineering Background. University at Buffalo 2019 Texas A&M 2021 I make data pipelines for my day job. Outside of work, I participate in online communities regarding Full Stack Engineering, Microelectronics, and more. You can find more details about me on my Youtube Channel. https://www.youtube.com/@mmshilleh Feel free to reach out!
Related products


Leave your feedback...