
How To Make Phone Calls With Raspberry Pi Pico W

Made by mahmood-m-shilleh
About the project
Learn how to make automated phone calls using the Twilio API in MicroPython using the Raspberry Pi Pico W. It is free to get started!
Project info
Difficulty: Easy
Platforms: Twilio, MicroPython
Estimated time: 1 hour
License: GNU Lesser General Public License version 3 or later (LGPL3+)
Items used in this project

Story
This tutorial demonstrates how to make automated phone calls using the Twilio API in MicroPython using the Raspberry Pi Pico W. It is free to get started all you will need is a working device and an active internet connection. This utilizes TWIML, the Twilio markup language. With it, you can send messages to your users, receive input, and much more. Sending automated phone calls can be an integral part of an IoT application!
Everything discussed here is shown in the Youtube Video above. Please consider liking the video and subscribing to the channel to continue supporting such content :) You can donate to the work here as well -> Buy Me a Coffee.
Also, consider watching the tutorial where we show how to send SMS as well, it is a good preliminary to this topic as the code is quite similar.
Step 1: Setup Twilio AccountCreate your Twilio account here: https://www.twilio.com/
Step through the account creation process to get your account token and phone number. This can be found in your Twilio console.
You are left with a good amount of free credit to start with. You do not need a credit card to do this which is nice.
Step 2: Create a TwiML FileA TwiML (Twilio Markup Language) file is an XML-based scripting language used by the Twilio API to control voice and SMS interactions between a web application and users.
TwiML files provide instructions for the Twilio platform on how to handle incoming phone calls or messages. These instructions can include playing pre-recorded audio, gathering user input, forwarding calls, and sending SMS messages.
Developers use TwiML files to define how Twilio should interact with users in response to specific events, such as an incoming call or text message. TwiML files can be hosted on a web server and accessed via a URL, allowing developers to dynamically modify call and SMS handling behaviors without having to update their application code.
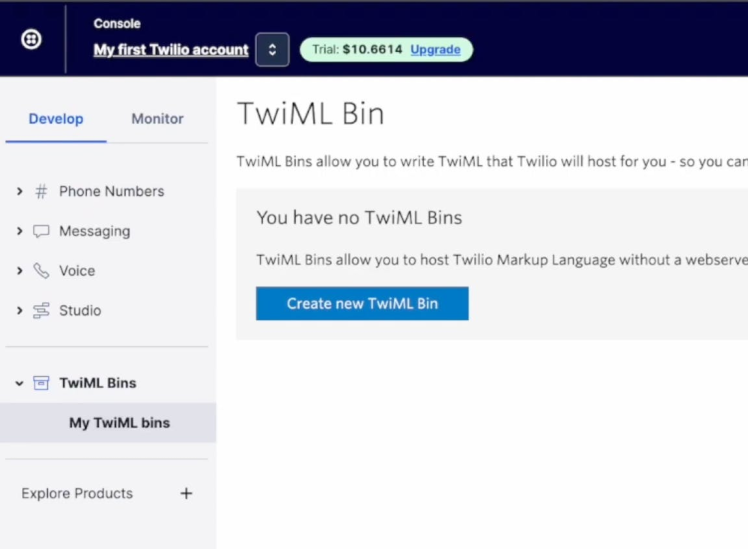
To get started with TwiML you need to host your TwiML file on a server so your application can find and execute the TwiML instructions (a sample TwiML will be shown in this tutorial). Thankfully Twilio offers a free hosting service you just need to go to this link. This allows you to create a TwiML bin to put your files into which has a corresponding URL. Follow the link and create a bin as shown.
<?xml version="1.0" encoding="UTF-8"?>
<Response>
     <Say>Hello World</Say>
</Response>
I use a simple example to say "Hello World"... classic. Go ahead and save this in your bin.
Step 3: MicroPython CodeGo into a MicroPython environment with your Pico W and utilize the following function to instantiate the phone call.
import time
import network
import urequests

import constants


def call_number(ssid, password, recipient, sender,
                twiml, auth_token, account_sid):
    """
        Description: This is a function to call someone with a twilio number.

        Parameters:

        ssid[str]: The name of your internet connection
        password[str]: Password for your internet connection
        recipient[str]: Phone number of recipient
        sender[str]: Phone number for twilio account
        twiml[str]: a URL that hosts a set of TwiML instructions
            (this could be an XML document or web application) or
            the set of URLs and configuration you've created as an
            application in the Twilio console
        auth_token[str]: Token from twilio profile
        account_sid[str]: Sid from twilio profile
    """
    # Just making our internet connection
    wlan = network.WLAN(network.STA_IF)
    wlan.active(True)
    wlan.connect(ssid, password)

    # Wait for connect or fail
    max_wait = 10
    while max_wait > 0:
      if wlan.status() < 0 or wlan.status() >= 3:
        break
      max_wait -= 1
      print('waiting for connection...')
      time.sleep(1)
    # Handle connection error
    if wlan.status() != 3:
       raise RuntimeError('network connection failed')
    else:
      print('connected')
      status = wlan.ifconfig()
      #print('ip = ' + status[0])

    headers = {'Content-Type': 'application/x-www-form-urlencoded'}
    data = "To=" + recipient + "&From=" + sender + "&Url=" + twiml
    print("Attempting to Call User")
    r = urequests.post("https://api.twilio.com/2010-04-01/Accounts/" +
                       account_sid + "/Calls.json",
                       data=data,
                       auth=(account_sid,auth_token),
                       headers=headers)
    if r.status_code >= 300 or r.status_code < 200:
        print("There was an error with your request to send a message. n" +
              "Response Status: " + str(r.status_code))
    else:
        print("Success")
        print(r.status_code)
    r.close()
All of the variables you need are explained in the documentation of the function.
If you call the function properly with the correct account information and of course, with the TwiML bin URL, you will receive a phone call on your phone (which you should use as a test case).
If you got that going, congratulate yourself, you are essentially done. I go through another more complicated TwiML example in the video on my channel linked above. The premise is that you can do much more complicated things with TwiML depending on your task at hand, such as receiving various types of user input which can be useful to an IoT application.
If you enjoyed this tutorial and it helped you learn something please once again consider subbing to the channel. Thanks for giving me your time, means a lot to me!
Credits
mahmood-m-shilleh
Mechanical and Software Engineering Background. University at Buffalo 2019 Texas A&M 2021 I make data pipelines for my day job. Outside of work, I participate in online communities regarding Full Stack Engineering, Microelectronics, and more. You can find more details about me on my Youtube Channel. https://www.youtube.com/@mmshilleh Feel free to reach out!
Leave your feedback...