
How To Connect Bmp280 To Raspberry Pi Pico/pico W

Made by mahmood-m-shilleh
About the project
Learn how to get temperature and atmospheric pressure values from the BMP280 using the Raspberry Pi Pico in Micropython.
Project info
Difficulty: Easy
Estimated time: 1 hour
License: GNU General Public License, version 3 or later (GPL3+)
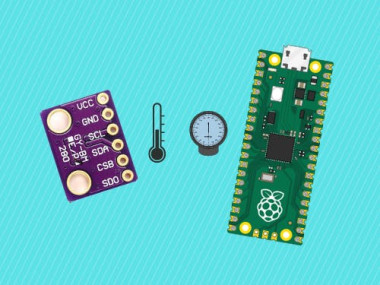
Items used in this project

Story
Discover how to effortlessly retrieve temperature and atmospheric pressure readings using the BMP280 sensor, an incredibly user-friendly and cost-effective sensor that opens up a world of possibilities for creating remarkable DIY projects. In this tutorial, we will guide you through the process of setting up the BMP280 sensor with the Raspberry Pi Pico or Pico W using MicroPython and the Thonny IDE.
Whether you're a beginner or an experienced maker, this sensor is perfect for kickstarting your journey into environmental monitoring and data collection. With its straightforward integration and reliable performance, the BMP280 sensor enables you to build a wide range of applications, from weather stations to altitude trackers and beyond.
By following our step-by-step instructions, you'll gain hands-on experience in wiring the sensor, installing the necessary libraries, and writing concise MicroPython code to read and display the temperature and pressure values. We'll provide you with a solid foundation in utilizing the BMP280 sensor, empowering you to expand your projects and explore new possibilities.
Get ready to embark on an exciting adventure in sensor-based projects with the BMP280 sensor and the Raspberry Pi Pico/Pico W. Let's dive in and unlock the potential of this fantastic combination!
Before reading the remainder, be sure to subscribe and support the channel if you have not!
Subscribe:
Support:
https://www.buymeacoffee.com/mmshilleh
Hire me at UpWork to build your IoT projects:
https://www.upwork.com/freelancers/~017060e77e9d8a1157
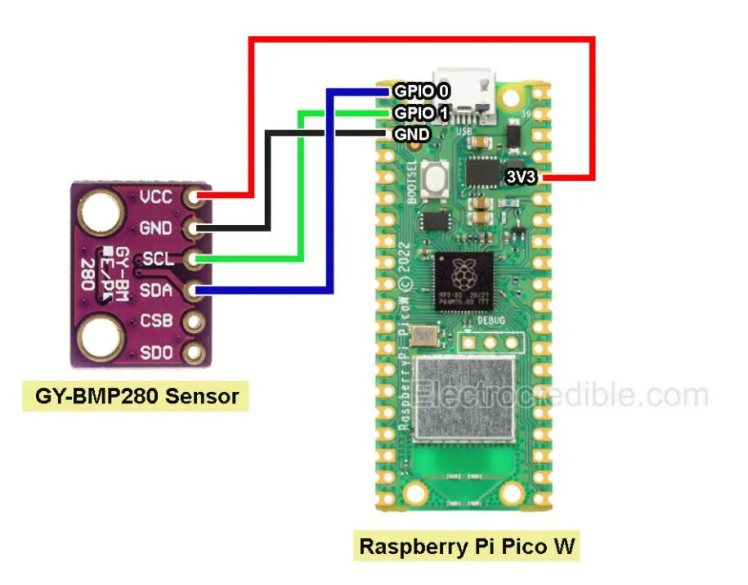
Step 1-) Phsyical SetupTake your soldered BMP280 (which you can buy pre-soldered on ShillehTek) and jumper wires. A breadboard is also optional here. Connect them as shown in the diagram below.
You will need to write Python Code on the device, but first you need to download the library from GitHub. Download the zip file here
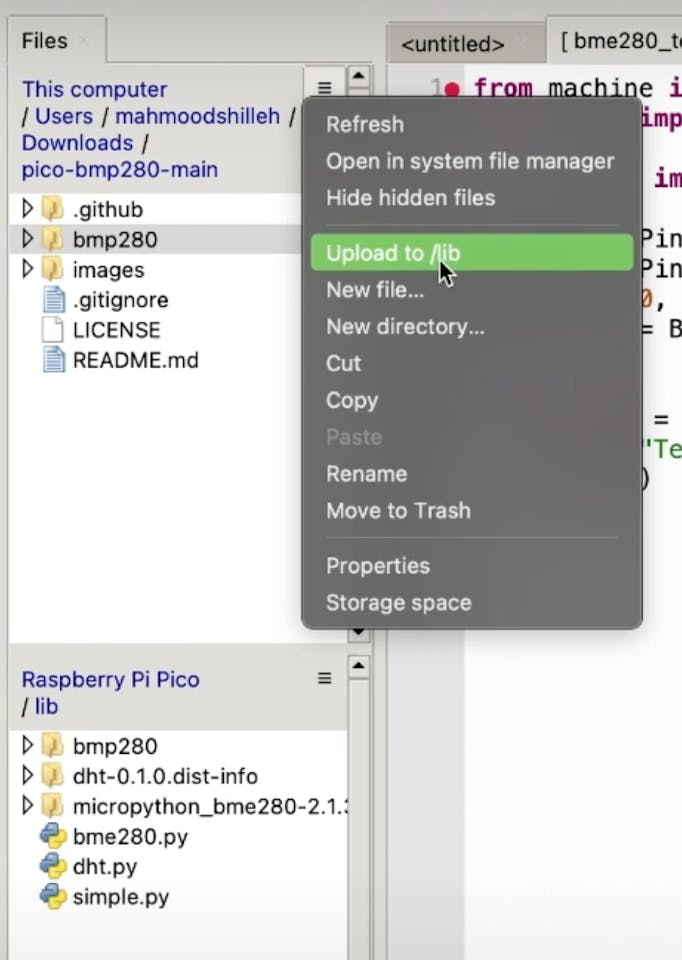
After downloading the BMP280 library, extract the contents of the zip file. Inside the extracted folder, you will find a directory named "bmp280". Navigate to this directory and locate the library files.
Next, connect your Raspberry Pi Pico to your computer and ensure that it is recognized as a storage device. In the Pico's root directory, look for a folder named "lib". If the "lib" folder doesn't exist, go ahead and create one. The "lib" folder is the conventional location where you store external libraries on the Pico.
Now, copy the contents of the "bmp280" folder from the library you downloaded and paste them into the "lib" folder on your Pico. This step ensures that the BMP280 library is properly placed in the designated location, making it accessible to your MicroPython code.
By following these steps, you effectively install the BMP280 library on your Raspberry Pi Pico, enabling you to utilize its functionality in your MicroPython projects. With the library in place, you can proceed to write code that interacts with the BMP280 sensor and retrieve temperature and pressure readings.
After you have transferred the BMP280 library to your Raspberry Pi Pico, you can run the sample code that I demonstrated in the video on my YouTube channel. The complete code is available on my GitHub repository, and you can access it by following this link: https://github.com/shillehbean/youtube-perks-level-1.
If you are a Pi Pioneer member on my channel, you have the exclusive perk of directly accessing the code. However, if you are not a member, I highly recommend watching the video to copy the simple code and follow along with the explanation. The video provides a step-by-step guide on how to set up and use the BMP280 sensor with your Raspberry Pi Pico.
This revised version provides clearer instructions and highlights the benefits of being a Pi Pioneer member while encouraging non-members to watch the video for a detailed explanation and code walkthrough.
The code does the following:
The code imports the necessary libraries:
PinandI2Cfrom themachinemodule, which are used for interacting with the hardware pins and the I2C communication protocol.sleepfrom theutimemodule, which is used for introducing delays.BMP280I2Cfrom thebmp280module, which is a library for interfacing with the BMP280 sensor over I2C.
It sets up the I2C communication:
- It defines the pins for the I2C SDA (data) and SCL (clock) lines using
Pin(0)andPin(1)respectively. - It creates an I2C object
i2c0with the specified SDA and SCL pins and a frequency of 400kHz.
It initializes the BMP280 sensor:
- It creates an instance of the
BMP280I2Cclass, specifying the I2C address of the sensor (0x76) and the I2C object (i2c0). - The comment mentions that the address may be different depending on the specific sensor.
It enters an infinite loop:
- Inside the loop, it reads the measurements from the BMP280 sensor using
bmp280_i2c.measurements. - It extracts the temperature (
readout['t']) and pressure (readout['p']) values from the measurements. - It prints the temperature in degrees Celsius (°C) and the pressure in hectopascals (hPa) using an f-string.
- It introduces a delay of 1 second using
sleep(1)before the next iteration of the loop.
In conclusion, integrating the BMP280 sensor with your Raspberry Pi Pico or Pico W using MicroPython is a straightforward process that opens up a world of exciting possibilities for your DIY projects. By following the steps outlined in this tutorial, you'll be well on your way to creating impressive applications that leverage temperature and pressure data.
If you found this tutorial helpful and want to dive deeper into the world of Raspberry Pi and MicroPython, I highly encourage you to subscribe to my YouTube channel. By subscribing, you'll stay up to date with the latest tutorials, project ideas, and insights. For even more value, consider subscribing to the channel perks. As a Pi Pioneer member, you'll gain exclusive access to the complete code used in this tutorial and other projects, saving you time and effort in your own implementations.
If you have any questions, doubts, or suggestions, please don't hesitate to ask. I'm here to help you on your journey and provide the support you need to succeed in your Raspberry Pi and MicroPython endeavors. Let's keep learning and building amazing projects together!
Credits
mahmood-m-shilleh
Mechanical and Software Engineering Background. University at Buffalo 2019 Texas A&M 2021 I make data pipelines for my day job. Outside of work, I participate in online communities regarding Full Stack Engineering, Microelectronics, and more. You can find more details about me on my Youtube Channel. https://www.youtube.com/@mmshilleh Feel free to reach out!
Related products


Leave your feedback...