
How To Connect Bmp-280 To Esp32: Get Pressure & Temp

Made by mahmood-m-shilleh
About the project
In this tutorial, we quickly show you how to set it up with the ESP32 which is a popular microcontroller. This will take only a few minutes
Project info
Difficulty: Easy
Platforms: Espressif
Estimated time: 1 hour
License: GNU Lesser General Public License version 3 or later (LGPL3+)
Items used in this project

Story
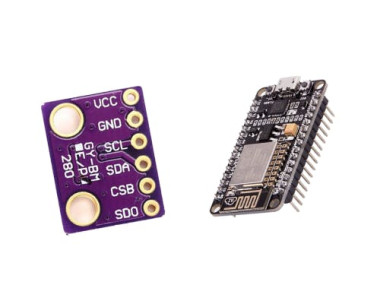
BMP280 is a great beginner sensor for the ESP32 to start creating some cool projects. It can measure pressure and temperature accurately, note that pressure can be converted to altitude with the right calibration. This sensor can be used on drones, weather stations, and various other applications in real life due to its accuracy. It is also incredibly cheap and can be bought pre-soldered and ready to be plugged in here.
In this tutorial, we quickly show you how to set it up with the ESp32 which is a popular microcontroller. This will take only a few minutes.
Before reading the remainder, be sure to subscribe and support the channel if you have not!
Subscribe:
Support:
https://www.buymeacoffee.com/mmshilleh
Step 1-) Setup Physical Connection:
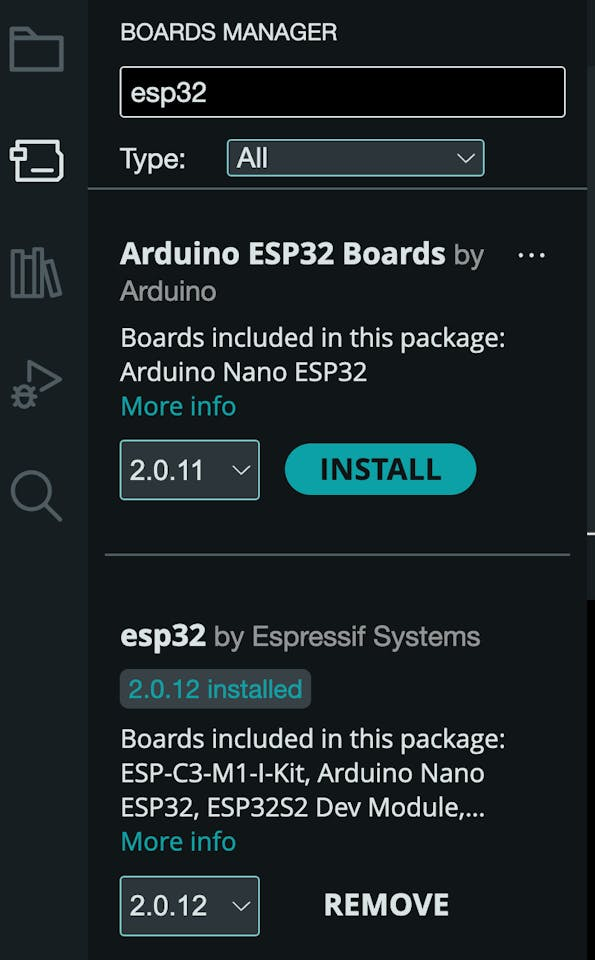
In the boards manager in Arduino IDE, download the esp32 boards by Espressif Systems.
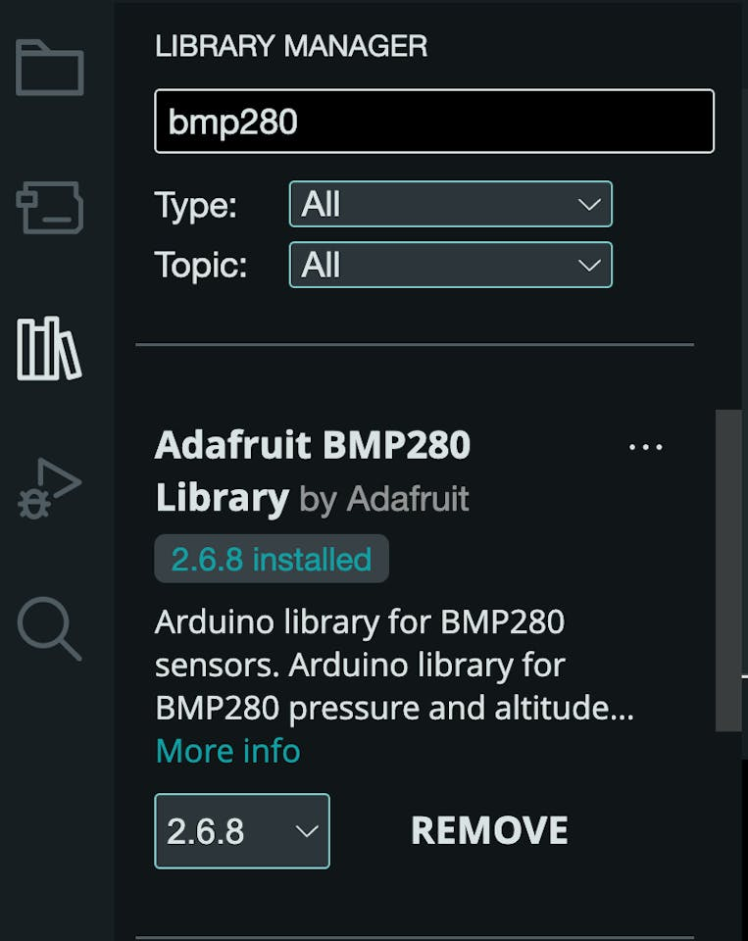
Followed by downloading the BMP280 library by Adafruit:
You should then connect to the board on your serial port and ESP32 Dev Module in the Tools > Board.
Step 3-) Run Example Code:Adafruit libraries come with amazing example code. To view the code in this tutorial go to File > Examples > Adafruit BMP280 Library > bmp280test
Here is the code for your reference.
/***************************************************************************
  This is a library for the BMP280 humidity, temperature & pressure sensor

  Designed specifically to work with the Adafruit BMP280 Breakout
  ----> http://www.adafruit.com/products/2651

  These sensors use I2C or SPI to communicate, 2 or 4 pins are required
  to interface.

  Adafruit invests time and resources providing this open source code,
  please support Adafruit andopen-source hardware by purchasing products
  from Adafruit!

  Written by Limor Fried & Kevin Townsend for Adafruit Industries.
  BSD license, all text above must be included in any redistribution
 ***************************************************************************/

#include <Wire.h>
#include <SPI.h>
#include <Adafruit_BMP280.h>

#define BMP_SCK  (13)
#define BMP_MISO (12)
#define BMP_MOSI (11)
#define BMP_CS   (10)

Adafruit_BMP280 bmp; // I2C
//Adafruit_BMP280 bmp(BMP_CS); // hardware SPI
//Adafruit_BMP280 bmp(BMP_CS, BMP_MOSI, BMP_MISO,  BMP_SCK);

void setup() {
  Serial.begin(9600);
  while ( !Serial ) delay(100);   // wait for native usb
  Serial.println(F("BMP280 test"));
  unsigned status;
  //status = bmp.begin(BMP280_ADDRESS_ALT, BMP280_CHIPID);
  status = bmp.begin(0x76);
  if (!status) {
    Serial.println(F("Could not find a valid BMP280 sensor, check wiring or "
                      "try a different address!"));
    Serial.print("SensorID was: 0x"); Serial.println(bmp.sensorID(),16);
    Serial.print("        ID of 0xFF probably means a bad address, a BMP 180 or BMP 085n");
    Serial.print("   ID of 0x56-0x58 represents a BMP 280,n");
    Serial.print("        ID of 0x60 represents a BME 280.n");
    Serial.print("        ID of 0x61 represents a BME 680.n");
    while (1) delay(10);
  }

  /* Default settings from datasheet. */
  bmp.setSampling(Adafruit_BMP280::MODE_NORMAL,     /* Operating Mode. */
                  Adafruit_BMP280::SAMPLING_X2,     /* Temp. oversampling */
                  Adafruit_BMP280::SAMPLING_X16,    /* Pressure oversampling */
                  Adafruit_BMP280::FILTER_X16,      /* Filtering. */
                  Adafruit_BMP280::STANDBY_MS_500); /* Standby time. */
}

void loop() {
    Serial.print(F("Temperature = "));
    Serial.print(bmp.readTemperature());
    Serial.println(" *C");

    Serial.print(F("Pressure = "));
    Serial.print(bmp.readPressure());
    Serial.println(" Pa");

    Serial.print(F("Approx altitude = "));
    Serial.print(bmp.readAltitude(1011.9)); /* Adjusted to local forecast! */
    Serial.println(" m");

    Serial.println();
    delay(2000);
}
This will give you a test code to start getting values. Simply upload this to the board, but before you do make sure to add 0x76 for the I2C address.
status = bmp.begin(0x76);
Or else you will get a device not found error.
If you want to get accurate representations of altitude you need to google the sea level pressure in your area. My location is in Austin, TX I can get it from the following website https://w1.weather.gov/data/obhistory/KAUS.html
There should be similar websites in major cities.
Upload the code to your device and open the serial monitor with the correct baud rate to start seeing values.
Conclusion:If you have the proper physical connection and modified the code with the correct I2C address you should start seeing values in your serial monitor. You can adjust the example code accordingly! If you enjoy beginner tutorials and more advanced content please be sure to subscribe to the channel! Let me know if you have any questions, and stay tuned!
Credits
mahmood-m-shilleh
Mechanical and Software Engineering Background. University at Buffalo 2019 Texas A&M 2021 I make data pipelines for my day job. Outside of work, I participate in online communities regarding Full Stack Engineering, Microelectronics, and more. You can find more details about me on my Youtube Channel. https://www.youtube.com/@mmshilleh Feel free to reach out!
Related products


Leave your feedback...